The most important stage of the repair is pasting the side surfaces. The appearance of the room depends on how the walls look. In the course of work, problems may arise that cannot be eliminated later. You can see a photo with high-quality wallpapering of walls with wallpaper below.
Preparatory stage
Before you take on the roller and the bucket of glue, you need to carry out a few simple manipulations. It is from the correct actions that the further process of work depends. First you need to calculate the material consumption, and prepare the walls before wallpapering.

A trip to the hardware store
Before you buy wallpaper, glue and other consumables, you need to accurately calculate the area of \u200b\u200bthe walls of the room. For convenience, you can always use the online calculator. When calculating, it is necessary to take into account the fit of the canvases, if they show a pattern.

Buyers are often faced with choosing the type of wallpaper. Modern manufacturers offer: paper, non-woven and vinyl lineup. All of them differ in thickness, width of the cloth, pattern and quality.


Wide non-woven wallpaper is in demand. They are easy to glue, they easily lay down on the surface and have high wear resistance.

Wall preparation
In order not to be disappointed in the end result, you need to clearly know how to prepare the walls for pasting. For surface treatment, you will need a spray bottle with water, a spatula, unnecessary rags.

To remove the old layer of wallpaper, you need to spray on it and wait until the canvas gets wet and begins to move away from the wall. To enhance the effect, use warm water and soapy water.

Then the canvases begin to rip off with a spatula or knife. If the wallpaper comes off well, you can remove it with your hands.

Cracks, cracks and irregularities can hide behind the old layers. They must be removed with putty. Then the walls are plastered and primed.

After such processing, it is better to transfer the pasting to the next day so that the applied layers dry well.

In the case of decorating walls with non-woven and vinyl wallpaper, plaster and primer are usually not carried out. The thickness of the canvases allows you to hide minor surface defects.

pasting process
First you need to dilute the glue. For each type of wallpaper there are special means for gluing. In warm water, gradually pour the contents of the package.


To avoid lumps, you need to constantly mix the solution. After that, the glue should infuse and thicken. The process takes approximately 15 minutes.

During this time, you can still cut the wallpaper. There are several ways to cut canvases:
- using an angle ruler;
- bend (without tools).

The roll is spread face down on the floor. One end of the canvas can be held by an assistant or it is clamped with improvised means to avoid folding the wallpaper back into a roll. The same is done on the other side of the cloth.

Then, knowing the height where the material is to be pasted, the same length on the wallpaper is measured with a tape measure. Moreover, it is desirable to add 5 cm to the value just in case.


A ruler with a right angle draws a line that should be perpendicular to the edges of the wallpaper. If there is no measuring tool at hand, the material is folded at the mark so that the edges of the roll coincide.

A piece of wallpaper is cut off with scissors along the fold line or along the drawn segment, on which glue is then applied.

Methods for spreading canvases
If you have paper wallpaper in front of you, then the adhesive solution is applied with a roller or brush on the wall and on the glued canvas. For non-woven and vinyl representatives, it is enough to apply glue only to a piece of wallpaper.


In order for the canvas to be evenly soaked, it is folded with a book. First, the two edges are bent so that they meet approximately in the middle, and then the already bent edges are again bent in half again.

Two blanks can be made using this method. While one is impregnated with glue, the second is glued to the wall.

Pasting is done from top to bottom. For this, a blank is taken and one part is stuck. Then the second half of the canvas is carefully attached.


With a dry cloth, the glued piece is ironed from the middle to the edges. This removes excess glue and unwanted bubbles on the wallpaper, which can be difficult to remove.

There may be unglued areas around the edges. They must be smeared with glue using a small brush.

While one person is engaged in the final work, the second is again preparing the next piece of wallpaper for gluing.

As you can see, sticking wallpaper with your own hands is not so difficult. Finally, I would like to give some useful recommendations to facilitate the pasting process:

Thin paper wallpapers are glued with an overlap. The remaining types of interlining and vinyl are glued end-to-end.


Work should be done in daylight. It is advisable to turn off the electricity, remove all sockets and switches before sticking. The place for the connectors is cut out on the already glued wallpaper.

It is necessary to remove the plinth in the renovated room.

You can not glue wallpaper with open windows. Drafts can lead to poor adhesion of glue and wallpaper. After gluing, the door to the room must be closed until the glue has completely dried.


Photos of finished walls covered with wallpaper can also be viewed in our gallery. Good luck and good luck with the repair.

Photo of wallpapering walls


So, the room is free from furniture, pictures and photographs are removed from the walls and cleaned in a dry, clean place, children and pets are sent for a short vacation to their relatives. We begin the process. If you are gluing for the first time, call someone for help, it is more convenient to do it together. But even without outside help, the first do-it-yourself wallpapering in life can turn out to be almost perfect if you follow our advice.
We stock up on tools and materials
Before you start moving and taking out furniture, you need to stock up on tools and materials. Here is the first "short" list of what you need:- Actually wallpaper and glue
- Wide and narrow spatulas for wallpaper stripping and puttying
- Containers for water or a special liquid for removing wallpaper: old wallpaper from the walls can be easily removed if it is properly wetted beforehand
- Container for diluting glue
- A special mixture or putty for leveling walls. Sometimes old wallpapers come off with small pieces of plaster, cracks and bumps are found under them - these holes must be repaired and leveled
- Sandpaper to finalize the wall
- Primer or primer (special solution for treating walls before gluing)
- Screwdriver, hammer, pliers for dismantling sockets, skirting boards and other things
- Scissors, and preferably a sharp wallpaper or clerical knife for trimming the edges of the wallpaper
- Tape measure to measure the desired length of the canvases
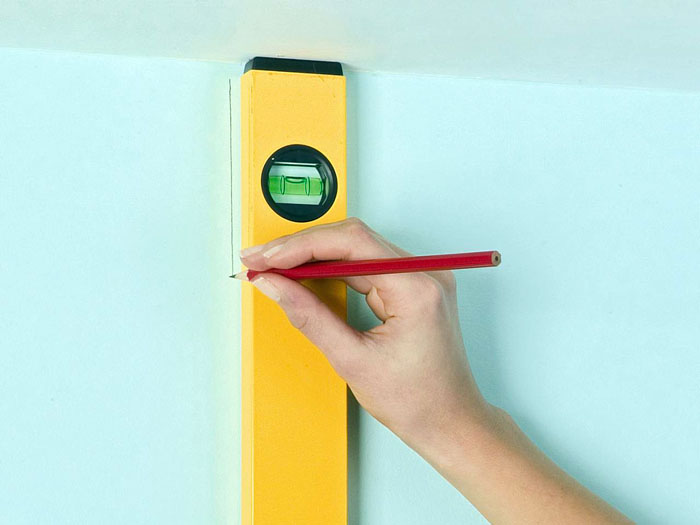
- Level or thread with a weight at the end (plumb) to align the wallpaper vertically
- A large wide brush or foam roller for applying glue and a couple of smaller brushes. With a wide brush or roller it is convenient to apply glue to the wallpaper and walls, and with a small one - to coat hard-to-reach places: corners, ledges, places behind radiators of radiators, etc.
- Soft plastic spatula
- Soft rags. Large dry rag - for smoothing the wallpaper. Wet clean cloth - to remove excess glue
- Stepladder or trestles
We count the number of wallpapers and glue
 How much to take? Let's count rolls. Most often, rolls with a width of 53 and 106 cm are on sale. They are also called "half-meter" and "meter". European manufacturers also produce wallpapers with a width of 68 cm. The length of the canvas in a roll is 10.05 m. It is most common. Vinyl wallpapers with a width of 53 cm are sometimes sold in rolls of 15 m each, and non-woven wallpaper for painting with a meter width is also supplied in 25-meter rolls. We recall the school geometry course, pick up a tape measure, measure the room and calculate the perimeter, summing up the length of all walls. For example, for a room measuring 3x4 m, the perimeter will be 3 + 4 + 3 + 4 \u003d 12 m. We multiply the perimeter by the height of the ceilings. Subtract the area of windows and doors from this and get the total area of the walls. S = (a * b) - ( (c * d) + (e * f)). S - the required area of the walls of the room, a - the perimeter of the room, b - the height of the ceiling, c - the width of the window, d - the height of the window, e - the height of the doorway, f - the width of the doorway. We calculate the number of strips as follows: divide the perimeter of the room by the width of the roll . For example, we divide our 12 m perimeter by the roll width of 0.53 m. We get 22.6. We round up and get 23 stripes. For wallpapers with a large ornament or pattern that needs to be combined, designers recommend multiplying the perimeter by a factor of 1.18 when calculating. We count further. The length of one roll is most often 10 m. The height of our room is 2.50 m. For convenience, another 10 cm must be added to the ceiling height. Thus, we get a strip height of 2.65 m. If we divide the length of the roll (10 m) by this number (2.65 m), then we will get 3 full strips from one roll of wallpaper. Do not worry about the rest: they can perfectly paste over the space above and below the window or above the door.
  Be sure to take one or two rolls for a spare. Even a super professional can easily ruin one or two wallpapers. It happens. If they do not come in handy, then whole unpacked rolls can be returned to the store within three weeks after purchase (if, of course, you have kept the receipt and labels). The amount of glue is also determined by the area of \u200b\u200bthe walls. For different types of wallpaper, different types of glue are used. For paper, any universal one is suitable; for non-woven or vinyl, you need glue designed only for this type of wallpaper. Any box of glue is supplied with instructions, where it is written how to dilute the mass, in what proportion, and for what area it will be enough.
 Preparing the walls
 So, the materials are purchased, the tool is prepared. Now you can get to work. We start by preparing the walls.
 1. Remove the old coating
 If wallpaper was pasted on the walls, remove them. So that the old wallpaper can be easily removed, they need to be properly wetted. We take a rag or sponge in our hands and wet the wallpaper abundantly. You can use a special water sprayer - the same as you spray houseplants or moisten the laundry while ironing. Washable wallpapers need to be cut a little so that moisture gets into the bottom layer. Attention: before removing old wallpaper with water, be sure to turn off the power so that moisture does not get into working sockets and switches. After the wallpaper gets wet, carefully remove the old panels. Five minutes is enough for paper wallpaper to peel off, vinyl and non-woven - a little more. If the wallpaper does not lend itself, we scrape it off with a spatula, trying not to damage the wall. If the wall was painted with water-based paint or whitewashed with lime mortar, we wash everything off with a mild soap solution. Oil based paint can be removed with special paint stripping solutions. They are sold in any building supermarket. You can use coarse sandpaper and just peel off the paint with it. If the paint does not come off, peel it off with a spatula.
 2. Align and prepare the wall
 Even if you very carefully remove paint or wallpaper, the wall will have to be leveled and processed. Therefore, the cracked plaster is removed with a spatula. After that, we treat the wall with a primer solution and level it with putty or a special leveling mixture. A primer is a useful thing. It not only contributes to better adhesion of the leveling mixture to the wall, but also performs an antibacterial function: it usually contains substances that prevent the formation of mold and mildew. If the damage to the wall is significant, it makes sense to re-plaster it - it's cheaper than leveling with putty. After the putty or new plaster has dried, we treat the wall again with a primer or primer (a special solution based on PVA glue). We apply it on the wall with a roller or a wide brush, without sparing. On such a treated wall, the wallpaper will hold much stronger.
 Gluing wallpaper
 First of all, prepare a place where you will measure, cut and smear wallpaper with glue. It can be a clean area of the floor or a piece of oilcloth spread on the floor. Prepare your tools so they are always at hand. Dilute the glue according to the instructions. Set up a ladder. And start.
 - Unwind the roll and measure the web to the desired length. Cut it off with sharp scissors or a special sharp knife. Cut the wallpaper strictly horizontally, use a metal ruler for this. In order not to damage the floor, place a large cutting board under the wallpaper at the cut point.
- Carefully read the instructions that come with each roll. Some wallpapers require glue to be applied to the canvas, some to the surface of the wall, some to both the wall and the canvas. Spread the canvas on the floor or oilcloth and apply glue to it (if you are gluing paper or vinyl wallpaper)

- Let the wallpaper absorb some of the glue. Five to seven minutes will be enough. After that, carefully lift the wallpaper by the upper edge and proceed to sticking
- Start gluing from the window. A window or other opening will be a great vertical reference. To align the wallpaper vertically, use a level. It is enough to level the first canvas, and glue the next ones, focusing on it
All types of wallpaper are always glued with closed windows and doors. The room should be warm, around 20°C. Draft is the first enemy of fresh wallpaper. Glue in a draft dries very quickly, and in some places the wallpaper simply does not have time to stick.

- Gently lift the canvas to the ceiling and stick to the wall, pressing well. Gently bring each next canvas to the previous one (end-to-end or with a slight overlap, if the type of wallpaper allows it) and smooth it. For smoothing, take a soft spatula or a large dry cloth. Smooth from the middle of the canvas to its edges

- If air bubbles appear under the wallpaper, they need to be smoothed out by squeezing the air over the edges of the canvas. This must be done very carefully so as not to damage the wallpaper. If the air bubble is not squeezed out or there is a risk of tearing the wallpaper, pierce it with a needle and gently squeeze out the air
- Paste the corners with two canvases, connecting them slightly overlapping. If you paste over the corner with one sheet, then with a high degree of probability folds form in this corner or the wallpaper will completely lag behind the corner after drying
- How to deal with sockets and switches? First, turn off the electricity. Remove covers from all sockets and switches. After the canvas is pasted, carefully make a cruciform incision in the wallpaper in place of the rosette. Bend the resulting corners and cut off the excess with sharp scissors.
After you have dealt with the sticking, close the room and try not to use it for at least a day. In no case do not open windows, do not create drafts, otherwise after a short time your new wallpaper will peel off the wall with a nasty crunch.

When choosing wallpaper, consider the type of room and the condition of the walls. For the living room, bedroom, corridor and other rooms where the walls are dry and smooth, any kind of wallpaper will do. For rooms with high humidity: kitchen, bathroom and toilet - choose washable vinyl wallpaper. The disadvantages of uneven walls will be hidden by embossed wallpapers, as well as wallpapers with a large cell or a dense pattern.

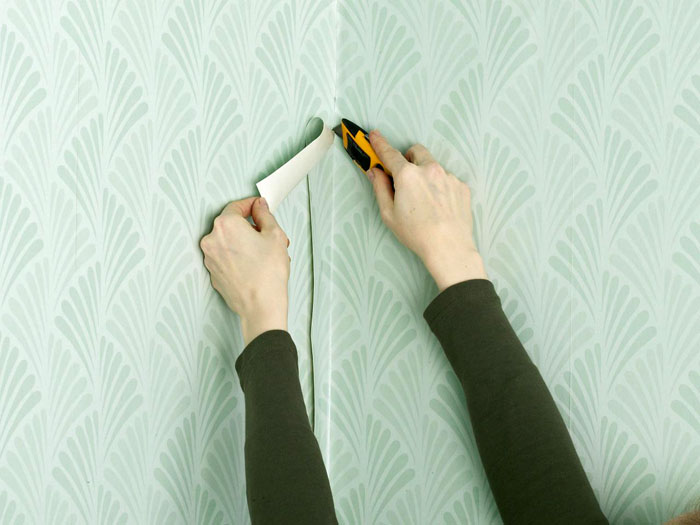
To trim the edges above the baseboard and below the ceiling evenly, do this before the glue dries. Use a spatula as a stopper, and keep the cutter horizontally, otherwise the paper may accidentally tear. Useful life hack: in order not to scrape hardened glue from the knife, rinse it with hot water before trimming the edges.

For beginners, wallpapering is scary in principle, and when they see a battery that cannot be removed, this is a real reason to panic. In fact, everything is not so scary: cut the wallpaper at the places where the pipes are connected and the battery is attached, stick the wallpaper according to the instructions above, and smooth out the bumps with a mop wrapped in a clean rag, remove traces of glue. Done, you are amazing!
 That's all. As you can see, wallpapering is not such a terrible process as it seems at first. Only those who don't try don't succeed. We wish you everything went well and easily!
Before you start decorating the walls, you must decide where to start indoors. Each room (be it a kitchen, a corridor, etc.) has its own characteristics, manifested in the presence / absence of niches, ledges, corners, as well as in the nuances of lighting. In addition, you must also consider the type of wallpaper and the layout of the apartment.

Preparing for wallpapering

First, decide what the sequence of actions to be performed will be. And the first step should always be, including:
- purchase of everything you need (wallpaper, adhesive, edging,);
- preparation of the required tools (for work you will need a roller, knife, brushes, tape measure, scissors);
- covering the floor with a protective material;
- preparation of communications and, of course, walls.

Purchase materials in advance. Moreover, it is necessary to think not only about how much glue and wallpaper will be required, but also about the tools with which the composition will be applied. PET film can be used to cover the floor, although old newspapers will do just fine. It is recommended to turn off the electricity supply, it will not be superfluous to remove sockets and lighting fixtures. It is better to take out the furniture (as an option - just move it to the center of the room and cover it with foil) so that the room is as spacious as possible.

The walls that will be pasted over need special attention. The old coating is necessarily removed, then the walls are puttied and primed. Also, before gluing, the room is well ventilated, after which the doors / windows are tightly closed to avoid drafts.


Note! Also make sure that there is a special place on the floor where you will mark, cut and grease the wallpaper with glue. And about that, in different rooms, we will tell below.

When repairing an apartment, many are faced with a choice: paint the walls or paste them with wallpaper? To answer this question, many different factors must be taken into account. To facilitate the choice, you should know that wallpapers have two big advantages over painting - when using them, the walls are decorated with a pleasant pattern, they can be made textured, suitable for the design of your apartment. To do this, you just need to learn a few tricks for quick wallpaper stickers. Below are recommendations and technology for performing such work.
Before you start wallpapering, you need to make sure that they are all from the same batch and that they are enough to cover the entire area with a margin.
How to choose the right wallpaper for a room
The collections of these products offered on the market and in construction stores represent a huge selection in terms of such parameters as:
- wallpaper material texture;
- various types of design studies;
- texture of various types;
- variety of color compositions.
The wallpapers themselves are divided into the following types:
- ordinary wallpaper, washable, waterproof - in relation to moisture;
- heavy and light - by density;
- smooth wallpaper, with a relief surface, with a small or deep pattern - according to the type of surface;
- single-color species or with small and large patterns - by color;
- combined wallpaper.
To choose the wallpaper suitable for your apartment, you must be guided by the following principles:

Figure 1. Scheme for applying glue to wallpaper.
- Determine the nature of the pattern - the pattern must be symmetrical. This will reduce labeling problems and will go a long way in calculating the number of rolls.
- The main pattern should be periodically repeated along the entire length.
- The step of the pattern in the figure is the distance between the repeating parts. It ranges from 5 to 30 cm. The larger this number, the more carefully it will be necessary to coordinate adjacent canvases with each other when fitting edges, and this increases the amount of waste.
Back to index
How to calculate the required number of wallpapers
First, measure the height of the walls from floor to ceiling. Rolls are usually 10 m long. Therefore, we divide ten by the figure obtained during the measurement and we get the number of whole panels that will go to the wall from one roll. The width of the wallpaper is 50 cm, so we measure the room along the perimeter and divide this number by 0.5 (all measurements must be made in meters) and by the number of panels obtained earlier. As a result, we get the number of rolls needed for the room. To eliminate the error and insure against troubles, it is necessary to purchase 1-2 rolls more than the calculated result when buying. Wallpapering one room takes one day. When buying them, make sure that all rolls have the same design number. It is not recommended to stick combined wallpaper yourself - for this work it is better to call a specialist.
Back to index
How to prepare the wall surface

Wallpaper is glued to drywall or plastered walls. Sticking new rolls on old ones is not recommended.
If the wall is painted, then you need to clean it of paint with a special liquid (it is sold in hardware stores). A layer of wallpaper paste is applied to the porous surface of the plaster before sticking, which is then allowed to dry - this will help move the canvases along the walls to match the patterns.
Back to index
How to mark up a room
Pasting should be started from the corner - this is necessary to hide the defects of the pattern if it is not aligned correctly (usually this happens on the first or last piece). When applying a large drawing, it must be taken into account that if there is any architectural decoration in the room (arch, fireplace), then the first canvas will need to be glued along the axis of this object. Subsequent pieces are glued on both sides of the first.
Having found the starting point, the roll is used as a template for marking the position of the panels on the wall. If the joint is in an inconvenient place, then you need to shift the reference point. If before a person has not been engaged in such work, then it is best to choose wallpaper with a small pattern when buying, when sticking which an arbitrary combination of patterns is possible. If you don’t want to mess around with glue, you can choose rolls with ready-made adhesive film - they are much easier to glue. Before starting work, it is necessary to determine the direction of the pattern itself - often manufacturers mark it with an arrow that points upwards towards the ceiling.
Back to index
Wallpaper cutting

First you need to measure the length of the wall and add 10-15 cm to the resulting figure to fit on each side. Then the roll is unfolded and the marking of the pieces begins. If the allowance is taken less, then there will be a need for more careful marking. When used in the work of the table, it can be used as a template. From the very beginning, the first piece is cut off, making a minimum allowance of 5 cm. The pattern of the subsequent panel must be combined with the image on the first piece. Before marking the entire roll, measuring the length along the table top and combining the patterns on all pieces.
Back to index
How to choose glue
If waterproof wallpaper (vinyl or washable) is selected, then you will need a special adhesive composition with fungicide additives that will prevent mold from appearing on the walls. When using ordinary wallpaper, a simple wallpaper paste is bought. Its label indicates the number of rolls that can be glued by purchasing the amount of adhesive in the pack. Do not try to stick new canvases on old wallpaper - the glue will saturate them unevenly and they will fall behind the wall.
To dilute it, slowly pour the contents of the package into the amount of water indicated on the label. The mixture is constantly stirred to prevent lumps from forming. It is necessary to let the glue settle (the time of this operation is indicated on the label). It retains its properties for about 6-7 days.
The marked pieces of wallpaper are laid out on the floor. They must be placed face down. Glue is applied to the middle of the piece and smeared with a brush or hair brush over the entire surface of the canvas for its entire length. If at the same time the glue gets on the floor, it must be immediately wiped off with a damp sponge. The smeared edge of the piece is folded with glue inside, which allows you to keep it from drying out and gives you time to transfer the canvas to the wall.

If you work with thick wallpaper, then they need to be given time to soak with glue. Therefore, the canvas ready for gluing is temporarily set aside and they begin to smear the adhesive composition on the next piece. It is possible to use wallpaper with an adhesive composition applied by the manufacturer.
To stick such products, you need to use a plastic trough, in which you should put a roll of wallpaper. Fill the container with water and place it near the wall. Cut a piece of the desired length (do not forget the allowances) and fold the roll with the upper end outward and face up. Immerse the wallpaper in water for the time indicated on the label, and then take it by the upper edge and drag it along the wall towards the ceiling. Excess water will drain into the trough. The panel is adjusted to the desired size, smoothed and cut according to the markup.
Back to index
How to paste wallpaper: the process of wallpapering and fitting
The first piece is glued with a plumb line. Since the corners of the room are never strictly vertical, it is not recommended to align the first canvas along them.
If the piece is not properly engaged, a defect will be revealed in the location of the main pattern.
Therefore, using a plumb line, a vertical line is applied to the wall. The distance from the corner of the room should be 2.5 cm less than the width of the roll. To work, you need a table or stepladder, otherwise it will be impossible to reach the ceiling. Approaches to the walls should be free, as you need to work quickly until the glue is dry.
Bring the canvas to the wall and bend the top edge. Move it up so that it goes up to the ceiling by about 5 cm. Align the edge of the piece with a vertical line drawn along the wall. During this process, part of the canvas will lie on the adjacent wall and close the corner. Smooth the wallpaper with a soft cloth or hair brush. The direction is maintained from the center to the edges. Then unfold the lower part, with glue and, pressing it against the wall, smooth it out. The part located in the corner is carefully leveled.
We will send the material to you by e-mail
It is rare that an apartment renovation is complete without wallpapering. This universal type of decorative coating is suitable for any interior, it is loved for its ease of installation and perfect look.
Wallpaper - a coating that is found in every second modern apartment
With your own hands - the task is not difficult, especially if you have all the necessary tools. Experienced people get by with a brush and roller, but other devices may come in handy for a beginner:
- paint bath and roller for applying glue. It is better to choose a roller with a pile of medium length, and the dimensions of the bath should correspond to the roller. You can replace it with a wide brush with a comfortable handle. In addition, keep a small brush handy for gluing seams;
- rubber roller for smoothing streaks on the wall and removing air bubbles on thin wallpaper. For thick ones, instead of a roller, you can use;
- a roller with a roller for pressing the web in the inner corners;
- container for dilution of glue: it is better to use a large pot or bucket with a lid. Airtight dishes will allow you to keep ready-to-use glue for several days;
- drill or construction mixer for mixing glue. If we are talking about a small amount of work, you can do it manually;
- pencil, long ruler, tape measure and scissors for marking and cutting canvases. For cutting, you can use a construction knife - the edges are smoother;
- a plumb line or building level for marking the vertical line from which you will glue the wallpaper;
- a sponge to remove excess glue and a dry rag for cleaning up debris.
In addition, in fact, the wallpaper itself, you need to prepare the glue. The composition is selected in accordance with the type of coating. You can buy glue at the store and dilute it according to the instructions.
Note! Instructions for the preparation of glue is placed on the package. It indicates the proportions of water and powder, the consumption of glue per square meter of surface and the specifics of the application.

The preparatory stage before sticking wallpaper on the wall with your own hands
Do not rush to immediately start wallpapering. It is not enough just to purchase tools and materials, you still need to carry out preparatory work. Examine the condition of the walls, remove the old coating and carefully prime the surface.
How to remove the old coating from the walls
If previously the walls were already decorated with wallpaper, they must be removed. In most cases, the material is easily torn off, but if you have pieces or whole strips that cannot be torn off, you will have to use special tools. Compositions for removing old wallpaper can be bought at the store, but it is cheaper and easier to make such a mixture yourself. The recipe is simple: add dishwashing detergent and a little wallpaper paste to warm water. Using a sponge, the agent is applied to the wallpaper and left for half an hour until the coating softens.
Ask a Question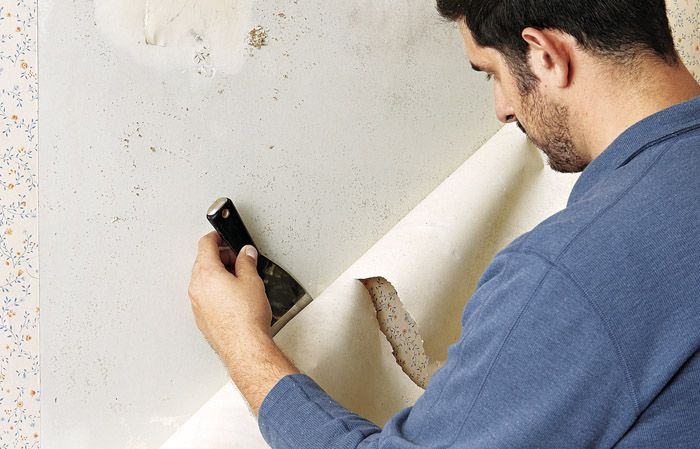
“Any alignment of the walls is accompanied by the formation of a large amount of debris and dust. Remember to use a respirator to protect your respiratory tract and close the doors to other rooms."
Wall primer
Do not neglect the primer of the walls. If you skip this stage of preparation, you risk getting an extremely unpleasant result - the wallpaper will simply peel off. In addition, the primer will even out the color of the wall, and the gray concrete will not show through under a thin coating. The primer mixture will fill the voids in the porous surface, you spend less glue.

For walls made of, concrete and wood, a universal acrylic primer is used. It is easy to apply, diluted with plain water and dries fairly quickly.
Note! Unscrupulous sellers can offer you, instead of acrylic primer, a solution of PVA glue. Be careful, outwardly the compositions are very similar, but the glue has a specific smell.
For walls made of wood, plywood or alkyd primer can be used. It dries for a long time - almost a day, but provides excellent adhesion even for heavy wallpaper. Metal walls are treated with a glyptal primer similar to enamel. Only she guarantees you high-quality coverage. The same primer can be used for plastic. This coating will dry overnight. Another option for a mixture for metal is perchlorovinyl primer, but it is not recommended for use in residential areas due to its high toxicity.

How to glue wallpaper - basic techniques
After you have prepared the walls well before the main stage of work, you need to solve several important questions: where to start gluing, how to properly cut the wallpaper and paste it in difficult and hard-to-reach places.
Related article:
interesting solutions for the living room, bedroom, children's room, kitchen and corridor. The basic rules for selecting canvases and recommendations from designers - read in our review.
Where to start gluing wallpaper and how to fit the pattern
Wise with their own experience, older relatives will tell you that you need to glue the wallpaper from the window. Indeed, the old paper panels were glued in this way for one simple reason: the joints were overlapped, and so that in natural light the seams were not conspicuous, they had to be directed away from the window. Modern manufacturers offer panels that are glued end-to-end. Such seams are less noticeable, but they require a perfectly even base. So the question of where to start work becomes less relevant: start from any side on which it is convenient for you to draw a vertical, and glue in a circle.

Pay attention to several important nuances:
- how the wallpaper will look in the opening between the windows. It is not always good if a seam is placed in a narrow opening;
- where the furniture will be. If you plan to put and do not place wallpaper behind it in order to save money, you need to decide on a starting point;
- if you plan to place it on one of the walls, you need to evenly measure the location of the pattern and continue pasting from this place.
The first canvas is the most difficult task. It is important to place it strictly vertically so that the slightest skew does not spoil all the work later.

Expert point of view
Dmitry Kholodok
Technical director of the repair and construction company "ILASSTROY"
Ask a Question“If you use a plumb line, rub the rope with chalk or paint. Fasten the top end of the plumb line and pull the bottom lightly - the paint will remain on the wall and mark the desired line.
Most often, rooms in apartments have imperfect corners. Therefore, it is better to mark the vertical on each wall. Wallpapering technology requires pattern fitting. Fashionable finishes are distinguished by complex ornaments and bright images. You should be aware that on the wallpaper packaging, manufacturers indicate the offset distance to fit the pattern. But in practice, it is easier to do the adjustment manually, visually combining the pattern. And this should be done not only at the stage of cutting the canvases, but also in the process of gluing them.
Video: wallpapering with a large pattern
Glue on the wallpaper or on the wall - how to apply it correctly
The answer to this question depends on what type of wallpaper you have chosen for your renovation. If you have paper wallpapers at your disposal, the glue is applied directly to the canvas. For reliable gluing of thick vinyl or non-woven coatings, the adhesive composition is applied to both the wallpaper and the wall. Non-woven wallpaper can be glued without applying the composition to the canvas, limited only to the processing of the wall.
How to glue wallpaper in the corners of a room
Most often in the process of work you have to deal with internal corners. Here you should make sure that the strip covers the corner and a few centimeters behind it. Even if the canvases are glued end-to-end, you need to overlap in the corners. Only in this way will you get an even angle. Use a level or plumb line as a guide. So that the overlap is not noticeable on thick wallpaper, after gluing, cut both layers along the ruler with a sharp knife, and until the wallpaper is dry, remove excess stripes from one side and the other. If necessary, add glue with a small brush.
You will also have to tinker with the outer corners. They are rarely perfectly even, so here you also need to use an overlap of 3 centimeters. After the first canvas has been glued, you need to cut it off, leaving a thin edge at the corner. The second strip is aligned vertically on the other wall and fixed so that there is a minimal overlap on the first panel. How to glue wallpaper in the corners in a short video course.
How to glue wallpaper near windows, doors and behind the battery
So, you glue the wallpaper with your own hands, and you have reached. Feel free to fasten the new canvas so that an entrance to the window is formed. If you need to seal the slopes, make two horizontal cuts and bend the panel. If it does not reach the frame, you will have to make another cut, it is advisable to join it at the corner (see the technology for gluing external corners described above).

is a serious obstacle. You can’t place wallpaper behind them, so you have to cut them off. This must be done so that it is not noticeable that there is a bare wall behind the battery. To do this, leave a part of the canvas so that it goes 10 centimeters onto the radiator, and then tuck it behind the device, pressing and smoothing it with a spatula. How to glue the wallpaper yourself behind the battery in the video.
How to make seams invisible
Why can the seams between panels remain visible? There are several reasons for this effect:
- defective coloring of the edge of the wallpaper. A minimum strip of tenths of a millimeter without paint can cause the seams to be visible;
- an error in gluing the canvas - a skew in one direction leads to minimal overlap or a gap;
- loose adhesion of the material to the base, part of the strip may lag behind due to an air bubble.

It happens that you noticed the marriage too late, what to do? There are several ways to mask the seam so that it becomes invisible. If you get an unplanned overlap, you just need to cut through both canvases as you would when working with internal corners, and remove excess strips.
Important! In order for the edges of the wallpaper to adhere tightly to the base, additionally coat them with glue and roll them with a rubber roller.
Notice the uneven coloring of the edge? It is best to return such wallpapers to the store, this is a defective product. If for some reason this is not possible, for example, you bought the material in another city, then try cutting off the unpainted edge. This is difficult, and new joint problems will inevitably arise. It is best to do this during the gluing process, specifically overlapping and cutting off the edge already on the wall. As an alternative to this method - the use of a suitable color paint. It is better to take the color half a tone darker.
How to stick wallpaper of different types
A wide range of wallpapers in modern stores includes products not only for every taste, but also for every budget. You can limit yourself to buying cheap paper-based wallpaper or purchase more expensive non-woven or vinyl options. Is there a difference in sticking different types of wallpaper?
How to glue paper wallpaper
Paper is an inexpensive and environmentally friendly coating. Experts advise when gluing paper finishes to apply glue to the panels. Keep in mind: the paper quickly absorbs the glue, so you have to work very quickly, otherwise the strip will get wet and will tear when glued.

Do not be alarmed if, even after careful leveling, irregularities appear on the surface after a few minutes - after drying, the canvases will “pull up” and be even again.
How to glue vinyl wallpaper
For vinyl wallpaper, you definitely need to purchase a special glue. This material is thick, and should only be placed end-to-end. On the packaging of vinyl wallpaper, they usually write what glue should be applied to: on the panel or on the wall. Unlike paper, vinyl strips should soak with glue within 10-15 minutes. The video below gives recommendations on how to glue vinyl wallpaper with your own hands:
Article