The questions of getting electricity for free were asked by many good engineers, such as Nikola Tesla, and by crowds of pseudoscientists, who were only waiting for exposure. The result of their work is a number of schemes and methods for obtaining energy from alternative sources. There are few real installations or experiences that can be of practical use. In this article, we will look at how you can get electricity from the earth.
Is it possible?
Before considering technological schemes and answering the question “how to get electricity from the soil?”, Let's see how realistic this is.
It is believed that there is a lot of energy in the earth, and if you make an installation, you will forever use it for free. This is not so, because to get energy you need a certain piece of land and metal pins that you install in it. But the pins will oxidize and sooner or later the energy intake will end. In addition, its amount depends on the composition and quality of the soil itself.
A very large piece of land is needed to achieve good power, so in most cases the energy obtained from the ground is enough to turn on a couple of LEDs or a small light bulb.
It follows from this that it is possible to obtain energy from the earth, but it is unlikely that it will be possible to use it as an alternative to electricity networks.
Electricity from zero and ground electrode
This method is suitable for residents of private houses if they have a ground loop. Did you know that a potential difference of 10-20 volts is often observed between the ground electrode and the neutral wire? This means that they can be used for free. You can increase them with the help of a transformer.
The energy consumed in this way will not be taken into account by the meter. Such a voltage can be determined either with a voltmeter, or by connecting between these two wires a low-voltage light bulb of the type that is installed in the dimensions or dashboards of cars.
Important! Do not confuse the phase with zero - it is dangerous!
It should be noted that a separate device made of metal pins driven to a depth of more than 1 meter is used as a ground electrode. The pipeline in most cases will not give a good result. You can learn more about it from our separate article.
Potential between roof and ground
This method also requires a metal pin to be driven into the ground, a wire is connected to it. The second wire is connected to the metal roof. So you get a couple of volts. The current from such a circuit will be negligible and it is not a fact that it will be enough to turn on one LED.
The next way is simple chemistry. This is the most real and understandable way to get electricity from the ground at home. This requires copper and zinc electrodes. Plates, pins, nails can act in their role. If copper is common, zinc can be a problem, so galvanized iron is easier to find.

You need to drive your electrodes into the ground at the same distance from each other. Let's say 1 meter deep and 0.5 meters between the electrodes. In this case, copper will be the cathode and zinc the anode. The voltage of such an element can be on the order of 1-1.1 Volts. This means that in order to get electricity from the ground with a voltage of 12 volts, you need to hammer 12 of these electrodes and connect them in series.
The decisive factor in such a battery is the area of the electrodes, the current strength depends on this, exactly, as well as on what is between them. In order for the battery to give out current, the earth must be wet, for this it can be watered, sometimes the zinc electrode is poured with a solution of salt or alkali. To increase the current output, you can score more electrodes and connect them in parallel. This is how all modern batteries and accumulators are arranged.
In the diagram below, you see another interesting implementation of such a battery made of copper pipes and galvanized rods.

However, over time, the electrodes will break down and the battery will gradually stop working.
The method of obtaining electricity according to Belousov
Valery Belousov has been studying lightning and protection against it for many years. He is the author of books on free energy and has developed a number of solutions to get electricity from the earth.

On the diagram you can see two symbols for grounding. Here one of them is a grounding conductor, and the second, next to which the letter "A" is the zero of the household electrical network. The following video demonstrates the operation of such a setup and describes the results obtained with its help:
The energy received is enough to power a low power 220 volt LED lamp. This method is convenient to use in the country, it can be easily reproduced at home.
Getting free electricity from the earth with your own hands is possible. But it is difficult to talk about the practical application and connection of powerful consumers. You can't start the refrigerator like that. To date, the only well-studied source of electricity from the bowels of the earth are natural resources such as coal, gas, fuel for nuclear power plants, etc.
You probably don't know:
Electricity costs go up with every tariff increase. And if city dwellers reduce unnecessary electricity consumption to reduce financial expenses, then the owners of private houses have the opportunity to receive additional electricity from the ground.
Getting free electricity from the earth
A question of efficiency
Getting electricity from the earth is shrouded in myths - materials are regularly posted on the Internet on the topic of obtaining free electricity through the use of the inexhaustible potential of the planet's electromagnetic field. However, numerous videos in which home-made installations extract current from the earth and make multi-watt light bulbs shine or electric motors spin are fraudulent. If getting electricity from the ground were so efficient, nuclear and hydropower would be a thing of the past.
However, it is quite possible to get free electricity from the earth's shell and you can do it yourself. True, the received current is only enough for LED backlighting or for slowly recharging a mobile device.
 Voltage from the Earth's magnetic field - is it possible!?
To obtain current from the natural environment on a permanent basis (that is, we exclude lightning discharges), we need a conductor and a potential difference. Finding the potential difference is easiest in the earth, which combines all three media - solid, liquid and gaseous. According to its structure, the soil is solid particles, between which there are water molecules and air bubbles.
It is important to know that the elementary unit of the soil is the clay-humus complex (micelle), which has a certain potential difference. The outer shell of the micelle accumulates a negative charge, while a positive charge is formed inside it. Due to the fact that the electronegative shell of a micelle attracts ions with a positive charge from the environment, electrochemical and electrical processes continuously occur in the soil. This soil compares favorably with the water and air environment and makes it possible to create a device for generating electricity with your own hands.
Method with two electrodes
The easiest way to get electricity at home is to use the principle according to which classical salt batteries are arranged, where a galvanic couple and an electrolyte are used. When rods made of different metals are immersed in a salt solution, a potential difference is formed at their ends.
The power of such a galvanic cell depends on a number of factors., including:
- section and length of electrodes;
- the depth of immersion of the electrodes in the electrolyte;
- salt concentration in the electrolyte and its temperature, etc.
To get electricity, you need to take two electrodes for a galvanic pair - one of copper, the second of galvanized iron. The electrodes are immersed in the ground approximately to a depth of half a meter, setting them at a distance of about 25 cm relative to each other. The soil between the electrodes should be well shed with a salt solution. By measuring the voltage at the ends of the electrodes with a voltmeter after 10-15 minutes, you can find that the system gives a free current of about 3 V.
 Extraction of electricity with the help of 2 rods
If you conduct a series of experiments in different areas, it turns out that the voltmeter readings vary depending on the characteristics of the soil and its moisture, the size and depth of the electrodes. To increase efficiency, it is recommended to limit, with a piece of pipe of a suitable diameter, the circuit where the saline solution will be poured.
Attention! A saturated electrolyte is required, and this salt concentration makes the soil unsuitable for plant growth.
Zero wire method
Voltage is supplied to a residential building using two conductors: one of them is a phase, the second is zero. If the house is equipped with a high-quality ground loop, during a period of intensive electricity consumption, part of the current goes through the ground into the ground. By connecting a 12 V light bulb to the neutral wire and ground, you will make it glow, since the voltage between the zero and ground contacts can reach 15 V. And this current is not fixed by the electric meter.
 Extraction of electricity using a neutral wire
The circuit, assembled according to the principle of zero - energy consumer - earth, is quite working. If desired, a transformer can be used to equalize voltage fluctuations. The disadvantage is the instability of the appearance of electricity between zero and ground - this requires the house to consume a lot of electricity.
Note! This method of extracting free electricity is suitable only for private households. There is no reliable grounding in the apartments, and pipelines of heating or water supply systems cannot be used as such. Moreover, it is forbidden to connect the ground loop to the phase to generate electricity, since the ground bus is energized with 220 V, which is deadly.
Despite the fact that such a system uses the earth for work, it cannot be attributed to the source of terrestrial electricity. How to extract energy using the electromagnetic potential of the planet remains open.
The energy of the planet's magnetic field
The earth is a kind of spherical capacitor, on the inside of which a negative charge accumulates, and on the outside - a positive one. The atmosphere serves as an insulator - an electric current passes through it, while the potential difference is maintained. Lost charges are replenished due to the magnetic field, which serves as a natural electric generator.
How to get electricity from the earth in practice? In fact, it is necessary to connect to the generator pole and organize a reliable ground.
A device that receives electricity from natural sources must consist of the following elements:
- conductor;
- ground loop to which the conductor is connected;
- emitter (Tesla coil, high-voltage generator that allows electrons to leave the conductor).
 Scheme for generating electricity
The upper point of the structure, on which the emitter is located, must be located at such a height that, due to the potential difference in the electric field of the planet, the electrons rise along the conductor up. The emitter will release them from the metal and release them into the atmosphere in the form of ions. The process will continue until the potential in the upper atmosphere becomes equal to the electric field of the planet.
An energy consumer is connected to the circuit, and the more efficiently the Tesla coil works, the higher the current strength in the circuit, the more (or more powerful) current consumers can be connected to the system.
Since the electric field surrounds grounded conductors, which include trees, buildings, various high-rise structures, the upper part of the system in the city must be located above all available objects. It is not realistic to create such a structure with your own hands.
Therefore
Electricity from the ground can potentially be extracted, but today there are no technologies that allow this to be done efficiently. If you have your own house with a plot, then you can experiment with creating an earthen battery from sheets of copper and aluminum foil - drawings and photographs are easy to find on the Internet. But practice shows that the power of the made capacitor is noticeably lower than the declared one and the design quickly fails. At the same time, the financial costs of materials are unlikely to ever pay off.
Do-it-yourself electricity from the earth - diagram, video
How to get free electricity from the earth with your own hands. Getting electricity from the ground using various schemes. How to get current for a private house from the magnetic field of the earth.
How to get electricity from improvised means
We offer interesting solutions for low-current improvised electrical appliances - flashlights, chargers, lighters. The article provides detailed photographs and video instructions on how to assemble original sources of electricity from improvised means with your own hands.

It's no secret that energy literally surrounds us and its carriers can be not only valuable minerals - oil, gas, coal, but also metals, carbohydrates, objects moving due to natural causes. Let us consider in more detail how electrical energy can be extracted from improvised means.
In this section, we will visually demonstrate the ability to extract electricity through a chemical and electrolytic reaction.
Carbon batteries from aluminum cans
Ordinary carbon batteries can be made by hand. For this we need:
- Two 0.5 l beverage cans.
- Two graphite rods Ø 15–20 mm long along the height of the can + 20–30 mm.
- Ordinary coal or ash.
- Paraffin or wax.
- A few copper wires, a knife.
The method involves recreating in an enlarged form miniature batteries for household appliances.
- Cut off the tops of the cans, leaving the sides.
- Install 30 mm thick foam on the bottom.
- Install the rods inside the cans, sinking them into the foam.
- Fill your sinuses with charcoal. There should be 10–15 mm left to the edge of the jar.
- Pour the sinuses with salted water (1 tablespoon per 1 liter).
- Pour melted paraffin or wax into the free space in the jar (up to the top).
Each of the cans will be identical in energy capacity to one AA 1.5 V battery. They can be connected in series, recharged and used in household appliances - clocks, receivers, LED lamps.
Electricity from oxidation
Proteins, fats and carbohydrates are sources of energy for the human body. It is extracted due to reactions taking place in the stomach and intestines. Namely, when gastric acid acts on carbohydrate, the energy contained in it is released. What if you try to replace stomach acid with a more familiar one - acetic acid?
For experience we need:
- Refined sugar - 2 pieces.
- Anodized self-tapping screws 15 mm - 2 pcs. (copper-plated and galvanized).
- Diode bulb 1.5 V with wires.
- We drill (not completely!) holes in the sugar.
- Carefully, so as not to crush the refined sugar, we screw in the screws.
- We connect the wiring of the light bulb to the heads of the self-tapping screws.
- Wet the refined sugar with vinegar.
Of course, this is not about sugar, but about the chemical process of oxidation of copper and zinc. Refined sugar is only a means to retain the acid. At the contact point of the oxidized surfaces and the acid, an electrochemical reaction occurs with the release of a small amount of energy. Theoretically, refined sugar can be replaced with a dense sponge, but the self-tapping screws will completely oxidize over time and become unusable.
Emergency power source
The principle described above can be used to create a charger from improvised means. This will require simple parts that can be found in the remnants of discarded material after repairs.
To create an energy source you will need:
- U-shaped galvanized drywall hangers (thickness does not matter) - 10 pcs.
- Thin copper wire - 15 m.
- Thin cotton fabric - a few rags, in extreme cases - toilet paper.
- Threads.
- Water, salt.

Work progress (for one battery):
1. Wrap the plates with cloth (or paper) in 2 layers.
2. Wind the wire over the fabric (not thick, the fabric should be visible).
3. Release copper wiring from each element.
4. Wrap the element with cloth again and fix it with threads.

5. Moisten cloth with salted water and keep wet.
One element gives out approximately 0.33 V. 5 elements are enough to burn the LED, 13-14 pieces are enough to recharge the phone.

Electricity will be generated while the oxidation reaction is going on, i.e. as long as there is an electrolyte (salted water) between different metals. If the element is dry, it is enough to moisten it and the reaction will resume until the salt solution eats away the zinc coating. Ideally, it is better to use full zinc plates.
Separate parts and salt can be taken with you on a hike or you can keep ready-made elements with a candle in case of a power outage. At nightfall, all that remains is to connect them together and moisten.
Pneumatic lighter
The gases that make up atmospheric air have a common property - they can become very hot with increasing pressure. This effect can be used to craft an "eternal" lighter. The manufacturing method will require the skills of a locksmith.
For work you will need:
- Round rod, possibly made of soft metal (copper, aluminium) Ø 30 mm and 200 mm long.
- Steel rod Ø 10 mm and length 200 mm.
- Rubber rings from the plumbing kit.
- Cotton fabric, foil.
- Access to a lathe.
- Drill a thick rod to the diameter of a thin one + 1 mm (cylinder).
- On a thin rod (piston), make grooves for compression rings.
- Drill a recess at the end of the piston.
- Install the rubber rings in the grooves.
- Wrap the fabric in foil and burn it on fire (tinder).
In order to use the lighter, you need to place tinder in the recess of the piston and insert it into the cylinder. Then sharply apply force along the axis of the piston and remove it from the cylinder. The tinder at the end will smolder and you can blow a flame out of it. This effect is used in diesel engines.
The examples described above may not be of high practical value, but they clearly demonstrate the possibilities of obtaining alternative energy for solving daily problems. In the following articles, we will look at other ways to implement natural and magnetic energy.
How to get electricity from improvised means
We offer interesting solutions for low-current improvised electrical appliances - flashlights, chargers, lighters. The article provides detailed photos and video instructions on how to assemble
Electricity in the country: where to get and how to properly dispose
Today, electricity in a country house is no longer a luxury: it is difficult to imagine a comfortable rest and effective care of the site without the appropriate equipment, so sooner or later you will have to think about energy supply.
To make the country house warm, light and comfortable, you should take care of the energy supply
Traditional sources
And if we are limited only to traditional technologies, then only two power supply schemes can be distinguished:

Connection to power lines
- Centralized - the site is “powered” from a power line passing at a relatively short distance.
- Autonomous - a generator acts as a source.
Let's consider both options in more detail.
- If we talk about the use of centralized power supply, then the main advantage is the rather high power provided. So, in this case, you can even organize the heating of the dacha with electricity without going broke on the fuel for the generator.

Connecting to wires on a pole
- On the other hand, the process of connecting to power lines is associated with very tedious bureaucratic procedures. Even if the wires are laid relatively close, problems may arise at the coordination stage.
Note! Unauthorized connection to power lines is an offense, and if such a fact is discovered, you will have to pay a considerable fine. It is also worth remembering that only professionals with the appropriate level of clearance should perform such work.
- Renting a diesel generator for a summer residence or buying such a device can provide you with energy, regardless of the location of the site. Yes, this technology is more costly from a financial point of view, but this way you can be sure that the light in the house and on the site will not disappear even during bad weather (wire breaks, especially in remote areas, are not uncommon).
Even a compact device can light up an entire house
- Another option for autonomous power supply is the installation of a gas generator. Of course, the price of the device will be higher than that of a diesel plant, and only specialists can service it, but the cost of a kilowatt of energy will turn out to be significantly lower.
As a result, the optimal instruction will be as follows: if possible, we connect to the power line and use its power, but just in case, we install a generator with a small supply of fuel in the house or barn. If there is no possibility of connection, we simply buy a more efficient generator, and design the site's electrical network, taking into account the limitations on the performance of the installation.
Alternative sources
However, modern technologies allow you to get electricity for free for giving. Under the "freebie" in this case there is complete or almost complete independence from energy prices. Of course, the alternative equipment itself needs to be purchased, and for quite a lot of money, but over time (from two to five years) it pays off, and then it works “in plus”.

Photo of the impeller of a wind generator on the roof of a house
Several of the most effective technologies can be identified, and we have summarized their features in a table:
The extracted energy can be used both for direct heating of the house and for electricity generation.
As with geothermal installations, solar energy can not only heat the house, but also power an inverter to provide electricity.
When the blades rotate, electricity is generated, which is stored in high-capacity batteries and can be used to solve a variety of problems.

Scheme of operation of a geothermal generator
However, such free energy supply is quite capricious. There is no wind or the sun has gone behind the clouds for the whole day - and you will have to sit in the dark! That is why experts strongly recommend equipping such installations with capacious batteries, and keeping at least a small diesel generator as a backup power source.
Features of electrical installation
If everything is more or less clear with the sources, we turn to the rules for arranging the power grid itself:

- Installation of wiring and electrical appliances in a country house can be done with your own hands, but it is better to entrust the connection to a mains or generator to electricians.
- At the entrance to the house, be sure to install a shield with a counter. We also connect each branch of wires to the shield through an RCD - an automatic circuit breaker. The use of such fuses can protect the system from power surges and short circuits.
Advice! If you are often away, then it makes sense to arrange remote switching on of electricity in the country. To do this, we mount a special module with a GSM receiver in the shield, which activates the entire system by a signal from a mobile phone. It is especially convenient to use such a controlled unit in winter: the heaters will have time to warm up the air by your arrival.

To protect against fire, we lay the wires in non-combustible channels
- When using generators, you need to carefully calculate the power of all devices included in the network. For example, heating a country house with electricity may require the installation of a separate generating unit, otherwise in autumn and winter we will have to choose: either the batteries work or the light bulbs shine.
- Country houses from block - containers, frame structures and log buildings are highly flammable. To reduce the risk of fire, all wiring should be run in non-flammable, preferably metal, ducts.

Proper grounding is one of the safety conditions
- It is also highly desirable to ground the wires. To do this, we connect each branch of the system to a ground loop brought out. The circuit is most often a triangle of steel or copper-plated rods dug into the ground and connected to the house electrical network with a conductive cable.
Providing electricity in the house and in the country is a matter of honor for any master. Fortunately, today there are more than enough opportunities for this, and we can easily choose what to use as an energy source.
Nine dachas - Electricity in the country: where to get it from and how to properly dispose of it
Electricity in the country: where to get it from and how to properly dispose of it
Charging a mobile phone from a candle or electricity for a summer house with your own hands
Do-it-yourself electricity for a summer residence? Why not? Surely, such a creative thought comes to the mind of many summer residents on those frequent days when the light is turned off without warning at the most inopportune moment.
Electricity from a candle
What are power generators? Diesel, petrol, gas or wood fired. And wind, solar ...
If you delve into the history of this issue, you can learn a lot of interesting things. It turns out that even before the war, in the 1940s, we produced portable thermal power generators based on the Peltier-Seebeck effect. The generator was put on the glass of a kerosene lamp and gave a current sufficient to power a lamp transmitter or receiver. These generators were used by the partisans.
Already during the war, the so-called "partisan's bowler hat" was also produced. Snow was poured into it or cold water was poured into it. While the kettle was boiling on the fire, it generated a current that was used to charge the batteries of the radio station. There is a legend: the German counterintelligence officers could not understand how the partisans in the forest produce electricity for such a long operation of their radio stations.
 The Peltier-Seebeck effect is simple. In a closed circuit of two dissimilar conductors P 1 and P 2, whose contacts are maintained at different temperatures T 1 and T 2, an electric current arises (this phenomenon was discovered by the German physicist T. Seebeck in 1821).
If a direct current flows in the same circuit, then one of the contacts is cooled and the other is heated (this reverse effect was discovered in 1834 by the French watchmaker J. Peltier). The effect is greatly enhanced if P 1 and P 2 are semiconductors of different types ( n-and p- semiconductors).
A single Peltier-Seebeck element is a thermocouple of two semiconductors connected by a copper bus n- and p- type. An assembly of elements connected in series, glued between two ceramic plates, is a Peltier (Seebeck) module.
Briefly about what these wonderful n-and p- semiconductors.

As you know, around the nucleus of an atom, on several shells, there are electrons held by the attraction of the nucleus. Their total negative charge is balanced by the positive charge of the nucleus.
In a metal, the electrons of the outer shell of an atom easily break off and randomly move in the interatomic space. These free electrons provide the electrical conductivity of the metal.
There are no free electrons in an insulator (dielectric).
An intermediate position is occupied by a semiconductor - a solid crystalline substance (germanium silicon, etc.). It has few free electrons and therefore it is a poor conductor. But its conductivity changes under the action of heat, light, impurities and, moreover, is associated with the movement of not only electrons, but also positive charges - “holes”.
When exposed to heat or light, free electrons appear that break away from the outer shells of semiconductor atoms - conduction occurs. This is the electronic conductivity n- conductivity: "negative" - negative).
The place where the electron came off is called the "hole". The atom now has a positive charge. But the hole is immediately occupied by an electron from a neighboring atom. In this case, the previous atom becomes neutral, and the neighboring atom becomes positively charged with a hole. Further down the chain: the atoms are immobile, but “on the baton” they transfer a positive charge along with the hole. This is also conductivity. It is called hole conductivity ( p-conductivity: "positive" - positive).
In a pure semiconductor, the electron and hole conductivities are equal. The dosed introduction of impurities (arsenic, indium) into a semiconductor crystal greatly upsets this balance. Semiconductors with predominant electron or hole conduction are called respectively n- semiconductors and p- semiconductors.
Of course, craftsman enthusiasts who learned about partisan electric generators could not pass by the idea of creating similar devices for their domestic and tourist needs. On the Internet you can find fascinating descriptions of experiments with the Peltier-Seebeck element, which took place with varying success.
Here we will introduce you to the final result of these studies to date - with the specific design of a home-made thermoelectric generator based on a Peltier module that generates 5 volts from a candle.
First, we list the materials and tools necessary for the manufacture of a thermoelectric generator.
 The main part is the Peltier module TEC1-12712 (62×62) with dimensions 62x62x3.8 mm. It can be purchased from EK ZIP and DEK for about 1,300 rubles. Instead, you can take two Peltier modules TEC1-12705 (40 × 40) with dimensions of 40x40x3.6 mm (DEK sells the module for 285 rubles).
The second important electrical detail is a step-up DC voltage converter from 1.5 volts to 5 volts. An EK-1674 converter of microscopic assembly, a little larger than a fingernail, is suitable (it costs 320 rubles in the Ekits.ru online store). The converter can be assembled by yourself according to the above diagram.

- a sheet of duralumin for the manufacture of a substrate for the module (a sheet of 40x30x0.3 cm can be bought from a private trader at a collapse for 300-400 rubles);
- Ikea candle in a glass (costs about 100 rubles) for heating the lower face of the Peltier module;
― ladle for cold water with ice for cooling of the top edge of the module;
- a soldering iron (for example, such a 12 volt soldering iron) and solder;
― hot-melt adhesive (hot-melt adhesive Radial 2 ml costs 150 rubles);
- jigsaw and hacksaw for metal;
Voltage tester.
Now you can start assembling the device.
Having stuck a saw blade from a hacksaw into a jigsaw, it is necessary to cut out a rectangle from a duralumin sheet according to the size of the Peltier module or two smaller modules.

On the resulting duralumin substrate, a large module or two smaller modules are fixed with hot glue. Hot melt adhesive resembles PVA in consistency, but firmly glues the ceramic edge of the module to the dural plate. According to the description, the glue can withstand a temperature of 300 °, only it dries for a long time: you have to wait 12 hours.

When the glue dries, the bucket must be glued on top with the same hot glue. At the same time, it is important that the bottom of the bucket is perfectly flat - for better heat dissipation. The duralumin substrate with a ladle can already be put on a glass with an Ikea candle. And then it's time to assemble the electrical circuit.

If you now pour cold water with ice into the bucket, light a candle under it and connect the tester to the wires, then after 3-4 minutes a voltage will appear: first 0.9 volts, then up to 1.5 volts. It is clear that there is nothing to do with this voltage: even charging a mobile phone requires 5 volts. That is why a converter was prepared that increases the voltage from 1.5 to 5 volts. Keeping patience and endurance, this microscopic transducer must be soldered into the circuit.

After that, the thermoelectric generator becomes quite suitable for charging a mobile phone. If partisans appear these days, they will charge their cell phones from a candle without any problems, wherever they are.
But it turned out that this thermoelectric generator can also be adapted for lighting. To do this, you need to connect a single-watt LED by gluing the LED itself to the wall of the bucket with double-sided tape (you can see this in the previous picture with the bucket).
A mini-projector (let's say modestly - a flashlight) does not light up immediately, but three or four minutes after the candle is lit. Measuring the illumination with a light meter (several repeated measurements at night) showed about 30 lux at a distance of 30 cm. And with this lighting, you can read!

Such a luminous flux gives a 10-watt incandescent lamp. It turns out that the heat of the candle is converted into light radiation with an intensity 10 times greater than the intensity of radiation from the candle itself (however, the candle also contributes a certain share to the lighting created by the generator). And this despite the fact that the Peltier element has an efficiency of only 2-3%.
Thus, we can draw an optimistic conclusion: the persistent experiments of the craftsmen led to positive results. Namely: with the help of a Peltier module, a voltage converter and a candle in field conditions, you can recharge a mobile phone, and, if necessary, assemble a flashlight on an LED. This flashlight will shine much brighter than a candle. And another conclusion: now you can provide electricity for giving with your own hands.
Provide electricity for a summer house with your own hands
You can provide electricity for a summer residence with your own hands. A homemade thermoelectric generator will help you with this.
How to get electricity at home
Electricity is getting more expensive every day and it's time to learn how to generate energy ourselves, but it's not difficult, read carefully. The article tells how free energy for the home is obtained from the energy of air and earth with your own hands.
DIY energy from the air
We create a wind generator with our own hands at home
A simple low-power windmill can be created at home. Based on the selected type of wind turbine, you can start assembling it. An example of a wind turbine assembly will be considered on a hybrid model that combines the Darrieus and Savonius generators. Assembly of the rotor The basis of the rotor will be. 6 neodymium magnets type D30xh20 mm, followed by 6 ring magnets made of ferrite D72xd32xh25 mm and two metal discs D230xp mm, the parts will be fixed with epoxy resin and glue.
 DIY windmill rotor
Do-it-yourself windmill rotor On each of the metal disks neodymium magnets are placed in the amount of 6 pieces, while you need to alternate their polarity and place them at an angle of 60 degrees, the diameter of the circumference of the installed magnets should be 165 mm.
 Rotor dimensions
Rotor dimensions Ring magnets are placed in a similar manner on the second disc. In order for the magnets to firmly “sit” in their places during operation, they are poured with epoxy resin.
Assembling the stator
The basis for the stator will be 9 coils wound with 60 turns on each, the thickness of the wire used should be 1 mm. Further, 1,4,7 coils are connected in series for the first phase, 2,5,8 for the second phase and, accordingly, 3,6,9 for the third.

Windmill stator A layer of parchment paper, fiberglass and finished coils are placed in a pre-prepared form of plywood. After that, the contents are filled with epoxy. After solidification, the finished stator is taken out of the mold.

Assembling the generator
All components of the generator are ready, and you can start assembling them. The generator will be fixed with a bracket with studs. The assembly of the generator consists of several stages:
- 4 holes are marked and drilled in the lower and upper rotors, then the thread for the studs is cut. This is necessary in order to smoothly seat the rotors in the set place.
- In the stator, similarly to the rotor, the same holes for the studs are drilled.
- The lower rotor is attached to the bracket with the magnets upwards, then the stator and the upper rotor are placed, facing downwards with the magnets.
- The whole structure is fixed with studs and nuts to the flange with bearings.
 Windmill stator
Windmill generator Windmill blades are made of various materials: wood, fiberglass, aluminum. A rather interesting solution is the manufacture of blades from PVC pipes. This design is good in that it has a very low weight and allows the generator to rotate even at very low wind speeds.
- Meter blanks of PVC pipes are taken and cut lengthwise into two equal parts.
- Semicircles of future blades are cut out of tin and bolted along the edges of the pipes. For manufacturing, you can use galvanized steel having a thickness of 0.75 mm.
 Making blades for a windmill
For the manufacture of orthogonal blades, it is necessary to cut out two pieces of tin with dimensions of 1000x40 mm and 4 parts in the form of a drop. The segments are bent at the edges and drops are attached to them. The blades are attached to the finished frame measuring 200x200 mm. Further, the windmill is installed on the mast and the installation of wires and equipment is carried out. Such windmills are not very difficult to assemble and will allow owners of cottages and private houses to become autonomous from power grids.
Do-it-yourself atmospheric electricity
For the manufacture of our generator requires a very simple set of tools available in almost every home:

- Electric drill
- Electric jigsaw
- Adjustable wrench
- Pipe wrench
- Set of drills with a diameter of 5.5 mm, 6.5 mm, 7.5 mm
- Tap for threading M6
- Screwdrivers
- Clamp and vise
- Cable stripping tool
- Roulette
- Marker
- Compass
- school protractor
But if you don’t have something, buy it at the tool store.
This design of the wind generator uses a DC motor from a treadmill (power supply 260V, 5A), with a threaded bushing 150 mm in diameter attached to it. With a wind speed of about 13 m/s (48 km/h), the output current reaches 7 A. This is a small, simple and cheap unit with which you can start the development of wind energy. DC motor from a treadmill (power supply 260V, 5A) with a threaded bushing 150 mm in diameter attached to it.


You can use any other DC motor that delivers at least 1V at 25 rpm and can handle more than 10 amps. Different engines have different mounting methods. Some are fastened with clamps, others have a plate welded to the body with two bolt holes. We secured the engine with clamps, but it would be better to secure it with bolts.
Wind turbine assembly materials
We offer you one of the design options from the materials that we had. You can use any other materials that can perform the same functions. If you have a welding machine, then many issues are solved much easier. For example, if there is no profile pipe, then you can use two corners 25 x 25 mm by welding a square out of them. The fastening of the longitudinal beam to the branch pipe can be done in many ways - welded, fastened with side plates or pricks on rivets or bolts. The diameter of the pipe is also not strictly specified, as it depends on the diameter of the end pipe on the mast on which the windmill will be installed.

The supporting frame of the windmill consists of:
- Profile pipe of square section 25x25 mm with a wall thickness of 2 mm, length 920mm.
- Adapter flange with a diameter of 50 mm from a square pipe to a round pipe with a diameter of 50 mm
- Branch pipe from a water pipe with a diameter of 50 mm and a length of 150 mm
- Self-tapping screws 19 mm (3 pcs.)
If you have the opportunity to use a welding machine, then weld a piece of 50 mm pipe 15 cm long to a square pipe, without using an adapter flange and self-tapping screws.
- Diode bridge (30 - 50 A)
- Clamps for mounting the engine with a diameter of 60-80 mm (2 pcs.) Or two bolts with nuts M8x40.
- A piece of PVC pipe with a diameter of about 75 mm and a length of 280 mm
- A square piece of thin sheet metal or tin 300 x 300 mm
- Self-tapping screws 4 x 19 mm (2 pcs.)
- A segment of a PVC pipe with a diameter of 200 mm, a length of 600 mm and a wall thickness of 5-6 mm. For example PVC pipe class SN8 sewer 200×5.9 - 1000mm.
- Bolts M6x20 mm (6 pcs.)
- Washers 6 mm (9pcs)
If you take a pipe with a wall thickness of 1-2 mm, then with strong gusts of wind, the blades will bend and may collapse.
blade cutting
To make blades, you need to cut the pipe into four identical plates 145 mm wide. From one piece of pipe you should get four plates with a width of 145 mm and one slightly smaller. This will be three sets of blades (nine pieces in total) and a piece of waste. Lay the PVC pipe 60 cm long on a table, floor or any flat surface. Draw a straight line along the axis of the pipe using a piece of square pipe (you can use a meter ruler or any other sufficiently long object with a smooth edge). Let's call this line A.

Take a tape measure and set aside from line A at each end of the pipe a measurement of 145 mm, make marks from each end of the pipe. Connect the resulting marks with a straight line along the axis of the pipe. Repeat the described operation three more times. We will get four sectors 145 mm long and the last segment should be about 115 mm long.
You have four identical sectors approximately 75 degrees in size and one sector 60 degrees in size. Cut the pipe along these lines using a jigsaw so that you have four strips 145 mm wide and one about 115 mm wide.


Lay all the strips with the inner surface of the pipe down. From one sector we get two blades. To do this, make marks on each strip along the narrow side from one end, retreating from the left edge of 115 mm. Repeat the same from the other end, retreating 30 mm from the left edge. Connect these points with lines, crossing the strips of the cut pipe diagonally.
Saw the plastic along these lines with a jigsaw. Put the resulting pipe sectors with the inner surface of the pipe down. Now cut off the corner at the base of the blade. To do this, make a mark on each diagonal cut line at a distance of 75 mm from the wide end of the blade. Make another mark at the wide end of each blade 25mm from the long straight edge. Connect these points with a line and cut the resulting corner along it.


This will prevent the blades from breaking in side winds.

Blade processing.
From the obtained blanks, we need to give the future blades an aerodynamic shape. The figure shows a section of the blade profile. You must file and sand the blades to achieve the desired profile. This will increase their efficiency and also make their rotation quieter.
The front edge should be rounded and the back edge should be pointed. Any sharp corners should be rounded to reduce noise. Just don't get carried away. Blades should not be thin.
Tail rudder cutting.
The dimensions of the tail rudder are not critical. You need a piece of thin sheet measuring 300x300 mm, preferably thin metal or tin. You can cut the rudder in any shape, the main criterion is its rigidity.

To drill holes in the blades - use a 6.5 mm drill. Mark two holes at the wide end of each of the three blades along their straight (back) edge. The first hole should be 9.5mm from the straight edge and 13mm from the bottom edge of the blade. The second is at a distance of 9.5 mm from the straight edge and 32 mm from the bottom edge of the blade.


Drill these six holes in the blades.
- Make a sleeve template on a piece of paper using a compass and a protractor.
- Mark three holes, each 6 cm from the center of the circle and equidistant from each other.
- Place this template on the core and pre-drill it through the paper at the marked locations.
- The accuracy of the installation of the blades at an angle of 120 degrees to each other and, accordingly, the balancing of the wind turbine depends on how the holes are drilled in the sleeve.
- Drilling holes in the sleeve is performed in two stages. First, holes are drilled that are closer to the center of the sleeve. Drilling and tapping holes in the sleeve - use a 5.5 mm drill and a tap on M6


- Screw the blades to the hub with three M6x20 mm bolts, one for each blade. At this moment, the outer holes, close to the boundaries of the bushing, have not yet been drilled.
- Measure the distance between the leading edges of the tips of each blade.
- Adjust them so that you get an equilateral triangle and all the tips of the blades are equidistant from each other.
- Mark and punch the top second hole on the hub through the hole in each blade.
- Make a mark on each blade and hub so you don't mix up the attachment points for each at a later stage of assembly.
- Twist the blades from the hub, drill and thread the three outer holes.
Manufacture of a protective casing for the engine.
- Draw two parallel lines on our segment of PVC pipe with a diameter of 75 mm along its length at a distance of 20 mm from each other.
- Cut the pipe along these lines.
- Cut off one end of the pipe at a 45° angle.
- Place a pair of needle nose pliers into the slot and look through the pipe.
- Align the bolt holes on the motor down the middle of the slot in the PVC pipe and place the motor in the pipe.
Final assembly of the wind turbine
Place the motor on a square pipe and screw it to it using clamps or bolts if there are mounting holes.

Place the diode on the square pipe behind the motor at a distance of 5 cm from it. Screw it to the pipe with a self-tapping screw.

Connect the black wire coming out of the motor to the "positive" input terminal of the diode (it is labeled AC on the "plus" side).

Connect the red wire coming out of the motor to the "negative" input terminal of the diode (it is labeled AC on the "minus" side).
To attach the tail rudder, position it so that the end of the square tube opposite the one on which the engine is placed runs down the middle of the rudder. Press the handlebar against the pipe with a clamp or vice.
- Screw the shank to the pipe with two self-tapping screws.
- Place all the blades on the hub so that all the holes line up.
- Using M6x20 mm bolts and washers, screw the blades to the hub.


- For the three holes in the inner circle (closest to the hub axle), use two washers, one on each side of the blade.
- For the other three, use one each (on the side of the blade closest to the bolt head).
- Tighten tight.
- Securely fix the motor shaft (which passed through the hole in the bushing) with pliers and, after putting on the bushing, turn it counterclockwise until it is completely screwed in.
- Using a gas wrench, tightly screw the 50 mm nozzle onto the adapter flange.
- Place the spigot vertically into a fixture so that the flange is horizontal (for example, in a hole in a table top or in a vise).
- Position the square tube carrying the motor and shank on the adapter flange so that it is in balance.
- After achieving balance, make marks on the square pipe through the holes in the flange for the installation of self-tapping screws.
- Drill two holes with a 5.5 mm drill bit. For convenience, remove the tail and adapter sleeve so that they do not interfere with drilling.


Screw the supporting square tube to the flange with two self-tapping screws.
The final chord, which will give an original look to your wind turbine, will be its painting. Here you can do whatever you want. The only recommendation for extending the life of your wind turbine is to choose an outdoor paint that is weather resistant.
After painting, install the casing on the generator and fasten it with two clamps. The wind generator is ready.

The issue of safety is of the highest priority for you. Your life is much more valuable than a cheap source of electricity, so follow all the safety rules associated with building a windmill. Fast rotating parts, electrical surges, and harsh weather conditions can make a wind turbine quite dangerous.
Do-it-yourself electricity from the earth
Zinc and copper electrode
Next method The generation of electricity is based on the use of land alone. Two metal rods are taken - one zinc, the other copper, and placed in the ground. It is better if it is soil in an isolated space.
Insulation necessary in order to create an environment with high salinity, which is incompatible with life - nothing will grow in such soil. The rods will create a potential difference, and the soil will become an electrolyte.

In the simplest version, we get a voltage of 3 V. This, of course, is not enough for a home, but the system can be complicated, thereby increasing the power.
Voltage in living quarters is fed through 2 conductors: phase and zero. When creating a third, grounded, conductor, a voltage of 10 to 20 V arises between it and the zero contact.

This voltage is enough to light a couple of bulbs. In this way, to connect consumers of electricity to "ground" electricity, it is enough to create a circuit: neutral wire - load - soil. Craftsmen can improve this primitive circuit and get a higher voltage current.
Do-it-yourself free energy for the home, Apartment renovation photo
Do-it-yourself free electricity is real, just watch the video showing the process of assembling a windmill and the energy of air and earth in your hands.
Many electricians are interested in one very popular question - how to get a small amount of electricity autonomously and for free. Very often, for example, when going out into nature or hiking, there is a catastrophic lack of an outlet to recharge the phone or turn on the lamp. In this case, a self-made thermoelectric module assembled on the basis of a Peltier element will help you. With the help of such a device, you can generate a current with a voltage of up to 5 volts, which is quite enough to charge the device and connect the lamp in an emergency. Next, we will tell you how to make a thermoelectric generator with your own hands, providing a simple master class in pictures and with video examples!
Briefly about the principle of action
So that in the future you will understand why certain spare parts are needed when assembling a home-made thermoelectric generator, we will first talk about the design of the Peltier element and how it works. This module consists of semiconductors connected in series - pn junctions, located between ceramic plates, as shown in the picture below.
When an electric current passes through such a circuit, the so-called Peltier effect occurs - one side of the module heats up, and the other side cools down. Why do we need it? Everything is very simple, this effect also works in the opposite direction: if you heat one side of the plate and cool the other, you can get electricity of low voltage and current. The great advantage of this method is that you can use any source of heat, be it a fire, or a hot mug of boiling water, a cooling stove, and so on. For cooling, you can use air or for more powerful options - ordinary water, which is sure to be found even in a hike. Next, we turn to master classes that will clearly show what and how to make a thermoelectric generator with your own hands.
Assembly master class
We have a very detailed and at the same time simple instructions for assembling a homemade power generator based on a mini-oven and a Peltier element. It will be useful to every traveler on a hike. To get started, you need to prepare the following materials:
- Directly the Peltier element itself with the parameters: maximum current 10 A, voltage 15 Volts, dimensions 40 * 40 * 3.4 mm. Marking - TEC 1-12710.
- An old non-working power supply from a computer (only a metal case is needed from it).
- Voltage stabilizer, with the following technical characteristics: input voltage 1-5 Volts, output - 5 Volts. This instruction for assembling a thermoelectric generator uses a module with a USB output, which will simplify and make the process of recharging a modern phone or tablet safe. This part can be purchased from a radio parts store or online.
- Radiator. You can take it from the processor immediately with a cooler (fan), as shown in the photo.
- Thermal paste, sold at a computer store.


Having prepared all the materials, you can proceed to the manufacture of the device with your own hands. So, to make it clearer to you how to make a generator yourself, we provide a step-by-step master class with pictures and a detailed explanation:

The thermoelectric generator works as follows: you pour firewood, small chips into the oven, set fire to them and wait a few minutes until one of the sides of the thermoelement heats up. In parallel, you can boil water on the grate. To recharge the phone, it is necessary that the difference between the temperatures of different sides be about 100 ° C. If the cooling part (radiator) heats up, it will need to be cooled - carefully poured with water, put a mug of liquid, ice, etc. on it. It is better to mount the radiator so that its fins are vertical, this improves the heat transfer to the air.
And here is a video that clearly shows how a homemade wood-fired electric generator works:
Generating electricity from fire
You can also install a fan from the computer on the cold side of the device, which will slightly change its design. Let's look at this option in more detail: 
In this case, the cooler will consume a small fraction of the power of the generator set, but in the end the system will work with higher efficiency. In addition to telephone charging, the Peltier module can be used as a source of electricity for a flashlight, which is an equally useful option for using a generator. Another feature of this design is the ability to adjust the height above the fire. For this, the author uses a part from a CD-ROM (one of the photos clearly shows how you can make the design yourself).


If you make a thermoelectric generator with your own hands using this technique, you can have up to 8 volts of voltage at the output, so to recharge the phone, you need to connect a step-down converter that will make a stable 5 V at the output.
Electricity is an integral part of our life. Electric energy has firmly entered everyday life, and even when going on a trip or purchasing a house, a plot, in the most remote corner of our vast country, a person sets one of the first tasks that need to be solved - providing himself with electricity.
For home
The owner of a country house, even in the case of a traditional power supply system, sometimes has a desire to reduce the cost of paying bills for consumed electrical energy.
Some developers create a completely autonomous system and become independent from electricity suppliers. Such a power supply system is especially relevant for remote places where there are no stationary power supply networks.
At present, thanks to the development of engineering and technology, installations that use alternative energy sources in their work, such as solar, wind, water and biofuel, have become widespread.
In the production of your electricity used to power your home, all of the above energy sources can be used.
Energy of sun
When choosing installations, the source of electrical energy, in which solar energy is, it is necessary to know the features of the location, which determine the number of sunny days per year.
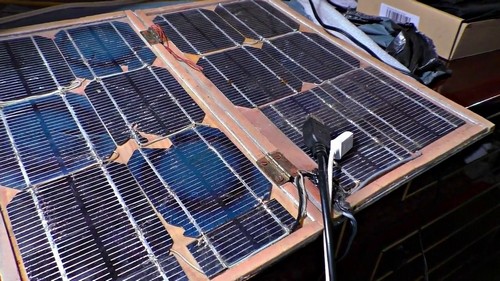
Devices that convert solar energy into electrical energy are solar panels (batteries), which, depending on the required power, are combined into groups.
The panels consist of photocells placed in a common housing. The principle of operation is based on the properties of photocells to create a potential difference between their layers, when exposed to sunlight.

Solar panels are the main element of solar power plants, which, in addition to them, include the following elements:
- Rechargeable battery (battery pack) - which is the storage of electrical energy.
- The controller is an electronic device responsible for the process of charging and discharging the battery.
- An inverter is also an electronic device that converts the direct electric current accumulated in the battery into an alternating current with a voltage of 220 V.
- Protective devices and automation devices, as well as connecting wires.
As additional equipment, to increase the efficiency of solar power plants, solar trackers are used - devices that allow you to determine the position of panels in space, in accordance with the location of the sun.
Wind energy
When choosing an alternative energy source, which will be the wind, it is also necessary to know what kind of winds and what strength are blowing at the place where the equipment is installed.
Wind generators are devices that convert wind energy into electrical energy. These technical devices differ in power, performance, installation conditions and design, on which all the indicators listed above depend.
Wind generators are:
- With a horizontal axis of rotation - the axis of the rotor and the leading axis are parallel to the ground surface.
There are single-blade, two-blade, three-blade and many-blade, with up to 50 blades. - With a vertical axis of rotation - the axis of rotation is located vertically with respect to the surface of the earth. These devices differ in technical design: Savounis rotor, Darrieus rotor, helicoid rotor, multi-bladed rotor and orthogonal rotor.
- Wind generator - sail.
All listed devices have their advantages and disadvantages, so the choice is always up to the user, which can be made based on selection criteria and individual needs.

water energy
Living outside the city and having a small river, stream or other body of water nearby, you can use the energy of water in order to get your electricity.
In this case, it is necessary to build an individual micro hydroelectric power station.
Equipment for such installations is available in various capacities, and even a small stream is able to provide the needs of the house for electrical energy.
Micro-HPPs are spilled on:
- Type: dam, diversion, dam-derivation and free-flow.
- Operating principle: waterwheel principle, daisy-chain design, using the Darrieus rotor and using the propeller principle.
- Capacities of installations and conditions of installation of equipment.
Each type of micro-hydro power plant and the principle of its operation have their pros and cons, which
determine the choice of equipment and the possibility of using it in a particular
specific case.
biofuel
Living side by side with wildlife, it is always possible to build a biofuel plant. Biofuels can be: solid, liquid and gaseous.
Solid fuel (ordinary firewood) and liquid fuel, which requires special equipment for production, should not be considered as sources of electrical energy, but gaseous fuel can.
Gaseous biofuel is a biogas obtained from the fermentation of substances of plant or animal origin, which are always available in the household.
The fermentation process takes place under the influence of bacteria in a hermetically sealed container. The gas obtained in this way is sent for combustion. When gas is burned, enough steam is generated in the steam generator to rotate a steam turbine connected to an electric generator that generates electricity.

earth energy
On the territory of our country, there are places where activity continues in the deep layers of our planet (on the surface of the earth). In such regions, as an alternative source of electrical energy, you can use the energy of the earth.
Depending on the source that gives off its heat, such energy is divided into:
- Petrothermal - the source of energy is the layers of the earth, which have a high temperature;
- Hydrothermal - the source of energy is groundwater.
The energy of the earth, in the form of steam, is supplied to a steam turbine, which is connected to an electric generator that produces electricity.
In the case of individual use, only the direct action method is possible, when the steam comes directly from the surface of the earth.
Other options, not direct and mixed methods, can only be used for industrial methods of energy processing.
All the options discussed above for using alternative energy sources for the production of their own electricity are available to users when the necessary conditions for their operation are created.
To create independent power supply systems, it is better to use several alternative energy sources at the same time in order to compensate for the possible difficulties of each method of generating electricity separately.
Quite widely, with autonomous power supply to houses, a wind generator + solar power plant is used.
For an apartment
In the event of a desire to create an independent power supply system for a single apartment, in an apartment building, it is impossible to use such sources as: biofuel, earth energy, water energy, and wind energy, it is also difficult to use.
The only source of energy that you can use to get your own electricity, in a separate apartment, without creating inconvenience for neighbors, is the use of solar energy.
The industry produces sets of solar power plants of low power, which can be placed in an apartment. Solar panels, in this case, are placed on the roof of an apartment building or the outer facade, if placed on the south side of the house.
A set of solar power plants, not of high power, consists of the same elements as in the power supply of the house, the difference is only in the number of solar panels and batteries.

Options for giving
If it is necessary to create an independent power supply for the dacha, the option of using a solar power plant is also the most acceptable. In this case, with the seasonal nature of the use of equipment, it is possible to mothball the devices or take them out of operation, for a period when there is no need for operation.
The option of building a wind generator is also quite affordable and justified. Because after incurring some one-time financial expenses, in the future, depending on the need, you can receive your own electricity.
The option of using the “wind generator + solar power plant” scheme, in this case, is also relevant, and allows you to create a completely autonomous and reliable power supply scheme.
How to DIY
The sets of equipment that were written about above are quite expensive, so creative people with engineering ingenuity sometimes have thoughts about how to make this or that device with their own hands.
In order to make a unit capable of producing electrical energy using alternative energy sources, it is necessary:
- Have basic knowledge in electrical engineering and electrical networks;
- Possess skills in working with manual mechanical and electric tools;
- Be able to work with a soldering iron;
- To have free time and, most importantly, the desire to create your own device that can generate electricity.

If, as a source of energy, you choose the sun's rays, then you need to make a receiving panel - a solar battery. To do this, you can go in several ways, these are:
- Purchase photocells and connect them in a certain way (performed by soldering). Make a panel case, in accordance with the dimensions of the assembled receiver, in which to place the photocells.
With this manufacturing option, it is possible to manufacture a fairly efficient device that can provide electrical energy to a small cottage that is not used for a long time. - With a low load power, when you need to charge a cell phone or other electronic device, you can make a solar panel from used diodes or transistors.
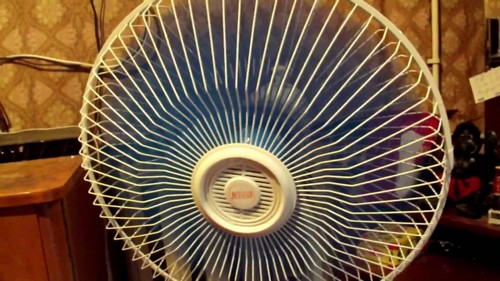
Wind generator from a room fan
The simplest wind generator can be made from a conventional household fan.
This will require a small generator from automotive equipment or an engine-generator, which must be mounted on a room fan rack. To do this, you can use any plastic container, inside which the converting device is placed. On top of this, a diode bridge is placed in the container, to which wires are connected, which are brought out to the outer surface of the container.
Fan blades are put on the generator (motor-generator) shaft, and a shank is attached to the plastic container, which can be made from improvised materials (plastic, plywood, plexiglass, etc.).
The entire assembled structure is placed on the fan rack, for this you can use a piece of plastic or other light pipe, with a diameter slightly smaller than the hole in the rack. This will allow the structure to rotate around its axis, depending on the direction of the wind.
The fastening of parts and assemblies is checked, if necessary, they are strengthened. The load is connected to the output wires. The device is ready to work.
Own electricity and own water
Living outside the city, and having a small river or stream near your house or cottage, you can always provide yourself not only with water, but also with your own electricity.
Of course, you can purchase a set of micro-hydroelectric power stations, which are quite widely represented on the domestic market, but you can make a similar device with your own hands.
The design can be simple or complex, it all depends on the need for electrical energy, as well as on the type of reservoir, i.e. the ability of water to create pressure in a given direction.
For the manufacture of the simplest design, you will need a car generator, a bicycle or other wheel, a pair of pulleys of different diameters or sprockets, as well as a metal profile (corner), which is available.
A metal profile is used to make the wheel and generator mounting structure. The wheel can be placed parallel or perpendicular to the plane of the water, it depends on the type of reservoir. Blades made of metal, plastic, plywood or other material are attached to the wheel. A pulley (asterisk) of a larger diameter is attached to the wheel axle.
The generator is mounted, a pulley (asterisk) of a smaller diameter is attached to its shaft. The pulleys are connected by a belt drive, sprockets - by a chain. Wires are connected to the terminals of the generator. The wheel is placed in water. The installation is ready to go.

Features of installation and operation of autonomous sources
In order to install an alternative source of electrical energy on your suburban area, cottage or apartment, you do not need to obtain any permits and approvals. This is the right of each user to determine for himself how to provide himself and his loved ones with electricity.
However, when building devices with high power, it is necessary to take into account factors affecting the environment and neighboring neighbors.
So when using:
- Solar energy - when placing a large number of solar panels, significant areas will be required, and therefore, it may be necessary to draw up documents for additional land plots.
- Wind energy - it must be borne in mind that wind generators, during operation, make noise, which can negatively affect others.
- Water energy - in the case of a dam, a certain amount of land is decommissioned, which must be taken into account during construction.
- Biofuels - in the production of the gaseous form of this energy source, smell, is a constant component of the production process. This must be taken into account when creating this method of generating electrical energy.
In addition to the fact that there are no prohibitions on the installation of equipment that produces electrical energy using alternative sources, there is also a law according to which every citizen who has installed equipment with a capacity of up to 30.0 kW and receives excess electrical energy that he himself does not can use - has the right to sell it to third-party consumers. This right is called the "Green Tariff".
Let's say you ended up on a desert island or stuck in the country without electricity and the phone's battery is dead. To make a life-saving call that may save someone's life will help the following tips for generating electricity.
You never know when you might need electricity.
How to get electricity:
Method 1. Wood electricity.
For almost any simple way to get electricity for free without connection to an existing electrical network, will definitely need galvanic cells, namely two metals that in pair form an anode and a cathode of opposite polarity respectively.
Now it remains to stick one of them into the nearest tree, for example, an aluminum rod or an iron nail so that it completely enters the trunk of the tree itself through the bark, and stick the other element, for example a copper tube, into the soil nearby so that it enters the ground by 15 20 cm. I would not be surprised if a voltage of approximately 1 volt appears between the copper tube and the aluminum rod. The more rods you insert into a tree, the better the quality of the electricity produced in this way (amperage). Just do not get carried away, remember that the tree is as alive as you are. You should use this method only as a last resort! Do not forget to then pull the pins out of the wood and cover with resin.
How to get electricity:Method 2
Fruit electricity?
Oranges, lemons, potatoes and other fruits are all an ideal electrolyte for generating electricity., especially if the extreme situation caught you near the equator. , bringing the voltage of your electricity up to as much as 2 volts!

How to get electricity:Method 3. Salt water electricity?
If you have there is copper wire and foil, the cost of obtaining electricity in this case will be equal to zero. We fill several glasses with salt water and connect them with copper wire, from glass to glass. At one end of each wire connecting the glasses must be wound aluminium foil.
How to get electricity:Method 4. Potato electricity?
You don't have a cottage electricity but there is a bag potatoes. From potato tubers you can get electricity for free, all we need is salt, toothpaste, wires and potato.
Cut it in half with a knife, pass the wires through one half, while making a spoon-shaped indentation in the center of the other, then fill it with toothpaste mixed with salt.
Connect the halves potatoes(for example, toothpicks), and the wires must be in contact with toothpaste, and it is better to clean them themselves. All! Now you can use your electricity generator to torture fires from an electric spark and light improvised light bulbs with charred bamboo fibers instead of incandescent filaments.
Then on the same fire you can cook the remaining potatoes)

What metals are best suited?
Here is a short table of the voltage series. The farther the metals are from each other, the greater the voltage, under all other identical conditions, you will receive:

How to get electricity:Method 5. Electricity from the air?
Definitely build a windmill, which by the way is not so difficult. All you need is helical blades rotated by the force of the wind, and an electricity generator to convert mechanical energy into electrical energy.

Also you can get free electricity from any motor!
*How to make a battery?
Lead and sulfuric acid have proven themselves for decades as a universal generator of electricity with excellent power quality, used everywhere, for example in car batteries.
To do this, we need both components, which we need to combine in ceramic dishes (it should not be difficult for you to find clay in extreme conditions and burn it).