All work on the construction of the foundation for an open terrace does not take much time. This is possible thanks to modern achievements in the field of construction and the creation of improved materials that are easy to use and facilitate work on.
The original arrangement of the terrace on the second floor of the cottage
Before starting work on installing a terrace on the second floor, you need to consider the following points:
Now we turn to the main type of work. Installing our brick wall, which is actually a thermal panel. Each part of the thermal panel consists of three layers:
- The first layer is a hard base;
- The second is insulation and waterproofing;
- The third layer is the finish.
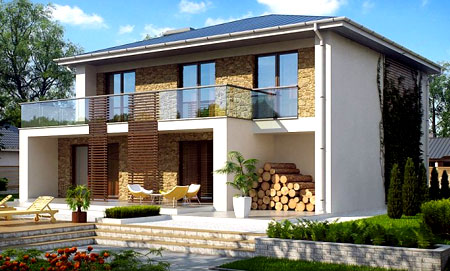 An example of a terrace on the second floor of a panel house
 Well, the last layer is a ceramic tile finish, which is a good addition to the look. Thermal panels are connected to each other by a special method, it is called "thorn-groove". This name means that there will be no seams on the facade of the house. All thermal panels will look like a solid real brick wall. In addition, such a connection will help keep the heat on the veranda.
In the 19th century, brickwork adorned almost every house in the Russian Empire. But the technologies that exist today were not even dreamed of then.
Next to the house is done for further fastening of the veranda. If you place your veranda in a house that stands on a lowland, and there is a source of water near it, then after the end of winter, the foundation of your house or veranda may not withstand the influx of water. Using screw piles, you will be completely safe, as they are absolutely reliable and will never let you down.
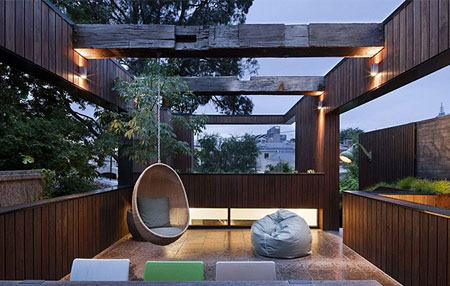 The original solution of the terrace in the open air
 Thermal panels have various additional elements, thanks to which you can sheathe a house or a veranda very carefully. For example, there are special panels for window openings or door jambs. Such special panels differ in color from the main facade. The color of these elements is darker than the main color of the thermal panels. Thus, we emphasize the geometry of the terrace by enclosing the door and window openings.
If not, to spend time outdoors, then the outdoor terrace on the second floor is the choice for you. In summer cottages, such a structure is simply necessary. A special terrace board is used to cover the terrace. This board has stood the test of time. It is laid on open terraces, piers, gazebos, in general, wherever there is sun and rain, frost and snow. Such a board can survive in the most extreme conditions, and all thanks to its cunning composition and waterproofing.
 Terrace waterproofing scheme on the second floor of the cottage
 It consists of sawdust and polyethylene. She got natural beauty from wood, and durability from polyethylene. Then you can decorate your terrace with decorative columns "daggers". Thanks to modern technologies, this decoration has a low weight and high strength, which is important for a building on the second floor. Basically, such decorations for the terrace are made of polyurethane foam.
Due to the low weight, the load on the terrace facade is minimal. Although most of these decorations are white, if you want to keep the same color, it is better to apply white paint again. This is necessary because the polyurethane material can turn yellow in the sun, and thanks to the paint it retains its original appearance.
How to improve the appearance of the terrace
At the end of the terrace installation, the best way to further improve the appearance is to paint. One of the most common and commonly used colors in which terraces are painted is white, which emphasizes the importance of the structure.
For laying the roof of the terrace, it is better to use polycarbonate sheets. This material is transparent and allows you to illuminate the terrace with the help of the sun, and also has waterproofing properties. Thanks to this, everything will remain airy and elegant.
 An example of arranging a terrace on the second floor
 In fencing, it was customary to use forged elements. Our homestead is modern, and specially purchased terrace railings are suitable for it, which are assembled simply as a constructor and at the same time have different widths, lengths and heights. You can choose the height and frequency of the racks yourself.
Various layouts - residential, and intended for summer holidays, occupy more than half of our catalog. Among 1700 ready-made architectural solutions, all building materials are presented: timber, brick, gas blocks, frame and monolithic concrete.
Features of a modern terrace
It is difficult to imagine a country cottage without an open or partially closed area for outdoor recreation. This is a favorite place to relax and receive guests. Initially, it was a structure in the form of a wooden flooring on a low support, rising 15-45 cm above the ground. Sometimes it was fenced with railings, a removable awning served as protection from the sun and rain. It was usually located in a shady part of the garden, or on the beach near the water.
Projects of modern houses with a terrace are very diverse - it is built into the overall architectural ensemble along with a balcony, a bay window and other elements (No. 40-09L). Its main difference from the veranda is that the site is equipped on an additional basis, and does not have a strong connection with the main foundation.
- Projects of houses from foam blocks (aerated concrete) with a terrace and a plinth. Inexpensive material is gaining popularity every day, and we offer more than 700 ready-made options for economical construction.
- No. 57-75 (218 m2) - a building of a relatively small area has an attached garage and an attic;
- No. 58-43 - a classic combination with a closed veranda and two entrances.
- Modern 2-level frame cottage with a terrace on the ground floor - No. 70-26 (175 m2). A very popular solution has been implemented here: in order not to cover the site with a temporary awning, it is placed under a balcony or loggia.
- The project of a terrace with a barbecue, built separately from the cottage (garden, country house) - No. 70-37. The structure was placed near the reservoir as a barbecue area, and practically is a gazebo - part of the building is closed with glass walls.
Our bureau offers not just a draft version, but a fully developed set of documentation for construction. In any of them, you can make changes at the request of the client, adapt it to another building material, add the necessary elements. At the same time, the architect takes into account the features of the relief of the site, the quality of the soil, the prevailing direction of the winds.
If the foundation of the house allows you to build a second floor, then you should consider creating an open terrace. The most difficult thing is to properly waterproof between the veranda itself and the first floor. From our article you will learn how a terrace is built on the second floor, and what is needed for this.
Pros and cons
Terrace benefits include:
- Universal application. The veranda can be used both as a living room and as a relaxation room, and in the warm season as a dining room.
- A cheap method to increase the living space of a private house.
If you perform the glazing of the terrace, then it can be used in the winter. Now they also produce special collapsible frames, which are installed only when necessary. With the onset of warm pores, such a design can be removed in just a few hours.
This terrace has its own nuances.
The disadvantages of open terraces on the second floor include:
- the need to strengthen the foundation of the house, since the second floor is an additional load on the foundation;
- seasonal use: in winter, without additional insulation, the veranda cannot be used, but snow will have to be removed regularly;
- the door leading to the veranda from the second floor should be secure and not easily broken (an open second floor is an easy option for burglars to sneak into the house unnoticed).
Video "Building a terrace with your own hands"
From this video you will learn how to build a terrace in a private house with your own hands:
Structural subtleties
The floor of the open veranda must be mounted under a minimum slope (up to 1 cm per 2 m of length) so that water does not accumulate there. Regardless of what the flooring will be mounted from, it is necessary to create a waterproofing and heat-insulating layer under it with a drain along the edge of the structure to prevent moisture from entering the interfloor overlap.
The frame for the terrace itself is recommended to be made of wood - it is light, with proper processing of wood, it will last no less than metal structures. A high side is necessarily installed along the edge, which is better to be made of metal (profiles with polycarbonate sheathing are also suitable).
Phased construction
The first thing to take care of is to strengthen the interfloor structure. If earlier ordinary wooden beams were used there, then they should be replaced either with new ones (beam 150 mm by 150 mm), or formed from metal rails. Already from above, they can be closed either with wood slabs or with a concrete slab in general (hollow, it can also be made of hydroconcrete, which does not absorb moisture at all, but is expensive).
Next is the waterproofing. Thermal insulation will be required only if there is a dwelling on the ground floor directly under the terrace. If there is a garage or, for example, a boiler room, then you can do without it.
Then the lags are mounted. Do not forget that the floor of the terrace should be located at a minimum slope to the edge, like a pitched roof. This will allow moisture to drain directly into the drain. Accordingly, several lags on one side should be processed with an electric planer to a depth of 1 cm.
If it is planned to lay thermal insulation, then the thickness of the log should be at least 10 cm - this will allow laying a layer of mineral wool or basalt slab between them. This material is the best option for thermal insulation.
 Don't forget to follow the building instructions
How to install a sideboard? The optimal and inexpensive option is on metal corners made of steel, at least 3 mm thick. They are fixed to the base either with the help of bolts and anchors (into concrete), or by welding (for a metal base). Wooden or plastic panels themselves are attached to the corners with ordinary rivets or screws, depending on their thickness. A minimum gap of 3-5 mm should be made between the floor and the panels so that water can flow out through the gap.
For thermal insulation of the terrace floor, it is recommended to use several layers of ordinary roofing material - they are in no way inferior to more expensive hydrotextiles. If the ceiling between floors is made of concrete, then it is recommended to punch grooves (strobes) along it, in which all moisture will accumulate, and from there it will be discharged to the drain.
All wood that will be used in the construction of the terrace must be treated with a waterproof antiseptic primer, on top with linseed oil, which protects much better than ordinary drying oil. From above, the wood is either coated with a layer of varnish or painted. By the way, it is better to give preference to oil paint - it will additionally protect the wood from fungus and mold.
Waterproofing must be laid not only on the floor of the future veranda itself, but also on the interfloor ceiling from the side of the street. It is through these places that moisture can penetrate inside. If the concrete begins to actively absorb moisture, cracks will appear on the slab during the first frosts, as the moisture expands when it freezes.
Thus, equipping a terrace on the second floor of a country house is a good and inexpensive idea. The main thing is not to make mistakes with waterproofing, otherwise after a few years you will have to completely change the interfloor overlap.
When designing the reconstruction of a residential building, the task of organizing an exploitable flat roof (terrace) at the level of the 2nd floor of a residential building was set and solved. An open summer terrace for relaxation was designed on this coverage area. The terrace is located above the garage, which is connected to a residential building.
Phased construction of an open wooden terrace
After erecting the walls of the garage and a monolithic reinforced concrete belt connecting the one-story garage building with a two-story house, the builders laid the metal rolling beams of the roof.

Coating beams
The cross section of the roof beams was taken according to the calculation. The calculation took into account permanent and temporary loads, including those from the formation of snow bags on the roof in winter (snow is not removed from a flat roof in winter). Also, in accordance with the architectural part of the project, the hanging walls of the tower of the house rest on the metal beams of the roof.
At the next stage, a removable formwork was installed using a moisture-resistant OSB board and boards, and the reinforcement of the monolithic floor slab was performed. After the reinforcement was laid out, snow fell and cold weather set in, so it was decided to concret the slab in the spring, at a positive temperature.


Construction work continued in the spring. The roof slab was concreted; a truss system was installed on the inclined sections of the roof, a valley was made to collect and drain atmospheric water from the roof in operation.


Terrace project in the photo

Construction of an open terrace above the garage

A waterproofing coating (bituminous tiles) was laid on the pitched sections of the roof, and rolled waterproofing made of built-up roofing felt was made on the flat exploited roof.


At the final stage, a staircase and an entrance porch from the level of the terrace to the house were made and a larch decking board was laid (the decking board is also called decking).


In the garage, a suspended ceiling was made on metal beams.