It is enough for the owner of the cottage to go out onto the porch in the rain or snow, as the question of whether to have a visor or not will be unambiguously resolved in favor of this design. That's just a convenient time for its construction will be irretrievably lost: you have to wait for spring. During this time, the steps of the porch may one morning become covered with ice. Or a snow build-up forms on them, and it will be so high that even the front door will be difficult to open. Another scenario is well known to motorists: in the evening it rained, which flooded the castle, and froze at night. Don't want to be in this situation? Make a canopy over the porch in time!
In order not to have to redo the visor later, you need to have a good idea of what exactly you want to get as a result. The minimum list of requirements that this structure must satisfy is presented below:
- it must withstand not only its own weight, but also the weight of climatic precipitation, taking into account the snow that can fall on it from the roof, as well as the weight of green spaces wrapping around it;
- since water will drain onto it, it is necessary to provide a system for collecting it into a storage tank or outflow into a storm sewer;
- it is desirable that the design protect not only the front door, but also the porch as a whole;
- the building should not look like an alien stain: it must fully comply with the overall style decision of the cottage.
As for the last point, everything will be fine with external indicators and design if you focus on the material from which the visor will be created. It should be combined with the exterior of the house, with the porch itself and with the roof. In this case, it is not necessary to completely match the material. It is important to choose the right shape, size, color, suitable shade or justified contrast.

Sometimes the canopy over the entrance is created as part of the main building. Then this is a solid structure, provided for by the building plan, equipped with columns that you so want to decorate for Christmas
The shape and dimensions of the visor should depend on the appearance and location of the entrance. Sometimes it is better to replace the visor with a canopy: in this case it turns out to be a more appropriate structure.
We choose the design of the future design
Take the time to compile a list of items that your choice is focused on, since it is your own time that will save you as a result, deciding on the design of the visor. By putting your thoughts in writing, you will not lose sight of anything.
Option #1 - polycarbonate
As the main material for the construction of the visor, polycarbonate has far outstripped all its competitors. In addition to such remarkable qualities as durability, reliability and practicality, polycarbonate is also distinguished by visual appeal. Due to the variety of colors used in its production, it is able to match any design ideas. There are, of course, materials that are cheaper than polycarbonate, but working with it is a pleasure.

Before building a visor yourself using polycarbonate, you need to study the rules for working with it: nothing supernatural, but it is recommended to follow
Option #2 - metal
A structure completely assembled from metal is a fairly simple and not too expensive option. It is not as easy to work with metal as with polycarbonate, because a special apparatus is needed to weld it. And this means that there must be at least some skills to work with him. However, if desired, welding can be changed to riveting or used to connect the nut to the bolt structure.
The disadvantage of this option is that the metal requires anti-corrosion treatment. Note that this design, unlike the previous one, is completely made of metal, which means it requires more attention.

Any product will look wonderful if the hand of the Master touches it. And in this respect, the choice of this or that material does not really matter.
Option # 3 - corrugated board
Decking in popularity can be compared with polycarbonate. A nice polymer coating allows it to compete with this material. But corrugated board has a significant drawback, which should not be forgotten - when it receives mechanical damage, its surface is irreparably distorted.

Well, who's to say that a corrugated visor looks too "simple"? As for mechanical damage, hail in our area is not a frequent occurrence.
To level this minus, you will have to look for the thickest corrugated board as possible, but you will have to pay more for it. It should be noted that it is much easier to work with it than, for example, with metal and even metal tiles.
Option #4 - lightweight plastic
This material is very similar to polycarbonate, but in fact they are special PVC boards. They are used for outdoor work, they should not be confused with cheap plastic used for interior decoration. A feature of this material is its truly unique lightness. At the same time, the material remains durable and quite reliable. Plastic is available in different colors, but can be brought to the desired shade with the help of a film.

Very concise and simple. But by no means "rustic", mind you! Such a visor is similar to a royal speech: laconic and to the point
Option #5 - metal and shingles
Two very different materials. Peaks of them are best built simultaneously with the construction of the roof of the building itself. Then the remnants of the material will go to the visor, and it will come out practically free. In addition, these materials will only be appropriate if the roof and canopy cover is completely identical. Otherwise, the difference will be too striking.

A nice visor made of reddish-brown metal tile looks quite unusual. Its Gothic form is fully consistent with the architectural design of the entire cottage.
These types of tiles are diametrically opposed in weight. Metal tile is a heavy material, and shingles are light. Nevertheless, both visors will turn out to be cute and of high quality. A metal tile product will be somewhat noisier in case of rain.

This is not even quite a visor, but a whole canopy covered with flexible tiles. A nice bonus of such coverage is silence during the rainy season. You can’t expect anything like that from metal, metal tiles and corrugated board
Option #6 - artistic forging
In terms of design, the forged visor has always looked and will look exactly the way it is: an expensive and original decoration. Yes, forging is expensive. But how beautiful! If there was not enough money for a fully forged product, opt for a combined version.

Yes ... Well, in principle, a completely forged visor is not needed. It will look heavy, and weigh too much. But this work of art, combined with railings and lanterns, looks luxurious.
In combination with polycarbonate, tiles, plastic, forging will still be invariably good. The only downside to this quality build would be its hefty weight. This circumstance must certainly be taken into account and the installation of such a visor should be entrusted to trusted professionals so that in winter it does not collapse under the additional load of snow.
Option # 7 - a classic made of wood
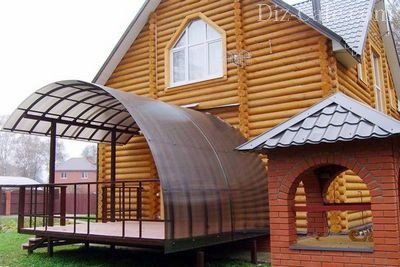
Recently, lurid Gothic has become less and less common among country houses, more and more attention is paid to high-quality, reliable and environmentally friendly log cabins. The most harmonious with such massive buildings looks like a wooden porch and a canopy, also completely made of wood.

A flimsy European building on a mighty Russian log house will look alien, albeit funny. But here everything is in place: a durable structure and flexible tiles as protection from rain and snow
Like the whole log house, the visor must be treated with agents that protect against decay, insects and other troubles that can happen to wood. In addition, waterproofing must be present, which can be used as slate, roofing felt, plastic, sheet metal, polycarbonate, corrugated board and other materials.
Master classes and examples of construction
Metal single-sided visor
Making a canopy over the porch with your own hands is not as difficult as it might seem. However, at the very least, patience is required. To create this reliable and durable design, we need the following materials:
- metal corners;
- eaves plank;
- adjoining bar;
- bars;
- gutter;
- pipe;
- flexible tiles or corrugated board;
- screws, screws, anchors.
It is necessary to prepare the tools:
- roulette;
- welding machine;
- hacksaw for metal.
Do-it-yourself work on arranging a visor above the porch begins with a sketch of the future design. Since we are not going to make an abstract canopy, but a very concrete one, you will have to take a tape measure and determine the width of your porch. Add 60 cm to the figure determined by the measurement, and you get the width of your visor.

An approximate sketch of the structure looks like this. You should not rely on your own memory and imagination: draw, it won’t take you much time, but it won’t let you make a mistake
By measuring the distance from the front door to the place that should be under the protection of the visor, we get the length of the future home-made structure. The height of the shed canopy is calculated based on the architecture of your cottage. Do not forget that the visor should have a slope of approximately 20 degrees. You have received all the necessary parameters, on the basis of which you can create a sketch.
Next, we proceed to trimming the metal corners to the required dimensions. The length of the rafters from the corners is equal to the height of the slope. From the corners, struts and a wall beam will be made. Between themselves, all the details of the frame are assembled by welding. The resulting strong and reliable frame will be fixed above the porch. The wall beam is fixed with stainless screws in front of the entrance, and anchors must be used to fasten the struts.

The general appearance of the structure will be approximately the same. By the way, if you also want to decorate your visor with forging elements, be aware that they are sold separately, they can be welded
A crate is laid out from the bars on the rafters. If the visor is covered with corrugated board, a distance of 30 cm must be made between the slats. If the design is made with flexible tiles, the crate must be made continuous. The selected roofing material will be laid out on it. You need to fix it with self-tapping screws, but with an overlap, and not end-to-end.
The finishing touches are the fixation of the metal bar adjoining the upper part of the ramp. A cornice bar is attached to the bottom. It remains to mount the gutter and pipe.
Arched visor made of galvanized metal
What materials are needed, what tool is needed and in what sequence to perform the work, you can see everything with your own eyes in this video.
Timber awning
Another video on how to make a canopy over the porch yourself. Detailed video instruction on how to make a wooden canopy over the front door with your own hands.
Among the attributes of the design of the facades of residential buildings, special attention is paid to the porch, which is located at the entrance to the house and primarily characterizes the taste of its owner. According to the generally accepted opinion, the porch, devoid of a visor, gives the impression of unfinished work on the design of the facade. In addition, not many will like the prospect of opening doors in bad weather in heavy rain, for example.
In addition to the above arguments, the need for a canopy over the front door is also explained by aesthetic reasons. To this it should be added that anyone (with experience in relevant work, as well as the ability to handle the simplest tool) can easily build a canopy over the porch with their own hands.
Varieties of visors
In practice, there are several varieties of protective visors, differing not only in the material used, but also in their shape. In this case, the following options are the most common:
- single-pitched canopy with a frame fixed on the wall of the facade;
- a gable canopy, both slopes of which cover the porch on each of its sides;
- a canopy in the form of a tent, completely covering the area in front of the front door;
- an arched structure that borders the porch from above and from the sides.

According to the mounting method, all known canopies are divided into structures mounted on special supports and suspended structures fixed directly on the wall using special brackets.
Material selection and sketch preparation
Before starting work, you must first select the material for the future visor, as well as prepare its sketch, taking into account the already selected material and the climate in your region. At the same time, most often in the conditions of central Russia, wood is chosen for the manufacture of these protective devices, which is easily amenable to decorative processing, which allows decorating the pediments of the visor with elegant carvings.

As a roofing for it, or other materials of similar properties are most often used. If you plan to make a protective canopy in the form of an arch or a tent, it is most convenient to use tiles to close them or make it from polycarbonate.

Work on the arrangement of the visor begins with preparatory operations, consisting in marking the place of its installation and taking all the necessary measurements. In this case, it should be borne in mind that the visor should completely cover the porch over the entire area and even slightly protrude beyond its borders. Such a margin will allow you to almost completely protect your porch from rain in strong winds.

When the measurements are completed, a sketch of the future product is prepared on a sheet of paper, indicating all its dimensions. Such a sketch will help you determine the amount of materials needed to make a visor and which will need to be purchased. These calculations should take into account the angle of inclination of the slopes and their total length. Before starting work, in addition to the boards and beams necessary for arranging the battens and rafters, special triangular brackets are prepared, and roofing material is also purchased.
The procedure for manufacturing a wooden structure
Work on the construction of a wooden canopy begins with the manufacture of several rafter squares, formed by two beams fastened together at an angle of 45 ° or 60 ° (depending on the width of the overlapped area).

After that, a gable roof structure is assembled from the squares, fastened with the help of two longitudinal beams, a ridge and a system of spacers. The resulting structure must be securely fixed in the marked place of the wall on pre-mounted metal brackets that repeat the shape of the squares.

As additional supports, two vertical beams with braces are used, which are rigidly fixed on the facade wall on the sides of the porch. Note that before the final fixing of the structure, it is necessary to check the horizontal position of its position, as well as the verticality of the installation of additional support beams. It is clear that all of the above applies to the installation of a suspended type visor.
If you have opted for the canopy with separate supports, there is no need to use special metal brackets.
In this case, special poles made of wood or metal and installed in pre-prepared pits act as supporting elements. Before their installation, a mixture of crushed stone and sand is poured to the bottom of the pits, after which the base of the pillar supports is concreted to the entire depth of the pit. Bearing beams are attached to the upper part of the supporting pillars with a rafter system mounted on them (i.e., the entire previously prepared structure). For a wooden porch, two pairs of rafter legs are quite enough, which are additionally connected with crossbars to increase the rigidity of the structure.

The installation of the supporting frame is completed with the installation and subsequent fixing of the ridge beam.

After that, a crate is laid along the already mounted rafters (thin bars, sheets of thick waterproof plywood or boards can be used for its manufacture).

Roofing material is laid on top of the crate, the installation of which is carried out in the manner prescribed for the type of coating you have chosen.

When finishing the canopy, you should take care of special hooks for attaching gutters, as well as wind slats. At the final stage of work, the elements of the drain and the protective eaves are mounted.
In the second part of this article, the features of making a protective visor from such a common material as polycarbonate will be considered. Its appearance has made a small revolution in the design of most types of lightweight and light-transparent structures. And, indeed, a relatively inexpensive, fairly strong and lightweight honeycomb material immediately began to be in high demand among the consumer and is widely used not only in the manufacture of sheds, but also in the arrangement of greenhouses, skylights, decorative barriers, etc.

Any person familiar with the openwork forms of a polycarbonate canopy over the front door will surely appreciate its aesthetics and will not refuse to have a similar design in their home. That is why we decided to help home craftsmen and acquaint them with the specifics of choosing the frame material, as well as with the basics of designing and practical manufacturing of such structures.
The choice of materials for the frame
When choosing a material that is best combined with polycarbonate and provides the visor with the maximum possible strength, in addition to the special requirements of SNiP, the attractiveness of its appearance should also be taken into account.
That is why, first of all, we will try to investigate various types of frame material for their compatibility with polycarbonate, and also try to evaluate the disadvantages and advantages of each of them.
Wood

A wooden frame is distinguished by ease of assembly and relatively low cost, but is significantly inferior to the same metal base in terms of reliability and service life. To eliminate this drawback, it is recommended to use only hardwoods for such a frame.
Before making such a frame, the wood should be treated several times with Oksol-type drying oil or a similar impregnation that reliably protects it from decay. From an aesthetic point of view, a polycarbonate canopy with such a frame fits perfectly into the facade of a wooden house, the log house of which is made of timber.
Polycarbonate sheets are fastened to the frame made of the indicated types of wood using standard self-tapping screws using special thermal washers that ensure the tightness of the fastening zone and are painted to match the color of the sheet itself.
Aluminum

The frame based on an aluminum profile is also quite light and easy to install, since corners or tubes are used for its manufacture, which can be easily cut and formed. One of the advantages of a visor on an aluminum frame is that it does not have to be primed and protectively painted. A relative disadvantage of this material is its significant cost.
But if you are not too worried about the cost of the material, but primarily attracted by the design of the structure itself - this option is the most preferable. A canopy with a frame based on an aluminum profile will look perfect against the backdrop of any modern facade.
steel profile

The structure of the steel profile is characterized by high strength, but at the same time it has a significant weight and must be fastened with great care (preferably using anchor bolts). In addition, the reliability of fastening such a canopy over the front door can be ensured through the use of threaded connections (bolted or screw).
To increase the aesthetics of the perception of the entire structure as a whole, all connections are best done by electric welding, and then gently grind them with a grinder.

Upon completion of the grinding work, the frame must be carefully primed and painted over with high-quality paint (preferably in two layers). The fastening of cellular polycarbonate blanks to the steel profile is carried out by means of self-tapping screws using special gaskets and plugs that block moisture access to the frame.
Features of the arrangement of the canopy
We will consider some of the nuances of manufacturing a polycarbonate-coated visor using the simplest design as an example, during the assembly of which the material is laid without deformation (bending) and with a slight slope that provides rainwater runoff. All necessary operations are performed in this case, taking into account the following installation features:
- Since polycarbonate is produced and sold in sheets of 6 × 2.1 meters in size, you need to prepare a tool for cutting it in advance (a hacksaw, an electric jigsaw or a regular clerical knife).
- The frame of the canopy can be fixed to the wall using special alignment dowels.
- For the convenience of installation work, it is best to start fixing polycarbonate sheets after fixing the frame on the wall.
- The number of sheet attachment points must be at least four.

In conclusion, we note once again that to fix the polycarbonate blanks on the frame, roofing screws of the required length with an elastic gasket and a special washer should be used.
Video
If you have the equipment, you can independently make a forged visor with polycarbonate, as in this video. Visual instructions for manufacturing here:
You can make a single-sided visor with vertical supports:
Photo


In order not to get wet in the rain and not languish under the sun while you open the front doors, you need some kind of protection. Usually they make a visor above the porch or just above the door. In some cases, the canopy can also cover steps and even a path or part of it. How to make a similar design, from what materials and we'll talk further.
Species and types
If we talk about the structure as a whole, the canopy or canopy over the porch consists of a frame and roofing material (cladding). There may also be support posts that support the outer edge of the canopy. They are optional. They are needed when there is no certainty that the structure without additional supports will be able to hold precipitation.
Canopy over the entrance: a common device
Precipitation mainly means snow. In regions with a lot of snow, you can either make the slope of the visor steep - so that the snow quickly melts, or install additional supports. You can do both, as they usually do - the margin of reliability / strength reassures and inspires confidence.
Frame and stand materials
The frame and supports of the visor above the front door are made of:

Recently, the most popular material for the manufacture of a canopy frame over a porch is a profiled pipe. With equal dimensions and wall thickness with a round pipe (if we compare the diagonal and diameter), the profile has greater rigidity. At the same time, it has a variety of sections - a square and a rectangle with different sides, it can be bent into arcs, it is easier to weld and attach to walls, it goes well with elements of traditional or cold forging, the durability is the same as other steel products. In general, it is the profiled pipe that is in favor today.
What is the lining of the canopy over the porch made of?
If we talk about materials for facing the visor above the porch, then the choice is very wide. Very often, the canopy over the entrance to the house is made of the same material as the roof. And rightly so, because in this case, a harmonious design of the house is obtained. With this solution, any roofing material is used:

Glass is rarely used. It is necessary to use reinforced types of triplex type, and not only are they expensive, they also weigh solidly, so additional suspensions or powerful support columns are definitely required. And if you consider that sheet polycarbonate or plastic in appearance is not much different from glass, it becomes clear why glass is unpopular.
Forms of canopies
There are more than a dozen forms of visors above the front door. The easiest to manufacture is a shed canopy. Requires a minimum of effort and materials, and can look very good. Its disadvantage is that when the snow melts, the snowdrift will be in front of your door and it will urgently need to be eliminated. The same "disease" affects other models with slopes tilted forward. These are excellent options for regions with little snowy winters, but with a hot sun - not quite for our latitudes. Although, if you are not afraid of the need for urgent snow removal, you can do any of the options.

Forms and names of visors above the porch
It is a little more difficult to make a gable visor (which is a house) and a simple arch. They are good because the snow that has come down is on the sides of the entrance and, even with a large amount of it, there is no need to urgently remove it. So for regions with a lot of snow, these are the best models.
How to connect the canopy over the porch and the wall of the house
One of the most difficult moments is to dock the canopy cover over the porch so that water does not flow down the wall. Usually, standard methods of joining the roof are used - with the help of a baffle bar. This method is suitable for any roofing material, as well as sheet metal and wood. You just have to choose the right color. There are two approaches here: in tone with the wall or in tone with the roofing of the visor. The options are equivalent, so it's up to you to decide / choose.

How to make a canopy adjoin a wall
A strobe is made under the baffle bar in the wall (5-7 mm deep). The edge of the plank is inserted into the recess, fastened, the seam is sealed with a moisture-resistant sealant for outdoor use. The other edge of the plank lies on the roofing material. When water runs down the wall, it flows to the bar, from it, bypassing the junction, to the roofing material and further into the storm drain system or directly to the ground - how is it done for someone.
If you use metal tiles, sellers have a special wall profile. It can also be used with other materials - it is important to choose the color. The regular assembly includes rubber seals, which are placed a couple of centimeters from the outer edge. In this case, with a strong wind, water and debris do not fall under the bar.

Standard solution for metal roofing. Suitable for slate, corrugated board
If the visor above the front door and porch is made of polycarbonate, glass or sheet plastic, the method described above is unacceptable - it looks too rough. In this case, there are two options:

There are no other good options. You can only combine both proposed for reliability.
How to fix if the wall is multilayer
Recently, more and more buildings have multilayer outer walls - ventilated facades, insulation ... The bearing part of the wall turns out to be closed by a couple of layers of materials, the bearing capacity of which is only enough to hold its own weight. Nothing can be attached to them. The entire load must fall on the load-bearing wall.

How to fix a canopy over the front door to a three- or two-layer wall
Even if the outer layer is a finishing brick, it costs nothing to attach to it. Masonry is usually carried out in half a brick. So it only looks solid on the outside. The mass of even the smallest and lightest canopy will not withstand, and the supporting columns do not help either.
Therefore, with any multilayer wall, holes are made in all finishing / insulating layers, structural elements are attached to the load-bearing wall.
Single-sided visor: design features
An inclined or straight single-sided visor is the simplest thing that can be. Straight lines are rare in our country - they are not very functional, but there are a lot of sloping inclined ones.
At the heart of an inclined single-pitched visor is a right-angled triangle. The right angle is adjacent to the wall, and the length of the sides depends on the desired slope.

The design of a single-pitched visor above the entrance
In the simplest case, it is possible to weld three identical triangles from a profiled pipe (as in the figure above), make holes for fasteners in them (at least three). These three elements can be connected into a single whole with the help of a crate for roofing material - as in the figure. And you can weld the crossbars from the same pipe (but of a smaller section) or a strip, a corner. This option - with metal jumpers - is more suitable for a canopy over a porch made of polycarbonate or plastic. It is also good for a metal sheet - it will be convenient to weld it or screw in self-tapping screws.

The idea is the same, but the material is different
There is also an option with a variable angle of inclination. This is a rectangular frame with lathing lintels, to which light roofing material is attached. This frame, with the help of a wall beam fixed on the wall, is attached above the entrance (we described how to make the connection above).

Variable angle
Depending on the required angle of inclination, struts are made. They can be made of metal or wood. Fixed to the frame.
If desired, this option can be made with an adjustable tilt angle. Make the fastening of the frame and struts to the wall movable (on hinges, for example), make several holes in the frame. By rearranging the struts in different holes, you can get a different angle of inclination. For doors, this possibility is not very relevant - except for glass ones - in order to close the too bright sun, but for windows it can come in handy.
Double canopy frame
There are at least two ways to assemble a canopy with two slopes: from two or more (depending on the length of the canopy) triangular rafters or from two rectangular frames with a crate, fixed with crossbars. The second option is shown in the figure below, and the first will be a little further.

Canopy house - one of the most popular options
Method one
Two quadrangles are assembled from a bar or thick board, which are combined with a ridge board. The angle of inclination of the slopes is set by saws on the ridge, fixed by crossbars - a spacer bar. Since the roofing material is laid from the ridge down, the battens of the batten are stuffed in the opposite direction. Under a soft tile the continuous flooring is required. It can be moisture resistant plywood or OSB.
How to make a canopy over the door in the form of a house
Brackets are also assembled on the ground - stops that will transfer the load from the visor to a large area of \u200b\u200bthe wall. It is better to assemble the structure on the ground (without fixing the roofing material). In order to raise and secure the canopy, assistants or the services of a manipulator will be required.
Method two
The second option is the assembly of individual truss structures. Maybe this option will seem easier to you - all gable roofs are assembled according to this principle.

An example of a gable porch with a truss system
Here, too, a frame is assembled from a bar and brackets are needed. But the frame lies in a horizontal plane, supported by brackets. Two or three triangles are assembled from rafters, which rest on a ridge beam, and it rests on a rack, which is fixed to the frame with its second end. It turns out a mini-model of the usual truss system.
To improve the appearance, mowing is placed near the rack. In the photo above, they are curved, but this is far from necessary. You can simply make it from a bar, sawing it at the right angle. It is also better to assemble the system on the ground - it will not work to connect exactly at a height.
metal
If the visor frame is made of a metal pipe, everything is much simpler. The pipe has a large bearing capacity, so there are much fewer supporting and auxiliary elements.
Two identical triangles are brewed - according to the size of the future canopy. They are connected by jumpers, the length of which is determined by the "depth" of the visor. To prevent the lining from bending, additional crossbars are welded.

Gable canopy over the porch of a metal pipe
The finished structure of the canopy is complemented by brackets - stops. In the picture above, the canopy above the porch has only a stop without slopes. For regions with little snow in winter, this is enough, and in order to keep a solid mass of snow, you will need a mowing or stand. Or maybe both (as in the diagram below).

A beautiful gable canopy over the entrance, made of a steel pipe with curly stops and poles (dimension diagram)
Decorative elements are an optional part. There may be a regular triangle.
Arched canopy over the porch: manufacturing features
A canopy over the front door in the form of an arch cannot be called difficult to manufacture. It is more convenient to make this form from a steel pipe, and from a profile, rectangular section. With the help of a pipe bender (it is also possible manually, but this is more difficult), several arches of the same size are made. They are connected by jumpers, the length of which is determined by the desired size of the roofing part.

Arched design - the simplest of the options
The first and last arches are connected by horizontal jumpers, brackets are welded to the last or, as in the figure above, ordinary stops.
Often you can see double arches with decorative and not very filling. They are typical for large structures. Still, the windage and snow load turns out to be large and it is better to play it safe by making a margin of safety than to do everything all over again.
Photo Ideas

Canopy over the porch of metal pipes and polycarbonate: different models

Beautiful design using traditional or cold forging

Canopy over the porch on a metal frame: single-slope, gable (house), arched models

Different in style and shape

With pillar supports and metal openwork for decoration

A canopy over the porch is not only above the front door, but also above the terrace

Wooden canopy over the entrance in the form of a house - options with support pillars under the tiles

Features of mounting polycarbonate
Residents of private houses often have to think about how to protect their porch from precipitation, which will erode the steps and platform. The easiest way is to put a canopy or canopy over the porch. It will not only protect the front door and porch, but also perform a decorative function.
Thanks to the variety of materials for manufacturing, as well as your own imagination, you can make such a visor that would fit perfectly into the interior of the house and even complement it. In this article, we will look at options for canopies over the porch, which you can make yourself or order from specialists.
Requirements for a canopy over a porch
What should it be? According to one publication, a canopy is a structure in the form of a roof located outside the house. In order for it to perform its functions and serve for many years, it is important to take into account some requirements that must be met.

The following is a list of basic building requirements:
- The canopy, like the materials, must be durable. It is important that the structure can withstand not only its own mass, but also the weight of precipitation. In winter, snow will fall from the roof, accumulating on the visor. In addition, the weight of decorative elements and vegetation is taken into account.
- Due to the fact that precipitation will flow from the product, a drain system must be provided to collect it in a certain place or container.
- It is important to choose the size of the canopy so that the porch is completely protected.
- The building should fit into the overall picture, and not be an alien spot.

In order for the design and external indicators to be in order, it is important to choose the material that would ideally fit the house or cottage. The visor should be in harmony with the exterior, and it does not have to be made of the same materials. You need to choose the right color, size, shape and additional elements. The choice of the design of the future product is an important stage. Take the time to make a list of items you should focus on. Let's look at the options for canopies and canopies over the porch of the house and their photos.
What are awnings
You should know that a canopy is a structure consisting of supports (frame) and a roof. Depending on the shape of the roof, products can be divided into the following types:
- lean-to;
- gable;
- arched and semi-arched;
- flat;
- domed;
- concave.

Each of the types has its own advantages and is able to decorate the porch. However, the difference is the complexity of the work. After all, it is much easier to make a flat roof than a domed one. Accordingly, the prices of products will be different.

As for the supports, some can be attached to the wall with anchors or brackets (if the canopy is small), while others can be dug into the ground, which will be their foundations. That is why there are two types of ready-made visors: suspended and supporting.

Speaking about the material for the supports, they are made of wood, steel, aluminum or forged products. Combining shape, frame material and roof material, you can get a unique canopy that performs its functions.
Polycarbonate canopy
One of the most popular materials for the manufacture of canopies is polycarbonate. It is head and shoulders above its competitors due to its characteristics and properties.

Products made from this material have a number of positive qualities, including:
- Practicality.
- Durability.
- Light weight.
- Waterproof.
- Elasticity.
- Harmlessness.
- external attraction.
- Ease of care.
- Resistance to temperature fluctuations.
- Fire safety.

Polycarbonate is easy to process, so you can make a visor yourself. The only important thing to consider is that the polycarbonate canopy has high light transmission. Therefore, if you want to cover the porch not only from precipitation, but also from sunlight, you should think about another material.

Advice ! The visor, made of monolithic polycarbonate, can be supplemented with flower pots with plants. The canopy will protect them from rain, wind and direct sunlight.
A pleasant moment is the variety of colors of finished products. You can choose the color that would be perfect for your design decisions and fit into the overall picture.


Consider also what material the supports for the canopy are made of. It can be wood, steel or aluminum. Polycarbonate looks especially noble together with a forged frame. With proper processing and the right combination, the canopy will emphasize the beauty of your home.
Canopy from corrugated board
In second place among the common materials is corrugated board. You can often see visors from it. Unlike polycarbonate, this material does not transmit sunlight, forming a cool shade in hot weather. It is worth noting the fire safety of the material. It does not burn, so your canopy will be protected from arson. Due to the strength, reliability, flexibility and resistance to temperature extremes, visors will serve you for many years. The color range of the material is not less than that of polycarbonate. You can choose any color, texture and pattern. And the coating is able not to fade in the sun for many years, retaining its original appearance. It is an environmentally friendly material that does not emit substances harmful to humans.

But, corrugated board has one main drawback - with a strong mechanical impact, its surface can be deformed. It is clear that a person will not directly affect the canopy, however, hail, falling icicles or snow can cause damage to the material. To avoid this, choose a thick corrugated board. It will cost more, but the purpose is fully justified. Yes, and a lot of material for the manufacture of a canopy is not required. How ready-made look, you can see in the photo.
Canopy made of bituminous tiles or metal tiles
Covers made of these materials have excellent characteristics. No wonder they are used as roofing for building a house. The metal tile has a presentable appearance, is resistant to mechanical damage, it does not require constant care, and over time its original appearance will not change.

The visor from a metal tile will be resistant to influence of ultra-violet rays and an atmospheric precipitation. In combination with wood or metal, the finished cover looks great. It is worth noting that it is rational to use these materials in the case when the roof is also made of them. Agree, it will hurt your eyes. When the house is covered with slate, and the visor is made of tiles, it looks just like a man in an expensive suit who rides an old Cossack. In addition, if you make a canopy at the stage of roof construction, then you can save money by using the leftover material for the canopy.

Please note that these types of tiles are different: metal tiles are heavy, and shingles are small. Nevertheless, products from one and the other material will look attractive. Please note that the metal tile has one drawback - noise. When it rains, the sounds will be quite loud and can be annoying. The same applies to corrugated board. But shingles, flexible, are able to absorb the sound of falling rain.
Classic - wooden canopy
Wood is the most ecological material. It has a number of positive properties. For centuries, it has been used by all mankind for their own purposes, and for good reason. It is easy to process and blends perfectly with almost any interior. Skillful needleworkers can make a work of art out of a covering by framing it with a sharp cut. If your home is located outside the city, surrounded by a garden, this is the perfect choice for you. The support from the log house looks especially beautiful.

It is worth mentioning the shortcomings of the material: the tree absorbs moisture and rots, insects can start in it and destroy the integrity of the structure. In addition, the tree burns perfectly. Therefore, all material should be well treated with special means against ignition, decay and insects. It is also important to provide waterproofing, because the visor will be constantly exposed to precipitation. It is better to use hardwoods such as walnut or oak.

These are not all options for canopies over the porch. They can be made from metal, glass, fabric and more. The same goes for shapes and design. It is not limited by standards. There are original canopies that amaze with their appearance. You can see some of them in the video.
In the construction area, there are a large number of various projects that are aimed at creating canopies for the house with their own hands. Consider some of the possible options for the construction of this type of extension above the porch and tell you all the nuances of the workflow.
Many experienced craftsmen and beginners in this business talk about how to attach a canopy to a house with their own hands, because, due to the variety of building materials on the modern market, these structures can have the most diverse configuration.
Polycarbonate has won a high rate of popularity among consumers, which protects well from sudden rains, and also firmly resists snow cover in winter. Regarding the base used, such varieties of visors are distinguished.
Types, forms of construction of canopies to the house with their own hands
- stone;
- forged;
- metal;
- wooden;
- combined.
As a combination, roofing materials such as slate, corrugated board, etc. can be used. In addition to such functions as shading and protection from precipitation, a good canopy should fit as harmoniously as possible into the overall landscape design of the surrounding area.
Therefore, the manufacture of multi-level structures is often practiced, and hinged structures are used as a budget option. One of the most common classifications of canopies is the division by purpose. Read more about this in the table.
| For the veranda | This type of protective elements, as a rule, are placed either on the back of the house, overlooking the garden, or erected from the facade of the building. If the area of \u200b\u200bthe territory allows you to make such a canopy larger, then the veranda itself can be used as a recreation area. |
| For the terrace | Do-it-yourself canopy over the house for the terrace can be made in several versions. A simple way to erect a hinged element is the construction of a shed structure, for example, from polycarbonate. Even an inexperienced master will be able to do this, moreover, in hardware stores you can buy a ready-made structure that you just need to assemble. Gable buildings are considered a more difficult option, they most often have a roof similar to a house. Based on their very layout of the terrace, and most often they are corner or through the entire building, the canopy can cover only part of the room. |
| For cars | Polycarbonate carports are popular among car owners. They are attached to the house in order to shelter cars from the sun or protect them from rain in a passive state. Many factories offer fairly simple but durable designs at an affordable price. When choosing this type of product, it is equally important to pay attention to the stylistic parameters of the extension. |
| marquises | Awnings are a kind of adjoining canopies, which are divided into retractable, with racks and basket. The first type operates due to the built-in electric drive and, in the absence of owners, if not needed, is stored in the assembled state, in a special case. The second one has an auxiliary fulcrum, due to which they are distinguished by endurance and are able to hold heavy loads. The third type is a frame covered with fabric. Basket canopies can be semi-circular and rectangular in shape, supplemented with stiffening ribs. |
Thus, a do-it-yourself canopy to a house is a building that is rich in its diversity, but before choosing one or another form of construction, it is worth considering its purpose, as well as clearly understanding the purpose of the building, calculating its functionality in advance.
How to make a canopy to the house with your own hands from polycarbonate
A polymer such as polycarbonate is perfect even for beginners in the construction field, besides, it has good performance and has a fairly affordable price. It is easy to cut and process with a tool, and a variety of types of material allows you to adjust designs from it to any environment in a suburban and private area. For those who are going to produce a visor at home for the first time, experts recommend taking a single-sided version of the structure as a basis, and then decide on the very type of base material. To choose a canopy for the house with your own hands, photo projects recommend using a variety of construction portals, where you can also go through an online consultation on any issue of interest.

Polycarbonate is divided into cellular (cellular), monolithic and profiled. The first is considered the most common in the field of private and commercial construction, it is distinguished by its low weight and low cost.
Due to its plasticity, the polymer is suitable for the manufacture of structures of various shapes and is available for work even by one master. As for monolithic polycarbonate, it is distinguished by its strength, and outwardly similar to glass, both transparent and colored, but it is considered more resistant to stress. Profiled polymer is used as a roofing material on roofs, and its characteristics are not worse than a monolithic look.
You can make a canopy to the house with your own hands according to the drawings that are presented on the Internet, but it is important to pay attention not only to the type of polycarbonate, but to its required thickness, take into account the bending radius, as well as technical indicators.
If a person has special skills, then the working project can be individualized by specifying the location and number of support posts, etc. Also, a properly developed drawing at the initial stage of construction allows you to correctly calculate the materials that need to be purchased so that there are no extra costs or you do not have to re-purchase.
List of necessary materials and tools for creating a do-it-yourself polycarbonate canopy
In order for a cheap do-it-yourself canopy to the house to have good strength, professionals recommend building it with a metal frame, and purchasing polycarbonate with a strength of more than 6 mm. So, the list of necessary materials and tools for creating a canopy with your own hands is as follows:
- polycarbonate;
- shovel, for preparing holes for concreting racks;
- welding machine and electrodes;
- grinder and wheels to it;
- thermal washers for fixing the polymer;
- tape measure and building level;
- sand, cement, gravel;
- profiled pipe with a cross section of 80 * 80.
In order to get a solid foundation during the construction of the canopy, racks are used, they are also mortgages or supports, they are poured with cement mortar, so it is additionally necessary to prepare a container for its preparation, as well as purchase paint and a brush for painting metal structural elements, thus protecting them from corrosion damage .
Stages of work on the construction of a canopy with your own hands
To build a canopy in the courtyard of a private house with your own hands and after a few working days to see the result of your work, the owner needs to complete the following stages of the construction process:
2. Install racks.
3. Assemble the frame structure.
4. Fix the polycarbonate sheet.
Stage 1.
According to a previously prepared or selected drawing, the master needs to mark out the work area using a rope and pegs for this. Some workers mark the places of the foundations by pouring chalk, others additionally clog the reinforcement, regularly checking the marks with a diagonal level to avoid skewing the structure.
The territory must be cleared of possible debris in advance in order to prepare a sand cushion on it. To do this, remove the top layer of soil and pour gravel, tightly trampling stones.
Stage 2.
In places of future supports, pits of the appropriate depth are dug (1 - 1.2 m). Usually, either a shovel or a hand drill is used in this process. It is with the installation of the foundations that the installation of the future polycarbonate visor begins. Before you insert the support into the pit and concrete it, you need to make a gravel cushion in the ground, and then fill the rack with mortar.
The layer of stones should be about 20 cm. To prepare the mixture for pouring, a percentage ratio of 4: 1 (sand: cement) is used.
In order for the voids between the stones to be densely filled, the prepared solution should be liquid in consistency, not thick. Fill it up to ground level. To continue the installation process, you must wait until the concrete dries.
Stage 3.
Next, a do-it-yourself canopy to the polycarbonate house is created by assembling the frame. To do this, longitudinal bars are attached to the installed supports, they are usually called Mauerlats. If the owner allows the budget, he can purchase such designs ready-made. The purchased elements are fastened with special bolts, and the design assembled at home requires a welding machine, with which the parts are connected. All joints are degreased, after which the metal surface is painted.
Stage 4.
At this stage, the master works with the polymer, cuts it into the desired pieces, lays it on the surface, fastens it, installs the end strips, etc. Sheets up to 8 mm thick can be cut with a conventional construction knife, and more durable material is processed with an electric saw. Fasteners are located on the profile sheet with a pitch of about 40 cm. Special metal strips are used as a polycarbonate connector.
Thus, a do-it-yourself canopy attached to the house will be perfect only if the owner does the work step by step using not only theoretical materials, but also watching a video with practical recommendations on the installation process.

Recommendations for making a wooden canopy for the house with your own hands
A do-it-yourself wooden canopy to the house provides protection for the adjacent territory to the building, and also protects from exposure to sunlight. But be that as it may, this hinged element must be stable, durable and reliable, therefore it is often made from such material as wood with a combination of corrugated roofing, soft tiles, etc.
It is worth considering that the canopy must be sloped so that precipitation does not linger on it.
Shed wall wooden canopies are considered popular among consumers; as a rule, they are fixed to the facade of the building. But there are times when the structure is mounted on vertical supports exposed on the sides of the house.
To create a wooden visor, you will need both a wall bearing beam and bars for racks. Boards for rafters and roofing base are purchased separately. The installation of wooden supports is carried out according to the same instructions described in the polycarbonate version. The rafter system and the crate are assembled using the “groove-to-groove” method.
The assembled wooden frame is intended for fastening the roofing material. In this case, it is corrugated board.
When buying it in a hardware store, it is necessary to clarify the thickness and brand, the choice of color rests solely on the taste of the owner. When laying it on the boards, you should be attentive to the fastening and fix the corrugated board as tightly as possible with self-tapping screws.
The roof sheathing must withstand the fastening line and have a good aesthetic appearance.
Pay attention to the self-tapping screws, their length must correspond to the selected brand of roofing and the cross section of the beam used to make the crate.
It is worth noting that the framework of such a plan also requires additional processing; for this purpose, various varnishes, etc. are used. means to prevent the process of wood decay.
When choosing a canopy for the house with their own hands, projects that offer a lot, the master must take into account his abilities, and in case of self-doubt, hire a professional team. published
If you have any questions on this topic, ask them to specialists and readers of our project.
P.S. And remember, just by changing your consumption, we are changing the world together! © econet