Repair in the apartment raises a lot of questions, especially for those who first decided to do such a responsible business, relying on their own strength. Our recommendations will help to plan the work correctly, so as not to correct the mistakes made later.
Preparing for renovation - planning and design selection
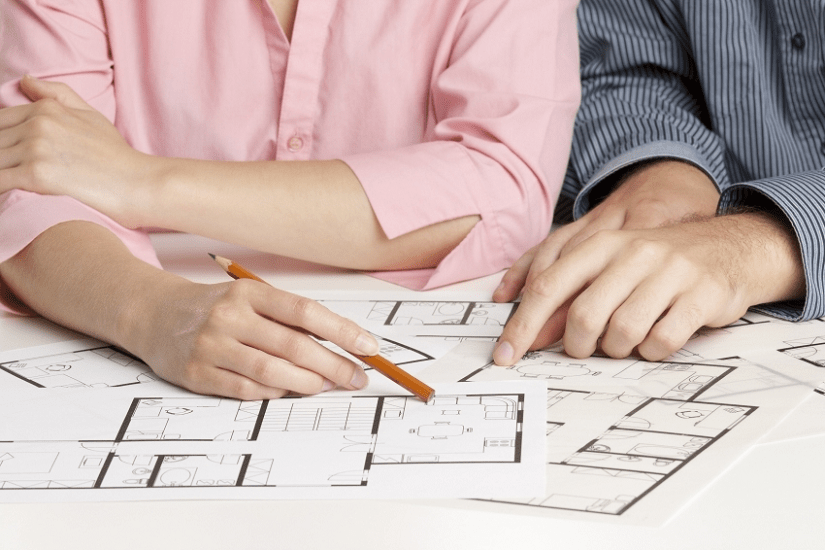
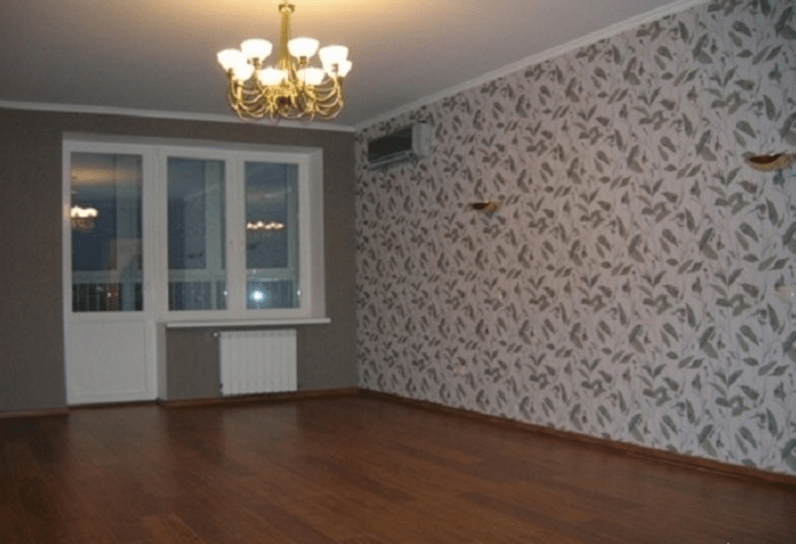
Correctly chosen sequence of repairs in the apartment will help to make it in a short time, without unnecessary worries. Initially, you should decide what kind of repair is to be done. Perhaps it will be cosmetic: it will be limited to changing wallpaper, painting and other individual operations. If a major overhaul is needed, planning is indispensable. After all, he may touch windows, doors, affect walls, floors and ceilings. Maybe you want to do the redevelopment of the premises, remove the walls.
Careful consideration is required for the layout and design of the premises. For each room, consider what material will be needed for walls, ceilings, floors. Perhaps you will change windows or want to rearrange furniture. It is impossible to keep everything in your head, so you need to make a plan. We measure all the rooms and make drawings on separate sheets. You will need six of them for each room: one for the floor and ceilings, four for each wall separately. On the plan, indicate the location of windows, doors, sockets, switches, lamps.
Write down on each sheet what materials will be used. For example, the floor in the kitchen: linoleum with insulation - 12 m 2, brown. Ceiling: 12 m 2 , water-based paint, white. The first wall: 6.1 m 2, align - satengips starting, finishing, primer. Painting: water emulsion, peach color, colorex, primer. Replace the door with a new one, leave the trim. It is advisable to indicate how much of which material will be needed, based on consumption rates, it would be nice to indicate the price. If you do not undertake any work, you will involve a specialist, indicate this in the plan. This is only an indicative planning, you can fix whatever you see fit. A start has been made - the work has been planned.
Continuation of preparation - furniture moves, unnecessary elements are dismantled
An ideal option if it is possible to completely free the apartment from furniture and interior elements for repairs. But, most likely, it will have to be moved to one of the rooms so that it does not interfere with work. We stack compactly, pack with stretch film. Renovation begins with other rooms. When at least one room is ready, the furniture is transferred there, arranging as the rooms are ready.
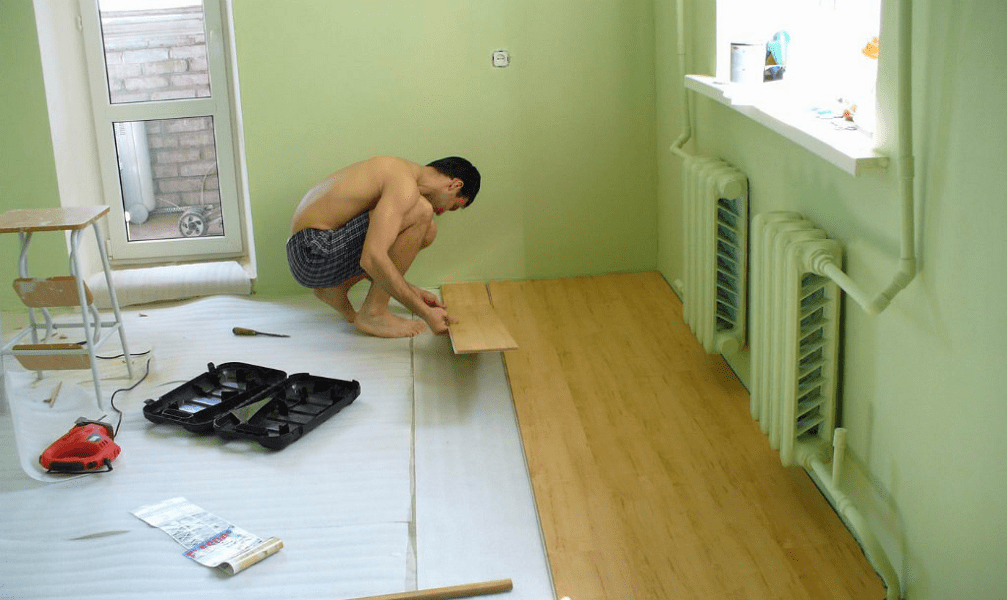
The next step is the dismantling of the elements to be replaced. If the repair is cosmetic, remove the layer of old linoleum, remove the wallpaper. During a major overhaul, you may have to remove interior doors, remove partitions, change door installation locations, create special niches in the walls, remove plumbing, etc. If you are not going to change the floor, but only update it, do not forget to cover it with a film so as not to damage it.
Time to dismantle old windows if you are going to install new ones. After installing the windows, do not remove the protective film from them. Let it remain for the duration of the repair and protect the glass from scratches, dirt, dust, inevitable during repairs. If redevelopment is planned, there is a desire to start from scratch, we demolish non-bearing partitions.
Water, heating, electricity - we repair, install a new one
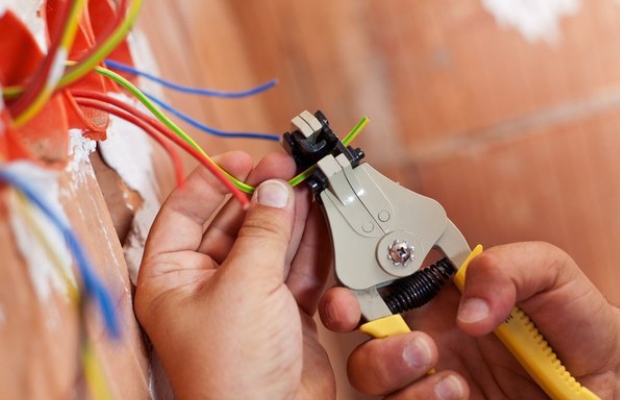
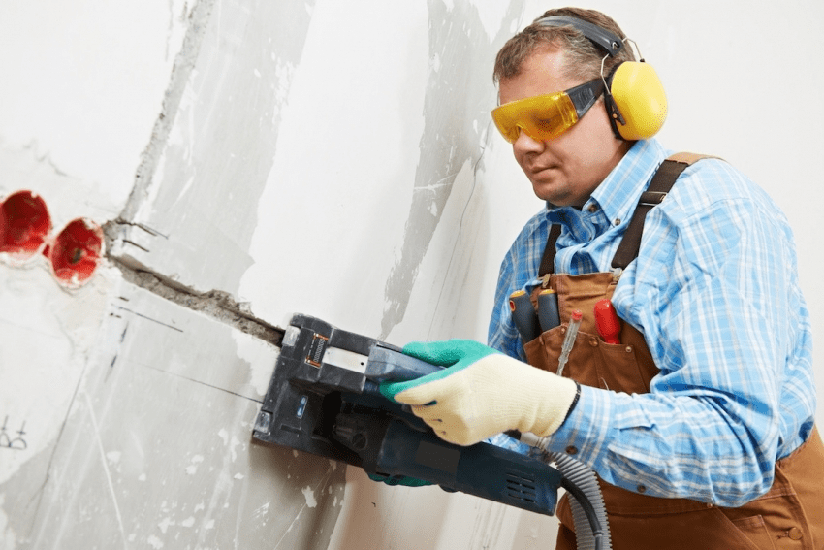
Having finished dismantling, in stages. We start with communication systems. The overhaul time is the most suitable for replacing electrical wiring, heating radiators, pipes, installing exhaust hoods, and air conditioning. Communications should be planned in advance, especially wiring. If you are going to build new partitions, the work should be done before wiring, pipes, so that you do not have to break and redo it later. In a frame house, wiring, pipes are best hidden in the walls. On the walls of another material, strobes are made, where the wiring is hidden.

Residents of panel houses should keep in mind that walls in such houses can only be ditched in a vertical direction. We breed wiring under the ceiling or in the place where the walls and floor are joined. We hide the wires under or behind the plinth. Do not forget to run cables for the Internet, television, intercom at the same time as the wiring. We do not immediately install switches, sockets, lamps, we only prepare places for them. Installation of devices is carried out after the completion of all work.
We are engaged in plumbing: we install pipes for supplying water to the washing machine and output to the sewer. We also make connections to faucets, bathrooms, showers, dishwashers, toilets. Already now it is important to know the dimensions of the bathroom and shower cabin, the places where water and sewerage are connected. It's good when they are already bought, but you can also find out the technical specifications in the store where you are going to buy the equipment.
Finishing work - scope for a flight of fancy
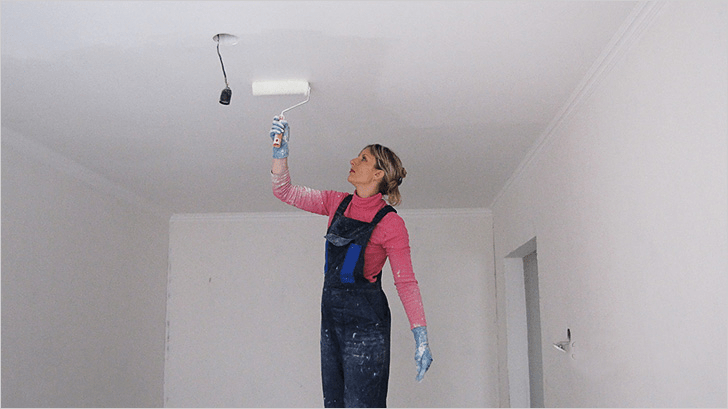
We carry out finishing, starting from the top - from the ceilings to the walls and floors. With this sequence, damage to the repaired parts when working with others is excluded. Stretch ceilings are an exception: they are made last. If you want to make a floor, start by leveling the screed. We use an economical method - a cement-sand mixture. If possible, use self-leveling floors. They are more expensive, but the result is worth it. If you are going to install a floor heating system - it's time.
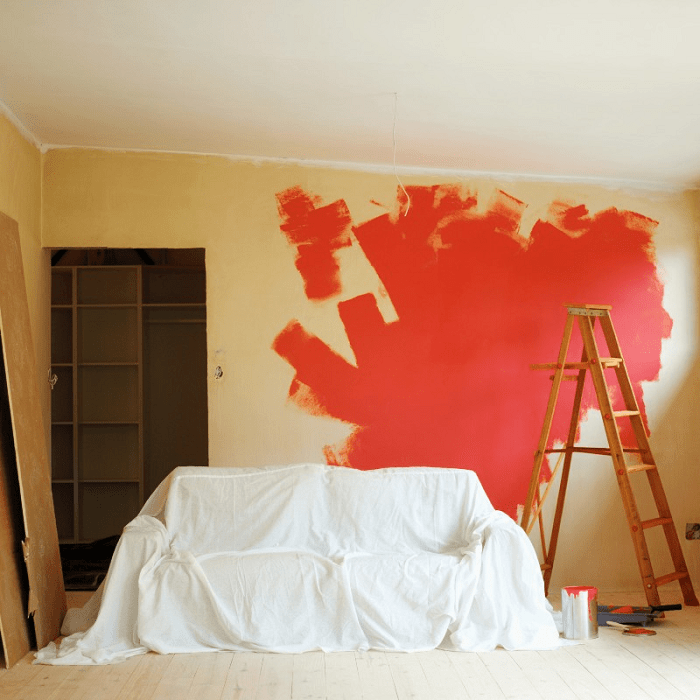
Let's start leveling the walls. The duration of work, the amount of material depends on the condition of the surfaces. You may need several layers, or you can get by with one. The walls are leveled, mainly with their own hands. The use of machine alignment in an ordinary apartment is not practical. Manual alignment is performed in two ways: visual and by beacons. We align the walls that are being prepared for painting with beacons, which ensures the best quality.
Having finished plastering, we proceed to the final work - puttying. Putty should be carefully to close up all the bumps, places of wiring communications. Finally preparing the surface for finishing. The choice of a primer is important - a high-quality one will avoid problems when puttying, painting, pasting. If you are going to install decorative elements like stucco, do it now.
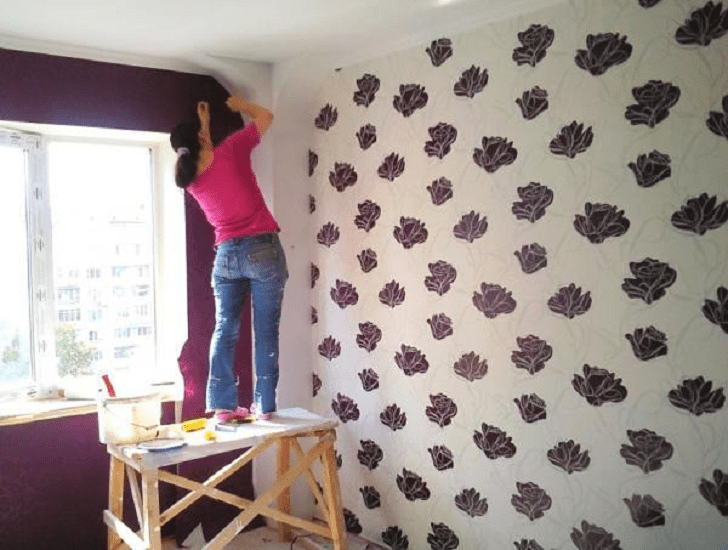
Then we move on to the wall tiles. It is important to plan which tile to use on which wall. If possible, we make an installation diagram on a computer or draw on paper. So we will find out exactly how many tiles will be needed, how many will have to be cut, in order to reasonably plan the purchase of a stock. A variety of colors, patterns, finishing materials allows you to make the apartment unique. In addition to ceramic tiles, decorative mosaics, bamboo tiles, 3D elements and much more are used at this stage.
Approaching the finish line - the last important touches
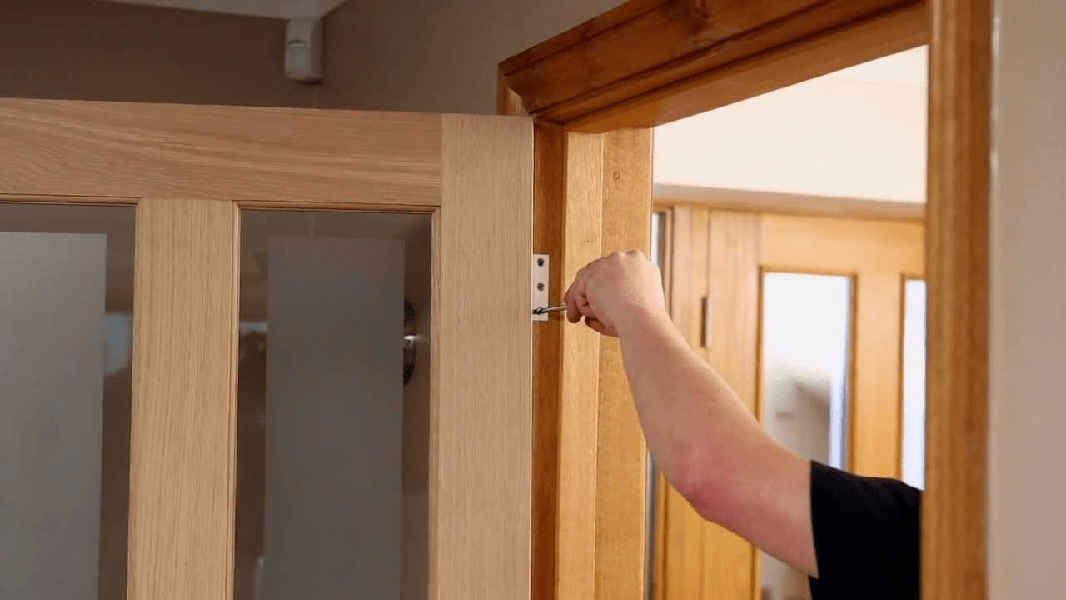
We install plumbing - all the connections are made earlier - and proceed to laying the flooring or decorating the walls. Most builders prefer this order: first start laying the final floor: laminate, parquet, linoleum. Next, we are installing interior doors. We select the door in advance in order to prepare, if necessary, doorways of the desired height and width. We install the boxes, hang the door leaf. We close the clean floor with a film and deal with the walls. Options at your discretion: painting, wallpaper.

It is not necessary to fasten the platbands immediately, it is better to do this after we paint the walls or wallpaper them.
We complete the process by installing fixtures, switches, sockets, fixing skirting boards.
Summing up - sequence of actions
So, summing up all the tips, we will outline the sequence of repair work in the apartment:
- 1. We are considering what kind of repair is needed: cosmetic or major, we choose the design. We draw drawings, specify materials.
- 2. We take out, take out furniture and everything that will interfere with the repair, dismantle unnecessary elements on the floor, walls.
- 3. We are engaged in dusty work: we remove old windows, install new ones, tear down partitions and install new ones. We bring communications - electrical wiring, pipes for connecting household appliances and plumbing.
- 4. Finishing work: we plaster the walls, we make a draft floor. Puttying, priming, laying tiles. We do the finishing floor, decorate the walls.
- 5. We install plumbing and appliances, hang the door. We fasten skirting boards, platbands.
We start the repair from the most remote room, so that garbage and dirt are not applied to the repaired premises. The corridor is being refurbished. Garbage, building materials are carried through it and there is a big risk that the walls, floor, ceiling will be accidentally damaged. We close the renovated room, we hang the door with construction film. In this way, we will prevent the ingress of dust, debris, building materials from the premises in which repairs are ongoing.
Repair in the apartment is now an expensive pleasure. Some save up for it for years, while others give away their last savings and fall into a debt hole. Regardless of the financial situation, everyone tries to save money, but in practice, not everyone succeeds in doing this. We will analyze what materials you can save on, and which ones are better not to, and learn how to expose hired repairmen who are trying to cash in on the ignorance of the owners.
Different types of repairs - how much to pay the master and how to save money?
The final estimate will depend on the type, size of the room and the complexity of the repair. There are three types of repairs: cosmetic, major and renovation. The cosmetic option is the most economical. This repair usually includes painting, wallpapering, sanding the floor. Such work is easy to do with your own hands, saving on calling a specialist. If some specialized tool is missing, it is not worth purchasing it for one-time purposes. Rent it. Make a preliminary estimate for repairs in order to adjust it in advance and find cheaper options. When deciding to hire a private specialist, redecorating an apartment will cost you, on average, 1,500 rubles per 1 m 2, and through a construction company - 2–2.5 times more expensive.
It is much more difficult to make major repairs on your own, since many of the works require special skills and abilities. Stages of such repairs: floor screed, wall leveling, demolition and installation of partitions, dismantling of old coatings and finishes, complete replacement of water pipes, plumbing and electrical wiring, replacement of windows, doors, garbage disposal. The price for calling a master during a major overhaul increases to 6,000–15,000 rubles per 1 m 2. And that's not counting the cost of consumables.
Here are four tips to help you save money on major repairs:
- 1. Remove old wallpaper, tiles, dismantle the flooring, clean and take out the garbage yourself. Such work does not require special skills and tools, and the savings are significant - 5000-8000 per 1 m 2.
- 2. Do not rush to spend money on finishing an expensive ceiling. Just level and paint it with inexpensive chalk paint. When money appears, sheathe the ceiling with drywall or make a stretch ceiling.
- 3. Do not remove plaster completely. Remove it only in those places where it exfoliates. However, take into account the peculiarity of the finish. If you plan to stick photo wallpaper, the surface must be perfectly flat. It may be necessary to completely replace the plaster, in which case it will not be possible to save money.
- 4. In order not to waste time on paperwork and extra money for garbage disposal, collect the waste in bags and send it to the basement, shed or leave it on the stairwell in a specially designated place, it is provided. Throw away one bag every day in the general trash can, there is nothing illegal about it.
Renovation practically does not differ from overhaul. The cost increases due to the purchase of expensive and natural materials from well-known manufacturers. The price of materials is automatically reflected in the cost of the master's work, which starts from 25,000 rubles per 1 m 2. .
How to check the honesty of the estimate - common tricks
If you decide to involve an experienced team of repairmen in the repair, be prepared that you may be deceived. To test this for sure, pay attention to a few important features. The information will be useful for both beginners and experienced homeowners who decide to start a renovation.
To display the exact cost of repair work, the foreman measures the parameters of your room with his tape measure. It seems that everything is fine and there can be no catch. In this case, we recommend that you give your own tape measure for measurements. Often, cunning repairmen cut the tape measure, for example, by 50 cm, and fasten it to another part of the tape, stepping back 20–30 cm or more. From a real size, for example, 2 m, your room increases to 2.3 m and, accordingly, the price increases, because the cost of work is calculated based on 1 m 2.
Upon receipt of the estimate, carefully study all positions. Often, repairmen duplicate the cost of services under the guise of other work. For example, leveling walls - preparing walls for wallpaper. Read each item carefully so as not to overpay.
Pay attention to the price for 1 m 2. Compare it with other construction companies and individuals beforehand. Prices below average should alert you. Usually, in the process of work, the repairmen who initially offered you a low price raise it and ask you to pay extra for additional services. The owner gets into a dead end, as the work is already in progress, and the estimate is automatically increased by 2-3 times.
Saving materials and increasing the cost of work is another trick used by dishonest repairmen. For example, you can put a 1 cm layer of plaster for the price of 3-4 cm, shorten the planned route for laying electrical cables or plumbing pipes, and take the rest of the material for yourself. In fact, you overpay for material that does not "work" for you. To avoid such mistakes when performing a turnkey repair, ask the repairmen to photograph the completed work process in detail in stages and send it to you by mail.
If you decide to put a warm floor, remember that it is not placed around the entire perimeter of the room. An unscrupulous foreman will offer you to put a warm floor under the furniture, where it is absolutely not needed, which will also increase the cost of the project.
Complete wiring replacement is another service that almost every foreman will offer you without making sure that you really need it. You can make good money on old wiring made of copper and aluminum cores.
And the last piece of advice: buy materials yourself, do not trust this business to the repair team. As a rule, they buy building materials in the market, where the storage conditions for many goods do not meet the standards. In addition, there repairmen can ask for a blank check with a seal, enter a list of goods themselves and their cost with an extra charge.
In which season repairs will be cheaper - promotions and special offers
It is better to start repairs in the off-season - in early or mid-autumn. This period is suitable for both external and internal repairs. It is still warm outside, and prices for building materials are gradually decreasing by the winter season. Savings on summer goods reach 15-20% without loss of quality. Therefore, if you planned to spend 250,000 rubles to renovate a room, know that in the fall and winter you can save about 30,000 rubles, which can be spent on renovating the hallway.
Promotions and special offers are a special type of service where you can save. Pay attention to non-liquids. They have a limited shelf life and do not last until the next season. Hardware stores do a good discount on such goods. If you are going to make repairs right now, look at putty, plaster, glue, sealant at a bargain price, below the market average.
Budget plumbing replacement options
Replacing plumbing affects a significant part of the repair budget. If it is in good condition, without chips, cracks, and only the surface with an old coating makes you think about its dismantling, we advise you to clean and restore the plumbing. We replace expensive detergents with a mixture of baking soda and vinegar, which destroys stubborn plaque well. Budget option for transformation -. You can cover the bath yourself with enamel, liquid acrylic or order an acrylic liner to fit the dimensions of your plumbing. Restoration will reduce the cost of buying a new bathtub by about 4 times and, depending on the option chosen, will extend the life of the old bathtub from 5 to 20 years.

If you still decide to change plumbing, consider buying a budget option from the so-called landfill entrepreneurs. Often, upon arrival at a new house, the owners change faience and cast-iron plumbing, which is in good condition, and throw it into a landfill. Resourceful businessmen have come up with an easy way to quickly and easily make money on this. They pick up plumbing in good condition from the landfill, wash and put it in order. They do not expose their contacts directly, working on the principle of word of mouth. In the auxiliary warehouse of such entrepreneurs, you can pick up the right plumbing and save a third or even half of the factory cost.
Economical wall cladding and flooring in dry and damp rooms
To save money when cladding walls, we advise you to buy not edged (planed) lumber, but slabs (wood sawing waste). The croaker is sold raw and does not correspond to the quality of the usual materials. It is easy to fix this if you purchase it in advance in March-April and keep it in a dry room until autumn. In addition, slab sheathing saves money on leveling walls. In 80% of cases, it completely hides all the irregularities. Not only to save money, but also to make wall decoration practical, the option of wall cladding with croaker to the waist and pasting the walls to the ceiling with non-woven wallpaper will help. The lower part is resistant to wear and dirt, and the upper one completes the overall picture.
The most budget option for laying the floor in dry rooms is marmoleum. This material requires leveling the floor in only 10% of cases. However, for rooms with high humidity (bathrooms) marmoleum is not suitable, you will have to lay classic tiles. An alternative to marmoleum is laminate. This option is also inexpensive, looks beautiful and is suitable for laying under a plank floor. True, the floor will have to be leveled.
For wall decoration in the bathroom, choose laminated hardboard. Such material is less familiar than tile, but cheaper. The ceiling is better sheathed with plastic panels. Don't skimp on waterproofing. The money spent on it will pay off and extend the life of even the cheapest finishing materials. Instead of gypsum plaster, use a cement-plaster mixture to level the walls. It is not inferior in quality and is cheaper. When deciding to tile walls and floors, buy a solid color finish. Such a tile does not need to be often adjusted and compared with the pattern, less material is used, which automatically affects the purchase price.
What is better not to save on, so as not to pay twice later?
When carrying out major and European-style repairs, it is impossible to do without replacing the wiring. At this event, it is better not to save money and entrust the work to a professional. It is especially important to pay attention to Soviet wiring due to the high power of modern devices, which sometimes the old cable cannot withstand. During the replacement, you will have to use a wall chaser to lay new wiring with high quality. Workers charge for this service from 100 rubles per 1 m 2.
A complete replacement of wiring in a two-room apartment, on average, will cost 40,000 rubles. A private specialist may take less, but he does not give a guarantee for installation, so if a malfunction occurs, you will have to pay the master again for the work. To save money, we advise you to contact an electrician from the DEZ. Such a specialist performs the work slowly as the workload, however, the quality and guarantee of service is a definite plus for choosing this particular master. But sockets and switches can be installed independently.
Another job that you need to involve a specialist and not save: replacing plumbing pipes. Choose your supplies according to your budget. Attracting a plumber will cost, on average, 15,000–20,000 rubles. If you do not have experience in connecting plumbing, we also recommend that you seek help from a specialist.
“Yes, so that repairs in your apartment do not end!” - throws a passer-by over his shoulder and leaves home. And you stand and think: “And why is he? Did you wish for wealth or, on the contrary, ... overlaid?
But indeed, the issue of repair is an unpleasant matter for the average citizen. With today's prices for materials and services of construction Jedi, you will have to fork out seriously. And how much time and nerves you have to spend, and even live in a ruined apartment! You don't wish it on your enemy. But repair is a vital necessity, and sooner or later you will still have to face it. Some craftsmen, even in times of crisis, still manage to do the renovation of an apartment with their own hands quickly and inexpensively. But how do they do it? Inexpensive - this is a cosmetic repair with your own hands and domestic materials. Such repairs do not require large financial investments, but the cleanliness and freshness of your apartment is guaranteed. Cheap is not always bad.
Where to begin?
Get a small notebook. In it you will write down all ideas, prices and phone numbers of shops or specialists. But the main thing is that it will contain a plan for your repair and an expense estimate. The plan should reflect all your wishes: replacing windows with plastic, false ceiling or just whitewashing, new tiles in the bathroom, wallpapering or a couple of new outlets in the kitchen. Write exactly what you want. Decided on the wallpaper - that means wallpaper, if you want decorative plaster - then so be it. Pipes are buzzing - replace, a punctured toilet - throw away. You may think that, based on your desires, do-it-yourself apartment renovation will not work quickly and inexpensively. But you probably do not know this, but only drive yourself into the framework. If it turns out - you will do it, if not - it's not a big loss, it's just a note in a notebook. Next, get down to the estimate: what exactly do you need and in what quantity. How many meters of tiles, grout, bags of putty, wallpaper, chipboard and other things. You can always correct these entries.
To find out exactly what materials, what quality and price you need, go to online stores and construction forums for help. Carefully study the characteristics and pricing policy, approximately calculate the expense. And at the same time, calculate how to replace the faucet yourself, glue wallpaper or install drywall. Determine for yourself: I can do it myself, but here you need to look for an electrician or plumbing. Write it down.
How can you save
Lots of options. To begin with, remember: it is better to buy materials for apartment renovation in the cold season - the price is much lower. Summer is the construction season. In winter, you can stumble upon a 50% discount in building markets or the “Buy 2, get 3 for free” promotion! So you can buy the same wallpaper at a low price, but with a much better look and quality. And if they lie for a couple of months in a dry pantry or closet, then nothing will happen to them. Check local forums, especially if you live in a big city. There you will surely find many people who have already done inexpensive apartment renovations with their own hands. Photos of finishes, tips, addresses and phone numbers of specialists you will surely find in the same place. And you will also stumble upon the heading “repair” and “remains of materials”. Periodically view who and what interesting sells or gives away. After repairs, people often have materials that no one will buy at the sale price, but it’s a pity to throw them away. So, you can buy a couple of bags of putty or even Spanish tiles for a ridiculous price. A person has an extra 2-3 meters left, there is nowhere to put them, and you will be fine in the toilet. There you can also find the remnants of the cable or grout “for a chocolate bar”. More impressive people, settling in new buildings, often change brand-new plumbing or PVC windows for more expensive ones, and these are given for next to nothing. Why? Because they want “Rehau” or “only France”, and such a window will do just fine for you. Everything is better than the old wooden one. When you get rich, buy yourself a Rehau.Tools for repair
A construction tool costs a lot of money, so it’s better not to spend money on it. As an option - take it for a while, it is rented everywhere. And it will be even better if you borrow it from acquaintances, friends or relatives. And be sure to thank the person for the help. How? You better know. Take this opportunity to ask if they can help you with the decoration of the apartment. Especially if your friends are well acquainted with the building charter. It will also help to do the renovation of the apartment with your own hands quickly and inexpensively, and even with high quality. Yes, and for sure your friend will make a significant discount for the old memory.
You will need:
Step-by-step instruction
1. The concept of repair includes the following list:
4. The next step is to repair the ceiling. Expand all the cracks with a spatula so that they become deeper. Prime with primer, putty with putty and let dry. After the primer dries, sand the ceiling and prime it again. Repair the walls before painting the ceiling. 5. After working with the ceiling, proceed to remove the old wallpaper. To do this, wet the old wallpaper with water, let it soak for a while, and as soon as it gets wet, remove it with a spatula. The wall must be dry and clean before you start repairing it. Expand all the cracks on the wall with a spatula, prime them with primer and seal with putty. When those places that you putty dry out, sand them, and then cover them with a primer again. If you will be gluing thick wallpaper, then do not use finishing putty. 6. The next step is painting the ceiling or wallpapering the ceiling. Dilute the water-based paint as written on the can and paint the ceiling 2 times. If you decide to glue the wallpaper for painting, then glue it and paint it 2 times as well. Domestic paints are cheaper, so your budget will not suffer. 7. Before wallpapering the walls, it is necessary to paint the doors and window frames with paint. If you buy "P" paint from Russian manufacturers, and not imported ones, then it will cost you much less. After the paint has dried, proceed to wallpapering. To save money on buying wallpaper, choose a domestic manufacturer. In terms of quality and durability, wallpapers from Russian manufacturers are not inferior to imported ones. 8. The final stage is the painting of the floor. If the furniture was not taken out, then seal the legs and the perimeter of the furniture with masking adhesive tape, and remove it after painting - the furniture will remain clean. Choose domestic paint - it will come out cheaper, but it will not affect the quality of the painting.
Walls
Walls are the first thing that always catches your eye. Of course, everyone will like smooth walls and beautiful stylish wallpapers, but if there is no money for leveling and expensive materials, you can limit yourself to simply replacing old wallpapers. Only by re-gluing the wallpaper will you already transform the apartment. It is quite possible to pick up inexpensive dense wallpaper on a paper or non-woven base, and you can stick them even on not very even walls. Non-woven wallpaper hides small irregularities especially well.
There is another option. The previous owners left a couple of rolls of wallpaper in the apartment, which they did not need during the renovation. For example, I just changed some particularly dirty and torn sections of the wallpaper. It was enough to replace the wallpaper strips where they suffered the most. These are protruding corners, places near the door jambs, in the hallway at the entrance, in the kitchen not far from the stove - all this will cost much less than a complete replacement, and the housing will look much better.
Ceiling
If we are dealing with whitewash or lime layers, it is best to clean them first. Numerous lime deposits, flaking and crumbling, are not only aesthetically ugly, but also harmful to health. It is not difficult to wash out lime, you must first soften the layers by wetting small areas of the ceiling with water from a spray bottle, and then clean off the white with a hard spatula or scraper. If there is old peeling wallpaper on the ceiling, they need to be removed.
After stripping, the ceiling can be further sanded with ordinary sandpaper, that is, sandpaper, and primed. If the surface is smooth, without pits and cracks, it will be cheaper to paint the ceiling with acrylic paint, it is better to use matte paint in light, clean colors. If there are small defects, the wallpaper will hide them. Wallpaper for the ceiling should be chosen white or very light, without a pronounced pattern and with very fine corrugation. Another economical option to transform the ceiling is to glue foam boards.
floors
If these are concrete floors, as a rule, nothing further needs to be done with them in terms of preparation, they are quite even and durable. Squeaky wood floors are a much more serious problem, and repairing them, at least over time, cannot be avoided, but the creaking problem can be temporarily solved. Squeaking in wooden floors occurs when adjacent boards rub against each other. In particularly “loud” places on the floor, you can drill a few holes with a conventional drill and pour in some mounting foam. The foam will fill and seal the voids between the boards and the floor will stop creaking. This must be done carefully, without fanaticism, so that the floor does not swell.
You can even out strong “waves” and uneven wooden floors by nailing hardboard, plywood or OSB sheets on top. For the necessary strength, the thickness of plywood or OSB should be about 1 centimeter. As a floor finish, linoleum is still the most economical and durable. Fortunately, the choice of linoleum in stores is extensive.
Tile
If we have already figured out the wallpaper on the walls, then what to do with the tiled floor? Replacing the tile, of course, can be a way out if the tile does not stick to the wall, because there is no other way out. In rare cases, when the tile easily moved away from the mortar, and the mortar itself adheres well to the wall, the tile is easy to restore by smearing it with a thin layer of PVA glue and pressing it firmly into place against the mortar. Here the main thing is to get the right side of the tile into its imprint on the mortar, and the PVA glue will very firmly glue the ceramics with the mortar - checked! But if the tile is holding tight, and buying a new one is expensive, you can work a little on what you have. Tiles, firstly, can and should be thoroughly washed. Since it is a tile, it will withstand much more aggressive cleaners than dish gel, but it will also look much better when it is cleaned of limescale, rust and other traces of use. It is also necessary to clean the seams between the tiles. There is no need to be afraid to damage the grout, on the contrary, you need to clean as much grout as possible. Mold often settles between the tiles in the bathroom and it is very difficult to remove it from there.
After removing as much grout as possible along with unwanted flora and fauna, the seams can be treated with a special antiseptic agent. After that, they can be filled with fresh grout. It is better to choose a grout color that is neutral or close to the color of the tile.
Plumbing
Carefully inspect plumbing fixtures. No cracks or chips? There is no need to change plumbing. Plumbing cleaners will help bring all the surfaces of sanitary ware into a more presentable look, and a bright shower curtain will complete the job. By the way, you can also freshen up a cast-iron bathtub with paint. Not from the inside, of course, but from the outside. But, shining with freshly painted sides, the bath will immediately take on a more elegant look. And if, nevertheless, the inner surface of the bathtub is damaged and worn out, it makes sense to turn to specialists in the restoration of bathtubs, who will cover the surface of the bathtub with new enamel right at home.
As a rule, such a service is cheaper than buying and installing a new bath. And here is another option: make a bath curtain not only for the top, but also for the bottom (use glue and Velcro).
Electrician
Check all outlets. If you see melted plastic around the plug holes or even just dark spots, these sockets should be changed without hesitation! Fixtures are changed as needed. If they are intact, not obsolete and all the bulbs are on, it is enough just to remove them, wash them and hang them back. Do not forget to turn off the power in the apartment when working with an electrician!10 ways to spend less on decorating an apartment, and get a real masterpiece
Designer tips: 1. 100% polyester silk. Stone-like tiles, parquet-like linoleum, onyx-like laminate, Trekhgorka under Ralph Lauren. Porcelain stoneware "under the python". “Artificially aged” something there ... It’s embarrassing to even think about it. Alas, the number will not pass. Look through good interior magazines. There, everywhere, stone is stone, tile is nothing but tile, and wood is exactly what wood is. If there is no money for parquet, and a simple laminate is beneath your dignity, look for a good engineering board. As a result, you will get a floor that looks much more expensive than the money spent on it. A good alternative to porcelain tiles for kitchens, bathrooms and hallways is cement tiles. The result will look more expensive a hundred times. 2. Adjacent rooms should contrast. If you have a bright living room, consider painting the entryway a deep, relatively dark color. In any case, the cost of paint will be the same, and the result may look really expensive. 3. If on good carpet no money, look for viscose or fiber blend carpeting that mimics a silk or wool pile carpet.
4. Plant the curtains on a thick lining. Even inexpensive curtain fabric will seriously benefit from this. Look for fabrics that are three meters wide. This results in significant savings. If you are not ready to spend a lot, give up printed textiles (fabrics with a pattern). When cutting fabrics with a pattern, due to the need to properly join the fabrics, there are a lot of scraps. The more rapport, the more waste. Do not use curtain tape for curtains. Let the seamstress lay the "manual" folds. It's not that expensive, and the folds gathered on the braid look very cheap. 5. Set-headset-set. The same things in the interior are allowed only in one case: if they are paired things that form a symmetrical composition. Chandeliers, table lamps and sconces from one set, leave those to whom God did not give imagination. He also - sets of upholstered furniture "sofa-two chairs" and similar tender sadness. For more details, see the next paragraph. 6. Ready solutions. Bad news: there are none. At least for us. The shower room is built using the construction method because it is a room. Unless you run a student hostel or an underground massage parlor with a striptease, a shower stall (it's a sad structure of yellowish acrylic and skewed doors) will not work for you. Do not spend money on "designer" plumbing. Let the appearance of the sanitary equipment of the bathroom (kitchen, bathroom) be dictated by the function. Buy washbasins and faucets with simple shapes, without inappropriate decor. The toilet bowl should be invisible and cope with its duties. No one will love them, right? 7. Paintings, prints, prints, photographs and posters frame in simple but deep frames with glass and be sure to passe-partout. Even a picture printed on a home inkjet printer (or a naive children's drawing) looks very significant in such a frame. Play with the size of the passe-partout. A small work in a very wide passe-partout looks very “designer”. And, by the way, cardboard for a passe-partout can be almost any color. eight. Cosiness. Another collective fetish. According to my observations, what is called “comfort” in our Palestinians is, in 99 percent of cases, poetic crampedness. In many ways, this is a bodily memory of a bygone childhood, of a warm and affectionate meager Soviet life with carpets teeming with saprophytes, a kind grandmother, Czechoslovak crystal and Dreiser, unread by anyone, in the polished Polish wall "Hanka". The coziness will not be added by an expensive demon like a round bed with music and a minibar, a bar counter with a built-in aquarium, etc. The same is true for such rich things as a lambrequin, a garland and a swag. Do not worry: in a good, thoughtful interior, coziness inevitably comes naturally. Therefore… 9. … Farewell, gypsy Sera! Duvet covers made of coarse calico in a small Nefertiti, towels in scarlet roses, pillowcases with “stray-eye” shades, nylon blankets with Shanghai leopards. All these are attributes of collective farm chic, forgive me for being direct. They don't add comfort. Motley coloring is often necessary for these things solely to hide their exceptionally lousy quality. Let the bed linen and bath towels be plain white (options: ivory, ecru). But from excellent Egyptian cotton. ten. However, with ivory, it is also important not to overdo it. Peach, beige, sand… The average nuance range is good for chain hotels. Because their stencil interiors are bound to please everyone. Your interior should please you. After all, he is a manifestation of your essence, right? Pick up a fan-palette of any paint manufacturer. Do you feel a pleasant heaviness? These are your possibilities. Don't miss them!
The issue of repairing a room almost always rests on the budget for future work. Most often, the owners of an apartment or house are faced with a choice - to do a cosmetic renovation of the room with their own hands, without putting it off indefinitely, or to plan a major restructuring with redevelopment and a major design update for an indefinite future. Most masters in such a situation recommend a redecoration of the room, during which the vast majority of problems with the interior of the room can be solved.
How to approach the organization of repairs in one room
Starting repairs in a room is always inconvenient and even scary, especially if there is not enough experience, and of the assistants at hand, there is only a cheat sheet on doing a do-it-yourself room renovation for beginners. But, as a rule, uncertainty and doubts pass when the scope of future work becomes clear and the question is resolved in what sequence to make repairs in the room.
Therefore, the first step is to draw up a master plan for cosmetic repairs, and most importantly, before trying to make repairs in the room, it is necessary to draw up a detailed estimate for the purchased materials and consumables. This is a prerequisite, even for repairs in a small room you will need to make a list of several dozen items.
Where to start repairs in the room is not important, you can carry out repairs in the sequence that seems more convenient in these specific conditions. Traditionally, do-it-yourself room repairs begin with the most “dirty” or rough work and end with fine finishing procedures.
A typical list of work or a sequence of repairs in a room is as follows:
- The old finish is removed from the walls, ceiling and floor. Removing the floor covering gives the largest percentage of dust and dirt, so it is removed first;
- A rough preparation of the floor is being carried out for further laying of a new floor covering;
- Wiring is being repaired, lamps, switches are being moved and hung, corrugations are laid out for television and Internet cables;
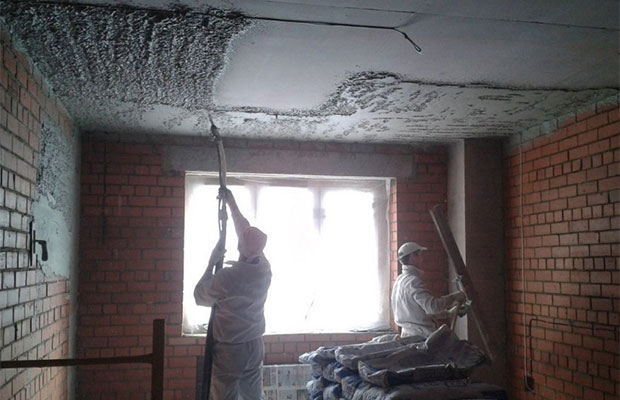
- Walls and ceilings are cleaned and plastered. If the plans for cosmetic repairs involve changing the wallpaper to a more modern type of finish, then you will need to level the walls with gypsum plaster;
- The ceiling surface is leveled in a similar way. For whitewashing or painting with a water-based emulsion, the ceiling is overwritten, plastered with a lime-gypsum mixture and a decorative coating is laid;
- Decorative wall decoration is being carried out, ceiling plinths are being glued, the lining of interior doors is changing;
- A new floor covering is laid, skirting boards are installed, lamps are hung, switches are being installed.
Of course, at each stage of repairing a room, a photo, a large amount of debris and dust will be generated. Not only will you have to regularly clean the room and take out rubbish blockages, you will need to try to cover areas with already completed repairs with a protective plastic film to avoid dusting the surface.
What not to include in a room remodel
Master finishers often call redecoration work "for three days", in order to update the interior in a room, more, as a rule, is not required. The list of repair measures does not include the most expensive work:
- Redevelopment of premises with the transfer of interior partitions;
- Replacement of the heating system;
- Installation of expensive multi-tiered suspended ceilings;
- Balcony glazing and replacement of windows with double-glazed windows;
- Underfloor heating equipment in the room.
It is clear that all of the listed components of the repair require serious financial costs and the involvement of qualified specialists in the work. It will take more than a day or two to carry out such serious events. In addition, such is the specificity of the repair in the room that, willy-nilly, dust and construction debris spread throughout the apartment. Therefore, the situation is regulated in this way - either cosmetic repairs are made in a single room, or the entire apartment “gets up” for major repairs.
In general, the redecoration plan includes everything that can be done in a couple of days with your own hands for relatively little money.
The main task of cosmetic repair
The main goal of repair work is to refresh the interior of the room, remove minor defects and damage accumulated over the years, which are insanely annoying and interfere with everyday life.
In rare cases, cosmetic repairs are the result of force majeure, for example, the flooding of the room by the neighbors on the floor above or the preparation of the premises for rent. There can be many reasons, but the main thing is still maintaining the premises in a comfortable condition for living.

Properly performed cosmetic repairs make it possible to save on the volume of future overhauls. For example, performing a floor base screed and leveling the walls will at least reduce the time and effort spent on preparing for a major overhaul, of course, provided that the repair of the room with your own hands is done as conscientiously and efficiently as possible. .
The next stage of repair, distribution of costs and loads
One of the most difficult stages of redecoration is fairly considered to be budget planning and material procurement. Especially if you plan to do most of the repair procedures yourself. The reason is simple - amateurs and novice craftsmen have no idea at all how much specific material is required for a particular area of work.
In this case, the problem is solved in two ways:
- Compiled List works and estimates can be shown to an experienced craftsman who will help calculate the expense by squaring the room;
- Calculate flow on the basis of standard recommendations of building materials manufacturers, increasing the stock of glue, plaster mixtures, wallpaper, flooring by 10% of the calculated indicators.
In the latter case, the cost of purchasing materials will increase significantly, but in the end, the remains of cement, dry plaster and glue can be used to redecorate other rooms in the apartment. In addition, having a list often helps to get a wholesale discount, so there should not be significant gaps in the budget for a future cosmetic renovation of a room with a competent organization of the purchase.

Preparatory stages of repair in the room
The first, most time-consuming stage has always been and remains the rough peeling of the walls and ceiling. Usually, repairs in a room begin with the removal of furniture and sealing the front door with a protective awning. You can use thick plastic wrap or an old blanket. An impromptu curtain will protect the rest of the apartment from noise and dust, which, even with very careful work, the use of a vacuum cleaner and wet cleaning of floors, always accumulates in considerable quantities in the room.
Before repair, lamps must be removed, instead of a chandelier, a cartridge with a light bulb is left in the room. If double-glazed windows are installed in the room, then it will be useful to tighten the window opening with foil before repair. It is clear that the floor covering is also covered with a film, it is easier to roll up the laid polyethylene than to wash out the dirt in the room every evening.
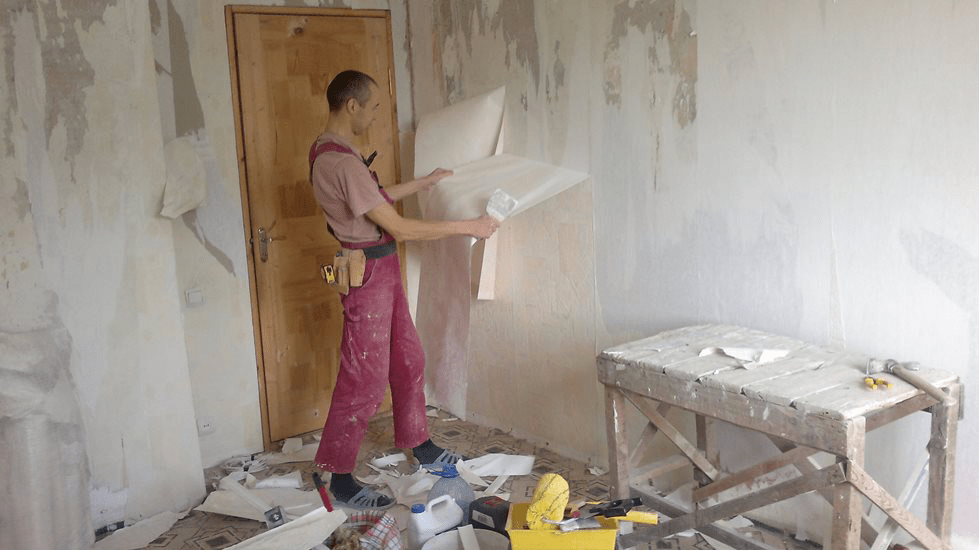
Removing old finishes from walls
It takes about a third of the planned time to prepare for cosmetic repairs. During this time, you will need to remove the whitewash and wallpaper from the walls of the room. If there are areas with damaged plaster, it will take another day to knock the plaster off the walls.
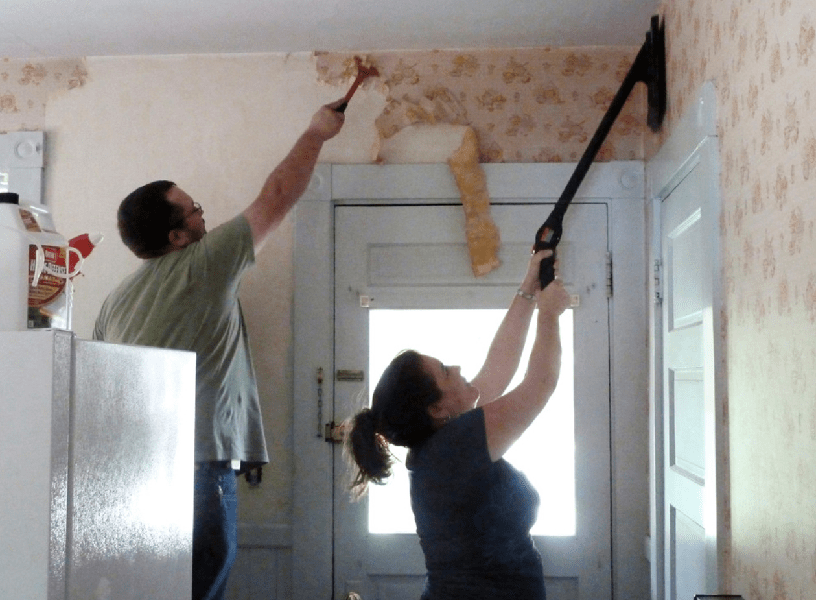
Old wallpaper is removed either with one panel or scraped off in small pieces for a long time, it all depends on the glue used. Before removing the wallpaper, the surface is moistened with a spray bottle with a small amount of water. After 20-30 minutes, the tapestries can be removed in patches. For particularly strong adhesives, boiling water and steam are used. In any case, after peeling off the old trellises, you will need to go through with a vacuum cleaner and a stiff brush to remove dust and glue residue.
Stripping and restoration of the ceiling surface
The ceiling is freed from the decorative coating much faster and easier than the walls. If the plans for cosmetic repairs include sticking polystyrene plates or laying plastic panels, then it will be enough to remove the top layer of whitewash.
The situation is more complicated if the ceiling in the room is painted with water-based paint or whitewashed with lime. In this case, it will take at least a day to remove the durable layer of the old finish.
The most common option for restoring the ceiling during cosmetic repairs involves leveling the plane of the ceiling. In any room of any apartment, floor slabs lie with a trim of several degrees, which leads to a difference in ceiling height near the opposing walls of the room from 2 to 5 cm.
If the time and budget for cosmetic repairs allow, then it is best to level the ceiling with high-quality gypsum plaster.

To do this, plastic slats are sewn onto the ceiling and the plane is tightened with a plaster mesh. Reiki-lighthouses are glued with alabaster, guided by pre-stretched marking horizontal cords. The mesh is sewn on dowels. The total time required for the final leveling of the ceiling in the room is 5-6 hours of work.
In one working day, you can complete a complete ceiling repair. The next day, you can rub, prime and paint the surface.
Cosmetic repairs to the walls of the room
During cosmetic repairs, the walls are leveled and plastered only in exceptional situations when the situation requires it, for example, the appearance of a large number of cracks or chipping of the plaster. In addition, the total area of the walls of the room, as a rule, is three times the area of \u200b\u200bthe ceiling, which in itself requires a lot of time and materials.
Therefore, during cosmetic repairs, the preparation process is limited to cutting small cracks, followed by puttying and grinding the surface. Sometimes, in order to level the plane of a single wall, especially problematic areas are subjected to grinding with an electric grinder.

In addition, at this stage of the repair work, it is not difficult to change the profile and configuration of the electrical wiring in the room. It is enough to drill channels in the lower part of the walls to the installation site of new electrical outlets, break through the "glasses" for the undercuts and install the outlets themselves. Corrugations with wiring laid in channels can be rubbed with gypsum or alabaster mass. All work will take a maximum of 2-3 hours. At the end of the preparation for finishing, the surface is vacuumed and primed.
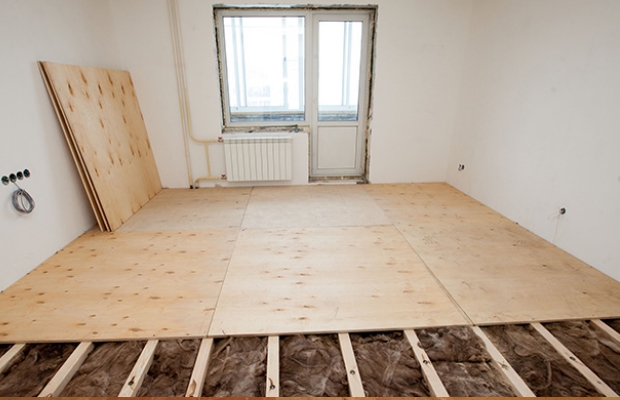
Rough floor preparation
After the completion of the most time-consuming work with the preparation of the ceiling and walls, you can proceed to cleaning and preparing the floor. If the floors are concrete, with laminate-based flooring, then cosmetic repairs may be limited to re-laying laminate boards, with or without replacement of the lining material. Most often, damaged plates are changed in the room, after which the coating is polished using wax mastic.
During cosmetic repairs, linoleum coatings are cut out, the base is cleaned to concrete, primed and covered with a heat-insulating lining based on polyethylene foam.

If the room has wooden floors, then first of all the floorboards themselves are cleaned and repaired, then the joints are clogged and minted, after which the surface is polished and prepared for painting.
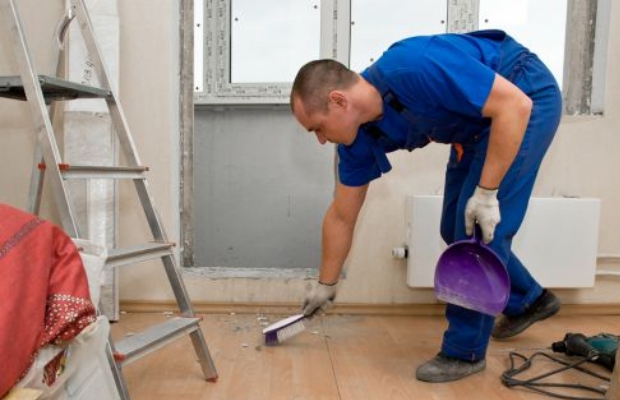
Don't forget about debris and dust
Any repair work, even the most simple and superficial, is always accompanied by the formation of a large amount of debris and dust. Before repair, you need to prepare two or three polypropylene bags, in which all the garbage from the room will be collected daily. At the end of the day, after each finishing operation, the walls and floor are cleaned of crumbling crumbs and plaster residues, and before finishing, the walls are vacuumed or wet brushed.
If it is supposed to level the walls of the room with gypsum plaster, then the amount of garbage will increase by five to six times. It will be necessary to think in advance and find a way to collect and remove from the premises 150-200 kg of cement-sand garbage screenings. You cannot send it to the garbage chute or garbage cans; you will need to order a special service for the removal of construction waste.
Fine cosmetic repairs in the room
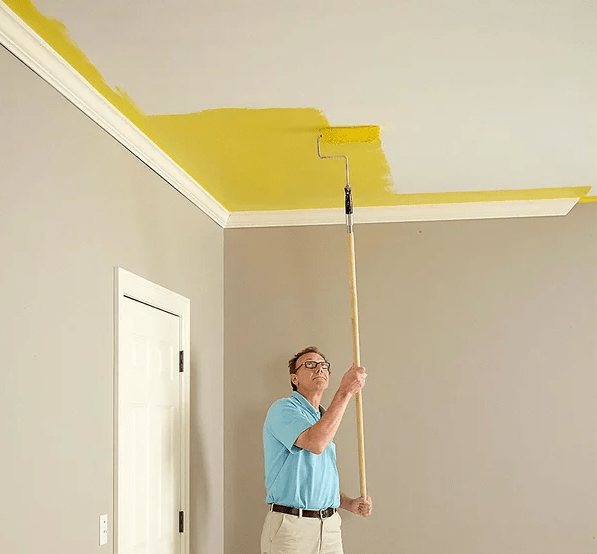
The first is the finishing of the ceilings. Usually, the repaired and sanded surface is primed and painted with light-colored acrylic paint.

If wallpaper is used in the interior of the room, the ceilings can be decorated with non-woven or vinyl wallpaper to match the future wall decoration. A common practice for decorating lamps and chandeliers is the use of imitation styrofoam moldings and decorative ceiling plinths.
The fine finishing of the walls in the room is considered one of the most responsible and at the same time time-consuming cosmetic operations. Even taking into account the fact that half of the walls in the room will be covered with furniture, a certain part of the walls will still be clearly visible to everyone in the room. If during the cosmetic repairs it was not possible to qualitatively level the surface of the walls, you can hide the flaws only under the wallpaper. Best of all, tapestries on a fabric basis or with a pronounced embossed textured surface. It will take 7-8 hours or a full day to paste over the room.
Repair of doors and floor in a small room
The wooden plank floor of the old layout often has to be hidden under linoleum or laminate. In this case, the surface of the floorboards is polished with a sander, and the joints are sewn together with nails hammered at an angle to the board. At the next stage of the repair, the floor surface is sewn up with OSB boards, after which linoleum or any other type of flooring can be laid in the room.

The situation becomes more complicated if the concrete floors are aligned with the level of the screed throughout the apartment. In this case, any floor covering in the room will lead to the appearance of a threshold, so the laying of laminate or parquet must be planned simultaneously in all rooms.
The final stage is the restoration of interior doors. The hatch and the door itself, if they are in good condition, can not be changed, but restored with cleaning and polishing of the surface. The outer lining of the door frame during the repair is traditionally replaced with a new one. The replacement of doors with a carrier frame is planned for a major overhaul, usually so that the entire apartment or house has doors of the same style and design.
Conclusion
Repair of a room, even in a cosmetic version, requires careful preparation, first of all, in the details of the future interior of the room, the method of decorating walls and floors. Any attempt to postpone the decision to the future, to do it randomly, as it happens, will lead to a significant increase in costs and increase the time required to restore the room by two to three times.