Cassette ceilings will decorate the interior of any room in an original way. They are practical and easy to operate and maintain. The design is very strong, but at the same time light and does not create additional loads on the floors.
This is a very important factor when performing finishing work in old houses with wooden floors. Decorative suspended cassette modules made of aluminium. They are moisture resistant and durable.
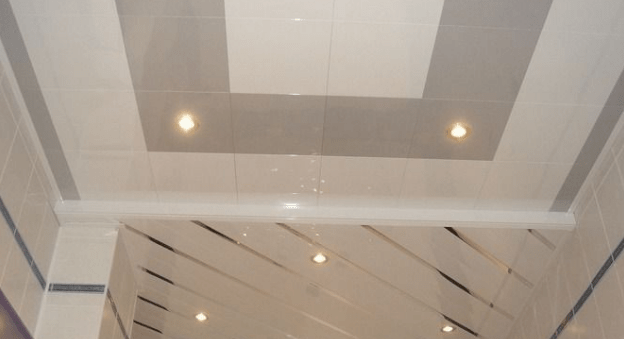
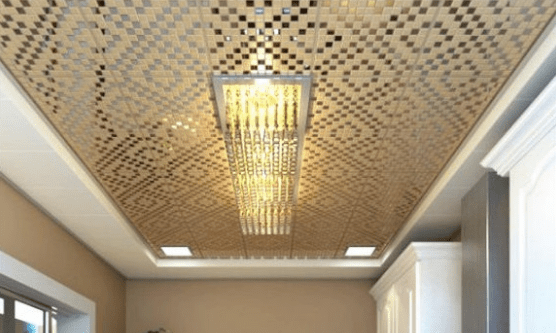
For interior decoration, suspended cassette ceilings may include modules covered with a decorative matte or glossy layer of different colors and shades. Coatings are also widely used, metallized mirror and coated with polymers.

Cassettes allow you to hide various defects in the existing ceiling and place any communications under them. At the same time, access to the subceiling space is very simple due to the design features of the panel fastening.
When combining panels of different colors, cassette suspended ceilings allow you to create a variety of design solutions for decorating rooms. Any lighting devices are easily built into the modules.

Cassette is easy and quick to install. Each home master with one assistant will be able to do the work. For work, you will need a minimum set of tools and basic knowledge of installation technology.
There are two types of cassette ceilings:
- With open suspension system
- With hidden suspension system
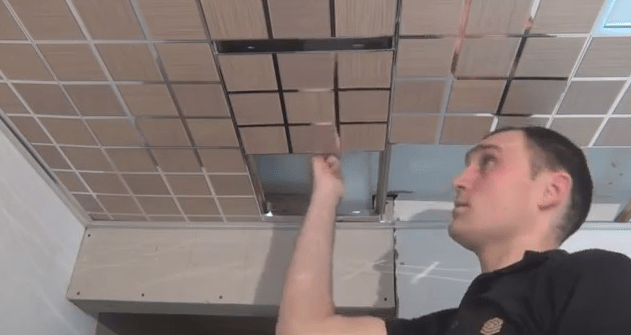
Installation of cassette ceilings with an open suspension system is considered the most common. For the installation of modules with a size of 600 x 600 mm, a T-shaped profile is used. Modules are made of aluminum or galvanized steel with various types of perforations. After the T-profile is visible at the joints of the panels.
False ceilings with a hidden (stringer system) are easy to assemble and differ in the way the modules are attached. It is attached to the profile comb from below, and the next module is mounted end-to-end with the previous one. After the installation is completed, the supporting profile is hidden.

This article discusses the application of the most popular open type suspension system. Before starting work, you need to draw up a small plan or procedure. An example plan should look like:
- Let's calculate the materials
- Let's pick up tools
- Hanging system installation
- Installation of fixtures
- Installation of aluminum modules (panels)
Let's take a closer look at each point of the plan.
Material calculation
To calculate the materials, it is necessary to accurately calculate the area of \u200b\u200bthe ceiling. Important to remember! Before installing the aluminum cassette ceiling, the walls must be aligned, otherwise after installation all the irregularities at the junction of the wall corner and the wall will be visible.
Knowing the area of the ceiling, you can order a set of materials. This can be done at any building supply store. There you will be helped to choose the color and design of the future ceiling.

Cassette set has the following composition:
- Corner wall guide
- T-bearing profile with 15 mm or 24 mm shelf
- Universal adjustable hangers
- T-bars 15 mm or 24 mm
- Aluminum modules 600 x 600 mm

Selection of tools
To perform the work you will need a minimum of tools:
- Water or laser level
- upholstery thread
- Electric impact drill
- A hammer
- Bulgarian
- Pliers
- Tape measure and pencil, crayon
- Corner construction 90 degrees
Hanging system installation
The cassette ceiling begins to be mounted from the marking of the horizontal plane of the future ceiling. To do this, use a laser or water level. With their help, marks are applied to four walls. All marks are connected using a painting thread.

Markings are made on the ceiling (straight parallel lines) for mounting adjustable suspensions. The width of the extreme modules adjacent to the walls must be at least half the width of the entire slab and be the same around the entire perimeter. Whole panels should lie between them.
Holes for plastic dowels are drilled with a drill along the line marked on the walls with a step of 400 mm to a depth of 6 cm. Dowels are driven into the holes with a hammer. After that, they proceed to fixing the wall corner with self-tapping screws (the length of the rail is 3 m).
It is fixed with self-tapping screws to the wall in a dowel around the entire perimeter of the room. Universal suspensions are fixed along the lines marked on the ceiling with a step of 0.5 m. The suspension has two metal spokes threaded into a sickle-shaped spring, thanks to which its length can be adjusted. One spoke has a loop for attaching to an existing thread, and the second has a hook for attaching to a T-shaped hanger (hook hook into the hole on the profile).

After the hangers are fixed along the marked lines, a T-shaped carrier profile (its length is 3.7 m) is suspended from them. The profiles are connected to each other by jumpers from the same T-profile (intermediate profile 0.6 m or 1.2 m) with a step of 600 mm. They are connected using built-in grooves on the profile and hooks on the jumper.
When intermediate rails are inserted between the main rails at an interval equal to the width of the ceiling module, the aluminum module is trimmed. This is done using a grinder or a hacksaw.
Installation of fixtures
It's important to know! Before proceeding with the installation of a suspended cassette ceiling, all lighting wiring (as well as other wiring) must be laid in a protective corrugated plastic sleeve. It is usually attached to the ceiling with clamps.
In this example, we will use raster fixtures with a format of 600 x 600 mm. They fit seamlessly into the frame cell on our aluminum cassette suspended ceiling. Luminaires are installed on the guide and intermediate T-shaped profile and connected to the network.
Mounting of aluminum modules
After that, ceiling aluminum modules are mounted. Important to remember! An angle of 90 degrees must be observed between the intermediate profiles and the supporting T-profile.
The cassette module in an aluminum suspended ceiling is installed with its protrusion on a T-shaped suspension shelf. This allows, by easily lifting the element, to remove it from the structure and gain access to lighting devices or other ceiling communications. If necessary, it must be cut to size.
This is done with a grinder or a hacksaw. After the installation of aluminum panels is completed, the installation of the cassette ceiling is completed.
Maintenance of cassette aluminum ceilings
To remove dust, the surface of the ceiling can be pre-treated with a vacuum cleaner. After that, remove dust from the surface of the plates with a soft and damp sponge with soapy water.

If dirty spots appear after replacing lamps in lighting devices, remove them with a rubber eraser. After cleaning with an aqueous solution, wipe the surface of the ceiling with a dry and soft cloth, and the aluminum cassette suspended ceiling will sparkle with its original beauty.

There are 2 ways to install a closed-type cassette ceiling - simple and reinforced. With a simple installation, the BT-600 combs are hung on a conventional spring suspension, and with a reinforced mounting method, the BT-600 combs are installed on an additional rigid frame made of PP profile.
The installation sequence of the closed-type cassette ceiling
Installation of a closed-type cassette ceiling consists of the following steps:
I. Installation of wall corner (corner profile)

The corner profile of the cassette ceiling is attached along the perimeter of the room to the walls, as in the installation of other types of suspended ceilings. The horizontal level is determined using a laser level or hydro level. The corner is nailed to the walls with the help of driven dowels, anchors or self-tapping screws, the fastening interval is not more than 0.5 m.
II. Installing combs BT-600

Installation of guide combs is carried out in increments equal to the size of the cassette - usually 300mm or 600mm. With a simple method of mounting a cassette ceiling, the BT-600 stringer combs are suspended on adjustable spring hangers, with reinforced assembly, the combs are attached to an additional frame pre-assembled from PP profiles.
III. Installing cassettes in combs

The final stage in the assembly of a closed-type cassette ceiling is the installation of panels in combs. Trimming to the size of the cassettes adjacent to the walls is carried out using a construction knife and metal shears. First, the side stiffeners of the cassette are cut with scissors along the marking line, and then a notch is made along the ruler with a knife. The aluminum cassette breaks easily after a few folds along the notch.
Functional and aesthetically pleasing, the cassette ceiling as a basis for surface finishing is ideal when a representative effect is to be achieved. You can install the structure on your own, and without the use of special equipment and even without experience, but by following simple instructions.
Design features of the system
To understand what it is, what stages it is divided into and how long it will take to install it yourself, you should have an idea about the design of the system. The cassette ceiling is a variation on the theme of the classic suspended structure. Its basis is modules, square or rectangular cassettes.
For the manufacture of cassettes, aluminum or galvanized rolled products coated with bimetallic material are used. At the same time, steel elements are polished to give them a durable mirror finish, and galvanized elements are additionally treated with powder paint to prevent abrasion.
The cassette-type ceiling system, in addition to the cassettes, includes adjustable suspensions, as well as two types of guides and corners. Exceptionally, all components are additionally treated with agents that prevent corrosion and damage due to contact with chemicals.
Characteristics of cassette-based structures
To characterize suspension systems, it will be enough to analyze their advantages and disadvantages. A standard cassette suspended ceiling has a number of positive qualities. These include:
- the possibility of masking technical equipment and communications in the interceiling space;
- simple and quick access to communications in case of need for repair or replacement;
- the ability to hide surface defects of the old coating;
- simple and fast installation;
- ease of installation of lighting equipment of any configuration;
- improved illumination of the room with energy savings due to reflective ability.
Among other things, the systems are resistant to moisture, weigh little, do not require special care, and are durable. They can be removed and reinstalled as many times as needed without loss of quality. A significant advantage is increased resistance to fire.

Despite the advantages, a cassette-type suspended ceiling cannot be called ideal. He has one, but tangible minus - a low level of noise absorption. The problem is simply solved by the correct selection of soundproofing materials.
In general, it should be noted that the light weight of the finished structure has practically no effect on the state of the suspension system, so it is allowed to install structures without additional reinforcement in the budget version. The perforated surface of finished ceilings creates additional ventilation and this makes them even more attractive in terms of use in any type of premises.
The standard cell parameters are 600×600, if necessary, you can order design options with cell sizes of 300×300, which are especially harmoniously combined with Grilyato and Armstrong ceilings, allowing you to implement the most original and non-standard design solutions. An additional bonus can be considered the possibility of coloring finished cassettes in any color. In the original version, the following colors are available:
- superchrome;
- white;
- aluminum;
- silver;
- gold;
- matt.
Variations of the edges of the elements make it possible to install a cassette ceiling with systems of various types: recessed SKY T24 and SKY T15, ordinary - SKY TY, without a visible system - SKY 600 to create the effect of weightlessness.

Ceiling construction elements are supplied in special cardboard boxes. They are used with particular success in rooms with a high level of humidity, including showers and pools, as well as in halls with increased requirements for compliance with sanitary standards, for example, hospital wards, operating rooms, food preparation areas, etc.
Designs look great in festive and gaming halls, in the design of stylish youth designs, where the emphasis is on visual luxury with the use of gold or chrome-colored cassettes.
In rooms where it is necessary to increase the level of ventilation, cassette perforated ceilings are suitable.
About popular manufacturers and design advantages
Any installation of a cassette ceiling will have certain nuances, taking into account the chosen brand and the features of products manufactured under its brand.
Popular are the classic suspension-type designs based on cassette elements. An example of such products is the sky ceiling, an example of durability, ease of use, ease of installation. The designs managed to combine style, functionality and practicality - three important components of an ideal ceiling.
The systems include flat or convex plates made of aluminum or galvanized steel with a varnish coating that protects against mechanical damage. The scope of structures is not limited to residential premises. With no less success, they are used in offices, shops, shopping centers, airports, station buildings, etc.

The Cesal product is also distinguished by similar properties. Ceilings under this brand are practical and attractive, serve for several decades without requiring special care. Moreover, the modules are easy to maintain and are ideal for finishing specialized rooms in kindergartens, canteens, hospitals or pharmacies.
For rooms with special ventilation requirements, Caveen branded ceilings are suitable, allowing you to place musical equipment, lighting equipment, elements of the climate control system in the interceiling niche.
Armstrong systems are the undisputed leader of the domestic market. On average, the price per 1 m2 of structures is an order of magnitude less than the cost of the products described above, despite the fact that the quality of the products justifies and even somewhat exceeds the expectations of users.
The main feature of the systems is the production of three material options. Traditionally, the design includes panels based on pressed fiber; optionally, wood or metal cassettes can be ordered. Products serve the period declared by the manufacturer (up to 15 years), without requiring special care.

Albes ceilings are also an analogue of Armstrong of domestic production. Made of galvanized steel, the products are available in two versions: cassettes with straight and protruding edges.
All the products of domestic and foreign companies listed above show increased resistance to moisture and fire, are safe and durable.
A wide range of models allows you not to limit the designer's imagination.
How to install a cassette ceiling?
The easiest way is to mount the suspension system and cassettes as a finishing material, having a video instruction at hand. One way or another, before proceeding, you should study a simple algorithm of actions orally.
So, the installation of systems must take place subject to a certain temperature regime. Prior to the start of work, the ceiling elements are brought into the room where the installation will be carried out, one day in advance, thus giving them time to "adapt".
In the room at this time, it is important to control the level of humidity, prevent drafts, and monitor the level of heating during the heating season. These are the minimum requirements for preparing a room for the installation of a cassette structure.

Installation begins with the installation of a supporting structure, which is subsequently sheathed with cassettes of the selected manufacturer.
Traditionally, for the work you will need a standard set of tools:
- a hammer;
- roulette;
- crayons;
- pencil;
- metal scissors;
- twine, etc.
The correct start of work will be drawing up a plan of the room indicating the placement of the plates on the surface of the ceiling. It is important that opposite walls are finished with slabs of the same size. To calculate the parameters of the outer slabs, the length of the wall is divided by the length of the cassette. The resulting whole number will be the size of a solid slab, the remainder is divided by two and the dimensions of the slabs for mounting along the edges are obtained.
As soon as the drawing is ready, and the dimensions of the plates are calculated, proceed to the installation of the system. To do this, marks are made on the walls - designation of the placement of the structure, lines are beaten off with a cord around the perimeter of the room.
Mount the wall corner around the perimeter, adhering to the established line, using special glue, nails and screws for fastening. They proceed to the installation of the system, selecting the suspensions that meet the requirements for the length, placing the guides based on the corner, connecting at a right angle.

To better control the correct placement of the system, use the level. In addition to mounting the main guides, additional ones with a size of about 60 cm are attached to the spans. If the distance between the additional and main guides is more than 60 cm, a guide 120 cm long is chosen.
The next step is to install the cassettes. The suspension system is visible and hidden. The second one has some peculiarities. To make the cassette invisible, it is fixed inside the system, connecting it to the guide elements using a special snap-in mechanism. Thus, all subsequent cassettes are mounted at the same level, making the frame invisible.
In some cases, it is allowed to mount the modules directly to the floor slab using self-tapping screws and dowels.
In general, cassette, also known as mosaic ceiling, is mounted easily and quickly enough, regardless of the chosen method and type of modules. The main thing is to control the height level of the product, use proven fasteners and not make a mistake when calculating the dimensions.
Ceiling decoration is an important issue when designing a room. Everyone wants the coating to be not only durable, but also beautiful, as well as practical and safe for health. And these factors do not depend on the premises for which the repair is being done - in an office or a residential building.
There are certain types of ceiling structures that are suitable for decorating the ceiling both in an apartment and in an office. For example, cassette ceilings are suitable for use in both cases. However, we are used to seeing such ceilings, as a rule, in shops, business centers and similar buildings. However, the cassette design will look great at home.

Cassette ceilings - what is it?

The inhabitants of this European country have long been looking for a special ceiling design that would meet certain requirements:
- was easy to install;
- had a beautiful appearance;
- had a small mass;
- was durable;
- was undemanding to care;
- had very good strength properties.
The French concluded that only metal can create a similar design that meets these requirements. This is how cassette suspended ceilings appeared, which not only have an excellent appearance, but also good qualities that provide versatility and the ability to use in any room. It is the versatility that makes it possible to install these structures in almost any room in size and purpose. It can be an apartment, a residential building, a swimming pool, a shop, an industrial enterprise, an office, a business center, and so on.


Table. Components of a cassette ceiling.
| Part of the ceiling structure | Characteristic |
|---|---|
| This is the main part of the cassette ceiling, responsible for its appearance. The cassette is made most often of metal and has the shape of a square. Sizes can be different, from 30*30 to 90*90 cm. |
| Special rails that are suspended from the ceiling at a certain distance from each other. It is on them that the ceiling cassette is laid during installation. It rests on them most often due to its own weight. Guides are carrier and intermediate. The latter may have special latches to make it easier to assemble the base of the ceiling. |
| A small lightweight piece that attaches to the rail. |
| This part is necessary for installing the guides and for adjusting the distance from the ceiling where the cassettes themselves will be located. |
| This is a type of profile that is attached directly to the wall. |


As a rule, the slab is painted with a special paint or carefully polished and can have almost any color. Now even mirror cassettes are produced, which look very impressive in spacious rooms.
Prices for cassette ceilings
cassette ceilings
On a note! Interestingly, during installation, the cassettes, as a rule, are not attached to the profiles in any way - they simply fit on them and hold on due to their own weight.

Types of cassette ceilings
Cassettes are made from various materials, which allows them to be used to implement the most daring and unusual design ideas.
The most popular and well-known material for the manufacture of cassettes is metal. Plates are made from galvanized steel or aluminum. In the first case, the cassette is covered with a special powder paint, in the second - with a bimetallic coating or polished using a special technology, due to which it acquires a mirror shade (which the French, the creators of this type of ceilings, came up with to give the cassette). Aluminum plates are very light and thin.

Cassette ceiling "Albes" with aluminum plates

On a note! The paint is applied using a special technology using high temperatures. If there is a pattern on the cassette, it means that it has also undergone ultraviolet irradiation in order to better fix it on the material.

The cassette can also be covered with a special film that does not fade in the sun, does not lose color over time, and does not swell. The coating is fixed on a metal base due to a special heating method.
Let's take a closer look at mirrored ceilings. The fact is that such an effect can be achieved not only by chemical polishing of aluminum. Mirror cassettes are also made of silicate or acrylic glass. Plates can be both glossy and matte, and also have the color of gold, silver and other metals. During installation, these cassettes must be additionally fixed on the profiles so as not to accidentally fall and injure a person.

It is mirrored ceilings that can change the room beyond recognition, which is why they are probably the most popular. Due to the correct arrangement of lighting fixtures, you can create interesting effects of the play of light, and mirrored ceilings are also capable. The only disadvantage of using this type of cassette is that stains, stains and other types of pollution are clearly visible on them.

Ceiling cassettes are also made from gypsum. This is a light and interesting material that allows you to create a different relief and texture on yourself. Such plates are often used in rooms where sound and heat insulation is necessary, but they cannot be used where there is high humidity - gypsum cannot stand it.
There are also cassettes made of mineral and silicate fibers. They, like gypsum, are used for noise and heat insulation. Also, mineral fiber is considered an excellent insulation.

Wooden - the rarest cassettes, they are usually made from the best wood species (oak, bamboo, ash, and so on). They can be carved and look very luxurious.
Armstrong ceiling prices
ceiling "Armstrong"

On a note! The cost of cassettes depends heavily on the material from which they are made. The cheapest are aluminum, the most expensive are wood.
Pros and cons of cassette ceilings
In order to make the right choice and decide whether you need cassette ceilings, you should carefully read their pros and cons. Some qualities directly depend on the materials of manufacture.
Advantages of cassette ceilings
- Easy installation. Often cassettes do not even require fastening to profiles. In this case, there is no need for preliminary preparation of the ceiling surface.
- The ability to hide the imperfections of the ceiling. Under the cassettes, it is easy to hide all the cracks, spots, beams and other unpresentable elements of the draft ceiling.

- There is a place for communication. All wires, pipes, cables and other objects necessary for providing water, electricity and heat supply and passing under the ceiling can be easily hidden under the cassettes. And access to them is possible at any time - just take out one plate in the right place.

- Ease of replacement. If necessary, it is easy to replace one cassette with another, as well as install lighting fixtures on the ceiling.
- Mold protection. Since metal cassettes are very resistant to various types of fungus and mold, they are recommended to be installed in swimming pools, saunas, and bathrooms. The fungus will definitely not start on them, which means that your health will be safe. Also, such ceilings do not accumulate dust on themselves, and it is very easy to care for it.
- low price. Due to their relatively low price, cassette ceilings are a popular finishing option. There are, of course, types of plates that are expensive, but ordinary metal cassettes can be purchased by everyone.
- Durability. Service life at the correct operation at a cassette ceiling is very big.
- Big choice. A wide range of colors and various textures allow you to choose the type of cassettes for each specific interior.

- Safety. Glass and metal ceilings are not afraid of fire, which means they comply with fire safety requirements.
Attention! Wooden cassette ceilings will not meet fire safety requirements.
There are still disadvantages to cassette ceilings, like any other finishing materials. Some of them reduce the possibility of using such structures to nothing.
Stretch ceiling prices
stretch ceiling
- Cassette ceilings can only be installed in rooms with sufficient wall heights. The fact is that these structures “eat up” at least 15 cm of space, or even all 25. Therefore, they are not installed in the rooms of standard apartments.
- Although cassette ceilings are considered an inexpensive way to finish, drywall is sometimes much cheaper. The price “bites” not the plates themselves, but the profiles for their installation.
Installation of cassette ceiling structures
Mounting the ceiling from the cassettes is quite simple. But for this, in addition to the plates themselves, you may need various materials and tools.

Tools and materials for mounting the cassette ceiling structure:
- pliers;
- roulette;
- pencil;
- level;
- perforator;
- wire;
- spool of thread;
- nails or special glue;
- metal scissors.
You will also need all the components of the cassette ceiling shown in the table above. These are the plates themselves, wall corners, guide profiles, suspensions.
Attention! Buy all components from the same manufacturer, otherwise there is a risk that the components of the ceiling simply do not fit together.
Having bought all the tools and materials, you can proceed with the installation of the ceiling itself. Depending on the dimensions of the cassettes, there may be some differences in this process (for example, the distance between the rails). For example, consider the installation of plates with a size of 60 * 60, such dimensions are optimal for small rooms.
Step 1. Be sure to draw a ceiling plan. This often determines how correctly the entire structure will be placed. It is important to calculate the size of the extreme cassettes. To do this, the length of the wall should be divided by the length of the slab. We get a fractional number, where the first digit is the number of solid cassettes, and the second is divided by 2 (to get the size of the outer cassette).

Step 2 Using a level and a pencil, mark the height of the base ceiling. Decide how far the suspension structure will be located. At the same time, consider the need to lay various communications above the cassette. But in any case, the distance cannot be less than 15 cm.


Step 3 Fasten the wall corner along the line you marked. It is fixed in increments of 40-60 cm.

Step 4 Between the wall corners on opposite walls, pull the threads along the axis of the guides. These threads are needed as guidelines. Drill holes for the hangers opposite the intersections of the threads, then fasten the latter to the ceiling.
Attention! The distance from the extreme suspension to the wall can be a maximum of 60 cm. In other places, the suspensions are mounted at a distance of 120 cm from each other (provided the size of the plates is 60 * 60).


Step 5 Also focusing on the threads, fasten the guides. First, install long, basic (120 cm) slats, and then short ones (60 cm). Wall will have to be cut a little.

glass ceiling prices
glass ceiling


Step 6 The final stage is the installation of cassettes. Just place them on the guides. The ceiling is ready.


On a note! Remember that if communications will run under the ceiling, then it is best to install and check them before the ceiling is installed. Also think about the location of lighting fixtures in advance.


Video - Installation of Caveen and Cesal cassette ceiling
Caring for the cassette ceiling
The cassette ceiling is not demanding to care (unless, of course, it is mirrored). But in order for it to always look attractive, it must sometimes be cleaned of dust with a soft brush. If the ceiling has somehow become stained, purchase a cleaning agent that is suitable for the material of which the cassettes are made. Do not use abrasive products!
The ceiling that is not afraid of water can be washed with soapy water, and the remaining water can be removed with a rag or napkin. Ceilings made of gypsum, wood are cleaned with a vacuum cleaner.
Cassette ceilings are not in vain loved by the French. One has only to look at what a properly mounted coating looks like, and everything becomes clear: it is stylish, simple and beautiful. And installing a ceiling from cassettes with your own hands will also save a lot of money.
Video - Installation of suspended cassette ceiling
A new generation, which are increasingly used for finishing ceiling surfaces in residential and non-residential premises. A feature of this option is that it consists of a large number of cassettes. They can be made of various materials, mounted on a frame that is pre-installed. Due to its excellent aesthetic and practical characteristics, the cassette ceiling has a wide range of applications.
In building stores, a wide range of suspended structures is presented, which differ in appearance and price. The front side of decorative cassettes looks very aesthetically pleasing. On sale are options for different colors and textures, with designer drawings, geometric and floral ornaments, so this ceiling can be easily selected for rooms whose interior is made in different styles. 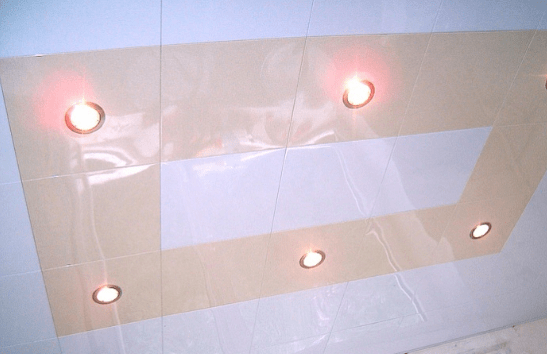
Cassette ceilings of a closed type appeared on sale relatively recently, but have already managed to take a strong position in the market due to a whole range of advantages:
Closed-type cassette ceiling is a great option for rooms with high walls. The huge assortment is capable to satisfy inquiries of the most exacting buyers. But such designs also have disadvantages, however, there are very few of them:
- not suitable for rooms with low ceilings;
- the edges of the panels form a kind of grid (but it is barely noticeable);
- the price of profiles is slightly higher than for plasterboard panels.
Closed structures, unlike open structures, are characterized by a more attractive appearance, since in this case the profiles are completely hidden behind the cassettes. 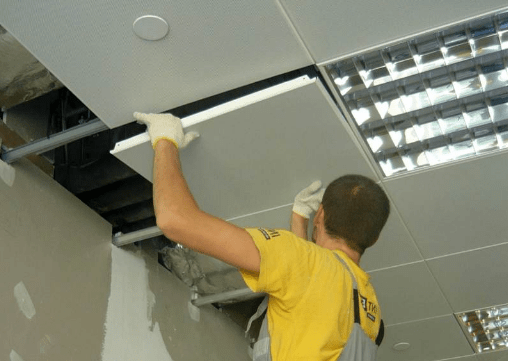
Types of cassettes
Using cassette ceilings, it will be possible to realize extravagant and unusual design solutions. These are not boring, monotonous designs, but surfaces that can be made in different colors are decorated with original drawings. Cassettes are classified according to the material from which they are made:
You can read about open-type cassette ceilings.
The cost of the structures depends on what material the panels are made of. The most affordable and popular are metal and mirror ceilings. They are not only inexpensive compared to others, but also have excellent performance properties, they can last for many years without losing their original characteristics. Cassette ceilings are available in different colors, which allows you to choose the most optimal option for any room.
Fiberglass cassettes are used in commercial and industrial premises, while exclusive wooden products are perfect for finishing private houses and expensive apartments with high ceilings.
Do-it-yourself installation of a closed-type cassette ceiling. Step by step installation instructions are shown in the video below.
Installation of a closed cassette ceiling
If you have minimal skills in working with tools and finishing materials, a general idea of \u200b\u200bthe design that you have to deal with, you can easily install a cassette ceiling with your own hands. Here it is important to follow the instructions and do everything step by step: