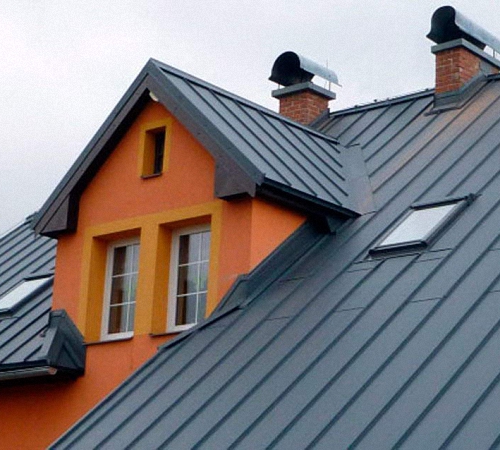
For more than 10 years, the specialists of our company have been manufacturing and professionally installing seam roofing from different metals on turnkey roofs of any complexity. The price for the installation of a turnkey roof is from 500 rubles per m2. In addition to the installation of the seam roof itself, we install all the accessories necessary for the proper operation of the roofing system: drainage systems, spotlights, snow retention, wind vanes, etc. We will help you choose the material for the roof of your own house, and for the installation of public coverings buildings.
Seam roof installation rules
Installation of a seam roof on a turnkey basis is a rather complicated and time-consuming process that requires a fairly long work experience and highly qualified specialists. In order to start making a seam roof, you need to purchase material - a metal strip. Its amount required for the installation of a seam roof can be roughly calculated as the roof area multiplied by one and a half. For a more accurate calculation, clear dimensions of all roof elements will be required.
- Work on the installation of a seam roof begins with the preparation of the base. As a rule, a crate with a distance between the boards of 50-150 mm is quite suitable for any type of metal. But such soft types of metals as copper or aluminum can, under the influence of snow load and heating, display the entire crate on its surface. Therefore, under copper and aluminum, a crate made of FSF moisture-resistant plywood (thickness from 12 mm), OSB boards (thickness from 11.3 mm), tongue-and-groove board (thickness from 25 mm);

- When the solid crate is ready, work is carried out on laying the lining carpet under the roofing. Since condensation-dew forms on any metal due to temperature differences, a continuous crate must be protected from moisture. The lining carpet successfully copes with this. If the crate is not continuous, then there is no need for its waterproofing from the metal;

- It is important to remember that each type of metal from which the roof is made needs its own fasteners. For example, fasteners made of copper and stainless steel are used for copper, for titanium-zinc and aluminum - stainless and galvanized steel, etc.;

- Seam roofing begins with the manufacture of all elements - picture panels, shaped strips, gutters (if a wall gutter is needed), embedded elements, type-setting frontal and gable strips. All components of the seam coating are made based on the width of the metal strip. On the panel there is 100% of the width of the tape, on additional elements from 20% to 100%. If you need any non-standard cornice or frontal plank that requires multiple cutting of metal, then this issue is agreed with the customer or architect;

- Installation of the seam covering is carried out starting with hooks for gutters, embedded strips on the cornices and ends of the roof, and also, if the roof is insulated, from the installation of a drip for condensate drainage. Next, a frontal board, gutters, cornice strips, valleys are mounted. Then panels-pictures, ridge and end elements are installed. The process of installing a seam roof is completed by installing wind vanes on pipes and connecting to vertical surfaces;

- For seam, as well as for any other, special security systems are needed. These include snow retention, walkways and roof ladders. The snow retention system prevents avalanche-like snow from the roof, and walkways and ladders help specialists of the facility maintenance service to move along the roof.

Seam roof maintenance
Properly manufactured and neatly installed seam roofing practically does not need any maintenance. The maximum that may be needed is to clean the snow in winter.
Our specialists
Thanks to their experience and high qualifications, our specialists are always ready to technically correctly and beautifully produce any seam covering, whether it is a roof made of picture panels, rhombus, checkers and any other non-standard metal coverings in Moscow and the Moscow region.
Advantages of ordering the installation of a seam roof
When ordering a seam roof and its installation at Eurokrov, you get:
- Qualified assistance in the selection of seam roofing material;
- A single contract for the supply of roofing and its installation;
- Quality service and comprehensive approach;
- Roofing installation works using modern technologies;
- Comprehensive guarantee for seam roofing and installation.
The cost of installing a roof is from 500 rubles per m2.
Our team performs roofing installation services in Moscow and the Moscow region!
We wrote about how to choose a material for a seam roof, as well as what types of seam joints are considered the most reliable, in. Today we will talk about the design features of a metal roof and the technology of its installation.
Guaranteed to protect the seam roof from condensate, deformation and depressurization will help to comply with certain rules regarding the arrangement of the roofing pie, the features of laying the roofing itself and the sequence of its installation.
In this article, we will consider the following questions:
- What elements does a seam roof pie consist of.
- How to equip the cornice overhang of a seam roof.
- The sequence and technology of installation of folded panels.
- Arrangement of valleys and junctions of seam roofing.
If the construction of a house begins from the foundation, then the arrangement of a seam roof begins with the creation of a roofing pie that protects the attic from condensation and cold. At the same time, the roofing cake serves as a reliable protection against the noise that occurs during precipitation.
Pavel T. FORUMHOUSE User
If the roof insulation is 250-300 mm (I have 300), then no noise is heard (unless, of course, hail is the size of an egg). The only place where I can hear the rain (and even then weakly) is in the bathroom, which has a stretch ceiling.
In order for the thermal insulation to be of the required thickness, the insulation can be laid in several layers (between and under the rafters).
The roofing pie of the seam roof consists of several layers:

Let's consider them in more detail.
Supporting crate - the lower wooden slats, on which a vapor barrier film and insulation are placed.
Vapor barrier film is a special material that does not allow moisture to penetrate from the room into the insulation.

Rafters - wooden beams with a section of 200x50 mm. The distance between the rafters is 1.2 ... 2 m.
Mineral wool is most often used as a heater. The insulation is laid between the rafters directly on the vapor barrier film, which, in turn, is supported by the lower crate.

Waterproofing is a special film that allows moisture to pass through only in one direction (from bottom to top). Waterproofing does not allow under-roof condensate to penetrate into the insulation, but allows moist air to pass through, accumulating in a layer of mineral wool. Waterproofing film is a diffusion (breathable) membrane that is sold in hardware stores.

berd80 FORUMHOUSE User
You can spread a diffusion membrane, you can use a special volumetric membrane (only it costs decently). No consensus was reached on this issue.
Waterproofing spreads across the rafters in the direction - from the bottom up (starting from the eaves, towards the ridge). The film is attached to the wooden rafters with staples (using a stapler). Individual strips of the waterproofing membrane are overlapped (overlapping width - at least 100 mm). On gable overhangs, it is necessary to provide an overhang of the film (the width of the overhang is approximately 150 mm).
The film should not be in a taut state, and the allowable sagging of the membrane between two adjacent lags is 35 mm.
In no case should the same material be used as a vapor barrier and waterproofing. Moreover, you can not change their places. All this will lead to the accumulation of moisture in the insulation or, conversely, in the room. The development of mold and the consistent destruction of building structures in this case are guaranteed.
The counter-lattice is a 50x50 beam, which is nailed to the rafters over the waterproofing film. The counter-lattice allows you to create an air gap between the waterproofing and the seam coating.
A special sealing tape is placed under the counterbars, which ensures tightness in the places of nail joints and protects the insulation from moisture.

Lathing - transverse strips nailed to the counter-lattice at a certain distance.
Arhios FORUMHOUSE User
A bar 50x50 (counter-lattice) is nailed along the rafters, and on them (across) - planks 100x25 with a run-up (batten).

The counter grille provides ventilation of the under-roof space, which eliminates the condensate that forms there. In order for the counter-lattice to perform its functions with guarantee, the cornice overhang of the seam roof must be made according to the following scheme:

The crate must be strong, rigid and even. The maximum clearance between the crate and the control rail 1 meter long must not exceed 5 mm.
Effective ventilation of the under-roof space is provided by a ventilated ridge.

As well as a ventilation mesh PVC tape, which is stretched between the crate and the frontal board of the cornice overhang.

Thanks to these two elements, a constant blowing of the under-roof space is ensured.
The step of the crate deserves special attention - the distance through which the transverse strips are nailed. In accordance with the set of rules for the arrangement of a metal seam roof (SP 17.13330.2011), the distance between the individual laths of the crate should not exceed 200 mm. This allows the foot of a person walking on the roofing to rest on two boards at once, which protects the metal from deformation.
Along the edges of the roof (in the places of roof overhangs), as well as in the gutters, a continuous boardwalk with a width of at least 700 mm is created.

Some users of our portal recommend making a continuous crate over the entire area of the seam roof, which, in general, is not a mistake (especially if this coincides with the recommendations of the manufacturers of seam paintings). For example, in accordance with the technological requirements, a continuous crate without fail “spreads” under a zinc-titanium roof.
A solid crate is a conditional concept. A small gap (no more than 10 mm) must be left between each transverse plank of the crate, which will compensate for the thermal expansion of the wood.

For more details, you can find out by visiting the corresponding FORUMHOUSE section.
Procurement of materials
If you decide to make seam paintings from rolled or sheet metal, then you cannot do without the use of sheet bending and seam-rolling machines. It is not advisable to purchase such equipment for personal construction. But this does not mean that metal should be bent manually.

vasilpolt FORUMHOUSE User
It is better to use the service of a team that has a machine for rolling pictures. The quality of the roof in this case will be better than if you bend the rolled products by hand. There is even a separate service - "Picture rental". Virtually every roofing company that has the necessary equipment offers it to their customers. Try searching in your area.
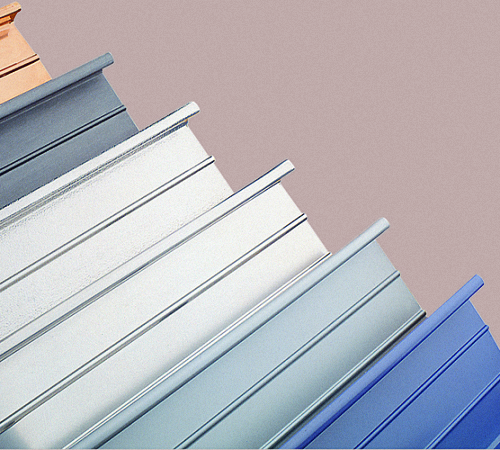
Also, with the help of sheet bending equipment, you can make the necessary additional elements. What kind of extensions will be needed for construction - it depends on the design features of the roof.

The photo shows typical profiles, the geometry and dimensions of which may differ depending on the characteristics of a particular roof.
Device and installation of the cornice unit
Installation of a folded roof begins with the arrangement of cornice overhangs. Immediately pay attention to the fact that the cornice overhangs have a different design. It directly depends on the design of the drainage system. Drainage systems, in turn, can have hanging or wall drains.
The cornice overhang with a hanging gutter does not have transverse seams, which makes the roof more airtight and easier to install. Considering that snow and ice can easily damage the suspended gutter, the roof surface with long slopes has to be equipped with additional elements for snow retention.

A system with wall-mounted drains and flat top ebbs has a more complex design, and its installation is best left to experienced tinsmiths. The rigidity of the system with wall gutters is an order of magnitude higher than that of its counterpart with hanging gutters.


Roofer1959 FORUMHOUSE User
Regarding the gutters: if they are done correctly, then any are good. Wall-mounted - more reliable in terms of rigidity, and I can vouch for its safety. But there is a weak point - eyeliner paintings (especially if the fold is single). Suspended is deprived of this minus, but its rigidity under certain operating conditions can be called into question.
There is no consensus on which drain should be installed complete with a seam roof. But no matter which option you personally like, the eaves knot will have to be equipped according to the same principles.
Installation of the cornice unit begins with the installation of drips and ventilation tape.

The lower cornice profile - a "drip" (through which the condensate formed in the under-roof space will drain) - is mounted on the rafters and covered with a waterproofing membrane. This is done at the stage of arranging the roofing pie.
A thin layer of adhesive or roofing sealant should be applied between the waterproofing and the drip.
Sometimes the lower drip is not used at all: for example, if the under-roof space is well ventilated (using a ventilated ridge on top and a ventilation tape on the bottom). But it is better if it is, after all, installed.
nekorsakov FORUMHOUSE User
First of all, a plastic mesh was mounted on the gap between the crate and the frontal board. On top of the mesh, cornice strips were stuffed, which were fastened to the crate with galvanized roofing nails, hammering them in a checkerboard pattern. The slats were mounted along a cord stretched along the cornice overhang, and the mesh was simply attached close to the edge.

PVC mesh protects the roof space from insects and debris. The distance between the cornice strip and the ventilation mesh must be at least 2-3 cm.
If it is planned to use suspended gutters as part of the roof, it is necessary to think in advance how to install eaves hooks for the gutter system. So, long cornice hooks, which are attached to the upper crate, are wound directly under the eaves bar. Under each hook, it is necessary to make a recess in the surface of the crate. Otherwise, the folded pictures along the edge of the overhang will go in waves.

To give the cornice overhang additional rigidity, metal roofing crutches are installed under the cornice strip.

The crutches cut into the flooring flush with the surface of the crate (similar to gutter hooks) and are attached to it with self-tapping screws.

The distance between two adjacent crutches is 60-70 cm.
Standard crutches are commercially available, but it is quite possible to make them yourself. For the manufacture of crutches, a steel strip is most often used - 40x4 mm. Billets of the required size are welded together, after which they are drilled and subjected to anti-corrosion treatment (treated with a primer).

Fasteners for galvanized roofing (including crutches) must be made only from galvanized steel.
The standard T-shaped crutch for the eaves has a width of 100 to 200 mm, and its length depends on the design features of the roof.

Crutches are used to reinforce cornice overhangs, as well as other roof elements. Therefore, they can have different geometry, which depends on the direct purpose of the product.

Seam joints themselves are already stiffeners. Therefore, on roofs with suspended gutters, roof spikes may not be used, but may be replaced by strips of galvanized or painted metal. They are installed along the overhang. Steel strips are placed on top of the eaves strip or placed under it - depending on the geometry of the eaves profile.

nekorsakov
Before the installation of the folded paintings, it was necessary to install additional metal strips, reinforcing the rigidity of the overhang and forming a ledge (50 mm), for which the folded edges were then fastened and crimped.
Seam roofs equipped with wall gutters and flat flashings must be reinforced with roofing spikes without fail.

Having completed the arrangement of the cornice assembly, you can proceed to the next stage of work. But first, let's talk a little about the construction tool.
Tools and fixtures for mounting folded paintings

A mallet (plastic, wooden or rubber) and a hammer are tools for forming bends and other elements of a seam roof.
Shlyazen (mandrel, mandrel-blade) is a device that serves to form ridges and arrange locks at junctions (valleys, bypass ventilation ducts and chimneys, etc.).


Straight and corner pliers (large and small) for forming seam bends and other complex elements and roofing.


Crimping roof frames - used for crimping L-shaped and double seams. In fact, both frames are used to close the double fold, because its folding is carried out in two passes: the L-frame closes the single standing fold during the first pass, and the frame for closing the double fold is used during the second pass.

There are also frames for bending roof overhangs. They are used when mounting various paintings (including self-latching ones).
A set of scissors for metal with various cutting angles.

It is impossible to cut the panels with a grinder or other abrasive tool! This destroys the protective coating of the material.
Installation of roof slopes on the example of a gable roof
Installation of roof slopes begins with the installation of the start panel. The key difference between the launch panel and the ordinary panel lies in the special geometry of the profile, thanks to which it is possible to attach the picture to the crate from two sides at once.


The step between adjacent fasteners (clamps) is 40 ... 50 cm.

Clamps must completely repeat the geometry of the bends that are on the side shelves of the folded paintings. Such fasteners can be made independently, or can be purchased on the construction market.
If the length of the roof slopes exceeds 6.5 meters, experts recommend using movable clamps that allow you to compensate for possible deformations from the thermal expansion of the panels.

After installing the starting picture, the rest of the roof is installed.
nekorsakov
Next to the laid and fixed picture, the next one is laid, which overlaps (with a folded edge) closes the nail shelf of the previous panel. Both paintings are crimped into the lock together with already installed (hidden) clasps. The result is a very reliable and tight connection, because all the fasteners are covered with sheets of metal.


Seam joints are crimped in a standard sequence. First, with the help of a frame for closing the horizontal lock, the first crimp is made. Then, with the help of a frame for closing the double seam, a second crimp is made.

The finishing picture is cut to size (so that it does not protrude beyond the gable overhang), folded over and fastened with clamps to the crate. The gable overhang is subsequently closed with a special profile.

Foamed soundproofing tape, which can be placed under the seam panels along their entire length, additionally protects the room from noise generated during rain. The tape is cut to size and stapled to the crate.

We have described the sequence of installation of paintings made on folding equipment according to individual sizes. Installation of a self-latching roof has its own nuances.
For example, during the installation of self-latching panels, roofing screws are used instead of clamps, which are screwed into the nail strips of the seam paintings. There are elongated holes on the nail strips that help to compensate for the thermal deformation of the panels.

For fastening clamps and self-latching panels to a wooden crate, roofing nails or galvanized self-tapping screws with a press washer (for wood) that have a flat head should be used.
To prevent the self-latching roof from rippling in hot weather, the self-tapping screws must be screwed exactly into the middle of the oblong hole. At the same time, having screwed the self-tapping screw completely, it should be unscrewed by about a quarter of a turn (so that the panel can move slightly under the action of thermal expansion).
Roofing in places of cornice overhangs
The ridges of the folded paintings, located in the places of the cornice overhangs, should be cut (literally by 2 ... 3 cm).

After that, the remaining (protruding) part of the picture will easily bend under the cornice overhang, forming a reliable and tight cornice ledge.


It is not necessary to completely remove the extreme part of the comb. It can be bent by forming a neat decorative cap at the end of the fold.

Installation of side end plates
We present the installation scheme of the side gable profile.

- The bar on which the wind bar is attached (the dimensions of the bar are selected based on the geometry of the wind profile).
- Roofing self-tapping screw "metal-wood".
- Side end plate.
- Start/finish panel of seam roofing.
- Self-tapping screw with a press washer.
- Klammer.
At the junction of the roof slopes, the end strips are connected as follows.

Installation of a ventilated ridge
The main elements of a ventilated ridge are: the upper ridge profile, ventilation grille and supporting elements.

nekorsakov
I decided to put the lower (supporting) slats between the crate and the picture, without fixing anything additionally. On top of them I mounted the upper strips (with some overlap). As a result, the support bar is held not by individual self-tapping screws, but by a whole roofing sheet, fixed with clamps and crimped with adjacent sheets. In this mounting option, the perforated wall of the support bar turned out to be pushed deep from the edge, which seemed to me better both aesthetically and functionally (away from the "aggressive" external environment with its precipitation).
Pipe Bypass
Chimneys and ventilation shafts are protruding elements, bypassing which, when arranging a seam roof, requires certain skills in performing tin work. Consider the standard bypass option using the example of a self-latching roof. It can be installed by any non-professional roofer.

Pieces with locks are cut off from standard seam panels (indicated in red in the diagram). Adjacency strips (side aprons) are formed from them, which, on the one hand, are adjacent to the pipe wall, and on the other, they snap into place with neighboring paintings. The space between the side aprons is closed with abutment strips (upper and lower), which do not have a latch. A hook is made on the top bar, on which a picture is placed, suitable for the chimney from above. The lower bar with a hook lies on the lower picture.
The aprons adjoining the pipe walls are closed with roofing sealant.
Panels that have rolled under a double fold are mounted in the same way at the place bypassing the pipe.

All four aprons, in this case, are connected to the adjoining paintings by recumbent and standing folds.
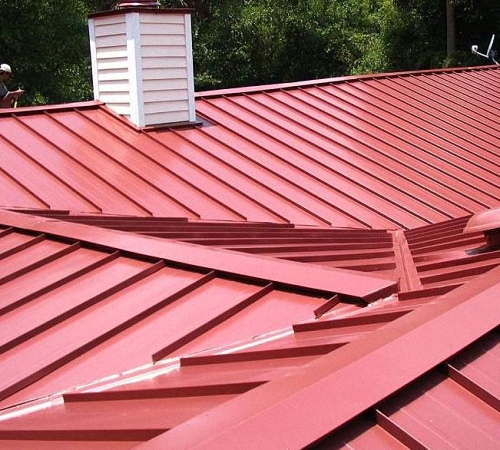
Valley device
Immediately pay attention to the requirements for arranging the base for the valley bar: the base here will be a solid wooden crate.

The design of metal junctions should ensure maximum tightness of the roof at the junction of two slopes. Therefore, the valley bar must be fastened to the crate with clamps (in no case with self-tapping screws), and the adjoining paintings to the valley should be closed with a double fold.


Sofa owner
Not the best solution is to perforate the paintings (and at the same time the valley) with self-tapping screws. It is more correct to make a fold (hem) on the edge of the picture and bring it to the corresponding fold of the valley. The result is a recumbent fold. The size of the overlap is approximately 30 millimeters. The endova, in turn, is fastened with clamps to the crate.
These rules are relevant for folded patterns and profiles made from sheet or rolled products on sheet-bending / seam-rolling equipment. When installing junctions on a “snap roof”, the instructions and recommendations of the roof panel manufacturers should be followed.
Connections to the wall
Adjacency to the wall is a structural element, without which no complex roof can do. Such junctions have a simple design and are made using a special profile.

You can find out more, as well as about the technological points associated with its installation, in the corresponding section of our portal. You can get information by reading an article based on the recommendations of FORUMHOUSE users. For those readers who want to see a visual master class on the installation of a seam roof, we have prepared a small thematic video.
The roof performs a very important function, regardless of its type and purpose of the structure. It is she who protects the house from the penetration of moisture, snow, wind, and also retains heat inside the living quarters. There are a large number of roofing materials that help the roof to fulfill its function, but the seam type occupies a special place. And there are reasons for this - this is the reliability of the design, its long service life, the possibility of mounting it yourself.
Tools for the installation of seam roofing
A folding hammer is needed for working in hard-to-reach places
The length of the frame for the fold corresponds to the seam step
The mandrel blade will help to bend the edges of the paintings without using a machine
Video: sheet bender for seam roofing
Seam roofing material
Seam roofing involves the use of metal sheets. Until recently, it was only galvanized steel, which is still used by some homeowners due to its resistance to corrosion. Now the list for arranging a seam roof is much wider:
- Galvanized steel with polymer coating. It protects the folds from the damaging effects of ultraviolet rays on the metal, and also performs an aesthetic function, because the tone of the material can be matched to the color of the overall landscape design idea.
Pre-painted galvanized steel can be any color
- Copper. As a rule, it is produced in rolls. The material can be clean or textured. The latter most often imitates the relief of tiles or other roofing material. A copper seam roof has a long service life, in some cases it reaches hundreds of years. In addition, it is copper that allows you to connect metal sheets not only with the usual folds, but also by soldering.
The copper roof has a typical shade for this metal.
- Aluminum. This material is particularly soft. In some ways, it is similar to copper sheets, in particular, it is produced in rolls and may have a pattern. It has a long service life, can reach 80 years. The advantage of aluminum is that it does not corrode and does not require painting or coating with any other similar material. Also, aluminum is absolutely not afraid of temperature changes, which means it can be used in areas with a difficult climate.
Aluminum is completely corrosion resistant
- Zinc titanium. Relatively new metal material. Produced both in rolls and in tape. It has one significant drawback - excessive fragility, which makes the installation process a little more complicated. Zinc-titanium is incompatible with other metals, as well as with some types of wood, so the scope of the material is limited. To work with it, you need a special tool and some skills. In addition, it is forbidden to work with it at an air temperature below 5 degrees. But there are also advantages of zinc-titanium: long service life and resistance to corrosion.
Zinc-titanium requires extreme care during installation
A metal sheet with curved edges for a seam roof has a very unusual name. Experts call them paintings.
Do-it-yourself seam roofing
You can make a seam roof with your own hands, provided that the technology is fully observed. It is equally important to properly prepare the roof for installation.. This process includes:
- Lathing installation. Before installation, all wooden elements must be carefully treated with antiseptic agents and mixtures that prevent rotting and burning. The type of crate depends on the material used. For galvanized steel, it should have a step of 20–25 cm, for copper it should be solid. In the first case, boards are additionally laid along the edge of the roof, there should be several of them and you need to fasten them without gaps. Similar masonry should be along the ridge joint.
Shedding for a seam roof must be mounted with a minimum step or be solid
- Material preparation. This should be done even before the metal sheets are raised to the roof. Cut the material according to the drawings made to draw up a pattern on the roof. Additionally, you need to prepare elements for adjoining, overhangs and other roofing elements. You should also take the edges that are needed to securely fasten the standing folds. For the arrangement of a seam roof, different types of connections can be used: single and double standing, single and double lying. Their choice depends on the angle of the roof. For example, if it is 15 degrees, then you can use a single standing type of connection. On roofs with a smaller angle of inclination, it is recommended to use a double standing type of connection. When using this step is not needed.
Each type of seam roof connection is suitable for a certain slope and junction
It is not recommended to take paintings with uneven edges or curved ones for work. Such a roof will be devoid of aesthetics.
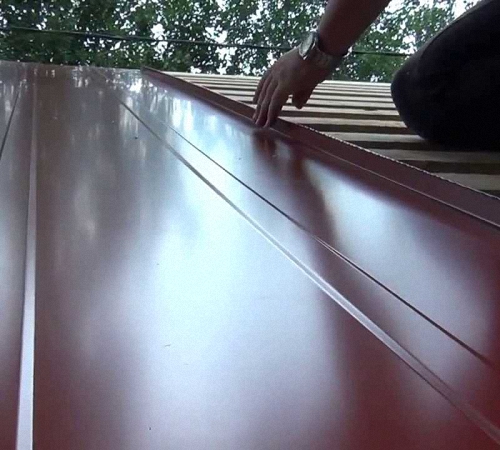
Seam roof laying technology
Technology does not stand still. This also applies to the method of laying the seam roof. At the moment, the so-called roll technology is used. Its feature is to create a picture for the entire length of the roof. At the same time, the rolls rise to the roof with the edges already prepared for fixing, and this greatly simplifies the installation process.
Metal sheets are fastened directly to the crate with the help of clamps, it is advisable to use the so-called wandering clamps, which significantly increases the reliability of fastening.
It is considered more reliable to use a floating clamp for a seam roof
In problem areas, it is recommended to use a double bend of the edge. This applies to valleys, gutters, grooves and other places where snow and water can accumulate. Lying seams can be used if you want the seams to be practically invisible on the roof. For roofs with a slope angle of more than 25 degrees, it is recommended to choose an angular standing seam, for which you just need to correctly bend the upper edge of the metal sheet.
Video: installation of a click-fold roof
Stages of installation of seam roof
The process of laying a seam roof is as follows:
- Installation of a cornice overhang, after which it is necessary to install a drainage system in the form of gutters. They should be installed at a slight angle. This will allow water from the roof to drain by gravity towards the funnel.
You need to start the installation of a seam roof with the installation of a cornice overhang
- Laying pictures on slopes. Finished sheets must be laid out on slopes in a vertical direction, starting from the ridge to the lower edge of the roof. Fasten the strips together with the selected type of connection. Temporarily, metal strips can be connected with nails almost at the very ridge.
Seam roof paintings should be laid in a vertical direction
- Fastening sheets to the crate. To do this, you should use clamps. They must be made from the same material that the roofing is made of. It is necessary to lay metal sheets in such a way that they rise 5–6 cm above the ridge. This protrusion will serve as material for the formation of the ridge ridge.
Paintings are fastened with clamps
- Joint sealing. All junctions with walls, groove joints must be treated with silicone sealant. This will prevent leaks in these areas.
Video: do-it-yourself seam roof installation
Installation of seam roof elements
After laying the metal sheets, you can proceed to the installation of roofing elements, namely the valley and the ridge.
To install the first element, you need:

A special metal pad is suitable for the skate. It has curved edges, thanks to which it easily fits with metal sheets of the roof. The ridge can be ventilated and non-ventilated, with the first option being preferable, since this will save on the installation of aerators to prevent condensation under the roofing material.
Seam roof ridge can be made independently
Video: valley eyeliner
Seam roof installation errors
With self-assembly of the seam roof, errors are possible. The most frequent are:
- Large pitch step. Ideally, it should be solid. This will prevent deformation of the metal sheets during the operation of the roof.
- Lack of treatment of wooden roof elements with antiseptic agents and mixtures against decay. Ignoring this rule will reduce its life. Despite the strength of the metal roofing, an unprotected roof will last exactly as long as the crate.
- Lack of ventilation gap in the roofing pie. This can lead to the fact that condensation will accumulate under the paintings, which will cause corrosion, because all the protective layers are on the outside.
- The use of metal fasteners that are incompatible with the metal of the roofing material. If you take copper for coating, then the clamp must also be copper, otherwise the seams will open.
- The use of a simple clamp when mounting long paintings. The metal expands and contracts under the influence of temperature changes, and a simple clamp is not able to withstand this. Therefore, it is recommended to use a floating element that has a free play.
- The use of a single method of attaching paintings in difficult places, which leads to deformation and divergence of the seam.
Video: mistakes that can be made when installing a seam roof
How to properly disassemble a seam roof
When repairing or replacing the seam coating, it will be necessary to dismantle it. But it is very important to disassemble it correctly. You need to do this in a certain sequence:
- coating around chimneys and ventilation pipes;
- windows, if any, on the roof;
- ordinary metal sheets;
- grooves;
- overhangs.
The seam roof is dismantled up to the restrictive grille, if any. Everything that is after it must be disassembled from the attic. For dismantling, it is worth taking a special tool - pliers. This must be done carefully, because the material can be reused.
A long service life is possible only if the installation technology is observed. Therefore, in advance you need to carefully deal with all the nuances associated with the seam roof, and prepare a special tool.
Compliance with the technology of installation of a seam roof helps prevent corrosion of the coating, its deformation and deflection. Properly installed material will serve its owners for many years. How to properly install a seam roof with your own hands, we will consider further.
Seam roof: features and benefits
Seam roofing is distinguished by a special installation technology, thanks to which a reliable seam lock is created that prevents water leakage. The appearance of the roof is particularly attractive, giving the building aristocracy and originality.
The roof itself consists of separate paintings, interconnected with the help of folds. For their manufacture, sheet or roll-type steel is used, always with a galvanized coating. To increase the durability of the structure, it is treated with a special coating of non-ferrous metals such as copper, aluminum, zinc, pural or plastizor. The most optimal and durable option in operation is copper. Despite the high cost of such a roof, it has an amazing appearance and good performance.

By connecting roofing sheets together, it is possible to obtain a connection called a seam. There are four types of such compounds:
- single type;
- double type;
- standing type;
- recumbent type.
The first option is relevant if the roof slopes are located at an angle of more than fifteen degrees. The second option is particularly waterproof and durable, although its arrangement will require more material and effort, but the result is worth it. Standing folds are relevant in the connection of strips of longitudinal purpose.
Among the advantages of seam roofing, we note:
- the possibility of using various coatings, which give it a unique shade and originality;
- thanks to seam joints, the roof does not leak
- does not need additional mounting holes, so the roof becomes resistant to changes in temperature conditions;
- a variety of installation technologies, materials, variations in sheet or roll laying, allows you to create an interesting roofing that will be in harmony with any building;
- the presence of a smooth surface provides a quick runoff of water and snow;
- due to the fact that the material is quite flexible, it is possible to equip such a roof on any type of roof;
- the light weight of the structure allows you not to mount the rafter system;
- such a roof is easy to maintain and repair;
- Duration of operation is another important advantage of this type of roof.

When installing a seam roof, you must also learn about its shortcomings, such as:
- the need for special equipment, which greatly simplifies the installation process;
- steel roof has a high thermal conductivity, therefore, it needs additional insulation;
- the roof needs to be equipped with additional nodes that reduce its noise output;
- in order to secure a home during a thunderstorm, it is necessary to install a lightning rod and grounding;
- on a smooth surface, it is necessary to install snow stoppers, as avalanches will fall to the ground during heavy snowfalls.

Varieties and technology of seam type roofing
The most durable copper roof in operation, it will serve its owners for more than one hundred and fifty years. In addition, this type of roof has an attractive appearance, as it has a special textured pattern that imitates various materials. However, the cost of such a roof is quite high, although it fully pays off during operation.
Aluminum roofing is lightweight, resistant to corrosion, mechanical damage and various kinds of loads. The service life of such a roof reaches a mark of one hundred years. The cost of such a roof is an order of magnitude lower than copper, but the performance is also at a high level.
Also, seam roofing is made of titanium-zinc coating, which is distinguished by its prestigious appearance, reliability and durability. In addition, a distinctive feature of this material is its high level of plasticity. After a certain period of operation, the roof is covered with a patina, which makes it even more elite.
The most affordable material for the manufacture of seam roofing is ordinary metal. The great demand for this type of roofing is primarily due to the affordable cost of coverage. The duration of operation of this design reaches the mark of 55 years. The option of choosing the color and appearance of steel is possible. In addition, zinc coating protects the roof from corrosion and destruction.
Seam roof - installation technology
Seam roofing differs not only in the materials from which it is made, but also in the technological moments of its installation. In the process of manufacturing the roof, materials are used both in sheet and roll versions.
Using sheets is a classic option that is unfortunately losing popularity. The main rule of any seam roof installation is the creation of special conditions in the attic space that prevent the formation of condensate on the roof that destroys it.
An innovative method of roofing installation is the use of rolled materials. This installation technology is distinguished by the presence of better seams, which are easily equipped by specialists.
Among the advantages of the rolled seam roof installation technology, we note:
- installation of not only steel sheets, but also a material with a polymer layer, which has better performance characteristics;
- the use of a standing double fold, providing a high degree of tightness of materials;
- the use of technology in various areas of roof installation, regardless of the slope of the roof and its shape;
- speed and ease of work, thanks to the mobility of the equipment used in the installation of the roof.
Seam roof installation tool
The correct use of the tool in the process of performing installation work, half ensures the duration of the operation of the roofing. The main tool for the construction of the clamp, it is used in any case of installation, both in roll and in sheet. There are two types of tool used when seaming a fold:
- mechanical equipment;
- electric tool.
The first option involves the use of a set of pliers, which contain two frames that cover the folds. With their help, it is possible to create single and double folds.
An electric machine allows you to speed up the work several times, while after rolling it stops on its own at the final section of the roof.
Also, when installing a seam roof, you will need a tool in the form of:
- hammer;
- pliers;
- scissors for metal;
- mallets;
- drills and screwdriver;
- level and other measuring instruments.
Additional tools used in the process of installing the roof depend on the individual characteristics of the building and the method of installation of roofing materials.
Seam roof: manufacturing and installation
To begin work on the installation of a seam roof, you should choose a crate, for the manufacture of which a steel profile, board or wooden beam is used. The main requirement for the crate is its maximum evenness, the absence of recesses.
Seam roof installation instruction:
1. Initially, an insulating coating is laid on the surface of the roof trusses. The presence of a light crate will provide sufficient ventilation of the under-roof space. The interval for laying the crate is 40 cm.
3. Before starting the installation of sheets, install the eaves of the roof.
4. Install a support board on the ridge area as well. In order for the joints to be evenly spaced on the roof, the first and last sheet should be cut in proportion to the dimensions of the roof.
5. Arrange a solid boardwalk on the valley.

6. Alignment of the sheets is carried out in relation to an overlap of 4 cm. To fix the sheets on the cornice zone, the upper crate is used.
7. On the end sections of the roof, the fixing of the roofing material is carried out using self-tapping screws and washers, between which sealing gaskets are installed.
8. At the joints between the roofing sheets, snow barriers are laid. To perform longitudinal joining of sheets, also use an overlap.
Features of installation of a copper seam roof
The ridge and ribs on the seam roof should be straight. If wood is used to make the crate, then do not forget to cover it with an antiseptic composition.
Before starting installation work, fix the cornices along the lower edges. Also, the drainage system is installed at the initial stage. Valleys are fixed on the crate, and an anti-condensate film is installed on the rafter system, which provides waterproofing.
Before starting work on the roof, measure its slopes. The slopes of a rectangular shape should differ in equal diagonals. Equipping the longitudinal joints, fixing the sheets is carried out in the direction from the bottom to the top. If the length of one slope is more than six meters, then it is assembled from several parts.
Installation of sheets is carried out with a slight overlap. When installing a copper roof, it is destroyed to use a seaming machine, which significantly improves the tightness of the joints between the sheets.
The lifetime of a copper roof is more than a hundred years, however, in order to ensure the fulfillment of this condition, the roof is installed on a solid deck.
When equipping a flooring for a seam roof, you should be guided by the following recommendations:
- without fail, you should take care of the presence of a special ventilation gap, which allows you to remove the condensate formed inside the roof;
- thus, the crate prevents corrosion of metal parts and damage to the wooden crate;
- the crate should be able to reduce the noise generated during rain.
A solid base is also equipped if the roof slope is less than fourteen degrees. In order to improve the tightness of the connection between the sheets, after seaming, use silicone sealant.

Installation of a self-latching seam roof
In order to create a self-latching roof, galvanized steel sheets are used. Sheets should be in the form of large canvases, which are interconnected using special grooves.
The most popular types of folds are recumbent and standing ones, used in longitudinal and transverse joints. A self-latching roof is much faster and easier to install than a standard seam roof.
In addition, this type of roof is distinguished by a variety of color and texture forms. Therefore, you can choose the best option suitable for a particular building.
To arrange the connections between the sheets, no special equipment is required, and all work can be done independently, without the involvement of specialists. In addition, upon completion of the installation, an ideal coating is obtained, in the form of a continuous flooring, which absolutely does not allow moisture to pass through.
This version of the roof is suitable even for a roof whose slope angle is 8 degrees. Among the advantages of a self-latching roof, we note:
1. Possibility of installation on various kinds of roofs.
2. Long service life.
3. Thanks to the special installation technology, the connections are reliable, and the seams are durable and tight.

4. Seam roofing has high bearing capacity, good resistance to the external environment.
Therefore, when choosing a seam roof for a house that you plan to install on your own, we recommend that you stop at its self-latching version, since this design does not require the use of special equipment to obtain a high-quality connection between the sheets. Repairing a seam roof will not be difficult, since if certain elements of it are damaged, it is enough to replace them.
Seam roof installation video:
In the construction of private houses and cottages, seam roofing has recently begun to be used more and more often, as the most optimal roof option for any one- and two-story building, observing the points of SNIP (building codes and rules for conducting construction work).
Folding is a certain technology of laying metal sheets on the roof, the nodes of which are connected in a special way using a machine (details can be seen in the photo below).
What does she represent?
Roof folding is also used in the construction of private residential buildings, primarily due to the availability and durability of the material.

The seam roofing technology originated in Germany, it is from there that this definition came to us (from the verb "falzen", which means "to bend" in German).
Also, in addition to the method itself, a special tool for seam roofing and a machine were developed to ensure high-quality work, because. bending metal with bare hands, creating, for example, a dome, will not work.
Nowadays, it is not difficult to buy a quality device to make a folded roofing cake, a huge variety of equipment is present in the domestic and foreign markets for construction equipment, and instructions in an understandable language complement such a device.
Folding and repairing a seam roof itself, although it sounds difficult, basically does not require specialized skills and abilities, a little practice, and even a person who is not knowledgeable in the construction business will be able to perform this procedure qualitatively or make a dome as in the photo below. The main thing is to comply with the points of SNIP.

You can verify the quality of work over time, if the sheets are fastened securely and in compliance with SNIP, moisture will not penetrate into the housing.
It is possible to install a seam roof or create a dome both at the construction site using a machine, and directly on the roof itself.
Seam classification and types of materials used
There are several types of seam seam: lying, standing, double and single. The laying technology largely depends on the type of seam.
Standing folds connect the side edges of the steel strips running along the slope.
We perform folds using a special electromechanical seaming device shown in the photo.

The most optimal and reliable type of seam is a double standing seam - in this case, the tightness will be maximum, which will not allow even a drop of moisture to seep through.
When creating a roofing seam covering using a machine, several components can be used.
Non-ferrous metals, namely copper, aluminum or zinc-titanium alloy. Over time, the red color of the roof turns into brown, and then into matte black.
The seam copper roof can be covered with a protective layer of patina, this technology will extend the life of the roof and protect the original color, protect our solid dome from damage and corrosion.
In other words, the layer of patina has turned the copper of the roof in the photo below into a virtually invulnerable material.
Because of this feature, copper is the most popular among roofing materials.

In practice, there are cases when a copper seam roof protected by a patina (a special machine was used during installation) has served for more than a hundred years.
In addition to a long service life, a copper metal roof is popular for the following reasons:
- The seam surface will absolutely not need operating costs. After the work, there is no need to paint or clean the surface, using expensive devices and construction equipment, the roofing cake will be protected from adverse weather conditions;
- Copper is harmless to the human body, the material does not emit harmful substances;
- Due to the high ductility of copper, seam roof repairs are quick and easy, the metal can be melted.
Along with copper, folding is done using polymeric materials, while observing the SNIP (shown in the photo below).

The seam surface consists of several layers: steel, zinc, primer, paint layer and the polymer itself.
This combination of layers was selected using many years of experience and practice, all components perform their specific functions, the repair of a seam roof, the instructions for which are available to everyone, is quite simple.
It should be remembered that not all polymer coatings have the same properties, according to SNIP.
Each material has its own indicator of exposure to ultraviolet light on the coating, tensile strength at different temperatures.
Following, in terms of popularity of use, is a profiled coating.
Using a machine tool, the wavy shape of the metal sheets is for decorative purposes, making the finish look nice (you can see an example in the photo below).

Such sheets can be produced using polymer products, but they are not always included in the composition.
The technology of polymer profiled coating will allow you to create the following roof shapes:
- Trapezoidal seam roof;
- Plain, rounded metal roof;
- Sinus-shaped seam roof.
Corrugated sheets are distinguished by the width of the finished profile, by the conditions of use, by the shape and height of the corrugations.
A roofing cake of this type can be suitable both for large-scale production and an office, and for arranging private housing, you can even create a dome for an urban building in compliance with the requirements of SNIP.
Among buildings of non-standard shape (an example is a dome), builders most often use aluminum.
This element has a flexible base and excellent resistance to weather conditions and corrosion, which is important for urban buildings.
In the presence of the required amount of this flexible metal, construction organizations can repair the seam roof and lay it using a machine, depending on the requirements, for example, a dome can be made. Also, the roofing cake can take any other shape (the most common ones are shown in the photo below).


Also, with the help of folded technology, you can achieve a different relief.
Aluminum performs equally well in any form, even decorative figures will look neat and elegant if all the work is done by qualified professionals.
The aluminum seam coating itself, during operation, forms a special protective film that protects the material from environmental influences.
In this case, special attention should be paid to the free access of air to the material.
In addition to good corrosion protection, aluminum does not transmit ultraviolet light and does not burn. A well-made aluminum seam roof with your own hands will last for several decades!
The video below shows the installation of a seam roof.
Recently, the technology of seam coating with the help of clamps has become in demand.
Klyammer - a special device of a curved shape, with which a sheet of steel is attached to the crate.
The convenience of the clamp is that it is attached to the sheets with ordinary self-tapping screws, which compensates for the absence of special holes in the roofing material.
How to lay a seam roof correctly?
The list of works is as follows:
- To begin with, a rafter system is installed in compliance with the requirements of SNIP. The elements of the system are treated with an ignition protection agent, as well as an antiseptic. At this stage, the sections of the greatest and least load planned in the future are calculated;
- A soundproof and waterproofing membrane is installed;
- It is necessary to form a system of easy access of oxygen to the layers of the folded surface. For this, special holes are created in the eaves and ridge;
- The crate is laid under the folded roof, which in the future will provide a ventilated space;
- The comb is installed;
- Sheets of metal are laid with an overlap, a self-latching seam roof is installed. At the same time, the sheets are connected on the roof itself, using a special device;
- Aprons are mounted on open places, consisting of a material identical to the rest of the coating.
It should be remembered that the seam cover can be mounted if the roof slope is at least 7 degrees, in accordance with the requirements of SNIP.
If the degree is even less, then the material can be deformed, and leaks form at the junction of the metal sheets.
When cutting off part of the coating, the cut corners must be coated with a substance that protects against corrosion.