Guide and step-by-step instructions for building a house or a Russian bath from a bar with your own hands.
How much does it cost to build a house?
With this question for many Russians, a new gardening life begins every year. After the newly minted landowner receives a plot of land, he will definitely face a difficult economic situation in our country.
Interesting proposals of many construction companies - to build any structure on a turnkey basis, may conflict with the family budget. Even if you give up architectural sophistication, building a house will be an expensive pleasure.
Often, the costs that will be spent on direct construction will be equivalent to the cost of materials for future housing. All economic calculations will rest on a simple identity: the cost of materials and the cost of work are equal. Therefore, it is better to build a house on your own.
The main difficulty in self-building a house is ignorance of construction operations and the sequence of their implementation.
How to build a house from a bar?
It is better to build a wooden house. After all, wooden structures are very simple. In addition, this material is pleasant and easy to work with. Wooden houses have an excellent microclimate.
You can go further in two ways. The first is to raise money and purchase the entire set of building materials at once. This set includes
- lumber for ceilings and floors,
- timber for a log house,
- edged and unedged boards,
- window and door blocks, etc.
- linen or jute insulation
- roof material,
- glassine,
- glass,
- ruberoid, g
- lift, staples, tow, etc.
The second way is the acquisition of all of the above in parts in accordance with the construction stages.
It is better to go the first way, since it will turn out cheaper in the end. In addition, when buying a complete set of building materials, many companies deliver them directly to the site for free.
It is necessary to ensure that the dimensions of the beam, one of the most important components of the future house, are at least 150x150x6000 mm. But, in principle, you can move away from these parameters.
Where to start building a house?
First of all, you need to go to the site, inspect the territory, find access roads (if there are no roads yet), determine the binding of the future house to the area, the type of soil. The place where the garden house will be built is determined according to the plan for dividing the entire territory into separate sections. The position of the house must be agreed with the board of the dacha association.
First of all, it is necessary to draw a site plan on a sheet of paper on a certain scale, indicating the specific dimensions and indicating on it the place that will be reserved for the house. It is necessary to certify this plan in the board with the seal or signature of the responsible person.
Work on the site should begin with cutting down shrubs, mowing grass, uprooting stumps and cutting hummocks on the territory of the future construction site. For these works, you need to have an ax, a shovel, a scythe, a hand winch, a crowbar and a sledgehammer. For cleaning stumps, it is better to use a sledgehammer.
After clearing the area, you can move on to the next step.
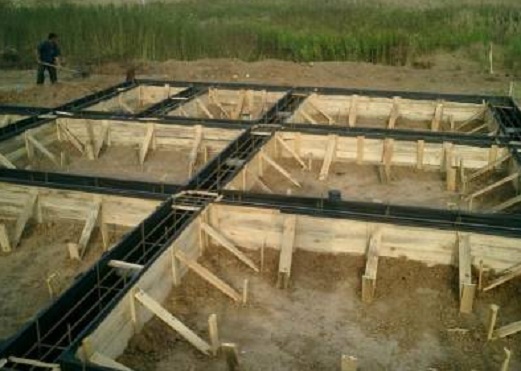
First you need to determine the type of foundation. It is better to choose a strip foundation, since with the help of it from a homogeneous material you can get a finished warm solid foundation with the lowest labor costs. And then you don’t have to do additional work on the manufacture and installation of taps and jumpers. A simplified method of marking the axes should be used, without using cast-offs. After all, the cast-off makes it very difficult to dig foundation trenches.
When digging the foundation, you need to remove the soil that is being removed, otherwise it will interfere with the construction. The fertile layer should be placed in a separate pile, it can be useful in gardening. A very important factor is the depth to which the foundation will be laid. The depth of the foundation will be affected by the level of groundwater, the type of soil and the depth of freezing.
Best of all, a shallow foundation with sand filling the bottom of the trench. To do this, sand was always poured into the trench in layers of 25 cm, rammed and watered. Before pouring concrete, reinforcement was laid on a sand cushion. There must be at least two bars of reinforcement.
Broken and deformed reinforced concrete lighting poles can be taken as reinforcement. With a sledgehammer, you can break the concrete around the reinforcement of the column. Two poles are enough. From one you can get 8-10 reinforcing bars, the diameter of which is 10-14 mm.
Before laying the reinforcement, it is necessary to straighten it and bend it in the corners. To do this, you can use two railway crutches. Hammer them with ridges to each other into a stump, beam or log so that there is a reinforcing bar between them. The rods that are placed should not be less than 20 cm behind each other. So that when pouring concrete they do not diverge, it is better to tie the ends of the rods with wire in the place of overlap.
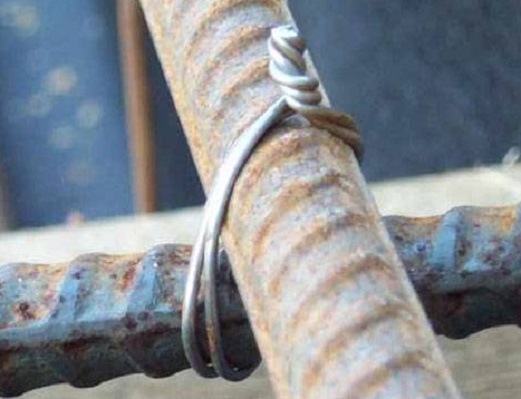
In order to protect the reinforcement from corrosion, it is necessary to place stones, pieces of brick, gravel under the bars so that the reinforcing bars are raised above the sand by at least 5 cm. If there is nothing to put the bars on, then they can be hung. The crossbar covers the top of the trench and reinforcement is suspended from it. The trench is then filled with concrete. It is better to purchase ready-made concrete, it is very laborious to prepare it manually.
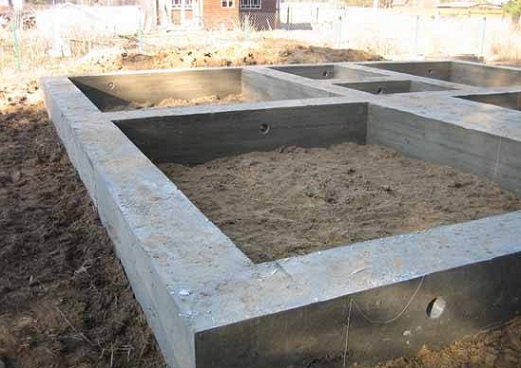
Foundation pouring
The foundation is best poured as follows. Along the axes of the foundation, metal rods are inserted into the uncured concrete, the length of which is 40 cm. To a depth of 20 cm, these rods are immersed in the base of the foundation. The remaining 20 cm form the base of the foundation. Rods are inserted at the corners of the foundation, and then after 1-1.5 meters between the corners. So the rods will be connected into one whole base with the plinth, and will serve as the basis for fastening the plinth formwork panels.
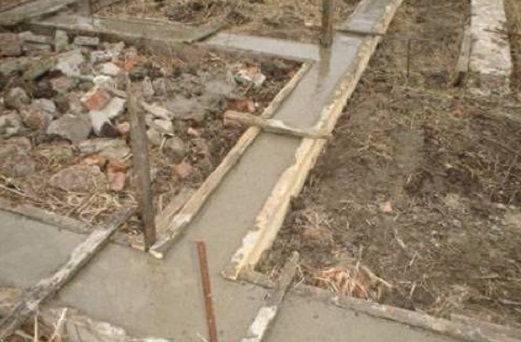
In warm weather, the surface of fresh concrete must be protected with moss, grass, sawdust and moistened with water, or simply covered with roofing material. Then it is necessary to make formwork panels. To do this, it is better to use edged boards, the thickness of which is 40 mm. The shields will be without gaps, the surface of the plinth does not require plastering. To save money, you can use unedged boards.
After harvesting the boards, you need to collect shields of the length and height that correspond to the plan. When finding the length of the shields, the initial size will be the thickness of the base and the distance between its center lines.
On the gaskets laid out on the ground, the shields are assembled in such a way that their smooth side is turned inside the base. Using conventional blade clamps, the boards are pressed tightly against each other. Linings are nailed to the shields, which are located at an angle to the longitudinal axis of the shield. Shields in height should be 10 cm above the level of pouring concrete.
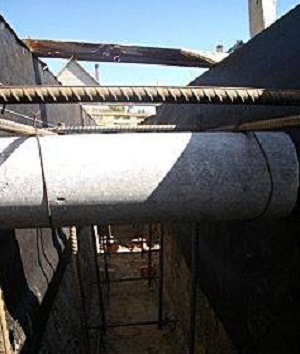
In any foundation, the plinth at a height of 15-20 cm from the ground must have ventilation windows. They should be opposite each other on opposite sides of the base. To create windows, you need to put asbestos-cement pipes in the formwork, tightly fitting the ends to the shields so that concrete does not pour into them
- Installation of shields begins with the inner contour. Before that, pieces of wire are wound on the pins so that on both sides of the pins there are free ends of the wire, the length of which is not less than 20 cm.
- First, shields with locks are installed. They are temporarily fixed.
- Then shields are substituted for them, the edges of which rest on locks. The ends of the shields are attached to the locks with nails.
- Shields of the internal contour, fastened together, are set relative to the axes of the foundation, and diagonally in the corners is checked.
- The upper and lower struts are nailed, which determine the width of the base.
- Then the shields of the outer contour are attached, their middles are combined with certain marks on the foundation.
- Nails are forgotten in the upper and lower struts. Shields collide with each other. It is checked whether the installation of the shields is symmetrical with respect to the center lines of the base, and the diagonals are measured at the outer corners.
- Then we bend up the nails, and the lower part of the shields is fixed relative to the axes of the base.
- In the upper part of the plinth on the struts, it is convenient to place the bars of the plinth reinforcement. Then the upper part of the plinth formwork is fastened with screeds. Rebar trims are overlapped and tied with wire.
- In such a simple way, a rigid structure was obtained, which is firmly connected to the base of the foundation. Before you pour the formwork with concrete, you need to mark the top line of the pour on the shields. From the most elevated corner on the ground, marking the level of the basement horizon begins. After 1-1.5 meters from the starting point, marks are made and nails are driven through them through the shields. The height of the plinth will be shown by the protruding ends of the nails. They will also be control marks when pouring the base.
To create an ideal surface, it is necessary to mark and constantly control the horizon with a hydraulic level. In hot weather, protect the flooded plinth. About 2-3 days it is necessary to withstand concrete in the formwork. In the process of building a house, he will gain the necessary strength.
Unloading building materials
If during the construction of the house the entire set of building materials was ordered, then it is necessary to think in advance where to unload them.
First you need to remove the window and door blocks from the car. It is better to push other materials back, having previously unedged boards laid out on the ground.
After the materials are unloaded, it is necessary to immediately sort them by type, and lay them out in predetermined places.
It is better to lay out the materials as follows. Most often, the foundation of the house is located in the corner between the boundary of the site and the road.
In this regard, building materials must be laid as follows: against two walls of the basement. It is desirable that the distance from the stack to the foundation be at least 3 meters. In order to prevent warping and deflection of the beams, it is necessary to lay them on even gaskets laid horizontally. The bars themselves can be used as spacers. If there is a lot of space, then the stack is placed in a cage: one row is placed along, the other across.
Boards are laid on linings from scraps of boards. A gap is left between the boards so that the stack "breathes". Each new row of boards must be interspersed with spacers. It is necessary that the planed plane of the board is facing down. For unedged boards, the wide part should be facing down.
All stacks should rise above the ground by at least 20-30 cm.
When all the material is sorted and laid, it will be necessary to cover it from precipitation with roofing material. An important detail: on any lumber, you must immediately remove the remnants of the bark.
Approximate calculation of "accompanying" materials for the construction of a 6x6 house:
- 50 pieces of staples;
- 2 bales of tow;
- nails: 200 mm - 16 kg, 150 mm - 8 kg, 120 mm - 6 kg, 100 mm - 20 kg, 70 mm - 10 kg;
- 7 kg of slate nails;
- nails for external and internal cladding;
- 3 rolls of 15 m glassine for the ceiling and pediment;
- 12 rolls of 15 m of roofing felt on the plinth, on the subfloor and on the roof.
Timber floor and walls
Now it's time to lay the first crown.
Before laying the bottom trim, you need to send two layers of roofing material around the entire perimeter to the base. To do this, a strip of roofing material is bent along and placed on the base.
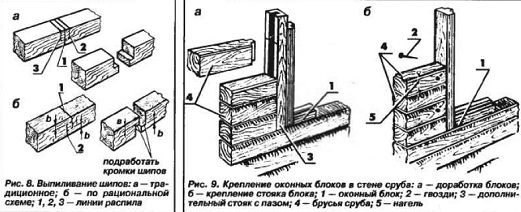
For strapping, even bars are selected without cracks, jumps and signs of rot. To prevent water from getting into the gaps between the bars, you need to chamfer 10x10 mm on the upper edges. Pairing the bars in the corners is best done with a spike and a groove. The dimensions of the spike should be 4x4 cm, and the dimensions of the groove should be 5 mm larger than the dimensions of the spike.
With the help of rectangular or round pins and 200 mm nails, the bars are joined together in a vertical plane.
It is better to cut curved bars into small pieces and lay them in window and door openings.
It is necessary to pay special attention to the antiseptic treatment of the bars of the first crown. Preheated oil should be lubricated on the inside and undersides of the bars, while leaving the ends clean. The processed strapping bars are laid on the base and fastened together with brackets.
After that, you need to immediately lay out the sexual logs. Bars can be used as a log, which are laid every 1 m. If the width of the basement allows, then the ends of the log are laid on it. If it does not allow, then tie-ins are made into the harness, and the ends of the lag are inserted there.
For large spans, the logs are laid on brick or concrete posts, which are buried 50 cm into the ground. The main requirement is that the position of the lag should be horizontal and the upper layers should have a single plane. For temporary flooring, unedged boards are laid on the logs.
Then you can start building walls.
The entire timber from which the house is built has the same length. But there are also window and door openings in the walls, so smaller bars may be needed. From one large beam, 3-4 smaller beams can be obtained.
Bars are prepared for 2-3 crowns. A uniform, even layer of tow is placed on the lower crown, its thickness should be 1 cm. Tow is twisted outward on both sides of the beam by 5-6. The second crown is placed on tow. Then the tow is put on again, and so on. The bars of the new crown are connected with nails to the bars below and overlying the crowns. The first nails from the corner of the house are located at a distance of 30-40 cm. Further, the nails are driven in after 1.5 m.
Window blocks every 2-3 crowns are fastened with nails to the wall beams.
If there is no window block, but you need to assemble a log house, you can make temporary risers from edged boards, the thickness of which is 20 mm, and the width is equal to the thickness of the log house. With the help of these boards, the beams of the opening are fixed and fastened in a vertical plane.
In this case, nails are driven through these boards into the end of the timber. When building the walls of a house, it is important to control the verticality of the corners and the horizontality of the walls. The bars must be fastened at the corners so that they do not go out.
A very crucial moment comes during the laying of the beams over the door and window blocks. In order not to pinch them, you need to leave a sedimentary gap, which is equal to 1/20 of the entire height of the log house.
Next, you need to install scaffolding. They are a flooring that rises 1.5-2 meters above the ground, depending on the height of the basement and log house. In forests, flooring is very important. It must support at least three people. Its width must be at least 60 cm.
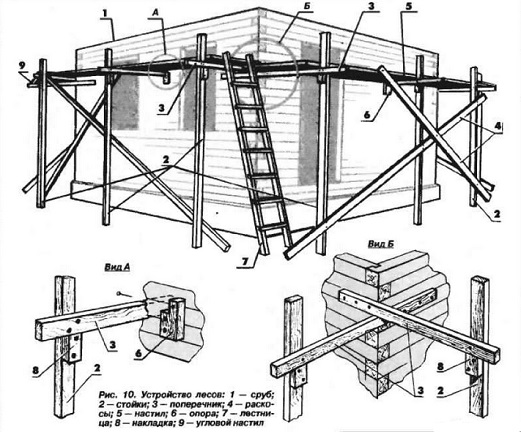
For the manufacture of scaffolding, any timber can be used - bars, slabs, round timber, edged and unedged boards. If the flooring of the scaffolding sags, you need to make it double. The laying of the beam can be completed when the height between the floor and the ceiling becomes at least 2.4 meters. The last crown must be well checked for elevation and diagonal and stapled at the corners. Now the walls are ready.
Roof
There are many different types of roofs: shed, gable, hip, tent, cross, etc. But in summer cottage construction, gable broken roofs are the most common. Because of their simplicity and manufacturability of installation, they have become very popular. Also, these roofs will allow you to build an attractive and spacious attic.
At the heart of the roof is a reliable overlap. It should consist of ceiling beams that are laid parallel to the facade. For a span of 6 meters in length, it is necessary to use beams with a cross section of at least 150x150 mm. You can support floor beams with a main wall.
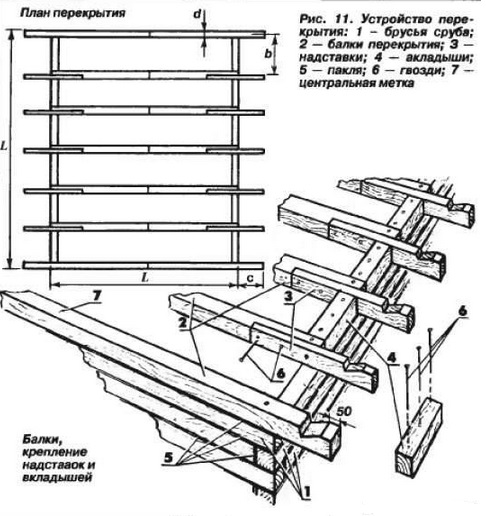
The distance between the floor beams should not be more than 1 m. On the upper trim of the log house, you need to mark the places where you need to put the floor beams. Using the hydraulic level, you need to achieve a common plane and strict horizontality. All irregularities that bulge must be carefully cut off with an ax.
It is necessary that the length of the floor beams exceed the width of the log house by two cornices.
Floor beams can be built up using pieces of boards 50x150 mm. At both ends of the beams, you need to cut out quarters 1 m long, insert extensions into them, connecting them with 150 mm nails to the bars. Then, on extensions, for ease of installation, inserts are made with a depth of 3-5 cm.
The prepared beams are lifted to the upper frame of the log house and laid in place on tow and nailed with 200 mm nails. Liners are inserted between the beams. With the help of them, you can fix the beams and protect the attic from the cold. The liners are nailed to the beam and to the strapping with 200 mm nails. The finished floor is covered with unedged boards.
In order to correctly determine the proportions of the roof, you can make a template. It can be crafted on the ground from edged boards. It is better to make a life-size template. So, using the template, you can determine what kind of mansard roof you want to build.
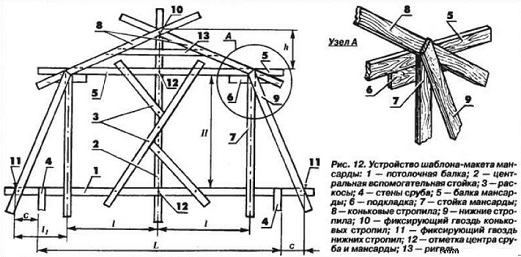
The next step is the installation of the attic frame. It can be done transversely and longitudinally. In both cases, the assembly is carried out on the floor. In the case of the transverse method, the frame profile is assembled from a U-shaped puff and 2 racks and is installed on the desired ceiling beam of the house. The installed U-shaped elements are connected by girders to each other.
The flatness of the walls and ceiling of the attic is difficult to achieve as the curvature of the beams of the ceiling ceilings is possible. Therefore, it is better to use the longitudinal mounting method.
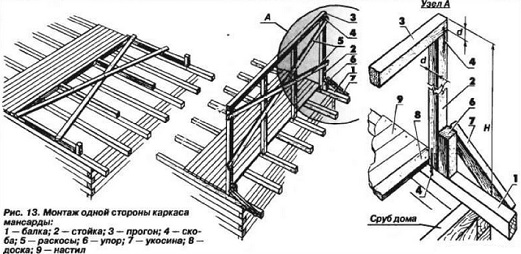
To use this method, it is necessary to free the right side of the floor from the temporary flooring. Racks are laid on the ceiling beams and the upper run is attached to them with brackets. Then the racks are fixed with braces. The span of the frame must be lifted without jerks; at the initial moment of lifting, it is necessary to place bars under the run. After checking the verticality of the racks on a plumb line, fix them with braces.
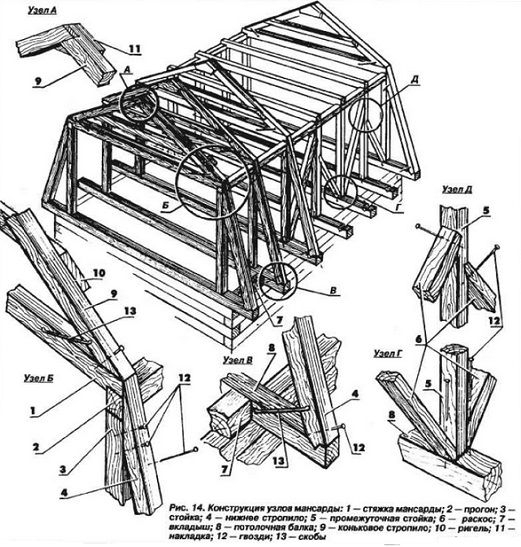
In order to facilitate installation, intermediate posts are placed under the purlins that have already been raised. The same operations must be repeated on the other side. After the racks with girders are raised and fastened, you need to tie them with the help of attic beams - floor screeds.
When the attic beams are laid and fastened with nails, unedged boards must be laid on them.
Linings assembled according to the template, ridge rafters, crossbars are installed on screeds and fastened with nails. Installation begins with the fronts, and then intermediate ridge rafters are exposed.
Now the attic frame is built.
Roofing of the house
This is a very responsible job that requires skill, knowledge and skills.
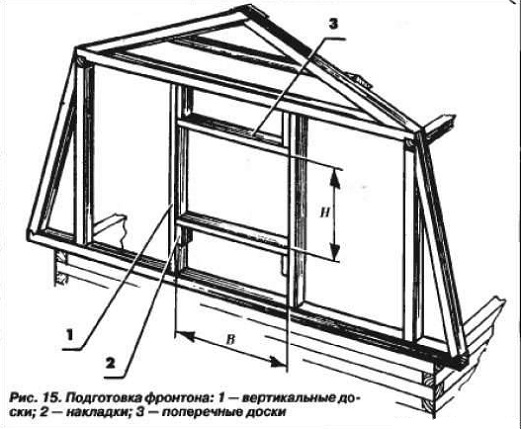
You need to start with the preparation of the fronts. Such preparation consists in installing two transverse and two vertical boards, the section of which is 150x50 mm. A window block is inserted into the resulting opening, its horizontal-vertical position is checked and fixed with nails.
Next, you need to tighten the pediment with glassine. It will protect against moisture and protect the house from drafts. Strips of parchment should preferably be overlapped and horizontal, and fastened to the posts with small nails or tacks. Usually the pediment is sheathed with a surge. It is better to sew the lower part of the pediment horizontally, and the upper vertically. This method is technologically advanced and very economical.
First, the vertical upper part is sewn up. It is necessary to carefully monitor that the boards lie vertically, and the ridge of the surge fits tightly into the groove. You can fill the surge, and then cut off its ends, which protrude above the rafters, with a hacksaw.
It is important to nail the drain board correctly. It needs to be nailed with a small bevel between the horizontal and vertical part of the skin. When sewing up the upper part of the pediment, remember that the overlay should always be a groove down. It is also necessary to constantly monitor horizontality.
roof lathing
We can say that this work is simple, but it has its own characteristics. Firstly, it is necessary that the crate protrudes beyond the dimensions of the house. Such a ledge must be made to protect from the fronts of the building from the ingress of storm water. Most often, an overhang of 50-70 cm is made. If the roof in the house is ruberoid, then the size of the overhang does not play a special role.
If the roof is slate, then the size of the overhangs of the gable cornices must be precisely determined in accordance with the total length of the crate. This can be done in a very simple way. It is necessary to lay out two boards parallel to the entire intended width of the roof on the ground. On them it is necessary to place a slate with the desired overlap in a whole wave or half wave.
Then you should compare the length of the entire row with the length of the roof. The difference between the length of the laid out row and the crate is divided into two parts and the required width of the overhang is obtained.
After the overhangs have been determined, two boards are nailed to each rafter. In this case, the width of the cornice must correspond to the departure of each board. Then it is nailed along the board to the ends of these ledges.
For intermediate boards of the crate, natural limiters are obtained.
The crate can be made of unedged boards if they are nailed with the view down. Between the boards there should be a gap of 5 cm. During the laying of the boards, the butt part with the top alternate. Edged boards should be nailed to the lower and upper parts of the rafters.
After the crate is ready, you should immediately sheathe the cornices of the gables. This is a very time-consuming business that requires certain skills, because you have to work in hard-to-reach places and at high altitudes. You can sew up the cornices immediately with shields, which are calmly and easily made on the ground. After they are made, all that remains is to raise them to the roof and make room for placing the lining between the boards of the crate.
If the need arises, then it is possible to close the joint of the shield with the boards of the pediment with flashings. Frontal boards should be nailed to the ends of the shields.
Next comes the roof. At the initial stage of construction, it is better to cover the roof with two layers of roofing material. The rolls need to be lifted onto the roof and rolled out perpendicular to the ridge. It is necessary that each next strip of roofing material overlaps another strip by at least 10-15 cm.
The first layer of roofing material can be attached with buttons, and the second - with wooden slats, which can be treated with paint, drying oil, machine oil or an antiseptic. It is better to close the roof covered with roofing material with a galvanized iron sheet along the ridge.

The ends of the roofing material that hang down must be well fixed.
Now the house is under the roof. Further interior finishing work will be carried out. This is the most enjoyable stage in building a house.
Internal finishing works
This stage of construction should begin with the stuffing of the subfloor. First you need to fill the cranial bars along the lower edges of the lag. And then nail the black floor boards to them. This flooring is covered with a layer of roofing material and a heater is placed on top of it. As a heater, you can use mineral wool or expanded clay. On top of the insulation you need to send glassine.
Boards of a clean floor are placed on the logs with the front side, while the nails are not hammered to the end. After a year, you will need to pull out the nails, and turn the boards over and nail them down completely.
When flashing the ceiling, you need to decide where to leave the opening to the attic floor.
After the ceiling is hit, you need to move to the second floor. There, glassine is laid on the ceiling boards, a heater is placed, then glassine again and the floorboards are nailed.
After that, the attic ceiling is hemmed.
At the stage of interior decoration, door and window blocks are exposed and fixed. They are fixed with wedges in the openings. The exposed blocks with the walls of the log house are fastened with nails 100-120 mm. Tow is stuffed into the gap, the parts that protrude are cut off. The gap between the wall and the block is closed with platbands. The threshold of the door unit should not rise more than 7 cm above the floor.
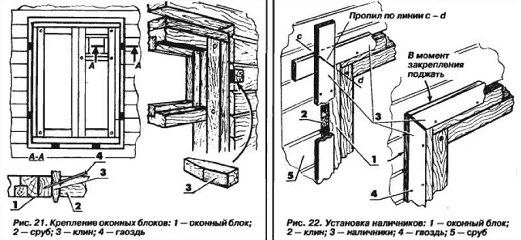
When fixing window blocks, an inclined cornice should be nailed above the upper casing, and a drain should be installed on the bottom board.
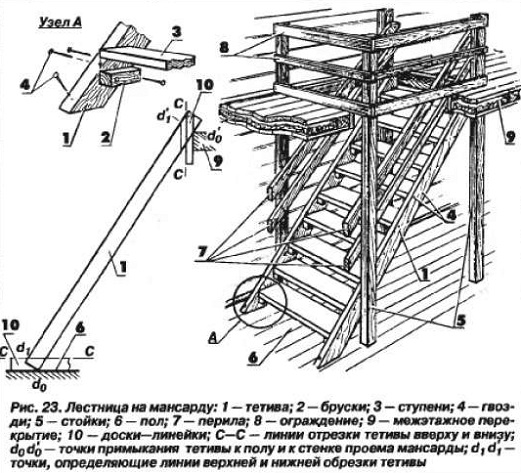
It is necessary to make a staircase that will lead to the second floor. By design, the simplest is a single-flight staircase.
Its lower part rests on the floor, and its upper part rests on the wall of the attic opening. The distance between the steps should be 20 cm. First, materials for the bowstring, railings and steps are prepared. For the manufacture of bowstrings, it is better to purchase lumber with a section of 60x200 mm.
For steps it is necessary to select dry material, at least 50 mm thick. Their length is at least 800 mm. The ends of the steps and their length must be identical.
The steps are laid on bars with a section of 5x5 cm and fastened with nails 100 mm to the bowstrings. The places where the stairs fit to the attic and to the floor are determined. Cuts are made, and the necessary workpiece is obtained, which fits snugly against the wall and floor.
On this blank, a second bowstring is cut. Both bowstrings are combined, and marks of future steps are applied on the outer edges. Bars are nailed along these marks, and then steps. The steps on the outside of the bowstring are nailed with decorative hats.