The technology of pouring monolithic concrete bases is in demand in private construction, the main advantage is the ability to obtain a reliable structure even when doing the work yourself. The requirements for the mortar, the reinforcement frame and other materials used are high; up to 30% of the budget is spent on laying this part of the building. The only way to save money is to pour the foundation with your own hands, without or with minimal involvement of specialists. In most cases, the tape type is selected.
The main nuance of the technology is the continuity of the process, the structure is poured into a single monolith. This and the need for the most homogeneous solution leads to the need to use special equipment. Manual mixing is not allowed, it is almost impossible to prepare high-quality concrete in a volume of 4-6 m3 yourself. The most popular device is a concrete mixer with a bowl capacity of at least 60 liters, on average it takes from 5 minutes to mix one portion (provided that the components are properly prepared).
When working with ready-mixed goods, two types of machines are used: a mixer or a concrete pump. The first is used when pouring a large volume foundation, a prerequisite is the organization of an entrance to the formwork and the preparation of gutters for filing. The more supply points, the easier it is to distribute the solution inside. Concrete pump services are required in the absence of an appropriate entrance, this special equipment is considered the most convenient due to the long hose (up to 50 m). The disadvantages include an increase in costs, its one-time rental costs 15,000-20,000 rubles.
The next is equipment for uniform distribution of concrete in the formwork, for example, internal vibrators. Their main purpose is to expel excess air from the solution and compact it. Rent is inexpensive (500-750 rubles per day), the use is considered justified (the characteristics of concrete correspond to its strength class, the reliability and durability of the structure increase). In the absence of such an opportunity, air is forced out manually - with a shovel or a special stick.
You will also need: a hook or a construction gun for tying the frame, formwork (the best surface is obtained when using shields made of moisture-resistant plywood or plastic), spacers, plastic pipes for laying holes for future communications, a wheelbarrow for bringing mortar, a trowel for leveling the top layer of the foundation. Soil analysis, calculation of the amount of building materials and reinforcement is carried out in advance. When planning the timing, it is taken into account that most of the labor costs are for earthworks; special equipment can also be involved in digging deep trenches and removing soil.

Step-by-step instructions for concreting the base
The Standard Guide includes the following steps:
1. Preparatory: cleaning the site of debris, marking. Particular attention is paid to the corners, diagonal deviations are checked and excluded.
2. Earthworks. The depth of the trench depends on the parameters of the soil, usually it varies from 0.5 to 1 m, the width is chosen 20 cm more than the size of the tape. At the end of digging, the bottom is checked for evenness, level deviations are unacceptable.
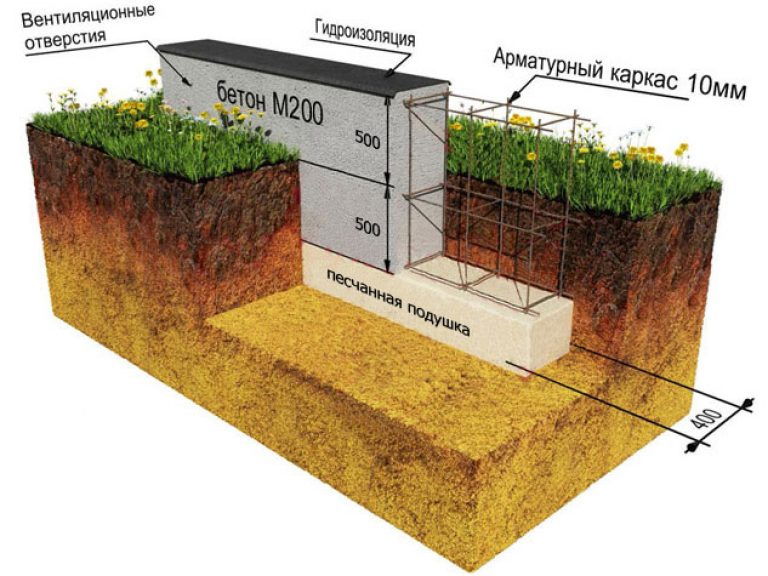
3. Formation of a pillow: at least 15 cm of sand and 10 cm of crushed stone are filled in layers and rammed. The main purpose of these layers is to reduce the load from soil movements on the lower base of the foundation; in problem areas, their thickness is increased. In some cases, a layer of rolled waterproofing is laid on top of carefully compacted rubble; an alternative option is to impregnate screenings with bitumen. With a high risk of displacement, the top layer of the pillow is recommended to be poured from lean concrete (up to 10 cm).
4. Preparation and installation of formwork panels. At this stage, in addition to laying holes for communications, it is important to check and mark the level of the future structure inside. To exclude backfilling with earth, the shields are made above the zero mark by at least 30 cm, to simplify the procedure for their removal, they are lubricated with oil. All elements are securely fixed, the corners are checked again.

5. Assembly of the frame. The reinforcement scheme is selected based on the size of the foundation, the cross section of the rods depends on the purpose of the building - for residential buildings, the minimum for longitudinal rows is 12 mm, baths - 10. The requirements for vertical and transverse are weaker, it is allowed to use rods with a diameter of 6 to 10 mm. It is not recommended to use welding to connect joints; for these purposes, plastic clamps or knitting wire will be required. The minimum number of longitudinal rows in a standard shallow foundation is 2; if the height of the structure is exceeded, they are increased (vertical placement interval is 70-80 cm). To prevent contact of the lower part with the pillow, pieces of brick or special plastic molds are placed under the rods.
6. Mixing in a concrete mixer. The ratio of binder to sand cannot be more than 1:3, the exact proportions are selected according to the required brand of concrete and the type of construction (from M200 and above). All components are prepared in advance, the allowable interval between mixing new portions is 2 hours. The foundation must be poured in one day, if this condition cannot be met, a ready-made composition is ordered.
7. The distribution of the mixture in the formwork: in layers of 20 cm, with air distillation with a chopper, stick or using vibration equipment or piercing with reinforcement. The top layer is leveled with a trowel.
8. Exposure of concrete in the formwork with mandatory moisture care and covering with a film. Shields are removed after 1-2 weeks, it is allowed to proceed to the next stage no earlier than in a month.

The above guide can be used for pouring a slab-type foundation, in which case the soil is removed around the entire perimeter of the building, the pillow, reinforced frame and concrete layer are placed over its entire area.
With self-mixing, the solution cannot be poured in one layer, it is distributed in squares. Materials and work are more expensive, this option is resorted to if shallow laying of the slab is acceptable or the construction of a house with a basement is acceptable.
What factors are taken into account when laying the foundation
The process becomes more complicated when planning a basement, erecting an extension to an already operated building, building on difficult soils, the need to replace or restore the structure. The foundation is laid to a depth of 2-2.2 m in the case of a cellar; for buildings with basements, the total height of the tape is at least half the floor. A foundation with a basement under a house is more difficult to reinforce and pour, the cost of building materials and the effort to dig trenches or a foundation pit increase significantly, when designing it is worth considering the feasibility of such a solution. An alternative is the laying of cellar walls from blocks, but this design is not suitable for all types of soil.
If it is necessary to lay a new foundation under an already operated building (old, or without a tape under the internal walls), the following scheme of actions is followed: digging up walls → clearing surfaces and corners, removing old concrete → reinforcing the reinforcement cage using anchoring or tying to old rods → formwork installation → concreting. Replacement is carried out in separate segments up to 2 m wide, dismantling - through one section, a gap is left for waterproofing the top layer. When laying under an old wooden house, the walls are slightly raised with jacks, starting from the most sagging corner.
When pouring a tape for an extension or in the absence of it, a trench is dug under the internal load-bearing walls with a depth no less than that of the monolith already in operation. A correctly made connection is impossible without anchoring. For this purpose, a hole for reinforcement with a depth of at least 25 cm is drilled in the foundation wall, and it deepens into the new base at the same distance. The brand of concrete used and the width of the tape are not lower than those of the old one.
How to fill the foundation: tips and tricks
To speed up the process, all proportions should be translated into buckets. The recommended ratio of components is 1:3:5. In recalculation for the M250 brand, one 50 kg bag of Portland cement M400 takes 5 buckets of sand, 12 gravel and 3.5 liters of water. These proportions are indicated for a measuring container of 10 liters, checking the weight of the filler on site is mandatory.
Technology violations and actions that complicate the process include:
- Digging trenches in advance, when they are left for a long time, the edges crumble, the markings go astray, and moisture accumulates at the bottom.
- Moistening the sand for the pillow even before falling asleep in the pit, otherwise the bottom will be washed out.
- The construction of a foundation for an extension to a house without a rigid connection or laying an expansion joint.
- Excess W / C ratio, use of stale binder, lack of a concrete mixer.
- Welding of reinforcement in the frame (seams are subject to corrosion and are inferior in reliability to wire), ignoring the requirements for the layout of the bars.