Usually, in order to save money, for baths with a total area of \u200b\u200bno more than 12 m2, they make the so-called non-attic shed roof. With a larger area of \u200b\u200bthe bath, the roof is best made with a gable roof.
But, nevertheless, if you plan to use the sauna all year round, then it is better to make an attic, as it provides good thermal insulation.
If we talk about the required angle of the roof slope, then it directly depends on the roofing material used and can vary from 4 to 12 ° - for non-attic roofs and from 12 to 28 ° - for attic roofs.
As a support for the roof, attic beams or wall beams made of coniferous wood are used. The size of the beams depends on the length of the span, that is, the distance between the walls. Usually, with a span length of 3.5 m or less, a beam 5-6 cm thick and 12-15 cm wide, respectively, is used, fixing it to the edge.

Naturally, before laying the beams, they are impregnated with an antiseptic. The side surfaces of the ends of the beams (ends), which rest on stone or concrete walls, are wrapped in a double layer of rolled material, such as roofing felt or roofing felt, and the ends themselves are beveled and left open.
The beams must be embedded in the walls in such a way that when the bath is heated, warm air cannot penetrate into the attachment points. Otherwise, the resulting condensate will lead to premature destruction of the tree. The embedment depth should be at least 10 centimeters.
On the beams, two-legged layered or hanging rafters are installed from logs of small sizes, beams or planed boards. The rafters are a kind of basis for the future roof covering, which can be used as roll materials, such as roofing material, slate, corrugated board or metal tiles.
If possible and, of course, if desired, the bath can be covered with turf, this will give it some flavor and allow it to harmoniously fit into the landscape of the area.
In order to cover the roof of the bathhouse with turf, it is necessary to arrange a continuous flooring of planed boards on the rafters, cover it with a waterproofing material such as roofing material on top, and then lay two layers of turf on top: the bottom layer is laid with roots up, and the top one with roots down.
But still we suggest you watch the video about how to make a roof for a bath with your own hands.
The first video will be about how to properly fix the roof rafters:
Installation of the truss system
Well, another version of the roof of the bath with an attic or an attic roof:
Bath roof erection
The ceiling in the bath can be made from almost any wood materials, but still it is better to make the ceiling in the bath from tree species with a low resin content.
All existing types of ceilings can be divided into three types:
1. Hemmed;
2. Floor-mounted;
3.Panel.
False ceiling in the bath

This ceiling can be done as follows:
- beams laid on the wall are sheathed with boards;
- after which a layer of light insulation should be laid from the attic side, for example, peat, slag, sawdust, dry earth, pumice, etc.
- then the backfill is closed from above with a slab nailed to the beams, or with special fire-resistant slabs, which include sawdust, cement, clay and water.

This type of ceiling differs from hemmed ones in that the boards are laid directly on the upper trim of the walls of the bath.

The most convenient ceiling is a panel ceiling of the same design as the blank wall panels. If the frames of the panels are made strong enough, then when installing them, you can do without additional floors.
How to insulate the ceiling in the bath
In private construction, the construction of a bathhouse is a special ritual, in which not only the desire to create a washing room is invested, but something more. The bath is a reflection of the soul of the house, a place for rest in spirit and body.
The construction of the bath is completed by the erection of a roof over it, which must immediately meet many quality and appearance criteria. We will figure out how to make a gable roof on a bathhouse on our own, and also highlight other possible options for roofing structures applicable for covering a bathhouse.
In this article
The choice and calculation of the design
Depending on the plans for the attic and aesthetic preferences, the roof for the bath can be made in two types:
Before you make a roof on the bath, you need to calculate it. Let us consider in detail the process of calculating and designing a gable structure, as the most popular and common:
- Structure measurement and level check. Design begins with the measurement of the bath. As a rule, baths are rectangular or square structures, convenient for the quick construction of a gable roof. The data obtained is transferred to paper in the form of a drawing.
Particular attention must be paid to checking the level of the walls of the building - building codes allow a deviation from the horizontal level of no more than 1 cm per 5 linear meters. If the deviation is greater, this must be taken into account when laying the Mauerlat. - Calculation of the angles of inclination and height of the ridge. The calculation of these parameters is dependent on each other: the higher the ridge of the bath, the steeper the slopes and the more usable space in the attic.
Tilt angle
The angle of inclination depends on the weather conditions of the region - its choice is influenced by wind and snow loads. The steeper the roof, the better it gets rid of snow masses, but the worse it resists strong winds. The calculation of the snow and wind load of the roof is done according to the SNiP data and maps dividing the country into special natural zones.
The slope of the slopes also depends on the chosen roofing material, each of which assumes the presence of its own interval of the possible slope of the slopes. It is possible to get acquainted with these data in specialized tables or characteristics of roofing materials.

Thus, the choice of the angle of inclination and height cannot be made "at will", but must be the result of painstaking computational work.
Choice of building materials. Design and calculations are important when choosing and purchasing building materials. Precisely made calculations make it possible to determine the required sections of the timber for the rafters, the need to create a sparse or continuous crate. These parameters are related to the obtained roof load data.
The amount of insulation, waterproofing film and roofing depends on the area of the planned roofing. When buying building materials, you should always purchase 15-20% more materials for possible overruns due to overlapping or waste.
Having created a plan for the future roof, you can actually move on to the main issue - building a roof for a bath with your own hands.
Construction of a gable roof for a bath
Construction of the truss system
The roof structure is based on a truss system, which is a complex of wooden elements:
- Mauerlat - the base that supports the entire structure on the walls of the building;
- Rafter trusses - elements in the form of isosceles triangles, the legs of which are rafter legs. It is the shape of the triangle, as the most stable figure, that allows the gable roof to withstand large external loads;
- Lathing - a system of a sparse or solid nature, which allows you to attach roofing material to the rafters.

All wooden elements of the roof structure are made from dried wood with a moisture content of not more than 20% without knots and cracks. Before installation, the wood is treated with special agents to prevent the formation of mold, fungus and wood damage by pests.
There are two ways to build a truss structure:

When calculating and choosing a material for a rafter system, the total load on it is taken into account, which depends on its weight of the structure, snow load, etc. As a rule, rafters are made of a wooden beam with a section of 50 * 100 mm.
Consider how to properly make a truss system for a gable roof:
- Mauerlat is laid on walls insulated with a layer of roofing material and attached to them with anchor bolts, studs or twist. In a bath from a bar, the role of the Mauerlat is performed by the upper crowns, fastened with brackets;
- Rafter trusses are fastened at the top with a metal plate. First of all, the extreme trusses are mounted, and then, according to the level set by them, the rest are set through a gap of approximately 60 cm. The rafter legs can be fastened to the Mauerlat by cutting or metal elements.

Roof decking and insulation
An important point in the construction of a roof structure is its vapor and waterproofing. The protective material is spread over the rafters with an overlap of up to 10-15 cm at the joints of the material and fixed with nails or staples. It is important to create ventilation gaps between the waterproofing and the roof. To do this, a counter-batten is created under the crate system.
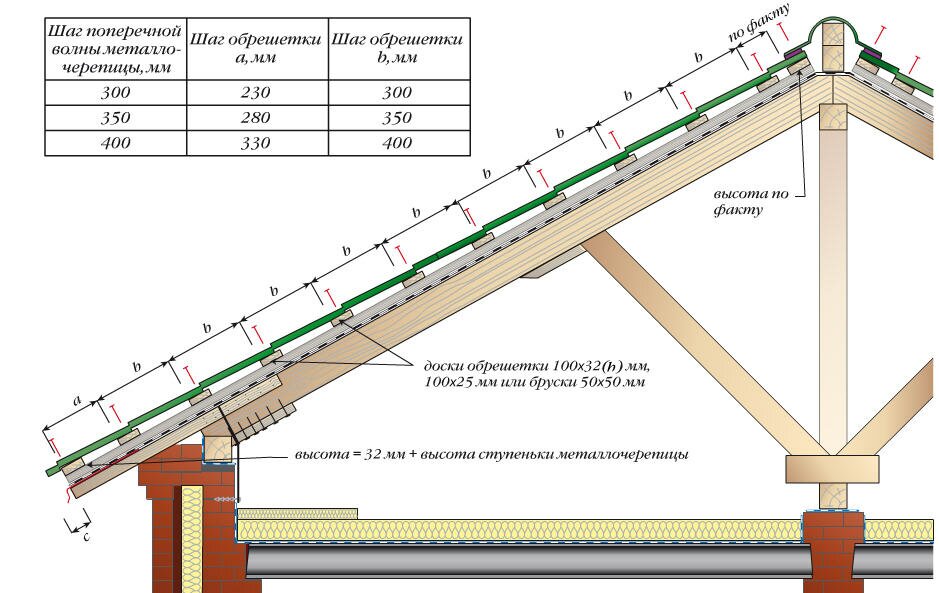
Next, the crate is stuffed, the step of which depends on the selected roofing material. Under soft roofs, a continuous crate of moisture-resistant plywood is made; for other materials, the step of the system can be increased up to 40-50 cm, depending on the slope of the slopes.
If you want to create a warm roof on the bath, a heater is used, which is laid from the side of the attic between the rafters and sewn up with a layer of vapor barrier material.

Installation of roofing material and pipe outlet
One of the finishing types of work is the installation of roofing material on the bath roof. Regardless of the chosen roof, the order of work will be as follows:
- Laying the first row of roofing along the cornice, maintaining the level and firmly fixing the first row of material;
- Installation of the following rows of roofing from the eaves up to the ridge. Each next row is overlapped with the previous one from 10-15 cm to avoid roof leaks;
- Lastly, the roof ridge is equipped, the options for which vary depending on the chosen roofing material.
An important point in the construction of the roof on the bath is the question: how to make a chimney? It is most advisable to bring the pipe in the bath through the roof 30-50 cm from the ridge with an elevation of 50 to 100 cm above the roof. The passage of the pipe through the roofing pie, the materials of which ignite easily and quickly, must be associated with the mandatory insulation of the pipe. To do this, a special manhole is made in the built roof, the walls of which do not allow the pipe to come into contact with combustible elements of the roof.
The final work is the installation of the drainage system, the sewing of the roof overhangs and the lining of the roof gables.

Other types of roofs for a bath: the main points of design and construction
To cover the bath, other types of roofs can also be used - shed or unequal. Compared to a gable, they are not so practical, but they have a number of reasons for building just above the bath. Consider their main features.
Shed roof
Consider how to make the roof of the bath in the form of a shed structure. This type of roofing can be used when it is necessary to cover a rather small bath or when the bath is an extension to the main building. To use such a design, one of the walls of the building is made higher in order to obtain the required angle of inclination of the roof. It is recommended to observe the slope of the slope within at least 20° for less load on floors, and in regions with snowy winters, increase this figure to 45°.
Calculation and construction of a shed roof for a bath with their own hands, in principle, repeat all the points above for a gable construction. Let's dwell on some points that are typical for a roof with one slope:
- When calculating the angle of inclination of a shed roof, an indicator of the value by which one of the walls of the building must be raised is taken into production. The larger it is, the steeper the erected roof will be and the less load on its truss system;
- The support points of the rafters are the Mauerlat, fixed on the walls of different levels.
The remaining operations for the construction of a shed roof are identical to the order of work for a gable roof described above.

Roof with unequal slopes
An interesting version of the roof for a bath is a design with two slopes of various lengths and angles of inclination. A longer and gentler slope in this case can be a canopy over the veranda adjacent to the bath. With seeming attractiveness, this type of roof for a bath has two drawbacks:
- Due to the small height of the roof above the bath, the dimensions of the veranda will turn out to be very small;
- The dimensions of the attic are very small and do not allow it to be fully used for storing household items.
Considering that the calculations and construction of an unequal roof are fraught with a lot of difficulties, the construction of such a roof over a bath is irrational.
Summing up
The erection of a roof over the bath as a whole follows the basic rules for the construction of roofs. The predominantly small size of the baths dictates special wishes for the roof being erected, which is most consistent with the gable roof. It allows you to create a durable, comfortable and outwardly attractive roof over a bath structure with the lowest economic and construction costs.
A gable roof with an attic is the best solution for creating a reliable structure in a bath that meets all standards. It is functional and with the right approach can be a good decoration. But in order for the gable structure to meet all the tasks set, it is necessary to design it correctly.
Advantages of a roof with two slopes
In some cases, you can get away with installing a simpler roof with one slope. But if you think about it, the financial expenses do not differ so much. Moreover, in terms of functionality, a gable roof has a number of advantages:
- the possibility of arranging a residential attic space or adapting it for bath accessories;
- high degree of thermal insulation of the bath ceiling;
- with the correct organization of the ramp, the structure will last as long as possible without repair and additional care;
- decent appearance.
A simple example of a gable roof: 1 - rafters; 2 - transverse fastening; 3 - Mauerlat; 4 - ridge beam.
What will be needed at work?
You can design a gable roof on a small bath yourself, but first you need to decide on the materials. This is not only the wood used to assemble the frame, but also the coating responsible for the angle of inclination. For each type of material, its own indicators are recommended:
- ondulin - 3-15 degrees;
- metal tile - 27 degrees;
- euroslate - 27 degrees;
- seam roof - 18 degrees;
- roofing material - 5 degrees;
- corrugated board - 8 degrees.

The indicators are dictated not by the decorative finish, but by the weight load on the roof frame. The heavier the material, the more you need to make the angle of inclination. Gentle slopes, under the influence of precipitation (snow) and the load exerted by the coating, can break through. In addition, heavy construction will create an additional load on the foundation of the bath. This also needs to be taken into account.
When choosing a material and determining the angle of inclination, it is recommended to take into account the climatic features in the region. If the precipitation is not intensive, then the given indicators for each material can be changed.
In addition to the coating in the construction of a gable roof on a bathhouse and other structures, lumber is required:
- mortgage beam (Mauerlat) it is made of a material with a cross section of at least 150x150 mm;
- roof trusses are wooden beams 50x100 mm;
- an unedged board is used as a crate.
In addition, you will need a film to isolate the steam passing from the steam room and washing compartment and a heater.
Stages of assembling a gable roof and truss system
The roof in any constructive plan is a frame sheathed with roofing. All work is carried out in strict sequence.
Mauerlat is installed first. To do this, a beam of 150x150 mm is laid along the upper part of the walls and fastened to the studs. They are immured in advance at the stage of laying the walls of the bath from brick or other material. There is also a wire fixing option. For this, segments of the required length are laid between the penultimate and last crown of logs, if the bath is built of wood, or in brickwork. Mauerlat must be laid evenly, both horizontally, and check the diagonal of the structure.
 In the Mauerlat, grooves are cut for laying the rafter legs, at a certain distance. If the wall panel is thicker than the base of the roof, it is additionally wrapped with roofing material in several layers and laid with bricks on the outside to increase strength.
Next, you need to assemble the truss structure. This is a rigid triangular bundle of timber. To further strengthen them, a spacer is mounted across each. A crossbar is installed at the top of the corner. It is mounted after the installation of the rafters, and it is better to assemble them on the ground, having previously “removed” the dimensions.
When the required number of rafters has been collected, they must be installed on the Mauerlat. The ridge corners are mounted first. Trim and attach to the Mauerlat. All is ready. Of all the types of bath roofs with two slopes, the process of installing the main rafters in this system is the simplest. At the end of the work, the evenness of both structures is checked. Next, the rope is pulled along the top of the corners and the rest of the trusses are mounted relative to this landmark.
After installing all the rafters, we check the evenness of the installation and carry out a control fixation to the Mauerlat and the ridge bar. If the roof slope is more than 4.5 meters, then you need to additionally install supports, so that they hold the rafter leg on one side and rest against the floor beam on the other.
Finishing work according to plan
The skeleton of the roof is assembled, it remains to carry out the final work. First of all, we determine the place where the chimney exits, if it is not laid through the wall. We mount a metal adapter and isolate it with a heater.

Next, we fasten the vapor barrier layer to the rafters with staples of the stapler. On top of it we stuff a crate from an unedged board. The step is selected according to the type of roofing material. Under roll coatings, continuous sewing; for sheet materials, boards can be fixed at a distance of 15–20 cm from each other. The crate is stuffed throughout the entire truss system, with a protrusion beyond the lower edge by about 20 cm. You don’t need to do more, and if the trusses are longer, then they are sawn off at the same distance.
No need to rush to lay the cover. First, you need to give it additional strength by sewing up the end parts. For this you need a board. In brick baths, stone is laid out, with sewing of gables. If you plan to use the attic space, leave space for the installation of a window frame.
When the structure is sewn from the gables, it will be much stronger. Now you can proceed to the next step. Waterproofing is laid over the crate. In some cases, the membrane used for this purpose is laid between the rafters, under the counter-batten. This allows you to create an additional air layer for quick drying of the roof structure and additional ventilation of the bath ceiling from the attic space.

Laying roofing material
The last step in the assembly of a gable roof. The laying principle is the same for all types of coatings. It is necessary to start from the bottom of the cornice and gradually rise, overlapping the lower rows with the next layers. Make sure that the laying is even so that the appearance is not spoiled by curved lines. Having closed both slopes, we install the ridge bar, fixing it with self-tapping screws.
The process of assembling a gable roof is over. This is the easiest option for designing a truss system. Taking into account the advice, you can independently design a reliable roof on the bath that meets all technological requirements.
At the final stage of the construction of the bath complex, a roof is erected on the bath with their own hands. If we build a roof for a bathhouse with our own hands, then before carrying out all the work, you should study in detail the technology and nuances of installing roof structures. After completing the construction of the roof of the bath with your own hands, you can begin to finish the building both outside and inside.
In order for the ceiling of the bath to not leak and retain heat well in the room, special attention should be paid to the process of installing the roof on the building. Subject to all the requirements of the instructions for erecting the roof of the bathhouse with your own hands, it will allow you to operate the structure for a long time without resorting to repair work.
In order to properly build the roof of the bath with your own hands, you must comply with all building codes and regulations. Such a roof must have high-quality steam, heat and waterproofing.
Before carrying out installation work, you should study the installation process in detail. This will avoid the occurrence of errors and will make it possible to reduce the cost of building a bath complex, since it will not be necessary to involve a construction specialist for the installation of the roof.
The roof of the bath complex is quite easy to mount on your own, for this purpose a person must have a certain level of knowledge in the field of construction and have skills in handling metalwork and carpentry tools.

To date, the most popular options for building a bath are the use of timber, logs and frame structures. Each of these types of buildings has features in the process of installing a roof structure.
Bath roofing
In order to properly build, you should study in detail the design options for this building element. The roof of any building, including the building of the bath complex, consists, depending on the type, of certain standard structural elements.

The composition of the structure of any roof includes the following structural elements:
- rafter system;
- crate;
- heat, steam and vapor barrier systems;
- roofing.
Depending on the design features, the following types of roofs are distinguished:
- lean-to;
- gable;
- hip;
- tent;
- multi-forceps;
- attic.
In addition, any of the types of roof construction may have its own characteristics, due to the preferences and desires of the building owner.
Most often used in the construction of baths. Experts recommend building this type of roof during the construction of baths, as it is the most convenient option. The presence of free space under the roof being built allows you to equip a small attic. In this case, the attic space can be used to store bath and other equipment.
The advantage of a gable roof is the absence of accumulations of precipitation, which can accumulate on other types of roofs in the winter season. On a gable roof, snow slides off the surface under its own weight.
A shed type of roof is used very rarely in the construction of bath complexes.
Installation of a gable roof of the bath complex
Since the gable roof is the most popular, you should take a closer look at how a gable roof for a bath is built with your own hands.

To date, there are 2 installation systems for a gable roof:
- Hanging rafter system. This type of rafter system is fastened with one side to the body of the building, and the second side is fixed between two opposite sections of the rafters.
- Inclined rafters. This type of structure is more stable, since the elements of the structure are additionally held by a rack located in the center.
A gable roof is the most preferred option for creating a do-it-yourself roof for a frame bath, as the design provides self-cleaning of the surface of the roof slopes from accumulating precipitation, which significantly reduces the pressure exerted on the building. This effect is achieved due to the fact that the gable roof has a large angle of inclination of the roofing planes.
By design, a gable roof represents several isosceles triangles of the same size and shape, which are evenly spaced along the entire building. The top of the structure is called the ridge. The transverse beam, to which the top of the rafters is fixed, is called the crossbar. The crossbar gives strength to the structure and fastens individual rafters into a single structure. The strength of the entire structure depends on the size of the step between the rafters.

The fastening of the rafters at the top of the walls of the building is carried out after the installation of the ceiling beams is completed.
Installation of load-bearing roof structures consists of the following steps:
- fastening the Mauerlat to the wall of the building;
- roof truss assembly;
- installation of two farms at different ends of the building;
- installation of the remaining roof trusses along a specially stretched cord.
After the completion of the installation work on the installation of the supporting structures of the roof, they begin to fix the lathing, the installation of layers of steam, hydro and heat insulating materials. Upon completion of these works, the installation of roofing material is carried out.
Carrying out the installation of the crate
After completion of installation work on the installation of roof rafters, the installation of the crate is carried out.

When installing this structural element, you should pay attention to a number of requirements that must be met during the work. These requirements are as follows:
- The boards that make up the crate are stuffed, starting from the ridge, and gradually move to the lower part of the structure.
- The crate can be solid or with gaps. The choice of type of construction depends on the roofing material used.
- The ends of the stuffed boards should protrude beyond the ends of the trusses that form the basis of the pediments by approximately 18-20 cm. Such a protrusion of the roof over the pediments protects the pediment from the adverse effects of atmospheric factors and is called the pediment cornice.
A solid crate is best used when using roll-type roofing materials. A solid crate is also recommended for use when covering the roof with metal tiles and slate. The gaps in such a crate should not exceed 10 mm.
When using sheet iron, asbestos-cement slate or bituminous sheet as a roofing material, the distance between the boards of the battens can be 18-25 cm.
After fixing the battens on the supporting structure of the roof, they proceed to the installation of steam, hydro and thermal insulation.
Installation of steam and waterproofing insulation
Before erecting a roof, many owners think about questions about how to do it right and what building materials are best to use. Roofing material and membrane film can be used as a vapor and waterproofing material for roofing installation. The roofing material is mounted on the rafters in 2 layers, this provides a high degree of protection of the load-bearing structures from the effects of negative atmospheric factors.

If a membrane film is used, then it can perform the functions of both a waterproofing and a heat-insulating material, since it has a low heat transfer rate.
For the high-quality functioning of the installed material, the film must be laid on the truss structure and fixed with construction tape.
The new strip must overlap the previous strip. It is forbidden to stretch the film on truss structures. The stretching of the film can contribute to the occurrence of damage during the deformation of the lumber from which the truss structures are assembled. Deformation of structures is possible when the rafter system is heated or cooled.
In the process of insulating the roof of the bath with your own hands, you should pay attention to some important nuances of the process.
These nuances are as follows:
- Insulation of the roof of the building is recommended to be carried out using mineral wool. This material is durable, non-flammable and retains heat well.
- When implementing roof insulation, it is not recommended to use foam. This building material is capable of releasing harmful volatile chemical compounds.
- The thickness of the insulation used must be at least 100 mm.
- A layer of waterproofing is laid on top of the insulation layer.
The last layer laid on the roofing cake is the finishing material. The choice of building materials for finishing the attic space depends on the financial condition of the homeowner and his preferences.
After the installation of heat, steam and waterproofing is completed, the installation of the roofing material is carried out directly.
For installation of a roof it is possible to use any roofing building material. The choice of roofing material depends entirely on the financial condition of the owner of the bath and the availability of this or that material in free sale.
Carrying out the finishing of the gables
After completing the installation work on the installation of roofing building materials, you can begin to finish the roof gables. The supporting frame of the pediments are the extreme truss trusses. To finish the plane of the gables on the roof trusses, wood bars with a size of 50x50 or 40x40 mm are stuffed. These bars form the crate of the pediment.

Closing the plane of the pediment is carried out with the help of finishing material. Lining can serve as a building material for finishing work. Sheathing of the frontal plane should be carried out with a margin, which provides a protrusion of the finishing material beyond the plane of the pediment at a distance of 20-25 mm.
Depending on the wishes of the owner of the bath, the pediments can be sewn up with finishing building materials both in the horizontal and vertical directions. Sheathing of the pediment with clapboard is carried out using self-tapping screws or nails.
Using clapboard made from wood offers some benefits to the homeowner. The fact is that wood is an environmentally friendly material, and when it is used, toxic chemical compounds are not released into the surrounding space.

However, it should be remembered that before using this material, it should be treated with special chemical compounds that prevent fire and damage to the material under the influence of negative atmospheric factors.
Being a natural material, the lining can suffer from an excess of moisture, therefore, in order to prevent the destruction of the building material used for finishing, it is required, after installation, to treat the pediment with a paint and varnish composition that has water-repellent properties. The compositions used to create a protective coating on the surface of the lining are unstable, which requires regular surface treatment of the gable. The regularity of processing should be 1 time in 2 years.
Carrying out regular processing increases the cost of operating the facility. The service life of a pediment made from a lining that has not been processed is about 5 years, in contrast to a pediment treated with an antiseptic, flame retardant and paint, the normal service life of which can be 15-20 years. In addition to lining, siding can be used for finishing work.
The construction of baths involves the arrangement of the roof, the options for its creation may be different, but provided that one of them corresponds to this structure. The question of which bath roof design is preferable in this particular case worries many owners of private households, especially when the work is done on their own.
A bathhouse is usually built on its own in a personal or suburban area, so you need to know not only how to make a roof, but also how to properly waterproof it and lay a heat-insulating layer, which roofing materials to prefer and other aspects of solving the problem. The fact is that the ceilings on this building have significant differences from the roofs on buildings for other purposes: the main load on its supporting structure is created from the inside of the room, and not from the outside.
As you know, the humidity and temperature conditions in the bath during the adoption of procedures are significantly increased and therefore a large amount of steam enters the attic space, after which it settles on the roof structure elements.
What are the roofs for baths
To help make a decision on how to make a roof for a bath, a construction project and applicable domestic building codes can help. First of all, when choosing the type of roof, the technical parameters of the structure are taken into account.
An important factor is the type of area where construction work is being carried out:
- a simple bathhouse near a residential building is usually built with a gable roof, such as in the photo;
- if significant precipitation is observed in the region in winter, then roofs with a large angle of inclination are chosen, but not more than 45 degrees. Such a structural solution allows the snow mass not to linger on the roof, and it rolls down;
- in the steppe or forest-steppe natural zone, where frequent gusts of strong wind are observed, the choice is stopped at a minimum slope, due to which the roof structure has such aerodynamic properties that allow avoiding heavy loads on it;
- in the case when the building is attached to a residential building, the problem of how to make the roof of the bath is simply solved - it is created as a shed in accordance with the technical characteristics of the house (in more detail: "").

The period of its operation without repair or restoration will depend on which roof arrangement option is chosen and the material for its creation, how reliably the installation work is performed. Multi-pitched roofs have the most presentable appearance, they have a more complex structure and they provide the building with an original look. But they are not always a reasonable solution, since they are expensive for the owners.
Features of creating bath roofs
Each of the options for how to make a roof in a bath has its own characteristics and advantages. So the presence of an attic improves the appearance of the building and ensures the creation of effective thermal insulation, and this factor is very important, since the bath is most often used in the cold season.

Regarding what material is best in the bath, it depends on its slope. When using a metal roof, this parameter should be approximately 20 degrees, and if a slate roof is to be created, then about 30 degrees. Roll coating requires the roof slope to be within 5 degrees.
In the absence of an attic, the slope, regardless of the roofing material used, cannot be more than 10 degrees.
Rafter system for the roof of the bath
Before making the roof of the bath, it is necessary to equip a supporting truss structure for it, consisting of separate trusses. They also carry out the crate and select the material for laying on the roof.
In the upper part of the strapping there are floor beams. Before that, to support the legs of the truss system, a beam called a Mauerlat is mounted. At the same time, special nests are made in the walls of the building, which are necessary to comply with the strictly horizontal arrangement of the floor beams, which are produced outside the outer perimeter of the bath. The size of the release is regulated depending on the design solution, but if it is more than 50 centimeters, the installation of support poles will be required.

Before you put the roof on the bath, before fixing the rafter trusses to the required places, you need to make sure that they are fully consistent with each other. To do this, you can put them all in one pile, and if there are deviations, it is desirable to correct such elements, and, if necessary, redo them. Otherwise, if the imperfections are not eliminated, the reliability of the truss structure will be violated.
After that, on the overlapping beams or on the Mauerlat, the corresponding markup is performed. It is possible, to give greater reliability, to nail the trimmings of the bars in such a way that the supporting parts of the rafter legs are located in the space between the trimmings. This method of installing the truss system allows you to significantly speed up the work and prevent errors and miscalculations in the size and location of trusses.
How to insulate the ceiling in the bath, in detail on the video:
At the same time, front trusses are attached to the center of the roof at a very small angle, which gives the supporting structure the necessary rigidity and allows it to withstand significant wind loads during operation. All other roof trusses are mounted at the same distance, which should be one meter, and fixed in place by stitching with a ridge board.
After the installation of the truss structure is completed, they begin to create a crate, which is made solid or sparse, depending on the roofing material that is decided to be used to cover the roof.
The choice of thermal insulation for the roof of the bath
The choice of how to make the roof of the bath involves the purchase of high-quality heat-insulating material, since the reliability and strength of the roof is affected by the increased temperature from the steam room. If you do not do the right insulation, in winter, the integrity of the roof will be threatened by the formation of condensate, which will certainly cause irreparable damage.

- the insulation is fixed under the rafter system;
- thermal insulation is laid on the roof structure;
- thermal insulation products are placed in the gaps between the trusses. This option is the most preferable because it is easy to implement and requires a minimum of time.
The construction of a bathhouse for permanent operation cannot be completed without roof insulation, because the safety of the wood materials that were used over a long period depends on this. The insulation is laid as close as possible to all planes of the truss structure. Even small holes and cracks are not allowed.

Most often, mineral wool is used for insulation, which, as a building material, has excellent thermal insulation characteristics, low price and environmental safety. Some property owners use foam as a heater, which is less often chosen due to its poor environmental friendliness.
In addition to thermal insulation, when creating a roof for a bath building, one must remember to provide hydro and vapor barriers, which provide the interior with the opportunity to "breathe".