The brazier is popular with those who like to relax in a big company in the country. The standard sizes of steel versions of the brazier and kebab, which are presented in stores, are only suitable for cooking a few pieces of meat. It is inconvenient to make steaks and kebabs on a brick building. Not everyone will decide to make a stationary construction for a barbecue. It is much easier to make a brazier from a car gas cylinder with your own hands.
To build a barbecue oven from a propane gas cylinder with your own hands, you will need a 50-liter container about 1.2 meters high. Such dimensions are most suitable for a rocket brazier. You can buy a gas cylinder in any specialized store or order it on the Internet portal. Online shopping is cheaper. If you plan to take the product in an offline store, it is better to give preference to Moscow firms. After all, large companies operate in the capital, the cost of their products is below the average price in the country. In addition, such organizations often offer free shipping.
 To create a hot smoked brazier, you will need the following tools:
- Drill.
- Chisel.
- A hammer.
- Bulgarian.
- Metal corner.
- Screwdriver.
- Metal tube.
- Door hinges in the amount of two pieces.
- Wrench.
On average, a home-made design will cost 2,500 rubles. This is inexpensive, especially when you consider that a ready-made high-quality brazier costs at least 15,000 rubles. The only disadvantage of a gas cylinder brazier is the increased fuel consumption in winter. After all, the metal cools quickly due to its low heat capacity. Check out the article about .
Making a homemade brazier from a gas cylinder
To create an open small brazier from a freon gas cylinder, no drawings are needed. Barbecue is no problem either. There is no single correct scheme.
Therefore, a metal structure should be made, focusing on personal preferences and the method of cooking.
If it is supposed to use ready-made coals and a grate, then it is recommended to make the distance between them small. It is enough to cut the cylinder or barrel evenly along the middle. If the summer resident plans to use skewers, the lid will have to be made smaller in height than the base.
Reviews of home-made cauldrons, barbecues from a gas cylinder or rims are mostly positive: the work is not difficult and does not require special knowledge and skills. And there are a huge number of manufacturing options, which can be seen in the pictures on the Internet.
 Step by step instructions are given below:
- Rinse the bottle.
- Cut it into two equal parts along, if you plan a regular barbecue. Or cut a rectangle in it if a barbecue is being constructed.
- Decide on the height of the brazier and make legs and a stand. They are made from pipes. Four holes should be drilled at the bottom of the base. Insert bolts, fix them with nuts.
- Install cover. To do this, make holes for the loops. Fixed with rivets and welded.
- If a removable cover is planned, then metal strips are attached to the edges of the barbecue.
open type, without cover
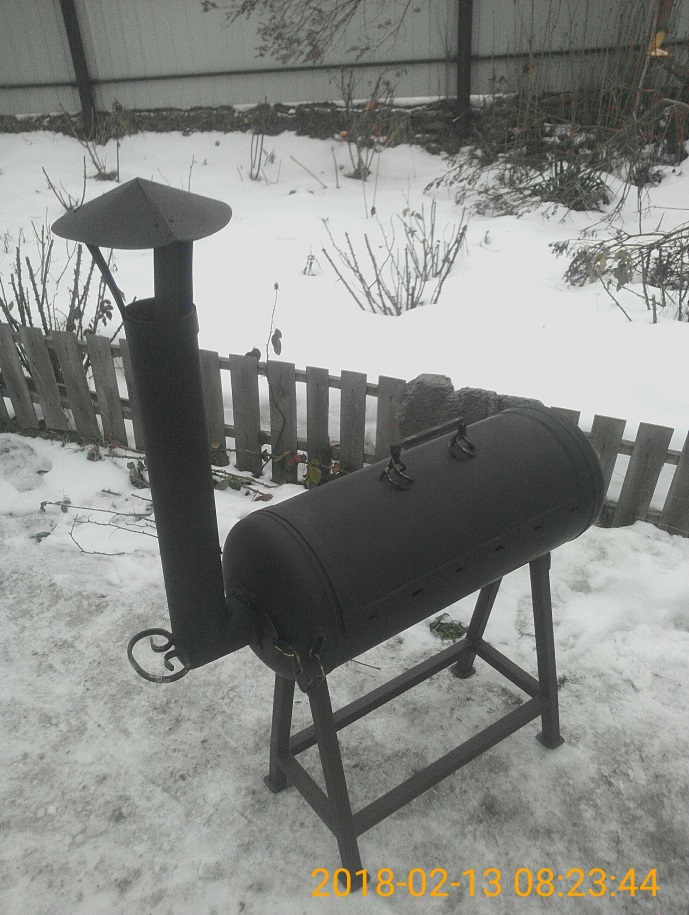
 It is easiest to make a brazier without a lid yourself. To turn an old gas cylinder into a brazier, you should cut the container in half and drill holes in the sides for air to enter. Usually, one half of a gas cylinder is enough to create such a product. It is installed on a support of stones, bricks, or simply on an earthen embankment. You can also make legs and weld them to the bottom.
The manufacture of such a structure takes a minimum amount of time. But in use the brazier will not differ in convenience. And its appearance is not particularly attractive. Therefore, there will be nothing to brag to friends. Many experts advise: if you have at least small skills in welding, forging, it is better to try to make some more interesting model. For example, a brazier in the form of a locomotive or a pig.
How to make a barbecue?
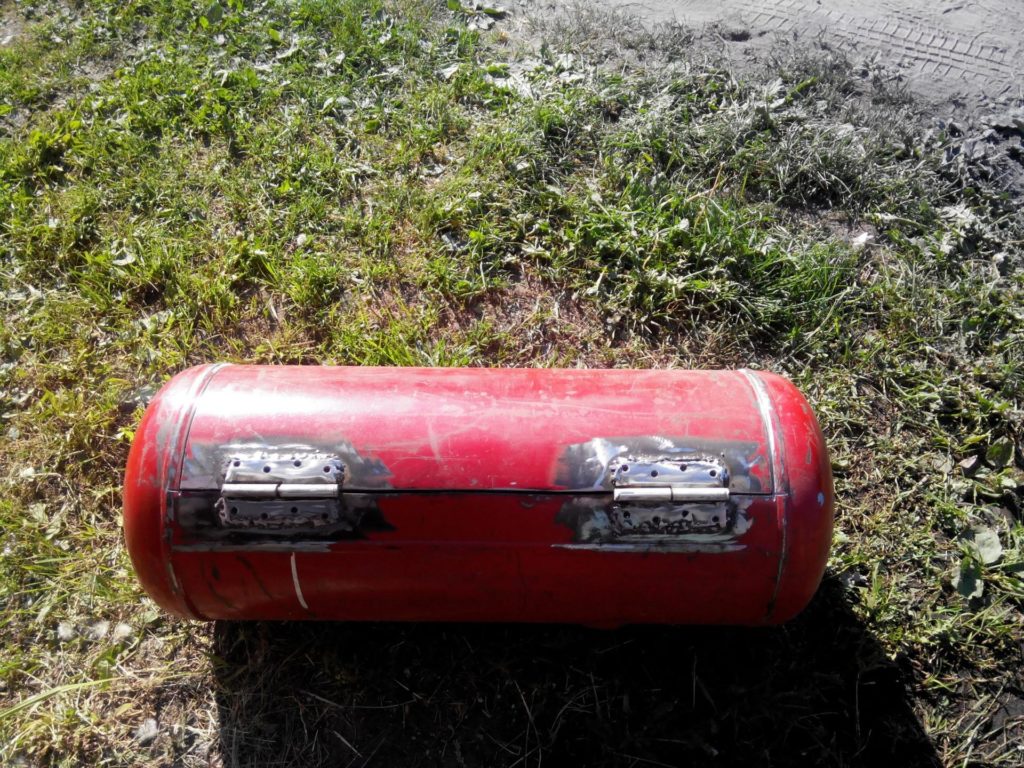
Structurally, a barbecue is a more complex option than a brazier without a lid. The bottom line is that the side of the cylinder is cut off and attached to the hinges - a door is obtained. Inside the container, a place is made for coals, a grid for frying products is installed.
To give a home-made barbecue and hearth functionality, they will improve the air supply to the stove. To do this, do the following:

If desired, you can modify the design. For example, build a canopy, make shelves, weld an exhaust pipe for good traction. To make it convenient to transport the barbecue, two legs are equipped with wheels, and the third is used for emphasis. It is desirable to make the handle for transportation long. It is convenient to have a board for seasonings and utensils on it.
Features of a homemade smokehouse
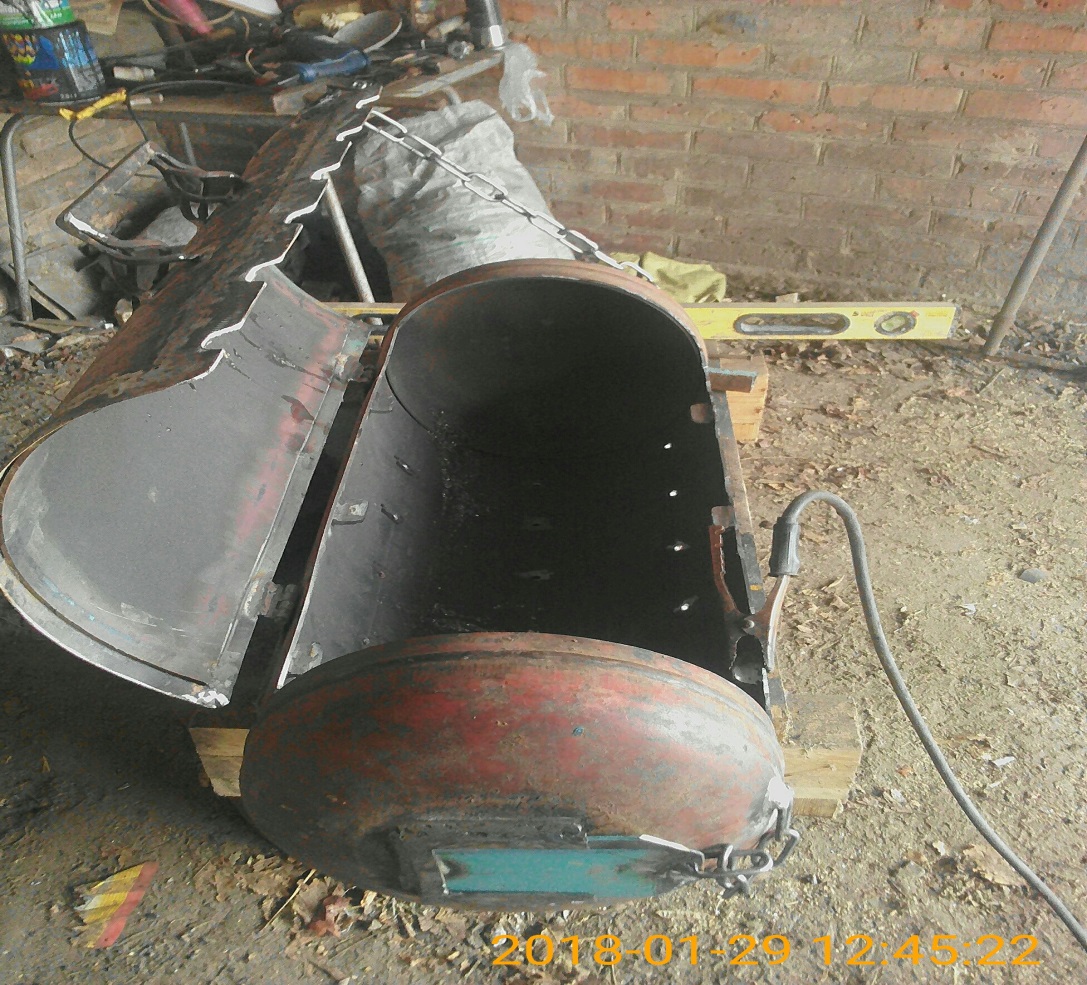
 The smokehouse differs from the usual brazier in tightness and the presence of a firebox. To make such a design, you first need to draw up a project. It is easy to find a suitable scheme on the Internet. Next, you should inspect the gas cylinder. If the surface is rusted, the product is not suitable for a smokehouse. If the cylinder is new, it is necessary to drain the gas by unscrewing the valve. Then the container is cut into two parts and connected with hinges. Fix the handles and weld the legs. A grid is inserted inside the container. A portable homemade smokehouse is ready.
As for stationary options, they are made a little differently. From the edge of the cylinder, where there is a weld, indent and draw a line three centimeters below the perimeter. You should get two circles. The cylinder is cut in straight lines in the middle (to prevent the formation of fire, the vessel is pre-filled with water). It turns out a lid in a curved form and a smokehouse cutout. There are different options for the execution of the smokehouse. When the work is completed, the product is checked for stability. Usually, if the legs are long, the structure is not securely on the ground. Therefore, additionally, corners are installed at the bottom of the legs.
We make a smoker with our own hands
If you already have experience in creating a barbecue from a gas cylinder, you can try to make a smoker that will combine two functions: smoking and frying food. To do this, you will need two cylinders with a volume of 27 and 50 liters, a welding machine, rods for the bed, a pipe elbow, electrodes, a piece of a meter-long pipe with a diameter of about 15 centimeters.
Smoker grill is created in this way:

Unusual barbecue options
You won’t surprise anyone with ordinary braziers from gas cylinders, so summer residents are trying to create unusual options that do not differ in their functionality from modern factory designs.
For example, they make a brazier in the form of a steam locomotive or a pig. There is no need to buy special materials. It turns out such a brazier is cheap, but it looks original. The main thing is to know the principles of welding and understand how to make a brazier with your own hands so that it performs all its functions to the fullest and serves for a long time.
How to weld a steam locomotive?
 The design in the form of a steam locomotive combines a brazier, a grill, a smokehouse and a barbecue. Externally, the product really looks like a steam locomotive. Such a model is built from several cylinders, main pipes and barrels. Each pipe has its own purpose. Steam locomotives with pipes of different diameters look especially good.
To create a brazier-steam locomotive, you will need three gas vessels. The side bases of the sewing machine are suitable as supports. The container on the right side performs the function of a barbecue, in the middle - a brazier. The first cylinder is installed vertically and a circle is cut out on the side with the diameter of the horizontal middle cylinder. On the middle vessel, the extreme left part is cut off and the cylinder is welded to the first vessel. The third cylinder with a cutout on the side is also welded to the second cylinder. A pipe is installed on a vertical vessel and a damper is made. A temperature sensor is installed on the first and second containers. A door is made in each cylinder: they are cut out and connected using canopies. Iron arched segments are welded onto the door, which will serve as handles.
Wheels are made from the remaining parts of the cylinders. But, to add style and originality, many use forging elements. It is recommended to install retractable grilles, tables, and other functional details. It is important, after creating a brazier-steam locomotive, to completely cover it with special paint up to 1000 degrees. Without a heat-resistant coating on such a product, it is easy to get burned.
Piglet and pig
 It looks interesting brazier, created in the form of a pig, a pig. For the manufacture will require only one old gas cylinder. The container is placed horizontally and the lid is cut out, as is the case with the creation of a conventional smokehouse. The lid is put on hinges. The legs are made of metal pipes. In order for them to securely hold the structure, a lattice is installed in the middle of their length. The nose and mouth are made from pieces of metal pipe. Ears are cut out of metal sheets, iron and welded to the part of the vessel that serves as the pig's head. It is recommended to use forging elements.
There are many photos and videos on the Internet that show how such a brazier looks like and how it is created. You can make a brazier in the form of a pig in just a couple of days. The main thing is to be able to work with a welding tool and be familiar with the forging technique.
The final stage - painting
The paint protects the metal surface from rust, as well as the temperature difference that occurs during the use of the barbecue. For dyeing at home, a heat-resistant composition is used that can withstand up to +700 degrees. In this case, the coating will have to be updated periodically.
 The painting steps are below:
- Clean the surface of the gas cylinder from the old coating. To do this, use sandpaper.
- Degrease with acetone, solvent or alcohol.
- Heat-resistant paint is mixed until a homogeneous consistency is obtained. All clots and sediment are removed. If the solution is too thick, add a little solvent.
- Apply the coloring composition with a roller or brush. To make the surface smooth and beautiful, you will need to paint in several layers. Drying time should be from 30 minutes to 2 hours.
- It all depends on the type of paint.
If you plan to paint the brazier on the street, the air temperature should not be above +40 and below +20 degrees. What kind of paint to process the structure so that it does not rust? Most often, waterproof acrylic paints in aerosol cans or oil burnishing are used. They dry quickly, are durable, safe and have anti-corrosion properties.
Outdoor recreation is always associated with barbecue, grill and barbecue. Of course, for their preparation you need to have a barbecue. If they are not, then you can make the device yourself. A gas cylinder is well suited for the manufacture of barbecue. This is because its walls are very rough (almost 4 mm) and they are made of high quality metal. In comparison, a steel sheet of the same thickness is softer and more easily deformed.
What can be done? A gas cylinder is just a container, which in skillful hands can turn into an excellent barbecue, smokehouse or potbelly stove. At the same time, you can make a brazier from a gas cylinder in different ways. So, it can be:
- a design in the form of one half of a propane cylinder sawn along the length;
- a design that has a cover;
- an option that is a barbecue and at the same time;
- a design that is both a barbecue and a smokehouse;
- barbecue in the form of a steam locomotive (they always like to depict it in the photo).
It is interesting that everyone can make any such barbecue from a gas cylinder with their own hands. Of course, this article will give all the necessary recommendations and step by step instructions creating the options above. It will not be superfluous to watch various videos, as well as drawings.
General algorithm of actions
Creating barbecues from a balloon involves performing very similar actions. The step-by-step instruction, which is often shown in the video, includes the following steps:
- Balloon preparation.
- Cutting.
- Creating a cover, blower and auxiliary holes.
- Leg mounting.
- Barbecue structures.
- Carrying out additional actions and decoration.
Tools and materials
Before you start creating a homemade brazier from a balloon, you need to stock up necessary tools, namely:
- Drill.
- Angle grinder (grinder).
- Welding machine.
- Metal brush.
As for materials, the main thing is gas or freon cylinder. It is best to take a container with a volume equal to 50 l. A short cylinder will make it difficult to turn the coals over. Do not take a container with lots of rust because it will not work out to make a good barbecue out of it. You will also need to have:
- Metal pipe (diameter 80 mm or more). It will make a chimney.
- Aluminum rivets.
- Bolts with nuts.
- Loops.
- Lid handle.
- Profile pipe size 50x50 mm. It is possible with a smaller section.
- Fire retardant paint.
- Elements resembling parts of a steam locomotive.
Read also: We make a brazier with a chimney pipe
Balloon preparation
 The gas cylinder may contain residual gas, which, when a small spark appears (and it always forms when cutting), it explodes. Therefore, it is impossible to start cutting a cylinder without proper preparation.
correct gas bottle opening under the barbecue provides priority gas release. To do this, open the valve or, if possible, unscrew it and turn the cylinder over. Then they wait until the gas comes out. To check for gas, you need to use soapy foam. The absence of soap bubbles means that the gas has escaped. This is often noted in different videos.
The next step - sawing off a part, into which it was screwed or in which the valve is tightly fixed. During this process, many sparks will be generated. You can eliminate their appearance, pouring water on the cut. It is better if this work is done by an assistant. Also, water will not allow the metal to heat up.
 There may be some residual gas in such a cylinder. To completely eliminate them, in the hole made in place of the valve pour water. She needs to fill the entire balloon. To facilitate the work, it is worth using a hose with pressure. While pouring water, the container should be shaken. After, you can drain the liquid. However, it should be remembered that it absorbed not only the remnants of the gas, but also its smell. And it is stable, and will be felt at the pouring site for several days. Therefore, if you do not want to feel it on the territory of the house or cottage, it is better to pour the water elsewhere.
cutting
The features of this process depend on which brazier the owner decided to make from a gas cylinder. Some people just saw the container in half. The cut is carried out along the balloon. At the same time, they do so that longitudinal weld metal container was a few centimeters lower.
When the cut on one side is completed, you should immediately proceed to fixing loops. This is worth doing because the balloon is still a one-piece structure and the lid is not moving anywhere. Thanks to this, the curtains are very convenient to weld. Moreover, the probability of making a mistake is significantly reduced. This trick is often talked about on video. It also provides the best step-by-step instructions.
To attach the hinges, you must first do rivet holes. Next, attach the hinges and insert the rivets. If they are aluminum, then it is advisable weld loops. Loops should be placed in one direction. Then the cover can be removed. After fixing the loops, continue cutting.
Read also: Barbecue with metal smokehouse
According to different drawings and videos, it is better to cut the cover. Longitudinal cuts do in the middle of the balloon. Transverse should be carried out in places located in 2-3 cm from transverse seams. You need to work so that the cut lines are even. At the opposite end of the valve, a hole for the blower is cut out. A 5x5 cm hole is enough.
Lid and blower
 To the hinged lid remains weld the handle, fixing elements and a metal strip. It is better to place the handle at one end of the cap, so that it is above the other part of the cylinder. Of course, it must withstand high temperatures, because The lid will get very hot. and give off heat to the handle. A handle placed in one of the corners of the lid will not allow you to burn a person’s hand while opening the barbecue.
Need to limit lid opening size. This is done by attaching to its free edges and the base of the chains. Also, according to some drawings, it is possible from the side of the hinges weld a metal pin. The lid will rest on it. It must be vertical. Its slope depends on how much the owner of the cottage wants to open the lid.
There will always be a gap between the lid and the base. To eliminate it, a metal strip is welded to the lid around the entire perimeter. The result of this process is often shown in the photo.
To make a blower, you need to make a hole at the bottom of the end with size 5x5 cm. weld a square pipe. Its length should not exceed 10 cm. In the middle of its two opposite sides, two holes are made into which they are inserted coarse wire or bolt. Until the last, a metal square sheet is welded. It should cover the opening of the pipe. By turning the bolt, it will be possible to change the position of the sheet and manage traction.
Legs and chimney
 To make it convenient to make a fire and prepare a grill or barbecue, the cylinder must be raised to a certain height. This is done thanks to leg mounting. It is best to make them from a profile pipe. First, two pipes are welded to the lower half of the barbecue. They should be located along the cut balloon. Next, four legs are welded to them. For convenient movement around the territory of the dacha or at home, to the edges of the legs, you can attach wheels. This feature can be seen in various photos.


An old gas cylinder is an ideal example of how many different useful products that are used in the country can be made from it. In this article we will talk about a very necessary device - a brazier from a gas cylinder. We will tell you how to cut it, what precautions must be observed, how to install all the required elements. And we will show in the photo and video various design options for such a barbecue.

Dismantling the cylinder
It is impossible to cut a gas cylinder to the required sizes and shapes immediately without checking its contents. First of all, it is necessary to empty the cylinder, suddenly there is gas left in it. Therefore, the valve should simply be opened, releasing the remaining contents.
Then you need to turn off the tap. Do it with a gas wrench. Usually it is easily unscrewed, but sometimes it becomes a problem for those who first encounter a similar situation. It's just that in some models of cylinders, the valve is blocked by two pins. They must be removed with pliers. After that, the valve is easily unscrewed.
The next step is washing. The cylinder is half filled with water, shaken or pumped over, then the water is drained. The gas itself has a specific smell, which is given to it by a special additive - an odorant. To get rid of this smell, detergent or bleach is added to the rinse water.

Cover cutting
The dimensions of the barbecue from the gas cylinder are determined by the size of the latter. But as for the parameters of the cut-out cover, there may be different options. It can be short or full length of the cylindrical part. As for the latter option, it must be understood that the gas cylinder is a seam pipe, on both sides of which spherical caps are welded. In one, a through hole for a tap is made, the second is a blank bottom of the product. So the lid of the brazier, and, accordingly, the part to be cut out, can be made from one weld to the opposite.
So, the gas cylinder is ready. It is marked for cutting. In principle, these are two longitudinal lines dividing the balloon in the longitudinal direction in half. Marking is very easy.
Circumference balloon, that is, its "perimeter", is 96 cm.
This indicator divided by "4", it turns out 24 cm.
Take as a measuring point longitudinal seam cylindrical part, that is, 24 cm are laid in two directions from it.
By label spend longitudinal lines, the ends of which should not reach the transverse seams within 2-3 cm.
The ends of the longitudinal lines connected around the perimeter cylindrical part. The markup is applied with chalk.

Correct marking is a guarantee of high quality of the final result
The hemispherical chalk-marked rectangle is not a lid. The size of the latter in width by 10 cm will be less. This parameter is plotted from one of the plotted longitudinal lines. After that, a lid is formed with chalk, which will need to be cut off.
Cutting is carried out with a grinder and a diamond-coated cutting disc. Many craftsmen recommend filling the bottle with water before cutting. In this way, the issue of stability of a cylindrical product and cooling of the cutting tool is solved.

Start cutting along one longitudinal line. It is cut from end to end of the markup. After that, it is necessary to weld the loops to the cut off section. They can be used any: door, furniture. The required number of loops with smaller sizes is four, large ones will need only two. They are simply applied to the balloon so that the cut is in the middle of the two parts of the loops. The latter are welded to the cylinder by electric welding. This step is done specifically now, because it is easier to fit the cap to the balloon and hinges before it is completely cut off.

On our website you can find the most . In the filters, you can set the desired direction, the presence of gas, water, electricity and other communications.
It remains only to cut the remaining three lines: one longitudinal, two transverse. A handle must be welded immediately to the lid on the opposite side of the hinges, so that it is convenient to open the barbecue from the gas cylinder.
And one more thing that will make the manufactured structure more convenient to use. In place of the welded loops on the cylinder, two stops must be welded, which will hold the lid open. That is, so that it does not fall behind the apparatus. To do this, you can use a corner of 40x40 mm. Pieces 2-3 cm long are cut out of it. They will be the limiters.
So that when the lid is closed, there are no gaps between it and the cylindrical part, it is necessary to create shelves around the entire perimeter of the cut off part. This will require a steel strip 2-3 cm wide and 2-3 mm thick. The strips are simply welded from the inside of the cylinder with a release to the outside in half their width. In addition, these welded strips will hold the lid so that it does not fall into the brazier.

Other design changes
In principle, the brazier from the gas cylinder is almost ready. It remains only to weld the legs and make holes in the cylinder itself for installing skewers and supplying air to the coal combustion zone. Start with holes for skewers.
One of the applied longitudinal lines remained unused. It is necessary to apply additional marks along it, dividing the lines evenly into several segments. The length of the last 8 cm. At their ends, through holes with a diameter of 10 mm are made using a drill and a drill.
On the opposite side of the opening made on the welded steel strip, it is necessary to make grooves for skewers. They should be located exactly opposite the holes made. The grooves are made with a grinder and a cutting disc.
Now you need to make holes for air supply inside the barbecue. To do this, 10 and 20 cm must be set aside from the weld of the cylindrical part of the cylinder in two directions. Longitudinal lines are drawn along them, in general there will be four of them, two on each side of the seam. They also share marks with a distance of 5 cm. After that, the marks on two paired lines are connected to each other. Through them, a grinder and a cutting disc make through slots.

It remains to plug the hole into which the faucet was screwed. Here they simply take a plate 2-3 mm thick, which is welded to the hole, scalded with a continuous seam from all sides.
Video description
The video shows the sequence of operations for making a brazier from a gas cylinder:
As for the legs, there are a huge number of options. The simplest - legs from a steel corner. The main thing is to accurately choose the height of the installation of the gas grill. It is optimally considered from 60 to 80 cm, that is, convenient for the growth of an adult. Although there are low modifications.
You can show your imagination and make the legs of the original shape, decorated with patterns. You can attach legs to them, make the device mobile, mobile, as shown in the photo below.

On our website you can find contacts of construction companies that offer services for the construction of small architectural forms. You can directly communicate with representatives by visiting the exhibition of houses "Low-Rise Country".
How to make a barbecue
In principle, a barbecue from a gas cylinder is made in exactly the same way as a brazier, with only minor additions. First, a grill is installed inside. It is removable, but for it it is necessary to install support shelves inside the cylinder. They are made from a steel corner 25x25 or 32x32 mm. The length of each shelf is 10 cm, they are welded on two opposite sides of the opening, three pieces at the same distance from each other. Location in height - under the holes for the skewer. Accordingly, and from the opposite side at this height.
Secondly, you need to install a chimney. There are quite a few options here:
on the lid;
side, with a tie-in hole for a tap;
next to the lid in the cylindrical part.

How to improve the grill
There are many additional little things that will make the process of cooking meat, poultry or fish on a barbecue grill a convenient and easy process. Here are a few of those little things:
A nut is welded to the cover of the device or to its cylindrical part, into which thermometer. Now you can monitor the temperature at which the meat dish is cooked.
Can be installed on the chimney tank. Lattices are installed on top of each other. This accessory is an excellent smokehouse design.
Can be inside the grill install grate, for its entire length. This will be the grate. Its task is to hold the coals, but let the ash through itself so that it does not interfere with the burning of firewood.
As for the decorative design, there is also a huge field of activity. What the masters just do not invent. For example, here is such an option in the form of a steam locomotive, as in the photo below. Definitely, such a design will decorate the territory of the cottage.

Video description
From the video you can learn how to create a brazier from a gas cylinder:
Conclusion on the topic
Today, finding barbecue grills from a gas cylinder with drawings and exact dimensions on the Internet is not a problem. All sorts of options are offered with simple designs and with additional convenient options. But the main thing, as practice has shown, is the exact observance of the height of the skewers above the coals. The distance is small - the meat will burn, the distance is increased - the dish will be cooked for a long time.
Everyone needs a grill. Someone arranges monthly picnic trips, someone cooks fragrant meat on their site. Such a vacation is always pleasant and useful, because beautiful landscapes and clean air give a boost of energy and have a relaxing effect. But there is not always money to purchase a brazier, because this design cannot be called cheap. But if you have free time, then the old gas cylinder can turn into a solid barbecue. This material contains drawings, a diagram, video materials and step-by-step instructions for making a brazier from a gas cylinder - all this will help you understand simple work.
We will study three types of barbecue based on a gas cylinder:
- standard brazier;
- barbecue steam locomotive;
- brazier-smoker.
Preparation of tools and materials
In order for the work to go quickly, you need to take care of the availability of the necessary tools and materials. To make a brazier, we need:
- Welding machine.
- Bulgarian.
- Several clamps.
- Metal pipe.
- Electric drill.
- Thick sheets of metal to add structural strength.
- Aluminum rivets.
- Loops for a cover.
- The basis of the brazier is a cylinder with a volume of at least 50 liters (if the cylinder is smaller, then the coals will be inconvenient to turn over).

The photo shows the main units for the manufacture of barbecue.
IMPORTANT! Safety must come first, so the sawing of the cylinder can only take place when all the gas has left it.
Gas is removed simply: turn the cylinder upside down and twist the valve. The gas is heavier than air, so in this position it will come out intensively. To see if the process is going on or not, you need to soap the valve hole. If bubbles appear, then the gas is escaping - we are waiting for completion. To be sure at the end, the cylinder can be completely filled with water so that it flushes out the last remaining gas.
Manufacturing process: instruction
When the cylinder is empty, and all the necessary tools are at hand, you can get to work:

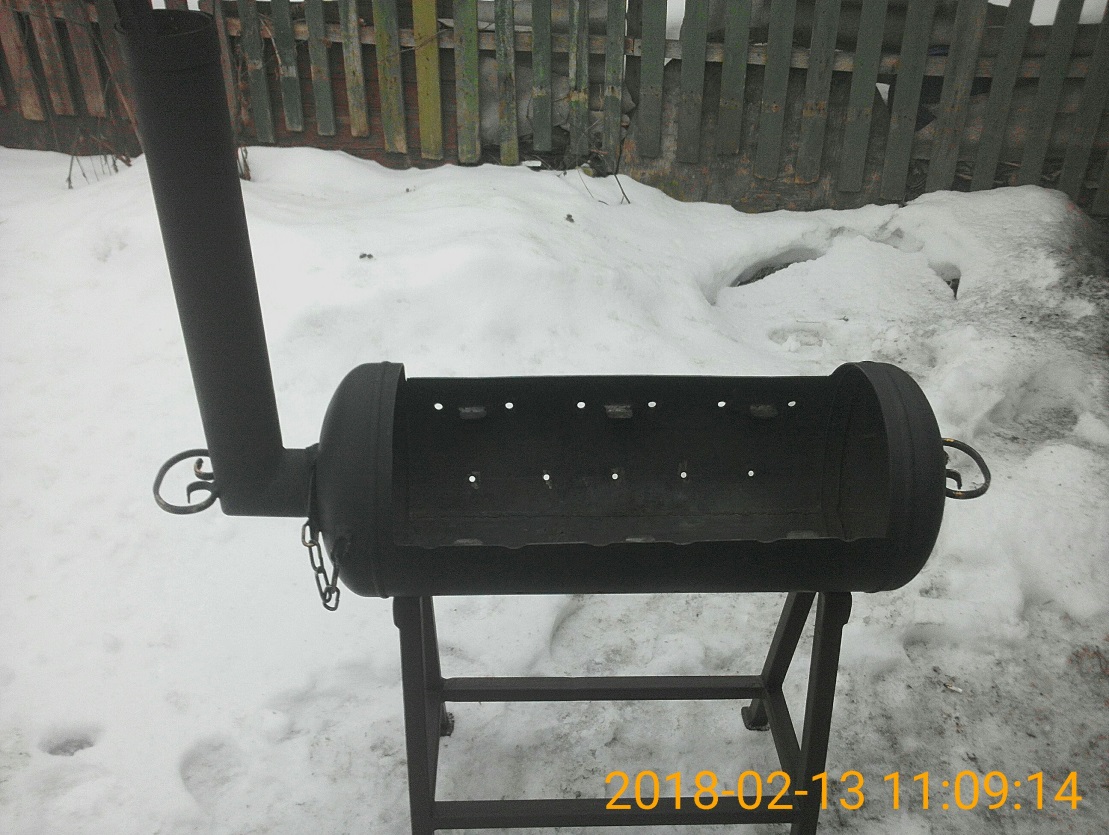
After drilling the holes, the manufacture of the brazier can be considered complete. Thoroughly clean it and heat it several times so that the smell of gas disappears completely. As for the paint, this is an optional step. Some owners paint with a heat-resistant coating, others skip this step. Anyway, after a few dinners with a good barbecue, the brazier will be smoked and black. To increase traction, it is recommended to install a chimney: a round hole is cut out at the end of the barbecue structure, where you can weld an ordinary drainpipe of a suitable diameter.
At the bottom of the brazier, you can put a pair of cast iron grates. They are used in potbelly stoves and various boilers. By installing these elements, there will be additional ventilation inside the brazier. Red-hot grates help save coal, as they are also involved in the process of cooking meat. You can place the barbecue in a brick gazebo or in an open area.
For convenience, the inner barbecue area is divided into two sectors. In one, protrusions are made for gratings, and in the second, slots for skewers are cut.
As tests show, the thickness of the automobile cylinder is quite enough for normal functioning - the shape of the brazier is preserved under the influence of high temperatures.
Features of the legs for the barbecue
The legs are the basis of a homemade brazier. Before you make them, consider whether you will carry the barbecue with you or if it is created only for use on the site. If you plan to go on a picnic, then you should take care of folding legs. First, four short bases can be welded, which can later be placed on a higher structure.
Legs are usually made of durable pipe. You can fix it both by welding and with the help of bolts: we drill holes and place bolts there. After installing the legs, the bolts can be tightened with nuts or welding can be used.
Barbecue smokehouse
Using the instructions for creating an ordinary barbecue from a gas cylinder with your own hands, you can also make a smokehouse. The main difference in design is the presence of a firebox. Also, the smokehouse must be airtight. A strip is cut off at the bottom of the cylinder, then half of the bottom of the cylinder must be cut off. As a result, we will have space for the firebox. It is made of dense iron sheets - 2-3 millimeters.

The element is welded to the bottom, after which we get a one-piece structure. Also, a brazier smokehouse requires a pipe through which smoke will exit. This part can be purchased on the construction market or made from a cylinder with a smaller diameter. Some craftsmen even install a motor, the task of which is to rotate the skewer with meat.
The structure must be covered with a safe, but at the same time heat-resistant paint. You can start cooking after roasting. Sometimes the smell of gasoline cannot be removed the first time.
Brazier locomotive
If you make an ordinary brazier with your own hands - this is several hours of work, then it can take more than one week to create a brazier-steam locomotive. This is a decorative product, which includes a barbecue, barbecue, grill and even a smokehouse. The brazier was called a steam locomotive, because outwardly it really looks like it, especially if pipes of different diameters are used in the design. Masters make real masterpieces with the help of several cylinders.

If you can take a standard gas cylinder for the base, then barrels and main pipes are suitable for the rest of the elements. Wheels can be made from cut cylinders, but forged elements can be used to add originality. Brazier steam locomotive must be completely covered with heat-resistant paint. For these purposes, a coating with a temperature limit of 700 ° C is taken. The paint needs to be updated, the intervals depend on the frequency of use of the barbecue.
Forged parts bring life to the design of the cylinders. Masters mount retractable grilles, comfortable tables, functional and decorative elements to them.

A steam locomotive is not only a curiosity that draws attention to your site, but also an excellent design that allows you to set the table as soon as possible.
If you decide to take on the manufacture of a brazier from a gas cylinder, then you should consider whether you are good at welding and a grinder. This is a rather complicated process, therefore, with inept handling of the tool, the result can only upset.
The homemade design has several features. Take note of them before starting work:
- if you do not apply a heat-resistant coating, then you can get badly burned on such a brazier;
- after several “sessions” with kebabs, the cylinder will become smoked, so you need to take reliable bags or plastic wrap for transportation;
- the design must be stable, but not heavy, so you need to calculate in advance what supports to make for the barbecue;
- only coal can be used as raw material, as there is too little space for firewood.
Drawings and videos
The drawing shows a brazier firebox from a gas cylinder:

This drawing diagram should help you understand what a gas cylinder brazier is:

Scheme of the brazier-steam locomotive:

This video explains in simple language how to build a brazier from a gas cylinder with your own hands at home:
The video instruction below will help you make a barbecue smokehouse:
My name is Rostislav, I am 37 years old and I am a builder with twelve years of experience. Today we will talk with you about outdoor recreation. And nature, as you know, is friends, family and barbecue. To cook meat in nature, you can use all sorts of improvised means - bricks or sticks, or you can make a beautiful brazier from a barbecue gas cylinder with your own hands and surprise everyone. If such a brazier will stand in the yard, then it will immediately attract the attention of your guests and neighbors. Also, such a brazier is compact enough to take it with you in the trunk of a car.
Making a brazier with your own hands will not take much time and labor, you just need to be able to use a grinder and a welding machine or ask a specialist. All photos and drawings of such a brazier from a gas cylinder are attached.

So what do we need for this:
Materials:
- Gas bottle.
- Pipe, diameter 90mm. Length - 0.7m
- Handles, 3 pcs.
- Profile pipe, 30x30mm. Length - 4m
- Corner, 40mm shelf. Length - 1m
- Sheet metal, 2mm thick, 1m2
- Fungus on the pipe.
- Sheds.
- Priming. Enamel paint for metal.
- The paint is heat-resistant, the temperature of use is up to 600 degrees.
- Chain, length no more than 0.7m
Tools:
- Welding machine, electrodes.
- Bulgarian, cutting discs and cleaning disc.
- Roulette
- Pencil.
- Hacksaw for metal.
- Drill, drill bit 4,8,10,12mm.
- Gloves, goggles, welding mask.
- Piece of chalk.
- Clamp clamp.
- Square.
So: Let's get to work.
To start the robots, we need an empty gas cylinder with a capacity of 50 liters. Such cylinders were previously used on the farm in the private sector. It consists of three parts: a valve, a reservoir tank and a cylindrical stand.

Marking the gas cylinder for barbecue
A gas cylinder, even if it is empty, is VERY DANGEROUS, therefore it is strictly forbidden to use open fire near the cylinder, as well as to cause mechanical damage. It could cost your LIFE!!!
The fact is that the so-called gasoline is used in the admixture of natural gas, which is designed to distinguish the smell of gas. Gasoline, in itself, is the same combustible gas that is absorbed into the metal, and even if the cylinder is empty during the test, gasoline vapors are still present in it. Therefore, I repeat once again, you need to work with a gas cylinder very carefully, without neglecting the safety rules.
Let's get back to our markup. If you look at the cylinder, you can see that a welding seam runs along its entire height. We take this seam as the first line of the beginning of our markup. If you take a tape measure and measure the circumference of the balloon ( circumference - this is the extension of the outer or inner line of the circle.) it will be equal to 96 cm. From this line - the seam, with the help of a tape measure we mark 24 cm in each direction. We put marks at the top and bottom of the balloon and draw a line with chalk. Then we retreat from this seam line in each direction by 10 cm. and also draw a line with chalk - this is our line for the air supply holes.
Next stage: we determine where we will have the front side of the brazier and add to the back line that we marked, retreating 24 cm another 10 cm. This will be our cut line. There are also welded seams on the bottom and top of the cylinder, which go around the circle of the cylinder. The distance between them is standard 61 cm. We retreat from these seams 3 cm, put two points each and draw a line. The fact is that in the middle of the cylinder along the circumferential seams there is a seam reinforcement tape and we need not to damage it.
Thus, we have drawn a cover for the future barbecue, the width of which will be 38 cm (96-24-24-10), and the length - 55 cm (61-3-3) as indicated in the drawing.


Preparing for cutting a balloon for barbecue
Before making the first cut, you need to protect yourself. To do this, you need to fill the bottle with water. How it's done? Before you start the robot, you need to make sure that the tank is empty. To do this, open the shut-off valve, which is located at the top of the cylinder and by ear determine if there is a hiss of gas. Then, in the same way, with the tap open, turn it down with the tap so that all the available liquid flows out from the inside.
The stopcock is made of bronze alloy, and bronze is a very soft metal to work with. Therefore, we take a hand saw for metal and at the bottom of the faucet - where it is twisted into a cylinder, we cut off the faucet completely. We have formed an inlet into which we can insert a watering can or hose to fill with water. You need to understand that the water that will fill the balloon will displace the air saturated with gasoline, so it is forbidden to smoke or use open or hidden fire during this operation !!!
The bottle must be completely filled with water. After that, we make a cork. This is where a cork stopper from a bottle of wine or something like that can help us. Having slightly tucked it, we hammer it tightly with a hammer into the hole. Then we lay the balloon in a horizontal position and make a cut.
Making a mangal cover
When starting to cut the cylinder, it must be taken into account that water will flow during the through cut. Therefore, we remove the electrical wires as much as possible and it is better to cut on an inclined base, controlling the flow of water. Yes, I agree that the event is "wet", but this is the safest method of cutting a gas bottle.
We make a cut with a grinder along our marked lines. They are marked in red on my diagram. The disk for the grinder must be chosen thicker, at least 1.6 mm. The width of the cut is compensated by the expansion of the metal when heated. It must be remembered that the metal on the cylinder “tenses” during welding and, when cutting, can wedge the disc a little, so we use wedges. At the same time, we cut off the threaded connection for the stopcock cover. It is located on top of the balloon.

So, when the brazier cover is cut out of sheet metal, we cut out strips 3 cm wide, one meter long - three pieces, and weld along the perimeter of the cover so that the edge of the strip protrudes 1.5 cm beyond the edges of the cover. With the help of clamps, periodically pressing the strip to the lid. This will prevent the lid from falling into the middle of the grill. We also weld the handle. We clean the welding places with the help of a grinder and a cleaning disk. After installing the cover on the cylinder, you need to center it and weld the curtains, having previously retreated the same dimensions from the edges of the cylinder.
From the side of the top of the gas cylinder, where we cut off the threaded connection, you can make a valve that will regulate the smoke output, that is, the degree of smoked meat. We cut out three strips of 10 cm each from sheet metal and bend the edge with pliers or in a vice so that we roughly get a corner and scald around the perimeter of the hole, observing even dimensions. And from the same sheet metal we cut out the valve itself, making an allowance of no more than 1 cm so that there is free play.
From the bottom of the gas cylinder there is a cylindrical stand, which we also cut off with a grinder. It is welded with a burst seam around the circumference of the cylinder.
Leg welding
The legs or stand can be welded from improvised material, can be made collapsible or stationary, with or without tables. You can even use a stand from an old sewing machine, but I got by with the most economical option.
We take a corner and cut off two blanks of 14 cm each, we find a longitudinal welding seam on the cylinder, which we took as a reference line. We put the cylinder on a horizontal platform or on a table, so that the seam is at the bottom and, placing a corner parallel to the platform, weld it at a conventional distance from the edge of the cylinder so that the center of the corner shelf coincides with the welding seam of the cylinder. We do the same on the other side. So we got the base for attaching the legs. And now we look if we need to make the legs not separate from the brazier, then we simply cut a 30x30 pipe or a corner in length, which will be convenient for us for the height of the brazier - about 50 to 70 centimeters. Next, weld it to the corner, which is on the cylinder.
And if we plan to make a collapsible structure, then we also cut the blanks into legs, but do not weld them to the corner, but drill holes of about 8 millimeters in the upper part of the leg and in the corner welded to the cylinder. Thus, we get a collapsible design: the cylinder is separated from the legs and can easily fit in the trunk of a car for going to a barbecue in nature. It should be noted that the legs must also be mounted observing the identity of the dimensions and diagonal of the structure. In the lower part of the legs, it is desirable to weld the support patches, after cutting them out of sheet metal and placing the brazier on the legs on a flat area. This is necessary so that the brazier does not fall into the ground under its own weight and has good resistance to tipping over. For more convenient transportability, you can mount small wheels on two legs.
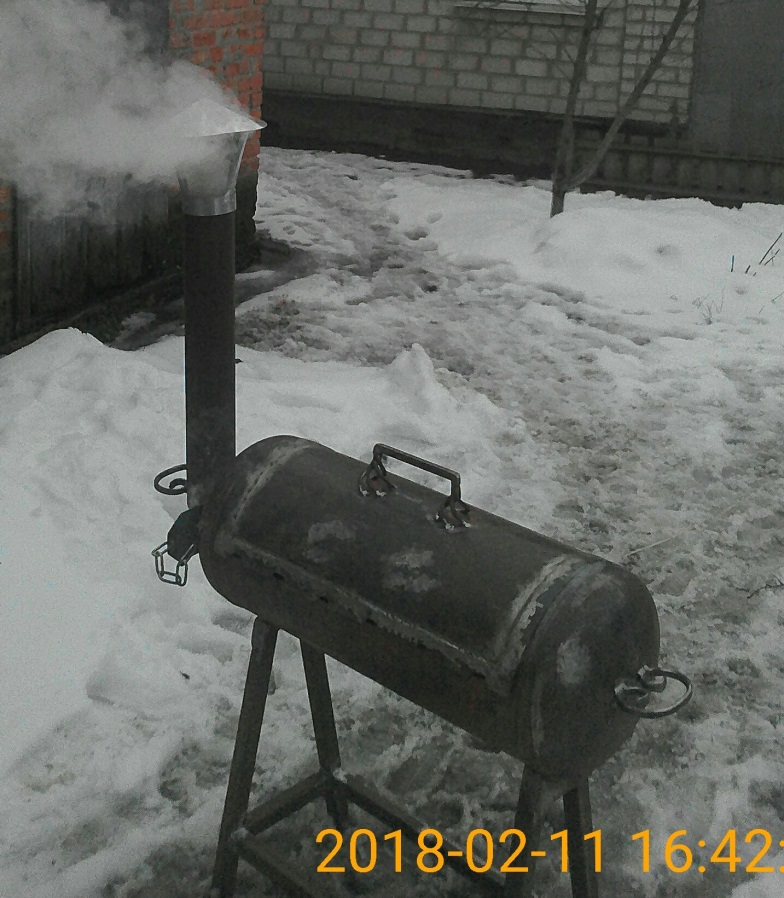
Installation of a chimney for a barbecue
A chimney is not an essential element of our homemade barbecue, but it gives a more aesthetic look and works as a regulator of the degree of smokedness of the cooked product.
For the manufacture of this element, a pipe with an outer diameter of 90m is quite suitable. and 70 cm long. Since the factory corners have a very smooth turn, you can weld the sharp corner yourself by first cutting out a pipe segment, which is marked from the turning point with a square in two directions at 45 degrees around the circumference of the pipe. Having cut a segment with a grinder, we bend the smaller part to the larger one, with the help of a corner we check the angle of 90 degrees and weld them in place. After that, we expose the pipe to the place of welding, where we installed the damper, and weld the pipe well in a circle. It should be noted that each seam must be cleaned with a cleaning disk. So it acquires a more aesthetic appearance and the quality of the weld is clearly visible.
When the pipe is welded, install a protective cap. It is fixed with a clamping bolt.
Places for skewers and grill nets for barbecue
For a comfortable arrangement of skewers on the back wall of our barbecue, we drill holes. The skewer has a pointed part in front, which clearly enters these holes and holds steady there. As we see in the photo above, six skewers are conveniently placed on the grill. To do this, we make a markup, stepping back from the top edge of our cutout of the brazier cover, 10cm. down on both sides, put marks and draw a line with chalk. This is the hole level. Then retreating from the edge of the radius cut 4cm. and mark the drill. And then every 10 cm we put the same marks. Using a drill and a drill, we drill holes according to the marks. To do this, we first use a thin drill, for example, 4mm, and then we drill it with a 10mm drill, and at the end we chamfer the hole with a 12mm drill. or round file. On the front side of the brazier, we also make markings on the upper edge of the brazier and cut out the grooves for the skewers with a grinder. When this operation is completed, cover the brazier with a lid and transfer the marks of the places where the cutout is made to the brazier cover. We do the same cutting. This must be done so that when the skewers are installed, the brazier lid closes more tightly.
You can also make seats for the grill - a grid. To do this, we just need to weld metal shelves between the holes for the skewers. We cut blanks 3 cm long from the corner, and weld them to the walls of the brazier, having previously marked the places of welding so that the grid has six points of support along the perimeter of the brazier. We clean the places of welding and cut off sharp corners.
To cook meat on a grill grid, you can use a stainless steel grid, with a cell of 10x10, or 15x15mm, after cutting out the size of the perimeter of the seats as in the photo below.

Air holes
In chapter "markup", we marked out the line for the air supply. This line is at a distance of 10 cm from the longitudinal weld on both sides. Then we take a drill with a diameter of 8mm. and drill those holes. I believe that the hole diameter of 8mm is enough for air supply, since a larger diameter can affect the spillage of burning coals during the burning of heat in the grill. These holes can be drilled both at the beginning of our barbecue assembly and at the end of the work.
You can also add handles on the sides of the barbecue - for ease of movement around the territory.
Barbecue painting
Barbecues are operated outdoors. Therefore, after installing the device, we immediately determine what paint to paint the barbecue.
The coating will protect it from atmospheric precipitation, high humidity and temperature changes. Of course, the brazier should be painted only on the outside. Inside it, when used, the temperature is too high for any type of paint.
The choice of coverage must be approached very carefully.
It must meet the following requirements
- The paint must contain modifiers that protect the metal from rust. The finish should not melt, i.e., have a high fire resistance. The instruction on the paint label must indicate its heat resistance of at least +500 °. Even better, if this figure is + 800 °.
- It should be borne in mind that the barbecues are used for cooking. Based on this, the coating should be environmentally friendly and safe. It should not react with any substances.
Paints are commercially available in two types: aerosol and just liquid paint.
Aerosol paint is sold in a can, in which there is air pressure, and when painting, we simply direct the jet of the can onto the surface to be painted at a distance of 20–30 cm. And liquid paint in a can is applied with an ordinary paint brush.
First you need to clean our brazier from dirt and dust, check the cleaning of all welds, and most importantly: clean the brazier and the brazier cover from old paint. The fact is that gas cylinders are not painted with heat-resistant paint, but applying heat-resistant paint to non-heat-resistant paint threatens with subsequent melting and burning out of the lower layer of paint, which will entail unpleasant consequences.
You also need to take into account that only the brazier itself can be painted with heat-resistant paint, the area of \u200b\u200bwhich is not more than 1.5m 2. Therefore, one bottle will be enough for us. And the legs and available additional elements can be painted with ordinary paint for metal. This will slightly reduce costs, since heat-resistant paint is much more expensive than ordinary metal enamel.
During and after painting, dust should not get on the painted surface and work should be carried out at a temperature of at least 10 degrees Celsius in calm weather.
On this, our work on making a brazier from a gas cylinder can be considered finished, but on my own behalf I want to add that there are a lot of schemes and examples on the Internet for the manufacture of this type of brazier. However, a brazier from a gas cylinder can be unique in its kind when you make it yourself and show imagination for the implementation of projects for additional structural elements. This is how I got a brazier from a gas cylinder with my own hands:
Write questions and additions below. I will be glad to hear your opinion.
We also recommend you: