Modern technologies in construction are unique opportunities. For many, such words as bridging and polymers, tape floor, GOST, cabinets, column connections, dimensions 100x200, or 150x50 do not say anything. But those who have already encountered the repair know that we are talking, most likely, about the field on the logs. Someone just wants to reinforce the floor, while someone needs to lay a new, durable and beautiful one. And very often the technology of arranging the floor on the logs is used.
It’s worth saying right away that laying the floor on logs is in many cases just the perfect solution. Indeed, this method has many advantages. It is very important that the floor is warm.

It is also worth making the floors on the logs as:
- Noise from neighbors in the apartment below will not penetrate to you;
- Installation can be completely done by hand;
- The cost of the floor and work is quite acceptable;
- Wires and pipes, not very attractive, but necessary, can be hidden under such a floor;
- This is an eco-friendly floor.
When you work, the smell in the room will be very pleasant. For many, by the way, the smell of processed wood is a real antidepressant, which by itself cheers up and sets you up for work.
Lags are called bars, which are needed as a support for a hard floor covering. Logs can be made of metal, polymers, reinforced concrete, but usually wooden logs are taken to be laid. Wood is easier to work with and cheaper.
Logs differ from beams in mobility and smaller sizes. Beams after installation, to give a figurative example, cannot be moved, but logs can. Yes, and it is much easier to mount them, and if repairs are needed, it will be simple and quick.
Installation tools: laying floors on logs in the house
To work, you will need a hammer, level, screwdriver or drill, knife. The following materials are taken for the manufacture of such a floor - pieces of chipboard or plywood, any insulation, self-tapping screws, corners or U-shaped fasteners.
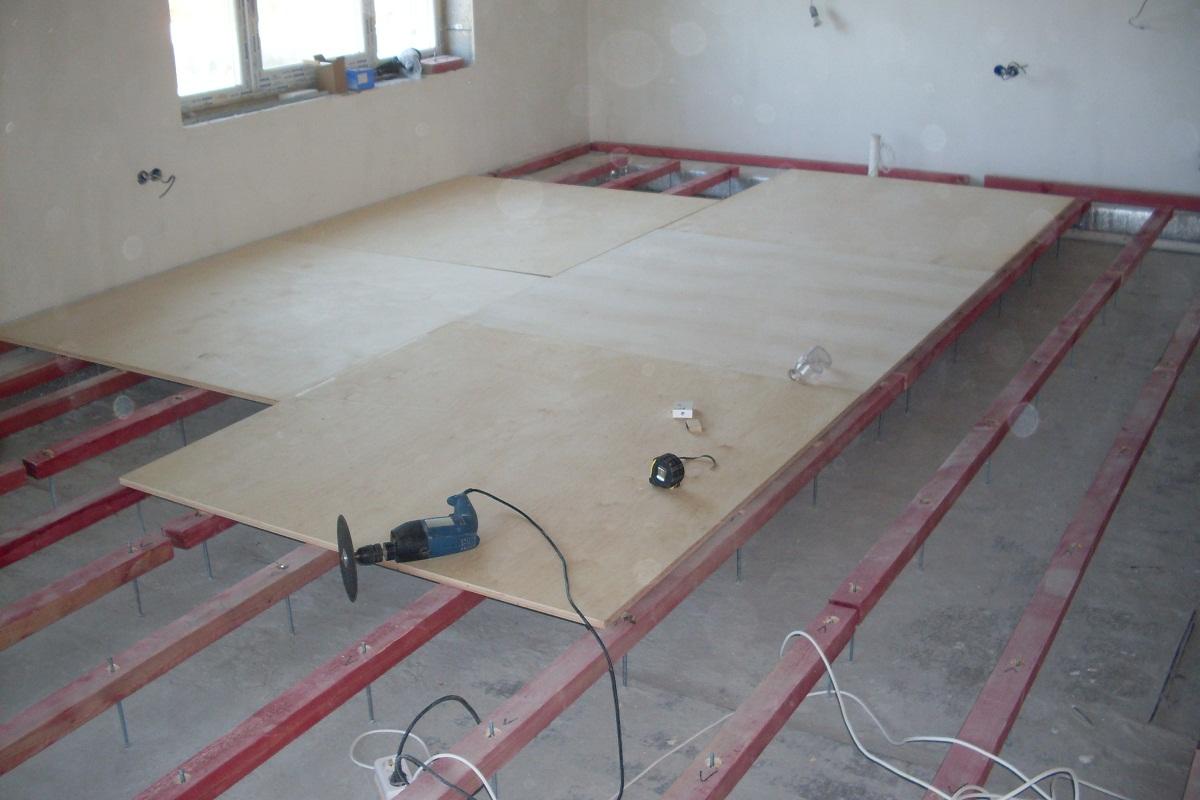
To prepare the floor for installation, the entire floor area should be freed. Check the old screed, if the concrete floor is already deprived of integrity, it needs to be patched up. Then debris and dust are removed, everything should be clean. Then you need to eliminate the defect of the subfloor. The floor should be primed. No matter how much the pros say about the need for a primer, there is some kind of careless attitude towards this procedure. The primer is right, it must be absorbed and dry, and only then the flaws are filled.
Then, the maximum point of the surface in the room is calculated from the level. You need to set a mark so that this is a guide for subsequent work. And then the work develops according to two possible scenarios: to make a screed, bringing the surface to one level, or to set the logs to the level with small plywood spacers.
Step-by-step instructions: do-it-yourself installation of a floor lag
It all starts with the fact that solid or connected bars are laid out across the width of the room. The first bar and the last will be located 20 cm from the wall. You need to calculate the step between the lags in advance.
- It is necessary to bring the level of the floor, the quality of the finish coating will depend on this moment;
- All bars must be placed in the same horizontal plane;
- For lifting, linings of bars or plywood are used;
- It is not enough to install, you need to fix the logs, for this, either self-tapping screws are used, or anchor bolts are installed;
- The length of the fastening interval is 70-80 cm, you drill the beam, capturing the concrete foundation, and tighten the self-tapping screw.

There is an option to install a log and on adjustable fasteners, turning it, you will achieve the desired result. By the way, if the finish is not a wooden floor, but a small ceramic tile, then the distance between the bars will be 30 cm. Only in this situation there are also transverse logs, moreover, at the same distance. They need to be fixed at an equal level with longitudinal bars (a corner is used). Such reinforcement of the structure must be used, because the size of the tile is small.
Modern logs for the floor: the size of the timber
The reliability of the design depends not only on whether you use a board or metal elements, but also on whether the calculation is correct. First, the length and thickness of the beam is determined. Length is the length and width of the house. In this case, it is imperative to leave a gap, and the beam, respectively, is selected 20-30 mm less.
Such a ventilation gap is necessary - it prevents deformation if changes in humidity and temperature occur.
The cross section of the beam, its size is more difficult to calculate. Here, the potential load on the floor is important, as well as the size of the spans between the support points of these lags. There is a table that makes the calculations easier. The larger the span, the thicker the beam will be. For example, the span size is 3m, which means that the lag section is 150 by 80 mm. The sectional shape is usually rectangular. Install the beam on the edge so that the logs can withstand high pressure.
What is the distance between the floor joists
The lag step will depend on the thickness of the flooring. If you use flooring from durable thick boards, logs can be fixed relatively rarely. Well, a thin and not particularly durable coating requires more lag.

Dependence can be seen in a couple of examples. For example, the thickness of the floor board is 30 mm, which means that the interval between the lags is half a meter. Or a thickness of 40 mm, therefore, a step between lags of 700 mm.
You really don't need an exact calculation. It will be sufficient to take just the distance between our lags of the average value. And if at the end of the installation you saw that the distance was inaccurate, then make the step between these last lags smaller, and the structure will be strong.
Beam size: floor joists
The length of the beam should be approximately 3 cm less than the width and length of the room where the floor is laid. The length of the log must necessarily be less than the length of the room in order to avoid deformation of the structure if temperature changes occur. It is good to make logs from solid materials, but sometimes the bar needs to be lengthened.
Two elements are spliced according to the rules:
- There should be supporting elements under the splicing point, for example, poles;
- If adjacent logs are spliced, then the splicing points are positioned relative to each other with an offset.
The connection must comply with these conditions, otherwise there may be a threat of low floor stiffness in the very place where the timber is spliced. Neighboring logs are spliced with an offset of a meter. This fact affects the size of the bars taken.
Algorithm: laying the floor on the logs with your own hands
You need to lay a wooden log from the corner of the room. Then, the first row is usually placed with a tongue and groove relative to the wall, and in this case, the gap between the wall and the lag should be 1 cm (to avoid wood deformation). Then a number of logs are laid offset relative to the first log, by about a few bars.

In order for the boards to be firmly attached to the base, you need to knock a little on the wood with a construction hammer. This is necessary for the reliability of fastening. Boards are attached along the wall, fixed with screws. The screws can be on the surface, it doesn't matter, the skirting boards will close them.
Hint: how to increase sexual lags
Everything is individual here, but there are some general rules. For example, if the floor lags and the strapping lower beam are at the same level, then they can be fastened together with forged staples, or perforated corners will help. If the logs are located below the strapping beam, then a metal bracket is used.
Roughly speaking, the main purpose of the reinforcement is to firmly fix the floor lag and the bars of the lower crown. In this case, when strengthening the floor, the floorboards will stop moving apart. Still, as an option, you can rally the floors until the cracks are eliminated, and the gaps are simply covered with skirting boards.
How to put logs on the floor (video)
Today, when the floor can be laid, poured, polymeric coatings can be made, plastic parts, brick inclusions, etc. can be used, many people refuse to use the classic methods of repair. But sometimes, instead of complex and expensive designs, old and proven methods are required. The same floor on the logs, which will "make friends" with both a wooden and a brick house.
When organizing wooden floors, logs are often used, especially for rooms located on the 1st floor. They can be made of wood, reinforced concrete, metal, etc.
What are wooden logs
Logs are transverse beams that are installed on bricks or reinforced concrete base. They are made from a solid wooden beam of square or round section. To save money, some owners make them from spliced boards installed on the edge.
Floors organized on logs
Benefits of using flooring on logs
- With the same lifting height, the floors organized with the help of a log have a much lower weight of the structure, for example, compared to reinforced concrete.
- The floor, organized in this way, is well ventilated.
- Hidden communications can be installed between the flooring bars.
- The floor, which has free space under the flooring, can be additionally insulated and soundproofed.
- Such floors can be leveled even if they have a large difference in height.
- A floor that has this design can be easily dismantled for restoration.
In order for the floors to be reliable and serve for a long time, the cross section of the beams must be correctly calculated. To do this, you can use special tables.
 Beam section calculation table
 However, there are situations when the floors need to be reinforced. This happens in the following cases:
- the load on the floor increases, for example, due to the conversion of the attic into an attic;
- damage to the load-bearing wooden elements from which the floor was made, fungal diseases or due to damage by rodents;
- excess of the bearing capacity, for which the floor was originally calculated;
- initial incorrect calculation of the section of wooden elements, etc.
Attention! It is allowed that the floor has a deflection of 1:300. That is, if the beam has a length of 3 meters and the deflection is 10 mm, then this is an acceptable value, and no reinforcement is required.
There are several ways to enhance the lag. Let's consider some of them.
We strengthen the floor by reinforcing wooden structures with overlays
It is performed if cracks are found in wooden structures or the floor begins to sag strongly.
Before performing work, it is necessary to unload the floors, and it may also be necessary to dismantle the coating. The unloading of the structure is carried out by installing temporary racks of logs, timber or jacks. The number of racks and their cross section depend on the length of the span of the structure and the load.
If the logs are made of a single log, it is allowed to install a single rack at the deflection point. If the structures are composite, then you need to install several racks. In the place where the floors sag, a jack is installed, and with its help they bring the system to a horizontal position.
If the floor caved in due to the fact that a beam of a smaller diameter than required was initially used, then using the table, calculate the desired diameter value. Next, subtract the diameter of the beam from the desired value. The resulting value will give us the minimum thickness of the lining, which is used in order to build up the beam.
The overlay is installed on one or both sides and stitched to the old structure using bolts with metal linings. They are needed in order to prevent the destruction of the tree under load at the attachment point.
To reinforce the floor, instead of wooden overlays, you can use metal ones. In this case, strips of metal 10 mm thick and 10–20% less than the width of the log are used. As in the case of wooden overlays, metal overlays are installed on one or both sides of the structural element, only the number of fasteners is increased by about 25%. The metal is treated with anti-corrosion compounds before installation.
If reinforcement is performed when the beam is damaged, then it is necessary to install a support, remove the damaged area, and treat this place with antifungal compounds. The pads themselves are also treated with an antifungal compound.
 Strengthening the beam with wooden overlays
 Reinforcement can be done with carbon fiber, which is used if the beam is not damaged by fungus, but cracks have appeared in it.
In this case, the damaged part is wrapped with carbon fiber, which is fixed with a special adhesive based on epoxy resin. Such material makes it possible to strengthen the structure without increasing the thickness of the reinforced element. A layer of carbon fiber 1-5 mm is wound on the right place, depending on the expected load and the condition of the beam.
After the repair work is completed, the supports are removed.
Reinforcement of wooden beams using prostheses
If the beam is damaged by a fungus or insects, then the floors can be repaired by reinforcing the structure with prostheses. The prosthesis is a special small metal truss, which is installed instead of the damaged area.
Dentures are made from a channel or welded using metal rods. In this case, it is better to use a channel for repairs on your own, since it is produced in standard sizes, and you only need to choose a suitable prosthesis. Due to its shape, the channel perfectly resists existing floor loads.
Attention! To manufacture a prosthesis from metal bars, it is necessary to perform a rather complicated strength calculation, and therefore it is better to entrust this matter to a specialist.
 To strengthen the floors, use prostheses made of a channel or a metal rod.
 Often damage occurs in that part of the beam that rests on the wall, since it is in this place that the logs are affected by sharp fluctuations in temperature and high humidity. If this part of the structure is damaged, then a system of wooden and metal prostheses is used to strengthen the floors.
Before starting work on strengthening the structure, the damaged element is supported by supports. The damaged area is cut out. The cut is treated with antibacterial compounds.
Next, wooden linings are selected so that the total thickness of the structure would be slightly greater than the thickness of the original structure. An insert is inserted between the overlays. The liner is fixed to the lining with nails.
 Strengthening the structure with a wooden prosthesis
 Reinforcing floors between floors
To strengthen the floors that are located between floors, you can install additional supports from below, which will take part of the load on themselves. In this case, the floors will be able to carry a large load.
- If possible, additional intermediate beams can be installed. This will also strengthen the floors.
- If possible, you can install additional intermediate lags.
If it is not possible to strengthen the beam in the above ways, then it is possible to unload the structures by redistributing the load on additionally installed elements.
The main element of attic and interfloor ceilings in many private houses is a wooden beam. The service life of wooden floors is limited due to the properties of wood, especially if it has been poorly processed or subjected to stress and moisture.
As a result of such factors, the beam ceases to cope with the function assigned to it (sagging, deflection, curvature is possible) and reinforcement of the wooden floor beams will be required.
In addition to damage and loss of the bearing capacity of the floor and ceiling beams (lag, girders), strengthening may be dictated by an increase in the load on the ceiling.
When to reinforce wooden floor beams
- poor condition of the beam structure. The result is damage to the wood. High humidity, temperature changes, the activity of various pests (bark beetles), cracking - all this leads to deformation of the floor beam;
- bearing capacity reduction. Under its own weight, constant and variable load, floor beams can bend. According to the regulations, if the deflection is within 1:300, then there is nothing to worry about. For example, if the beam is 2500 mm long. bent 10 mm. this corresponds to the normal deflection value. If the deflection index is greater, it should be strengthened;
- the need to increase the bearing capacity of the beam. Associated, for example, with the restructuring of the attic into an attic or living space. Such a restructuring will lead to an increase in constant and variable loads on the floors of the second floor, which automatically requires a change in the cross section of the installed wooden beams.
Within the article, several common ways to strengthen the overlap (, reconstruction) will be given. But, only a professional can accurately answer the question of how to strengthen wooden floor beams and only after analyzing the state of the structure. After all, in each case the decision will be individual.
Using the table, you can get an idea of what section the beam should have under a certain load.
Material prepared for the site site
Ways to reinforce wooden floor beams
The main types and methods of strengthening wooden floors are given in order of increasing labor costs and duration of work.
Amplification type without changing working conditions
Reinforcement with wood trim
The method is used when the tree is damaged. The linings are installed on both sides of the beam from the beam (on the sides or top and bottom), as tightly as possible to it and are fastened (tightened) through with a bolt. In this case, it is important to treat the damaged area and lining with an antifungal solution. In a critical case, if the area is badly damaged, it is better to remove it. To strengthen the beam, you need to fasten the overlay along its entire length.

Reinforcement of spans with metal overlays (plates) or bar prostheses
Steel plates are used instead of the wooden ones described above. The metal also needs to be treated with an anti-corrosion solution. The diagram of the device is shown in the figure.

Strengthening the overlap with carbon fiber (CFRP)
Modern reinforcement technology (carbon fiber reinforcement). Carbon fiber (tapes, sheets, plates, threads, fabric) is glued in several layers until the required beam stiffness indicators are reached. The ease of use and lightness of the material lead to the fact that carbon fiber is gaining popularity as an effective tool for the restoration of beams and building structures.
Below is a diagram of reinforcement (strengthening) of floor beams with carbon fiber.


Reinforcement at the ends with wooden or metal prostheses
The technology allows to strengthen the beam at the junction with the bearing wall. This is exactly the place where, due to temperature changes, wood damage occurs faster.


The diagram below shows the technology of reinforcement with prostheses from a channel, a rolled profile


Installation of a bar prosthesis
The bar prosthesis of the Daidbekov system is made from two paired trusses, which are made from scraps of reinforcing steel with a cross section (diameter) of 10-25 mm. The length of the prosthesis should be 10% more than twice the length of the decayed end of the beam, but not more than 1.2 m.

- Install temporary supports under the ceiling at a distance of 1-1.5 m from the bearing wall, consisting of racks and a run.
- Disassemble the ceiling from below to a width of 75 cm and from above - 1.5 m from the wall.
- Cut off the damaged section of the beam (0.5m)
- Bring the prosthesis blank vertically into the interfloor overlap and turn it to a horizontal position, first pushing it onto the beam, then pushing it into the wall niche in the opposite direction.
- Move and nail the sliding bar.


Amplification type with changing working conditions
Strengthening wooden floors in such ways provides for a significant restructuring of the supporting structure of beam spans.


Non-standard solutions
If it is not possible to strengthen the wooden floor beams, you can try to unload them, i.e., distribute the load from the existing beams to additionally installed elements.
Reinforcement of floors by installing supports under load-bearing beams
Supports supporting beams from below are a good way to redistribute the load from the beam to the support.

Strengthening floors by installing additional beams
If the existing logs are safe and sound, it is possible to increase their bearing capacity by increasing their number. Installing additional wooden beams will increase the load on the structure. When installing new logs, it is imperative to protect their ends with roofing material to avoid damage.

We hope that from the above methods of reinforcing wooden floor beams you will choose the one that will solve your problem in the best possible way and at minimal cost.
In most wooden houses, the construction of floors is used, in the manufacture of which wood is also used. Beams are made from this material. Given the significant load that they must withstand, it is often necessary to strengthen the floor logs in a wooden house. This is quite simple to do if you know the features of these structures and the basic methods for performing such work.
Wooden logs - description and benefits of use
Logs made of wood are beams that are installed on the lower trim of the log house or on the supporting structures of the wall. For manufacturing, a solid bar is almost always used, which has a square or round section. In some cases, in order to save wood, the owners of the building decide to build them from spliced boards installed on the edge.
The use of wooden logs in the construction of floors and floors immediately provides a number of significant advantages:
- the characteristics of wood make it possible to obtain a much lighter structure with equal height, for example, with reinforced concrete floor slabs;
- the structure of the floor with lags provides the possibility of ventilation, which is extremely important for the efficient use of heat-insulating material and the durability of the wood itself;
- it is easy and convenient to lay any internal communications between the beams;
- the design of the ceiling using beams allows for additional heat and sound insulation;
- using logs of various heights, you can easily even out even serious differences that have arisen due to errors in the construction of the log house;
- the design of the floors allows, if necessary, to carry out any repair work without serious problems and large labor costs.
Given the number of advantages listed, it is quite logical that floors using wooden beams are the most common design solution today. This design is used for most houses made of logs or timber.
The need to reinforce wooden floor joists
Quite often it is required to strengthen the floor log in a wooden house. This is explained by the desire of the owner to play it safe, making the important supporting structure as reliable as possible and able to withstand any load. Other, less pleasant reasons for doing beam reinforcement work can be:
- during operation, the load on the floor increased, exceeding the design parameter taken into account during construction;
- load-bearing wooden structures have partially lost their strength characteristics due to decay, the appearance of fungus or microorganisms;
- when designing the building, mistakes were made, as a result of which the cross section of the beams turned out to be insufficient for the normal operation of the building.
In each of these cases, deflections of the lag or the floor as a whole, as well as other types of deformations, can be observed. Of course, in such a situation, it is necessary to strengthen the floor beams in a wooden house as soon as possible. Otherwise, its operation will simply become unsafe for the inhabitants of the building.

Ways to reinforce wooden floor beams
When deciding to reinforce floor beams, two important points should be considered. First, the possible options for performing work. Obviously, it is extremely important to produce them in such a way as to obtain the desired load-bearing capacity of the structure, while spending a minimum amount of money and time.
Secondly, you need to understand that strengthening the logs of the second floor of a wooden house and the beams of the basement floor is far from the same thing. Therefore, the choice of work method should be based on the location of structures in the building.
Strengthening the lag with overlays
One of the simplest and at the same time quite reliable methods of strengthening beams is the use of wooden or metal overlays. Before performing work, it is necessary to unload the floors. For this, temporary racks are installed, which can be built from timber, logs or jacks. The longer the lag, the more often you need to mount the supports. If the ceiling is bent, with the help of racks it is required to return it to a horizontal position.
Then linings are made, the section of which is selected based on the load exerted on the logs. When reinforcing the floor, they are usually made of timber, and when working to strengthen the floors, it is allowed to use steel strips having a thickness of at least 10 mm and a width. The width in this case is selected somewhat smaller than that of the lags. The overlay is attached to one or both sides of the beam, after which it is securely fixed with bolts with steel linings.
Recently, special carbon fiber has been used to reinforce the beams. This material is effective when cracks appear in the structure. It is wrapped around the log and fixed using epoxy glue. After completion of the strengthening work, the temporary supports must be dismantled.
Strengthening floor beams with the use of prostheses
A prosthesis in construction in this case refers to a small steel truss that can be installed instead of a damaged section of a wooden beam. For its manufacture, metal bars are used or, which is even more efficient and reliable, a channel. Before performing work, the beams must be supported with racks, completely unloading.
After that, the defective area is dismantled, and a prosthesis is installed in its place. Then it is framed with wooden overlays in order to obtain a structure of the desired thickness. It is recommended to perform such work with the invitation of professional builders, as they require careful calculation and accuracy.
Strengthening the lag of the interfloor overlap
One of the easiest options to strengthen the ceiling in a wooden house is to install supports that can unload the load-bearing structures of the floor. Of course, this method can hardly be called the best, since it creates certain inconveniences and takes away part of the useful internal space. A variation of this method is the installation of intermediate beams, devoid of these disadvantages.
27/12/2017Squeaky floorboards are the most common problem in homes with hardwood floors. Its appearance can be caused by various reasons, and it occurs not only in old houses, but also in new buildings. To get rid of an annoying sound, it is not at all necessary to start a large-scale repair: there are several simple ways that will help you quickly and cost-effectively eliminate any squeaks. To begin with, it is necessary to establish exactly why the boards will be fastened together, and only then choose a way to strengthen the wooden floor.
In new floors, creaking usually appears due to violations of the installation technology or the use of low-quality wood for logs and flooring.

Old floors usually begin to creak due to wear and tear of individual structural elements, shrinkage of wood or the base itself.

The most common reasons are:
- weak fastening of boards- if nails or self-tapping screws are used that are smaller than necessary, very soon such fixation weakens, and the boards come off the lag. In addition, metal fasteners rust, become thinner, their caps come off;
- no gap around the perimeter of the room- fluctuations in temperature and humidity cause expansion of the material, and if the boards are laid without a gap from the wall, they swell in waves, begin to rub against each other and creak;
- tree shrinkage- over time, the boards dry out and move freely on the nails, making squeaks. The lags also dry out, the gaps between them and the boards increase, the floor begins to sag;
- lags are not level- due to height differences, when laying the coating, deflections are formed and, as a result, the floor creaks underfoot. The same thing happens if leveling pads made of soft materials are laid under the logs. Under load, such linings are compressed, reduced in size and lead to subsidence of the structure;
- raw wood- drying of the material after laying leads to deformations of the logs and boards, weakening of the fasteners, friction between the floor elements.


In older buildings, the creaking of wooden floors can be caused by subsidence of the foundation, which affects all elements of the structure. In such situations, simply strengthening the boards is not enough, and the only right solution is a major overhaul.

How to identify the cause of the squeak
To effectively eliminate the problem, it is necessary to correctly determine the cause of creaking floors. To do this, you need to examine the places where a creak is heard, check the tightness of the connections by intense pressing. If nail movements are observed or individual floorboards “walk”, the problem lies in the loosening of the fasteners. If the boards are knocked down firmly, but the flooring sags when pressed, this indicates a deformation of the lag or subsidence of the soil under the base.

The building level or rule will help you find the problem area: creaking usually occurs in places of the greatest differences in height. In this case, it is best to remove a couple of floorboards and look under the flooring: this way you can accurately assess the state of the lag, their degree of wear, and the quality of the rough foundation.

Wall squeaks are often caused by improperly fixed or cracked skirting boards. Carefully inspect them, pressing with your hand in several places, check if the nails come out of them when pressed, if there are any cracks in the material. To make sure there is a gap between the boards and the wall, it is worth carefully dismantling one of the plinth fragments.

Methods for eliminating creaking
So, when the cause is determined, you can choose the best method of strengthening the floor. There are several effective methods that have long been proven in practice by home craftsmen.
| Ways to strengthen the structure | Causes of the squeak | Peculiarities |
|---|---|---|
| Small gaps in decking, loose end connections | Minimum labor costs and financial investments with high efficiency |
| Gaps between the base of the floor and the joists | The method is expensive, but very reliable. |
| Loose connection of floorboards to joists | Economical and fast method, no need to spend a lot of effort |
| Worn material, drying of floorboards, presence of large cracks and other damage | The method is long and laborious, but it allows you to effectively eliminate squeaks and other defects. |
| The presence of wide gaps in the flooring as a result of drying out | The method is effective and durable, but requires some experience and physical effort. |
| Small gaps in the floor, loose fit of elements | Expensive, but fast and easy. The method allows you to remove the creak for a maximum of 3 years |
| Deflection of the boards due to the large distance between the lags | Easy to perform, but not suitable for high traffic areas |


We strengthen the floor with our own hands
You can strengthen the floor by any of the listed methods yourself, since special knowledge is not required for this and it is enough to be able to handle tools. Consider the popular strengthening options in detail.
Use of dowels or wedges
This method is great for those cases when the flooring is still strong and even, but there are small gaps between the floorboards. There are two options for solving the problem.
Wedge reinforcement. Wedges are cut from wooden slats according to the size of the gaps in the floor. With a knife or spatula blade, the slots are cleared of debris, vacuumed. Wet cleaning cannot be done - the tree must be absolutely dry. The wedges are coated on all sides with carpentry glue and tightly hammered into the cracks. If gaps or small indentations remain along the edges, they must be filled with glue mixed with sawdust in a ratio of 1: 4. Now you need to wait until the glue dries, remove everything superfluous with a planer, and thoroughly sand the surface. Finally, a water-repellent primer should be applied and the floor repainted.


Dowel reinforcement. At the joints of the floorboards in the place of the gap at an angle of 45 degrees, holes are drilled through both boards. The drill is selected according to the diameter of the dowels. The resulting dust and chips are removed, the dowels are covered with glue and hammered into the holes until they stop. After drying, the protruding parts of the dowels are cut off, the repaired areas are cleaned and leveled with putty on wood.

Anchors
If the creak appears due to a loose connection between the lag and the rough base, the best solution is to strengthen the structure with anchors. For this you will need:
- roulette;
- drill with a crown and a drill for wood;
- anchor bolts and key;
- putty.
Step 1. In the room, skirting boards are removed, dust and debris are swept out.

Find areas where the floor sags. Now you need to determine the location of the lag under the boards and measure the distance to the concrete screed. Logs are easy to find by nails - they go in rows across the floorboards. Stepping back about 5 cm to the side, a small through hole is drilled in the board and a piece of wire is inserted into it until its end rests on concrete. Measure the length of the wire and add 3-4 cm to the result.

Advice. If the nails are hidden under putty and a layer of paint, an ordinary magnet will help to detect them. By running a magnet along the floor surface, you can easily identify a number of fasteners and set the location of the log.
Step 2 Along the fastening line of the nails, a log is drilled through the floorboard in several places and deepened into the screed by 35-40 mm. Holes are made according to the diameter of the anchor bolt.
Step 3 They put a crown on the drill and drill a recess in the floorboard for the bolt head, clean it of dust.
Step 4 The bolts are inserted and tightened with a key until they stop, tightly tightening the floorboard and the log with the base.

Step 5 Small cracks in the boards are sealed with an adhesive mixture with sawdust, recesses under the bolt heads - with putty on wood.
As a rule, such strengthening helps to permanently remove squeaks and deflections of the floor. On top of the boards, you can lay chipboard, OSB, plywood or lay linoleum.
Pulling the floor with screws
To tightly connect the flooring with the logs, you need to use self-tapping screws of a slightly shorter length than the total thickness of the floorboard and logs. To determine this thickness, dismantle part of the plinth and take measurements through the gap. It is even more convenient to do this through a hole in the floor by removing one of the boards. Measurements are taken from the flooring surface to the rough base on which the logs rest.
For work you will need:
- screwdriver or drill;
- wood screws with a diameter of 3.5 mm;
- waterproof putty;
- tape measure and pencil;
- a hammer.
Advice. For a quality connection, you need to choose self-tapping screws, in which the thread does not reach the head. Such fasteners allow you to tightly pull the logs and boards together, unlike standard self-tapping screws.

Step 1. In areas where the flooring walks underfoot, determine the location of the lag along the nails. If the boards on top are covered with plywood or chipboard, you need to remove the plinth from one of the walls in order to see the ends of the log and outline the lines on the floor surface. If the lags are not visible from under the boards, it should be done differently.
Since the boards are laid perpendicular to the joists, you need to look at which side the ends of the floorboards are, step back a few centimeters and drill a through hole. If the drill easily passed through the floorboard, make a few more holes, moving further and further away from the wall in a straight line, until the tool hits the log. Mark this point with a pencil, then determine the location of the adjacent lag in the same way. As a rule, they are stacked in increments of 40-60 cm. Having found it, they put another mark and measure the distance between them. Having learned the laying step, it will not be difficult to find the rest of the logs.

Step 2 Along each log, you need to drill holes every 10-15 cm. In order not to go astray and get past the beam, it is best to mark up. Having found the location of the extreme lag at one end of the room, they determine it in the same way at the opposite wall, and then connect the marks with a straight line. The remaining lines are drawn parallel to the first at the desired distance.

The drill should not be placed perpendicular to the board, but at an angle, while it should enter through the floorboard into the log by about ¾ of its thickness. So that the fasteners do not loosen in a short time, the diameter of the drill must necessarily be less than the diameter of the self-tapping screws.
Step 3 The holes are cleaned of wood dust and screws are screwed in, deepening their heads into the floorboards by 1-2 mm. Old nails do not need to be removed if they are held firmly enough. The hats protruding above the floorboards should be hammered and drowned into the wood with the help of a chisel. Loose or rusted nails must be removed, and a self-tapping screw is additionally screwed next to it.

Step 4 They take putty on wood and carefully apply it to the boards with a spatula, covering the recesses from the fasteners. After drying, these areas are sanded with sandpaper, dust-free, primed. Now it remains only to paint the floor or lay the finish coat.

Video - Quick floor repair
If the floor creaks due to wear and tear, the methods described above will not work. More radical measures are needed here, that is, a bulkhead of the floor. To work, you will need a standard set of tools: tape measure, level, nail puller, hammer, drill, screwdriver.
Step 1. The baseboards are dismantled first, then the boards are removed one by one using a nail puller. To prevent the tool from leaving dents on the floorboards, it is recommended to use small wooden linings. Since most of the boards will be laid back, for convenience, they should be numbered from the back. Each floorboard is carefully inspected, all the nails are removed, carefully stacked on top of each other. Heavily damaged boards are discarded; it makes no sense to lay them in place.


Step 2 After dismantling the flooring, they begin to check the log and the draft base. If there are cracks in the screed, they need to be embroidered and repaired with fresh mortar. Cracked or rotten logs are removed, the rest are checked by level and, if necessary, leveled with linings.
Step 3 After removing debris and dust, proceed to the installation of the coating. The floorboards are alternately laid on the logs, focusing on the affixed numbers. A 10-15 mm wide indent must be made from the wall. Self-tapping screws can be screwed into the holes left by the nails, but only if they are not broken. Screw the fasteners at an angle to the board, so the connection will be more reliable.


Lay the floorboards, knock them out with a mallet, fix them with self-tapping screws


Step 4 If the paint on the floorboards has worn off in places and the appearance of the coating leaves much to be desired, you can sand the surface. Processing is carried out at least twice, first using sandpaper with a large grain, then with a fine one. This will achieve maximum smoothness of the coating, refresh it.
Step 5 After grinding, the floor must be vacuumed and a layer of protective primer with antiseptic properties applied. Now the surface can be painted or varnished.
Video - How to varnish a wooden floor
Often the boards dry out so that wide gaps form between them. At the same time, the floorboards are still quite strong and even, and there is no particular need to change them. In such a situation, you need to compact the flooring by fitting the old boards together and adding a few new ones. You can rally boards in different ways, we will consider one of the most accessible and simple methods.
For work you will need:
- screwdriver;
- mallet;
- several wedges carved from wood;
- plank;
- small trimming timber;
- wood screws.
Step 1. Carefully dismantle the skirting boards and remove the nails from the floorboards. Deformed or cracked boards are discarded, as they can break into pieces during rallying.
Step 2 The edge board from the wall is laid on the logs, leaving a mandatory gap of 10 mm. Fix the floorboard by screwing the screws at an angle to the surface. You can use nail holes if they are not broken.
Step 3. Lay a few more floorboards using the tenon-and-groove connection method.

Step 4 They take a wedge, put the narrow side against the floorboard, press it on the side with a piece of bar. The bar should lie on the log. After making sure that the wedge is tightly adjacent to the board, the bar is fixed on the log with two self-tapping screws.

Step 5 The wedges are fixed in two or three places, depending on the length of the board. Make the distance between the wedges as equal as possible so that the flooring is rallied evenly. Next, they take a plank, put it on the end of the wedge and knock it out with a mallet. Having completed with one wedge, move on to the second and so on.


Step 6 Having completed the padding, they take a screwdriver and fix all the laid floorboards to the logs with self-tapping screws - 2 on each log.


Step 7 Continue laying flooring. Self-tapping screws are carefully unscrewed from the support bar, the wedge is removed, the next 5-7 floorboards are laid. Again, apply the wedge to the extreme board, fix it with a bar and repeat the steps described above.

When all the boards are laid and solidified, there will be a wide gap between the flooring and the wall, which will fit 2-3 more floorboards. They are laid in the same way, pre-fitted to size, and screwed to the logs with self-tapping screws.
Video - Way of tightening the floor boards
Foam filling
If the coating does not need serious repairs, and the boards do not hold together much, you can use foam. Everything is very simple here:
- the floor is cleaned of debris and dust, the gaps between the boards are cleared;
- take a balloon with mounting foam, insert the end of the tube into the slot and blow it out;
- having filled all the gaps, allow the foam to dry, after which its excess is carefully cut off flush with the surface.
If plywood is laid on top of the boards, the areas where creaking is heard are drilled through in several places and blown out in the same way. After cutting off the dried foam, the treated areas are cleaned and wiped from dust. After that, it remains only to paint the floor or lay the topcoat.


Prices for mounting foam "Macroflex"
mounting foam macroflex
Supports from self-tapping screws
It is easiest to strengthen sagging boards with self-tapping screws, but only on condition that the load on the floor is not intense. It should be noted that this method of strengthening is only suitable for floors on a concrete screed. If the logs are installed on the ground, the screws will not be able to serve as a reliable support for the boards, as they will fall through, and the creak will only intensify.
How reinforcement is performed:
- determine sagging boards;
- guided by the heads of the nails, they mark the location of the lag with chalk;
- drill a hole in the center of the deflection at the same distance from both logs;
- screw in the self-tapping screw and cover the recess from the head with putty.

The number of screws for one deflection depends on the distance between the lags: up to 40 cm, one fastener is enough, from 40 to 50 cm - 2 screws, more than 60 cm - 3 screws. It is better to cut the sharp ends of the hardware with a grinder so that they rub the concrete less under loads.
Video - How to strengthen a wooden floor so that it does not creak