Related Articles
We select components for the soil
For this, a solution of copper sulfate is prepared (1 tablespoon per bucket of water), which we then pour over the prepared area. In a greenhouse made of film, but not heated, seedlings can be planted in the first decade of April. Planting pattern 60-70 by 20-30 cm. Before transplanting, the seedlings are well watered. On a hot day, it is better to plant seedlings in the afternoon, and on a cloudy day, in the morning. Each well is watered with thermal water, at the rate of 1-2 liters per well. Next, we take out the seedlings from the pots and plant them a little deeper than they grew before. This approach makes it possible to form adventitious roots on the main stem.
In general, peppers like high temperatures and normal humidity. The site is better to choose sunny and as protected from the winds as possible. The best option is the south side of the house. If there is no natural protection from the wind, you can build an artificial whip from twigs or other improvised material. The most suitable version of the predecessors of pepper is considered to be cucumber, cabbage, representatives of the legume family and table root vegetables, such as beets or carrots.
- pepper seeds germinate very slowly Be sure to monitor the temperature fluctuations in the pots, the allowable rate: from + 15 ° C to + 13 ° C.
- The container with seedlings needs to be turned all the time relative to the window so that the seedlings do not lean (you can highlight it with a phytolamp). Arrange the seeds so that they are between two layers of moistened clean tissue;
- To do this, we need a capacious colander and a pan, selected in such a way that it does not fall into it. Pour enough water into the pan so that it reaches the bottom of the colander, but does not show through its holes inside. Then we collect a full colander of soil, put it on a saucepan, cover it with a lid on top. The soil should be steamed for one to two hours over low heat. This method does not destroy minerals and trace elements, but at the same time it destroys fungus, bacteria, larvae, and insect eggs. After this procedure, it is recommended to "populate" the soil with beneficial microorganisms. For this, the Baikal tool or similar ones are the best suited. First method. It is good to pour the prepared fertile mixture with a solution of potassium permanganate (3 g per 10 liters of water), and then carry out additional treatment with antifungal drugs.
- To one part of sod land add 1 part of peat and river sand. The resulting composition is thoroughly mixed, after which it is well watered with a nutrient solution consisting of 25-30 grams of superphosphate, potassium sulfate and 10 grams of carbamide per 10 liters of water. In addition to peat, the soil for seedlings acquires good porosity after the addition of coarse-grained river sand. It is this component that creates the best conditions for growing garden plants in seedlings. River sand and peat can replace sawdust, but before using them, they must be treated with boiling water.
We mix the components
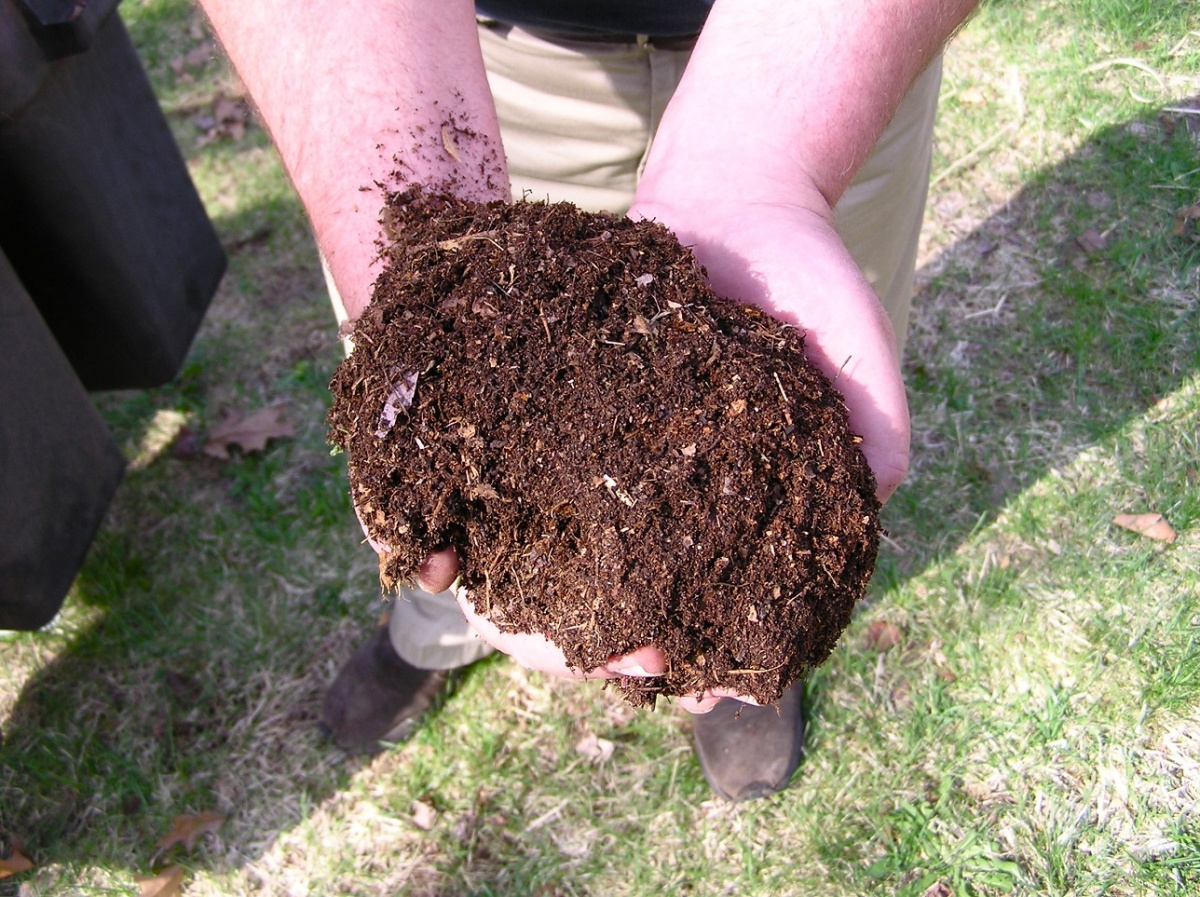
 The guarantee of a good harvest of tomatoes, cabbage, peppers and eggplant from your summer cottage will be properly grown seedlings. Therefore, first of all, you need to take care of the soil in which the seeds will germinate. The soil mixture for seedlings must meet certain characteristics. It should have good porosity, looseness and not too acidic. Such indicators can be achieved provided that the soil for seedlings is properly prepared.
Low-growing varieties with early ripening are planted in a row after 15 cm or 30-40 cm, but two plants per hole. After planting in the ground between the rows, they immediately loosen.
You should not plant pepper in the place where potatoes or tomatoes used to grow, because young seedlings can automatically get a whole “bouquet” of diseases of their predecessors through the soil.
- It happens that you have to wait up to three weeks. That is why they should be sown about three months before they settle in a permanent place of residence in a greenhouse, under a film or in open ground. Young gardeners often make mistakes in terms of planting. Let's say right away - late sowing leads to the fact that the crop will not be obtained due to late flowering at the end of summer, the maximum that you can count on is small "non-peppers".
Before planting in the ground, peppers must be fed at least twice. Namely: 14 days after picking and 14 days after the first feeding. Usually, the under-edges are applied in liquid form. For ease of use, you can buy already prepared fertilizers for seedlings. Here are some of the most used: Agricola, Fertika Lux, Krepysh, Mortar. Start transferring seedlings into large pots (0.8 - 1 l) should be at the end of spring. Transshipment must be treated with great care and attention so that the earthen clod is preserved. In this case, the seedlings continue to grow. You can use the soil composition that was intended for sowing and picking. But this time it should not be sifted in the same way as with a lumpy structure there is more access to the roots for air. Then add 1 tablespoon of double superphosphate, half a glass of wood ash to a bucket of soil mixture. Wood ash can be replaced with three tablespoons of Senor Tomato pepper and tomato fertilizer. 14 days before planting in the ground, hardening should begin in the fresh air, taking into account the preservation of seedlings from direct sunlight.
- How to prepare sweet pepper seeds for sowing. Seed sowing technology. Detailed instructions, nuances, tips - in this video.
- cover them to retain moisture;
The next way to disinfect the land before planting seeds for seedlings is to treat it with a weak solution of manganese. This process is very simple. In a liter jar, half a gram of dry potassium permanganate should be diluted, and the soil should be treated with the resulting solution.
- Method two. Land for seedlings is placed in a cloth bag or in a perforated container and set to steam for 45 minutes. You can, of course, ignite the earth in the oven, but along with pathogenic microbes, the necessary nutrients also disappear.
Soddy soil, peat and humus are mixed in equal proportions. To the resulting mixture, you can add a couple of matchboxes of superphosphate and 0.5 liters of cans of ash.
- leafy earth
 A typical mistake novice gardeners make is to sow seeds in ordinary soil taken from their garden. Therefore, many fail in growing seedlings of vegetables at home and prefer to buy plants ready for planting. The secret to getting good seedlings is to properly prepare the soil for seedlings. Therefore, we will prepare it ourselves, especially since there is nothing complicated in this process.
Soil disinfection
Pepper is subject to pollination, so if you plan to plant several varieties at once, then try to plant them at the maximum distance from each other or protect them by planting corn or sunflower.
- Soil for pepper should have at least three qualities: fertility, high drainage and good moisture retention. Site preparation begins in the fall, when the remains of the previous plant are carefully removed, and then the soil is dug up. Before digging, the soil is fertilized with a mixture of superphosphate (30-50 g), wood ash (50-80 g) and rotted manure or humus (5-10 kg). All figures are based on 1 square meter. Remember, fresh manure is pepper's worst enemy. Does not need pepper and organic additives. This is due to the sensitivity of the plant to dissolved nitrogen in the soil, and if there is a lot of it, then the plant directs all its forces to the development of the leaves, respectively, there is a threat to preserve the ovary and ripen the fruits as a whole.
- Let's start with soil preparation: before planting, the soil must be shed with boiling water and potassium permanganate, and the next day, level the surface, compact and make grooves at a distance of about five centimeters. The distance between the seeds should be at least two centimeters, and the depth should be 1-1.5 cm. Then we drop it in and carefully moisten it with warm water (preferably from a spray bottle). Until the seeds germinate, it is advisable to cover them with a film for the longest possible preservation of moisture and maintaining the same temperature.
It should be remembered that landing in the ground begins only when both conditions are met: a stable average daily air temperature of +15 ... + 17 ° С and the beginning of the formation of the first buds.
glav-dacha.ru
Preparing the land for seedlings

To avoid the risk of damage to plants, pepper dive at the stage of two true leaves without deepening or deepening only half a centimeter and no more. There is also another way: seedlings best tolerate picking at the cotyledon stage and therefore at this moment you can also dive. When using this method, deepening is allowed to the level of cotyledon leaves. Most often, this picking method is used for growing in greenhouses. But for growing at home, the first method is more suitable. 1-2 true leaves of the seedling appear after 3-4 weeks after germination. This is the most optimal for picking peppers at home. Preliminary, it is quite good to shed the soil in the container, and then wait for the water to drain onto the pan. Since the development period of pepper takes a considerable amount of time, it should be dived into small pots with a volume of about 100-150 ml. In such pots, seedlings can master an earthen clod much faster, as a result of which the earth then does not turn sour during watering and the roots are less damaged by rot. The sequence of actions when picking seedlings:
Put the seeds in place with a constant temperature of + 25 ° C.
The next way to prepare the land for
After the disinfection process, seed material can be placed in the earth nutrient mixture. Prepared soil for seedlings in accordance with all the rules will guarantee a high and stable harvest in your summer cottage. Have a good season!
To prepare the soil for seedlings of cabbage you will need:
. A distinctive feature of this type of soil is its high friability, but the low nutrient content does not allow it to be used as the main soil for seedlings. Therefore, its use is possible only after combining with other types of soil. Leafy land is most often collected in a forest belt where deciduous trees grow. Vegetable growers do not recommend using land collected under willow, oak or chestnut, as it will not work to prepare soil for seedlings of good quality: it is too saturated with tannins.
The soil for seedlings of tomatoes, peppers, cabbage, eggplant and cucumbers should consist of the following components:
Planting peppers by direct planting seeds in the ground is not advisable even in warm countries, because you still have to wait until the soil warms up, and this, accordingly, leads to a delay in the ripening of fruits, in general.  After applying the fertilizer, the site is deeply dug up, and in the spring it is loosened and fertilized with phosphorus and potash fertilizers. For 1 square meter, it is enough to add about 30 grams of each of the fertilizers. Immediately before planting, the earth is slightly dug up and the surface is well leveled.
womanadvice.ru
We grow seedlings of pepper at home
Let's dwell a little on the preparation of seeds. Many years of experience have shown that those seeds that have been in the refrigerator a week before germination in the fruit compartment (or where the temperature is not very low) germinate faster. Of course, some gardeners plant peppers without sprouting. Such planting material has its advantages: it is most resistant to drought and frost, although seedlings emerge much later.
Cold heavy soils are not suitable for peppers, so they can be diluted with peat or humus. After the soil is dug up to the depth of the spade bayonet and leveled. Planting holes are made at a distance of half a meter from each other. The depth of the hole should be equal to the height of the earthen coma. Then 1 tablespoon of a complete mineral fertilizer is added to the hole, which consists of nitrogen, potassium and phosphorus. After the plant is carefully removed from the pot and placed in the hole. The hole is filled up so that the bulk of the roots become closed. You need to pour about as much water as a third of a bucket. After the water is completely absorbed, part of the hole is filled with loose earth. Then the plantings need to be mulched with peat and, if necessary, tie up the bushes. At temperatures below +13 ... + 14 ° С at night, plants should be covered in arcs with non-woven material.
Seedling preparation times
You need to carefully take the seedlings by the "ears" and then place them in the hole in the pot so that the roots are freely located there, without bending;
Seed preparation
IMPORTANT! After 1-2 weeks, the seeds will peck and therefore this moment should not be missed, as the roots of the peppers are quite fragile and unable to tolerate damage of any kind.
- seedlings, this is the treatment with insecticides and fungicides. In order to destroy the larvae and eggs of insects, you can use the solution "Aktara" or "Aktellika", and to destroy bacteria and fungus, we will use "Fundazol" or the drug "Fuselad-super". This method is the most effective, but also the most insecure. Most of these drugs pose a direct threat to the health of animals and people, so you should be extremely careful in the dosage and use of the solution. Another obvious plus of this method is the long-term effect. The fact is that when watering, plants will also absorb chemicals, so they will be inedible for pests.
- How to start preparing for sowing seeds for seedlings? Of course, with the preparation of the soil mixture! Gardeners who are too lazy to make land suitable for seedlings with their own hands are often faced with the fact that the seeds simply do not germinate in the purchased substrate. This is immediately blamed on "unscrupulous" manufacturers, but often the reason lies not in the substrate itself, but in its illiterate application. Many believe that if you plant seeds in the most enriched soil, then everything will sprout as well as possible, but this judgment is fundamentally wrong. In this material, we will tell you how to properly prepare the land for seedlings so that it grows strong and healthy in it.
- Mix humus (compost), leaf soil and river sand 1:2:1. For a bucket of this mixture, 1 cup (200g) of ash, 0.5 cups of lime - fluff, 1 matchbox of potassium sulfate and 3 matchboxes of superphosphate will not be superfluous. If it is not possible to use mineral fertilizers, then they can be replaced with ash in the amount of 3 glasses.
Preparing the soil for seedlings is not a very difficult process, but it still requires some effort and free time from the vegetable grower. Therefore, many prefer not to bother and purchase a ready-made soil mixture. However, not all manufacturers of such products are conscientious, and it is possible to purchase peat land with an acidic environment. Even if mineral fertilizers are added to it, good seed germination and strong seedlings can not be obtained.

substrate for seedlings
Humus

Sowing
For successful development and a good harvest, it is important to organize proper watering, timely loosening and high-quality seed dressing.
- You should start working with seeds as early as mid-February, so that in May, when it becomes necessary to transplant seedlings into open ground, the plants are 90-100 days old. It is better to sow the seeds immediately in peat bags with a diameter of 8-10 cm. This measure is necessary because the pepper does not tolerate the dive process. Large pots should also not be taken, since the root system of the plant is very small at this time.
- As for the quality of the seeds, before soaking, it is worth lowering them into a weak solution of sodium chloride and leaving for a few minutes. Poor-quality planting material will pop up, and then it should be removed.
- It is very important to dive the sprouts correctly, the further development of the plant depends on it. How to do it - see this video.
Video "Sowing sweet pepper seeds"
After that, you need to sprinkle the hole with a small amount of soil and compact;
Picking and feeding
In order to grow high-quality pepper seedlings, it is necessary to prepare sufficiently fertile soil. That is why the substrate must be prepared very carefully and carefully. To begin with, it must be said that the earth from the garden is not very suitable for preparing a substrate, and especially if it has high acidity, it is clayey and heavy. The soil must be moisture-intensive, loose, contain the required amount of nutrients, have a neutral reaction and be free from pests and pathogens. In such a case, many gardeners and summer residents have their own recipe for preparing a soil mixture. An example of this would be a commonly used mixture of humus with turf soil and beach sand. Substrate proportions respectively: 3:3:1. An alternative to sod land can be peat. Then a glass of wood ash is added to a bucket of such a mixture. For beginner summer residents, in order to avoid failures, special soil is sold in specialized stores. For example, the highly nutritious Biogrunt substrate, which can be purchased at any gardening store.
- Bell pepper has many health benefits. And all thanks to its composition, which includes vitamins C, P, A, a group of vitamins B and minerals. Based on this, we can say that bell pepper is an invaluable vegetable, but, unfortunately, it cannot be seen on store shelves all year round. The solution to this problem can be growing pepper seedlings at home.
- General Information
- The soil for seedlings of cucumbers, pumpkins, melons, watermelons is prepared in the following composition:
- For this reason, the soil for seedlings of tomatoes, cabbage, peppers and eggplant is prepared by experienced gardeners with their own hands. It is best to do this process in the fall, and by spring the soil for seedlings will settle and sit down. If you leave it for storage in the barn, then it will also freeze well, which will only benefit him.
- . It is obtained from rotted manure or plants, which makes this soil the most nutritious and fertile of all existing types of soil.
- Water is one of the most important components of successful plant survival after transplantation. Therefore, during the first week, you need to water every two days, using 1-2 liters of water per bush. If the weather is very hot, you can water every day. A week later, they inspect the bed, and instead of the dead plants, reserve seedling bushes are planted. At the same time, further watering is reduced. On hot days, watering is carried out in the morning and evening hours, and during harvesting, watering is reduced to 1 time in 5-6 days.

An earthen mixture for planting is taken of the following composition: 2 parts of humus, 1 part of sand and 1 part of earth. After, it is necessary to add table ash - for 1 kg 1 tbsp. a spoon. In order for the seeds in peat bags to germinate, additional preparation is necessary. To do this, the seeds are kept for 5 hours in water, the temperature of which is about 50 degrees Celsius. The next 2-3 days they are in damp cotton fabric. This period is sufficient for the seeds to peck. Such preparation allows one day after sowing in peat bags to give the first sprouts. After making the seeds into the ground, the sowing is well watered and covered with a film or glass. Before germination, it is important to provide heat in the room (up to 22 degrees Celsius), but as for lighting, you can leave the crops for this time even in the dark.
Landing in the ground
Today in stores there is a huge selection of products that stimulate plant germination, whether to use them or not - the choice is yours, just remember that the soaking temperature should be 30-50 degrees Celsius. prepare for this and what secrets of growing seedlings exist you will learn from this article. Designed for a wide range of readers.
Video "Dive seedlings of sweet pepper"
We must not forget that the root neck can only be deepened by half a centimeter;
plodovie.ru
Time to prepare pepper seedlings
The sowing bowl must first be washed in a solution of potassium permanganate, then filled with the prepared substrate and slightly compacted so that it is about 2 cm from the soil to the edge of the dish. 2 cm. It is not necessary to sow the seeds thicker, because, as a result, pepper seedlings can shade each other and, as a result, stretch. Then you need to fill up a layer of soil mixture from above with a height of about 1 to 1.5 cm. After that, compact it a little again. Watering is required to pay special attention and ensure that the pepper seeds are not washed out to the surface of the soil. Then assign notes with the names of varieties to the containers with crops. To retain moisture as long as possible, crops are placed in a greenhouse. The constant temperature should be +25°C. A week later, shoots appear. You should follow certain rules for caring for them:
Growing pepper seedlings at home is not a difficult task. For good yields, you need to know the intricacies of watering, temperature fluctuations, and how to properly and successfully transplant plant stems so that they do not coarsen.
To understand the general principle that determines which land will be the best for growing seedlings of a particular crop, you need to know one simple rule. The soil mixture should match the composition of the one where the plant will grow in the future to the maximum. But this does not mean at all that you should use the land from your garden for this. The best option that suits most crops is the topsoil from under acacia trees. If acacias do not grow near your house, then you can use a purchased mixture, but before that it should be processed, because it may contain pathogenic microorganisms. For these purposes, the soil can be treated with fungicides or steamed in a water bath. Cultivation of land for seedlings is one of the key points, because pathogenic bacteria can “doze off” in the soil. In addition, the soil may contain both larvae and eggs of insect pests that are not averse to snacking on your young plants. If for each type of seedling it is necessary to choose its own composition of the soil, then the methods of its processing are always the same, we will talk about this later. Mix one bucket of leafy soil with the same amount of humus. 1 glass (200g) of ash is poured into the resulting mixture, up to 10 g. potassium sulfate, and about 20 gr. superphosphate. Everything is thoroughly mixed. Preparing the soil for seedlings begins with the process of mixing the earth. To do this, spread the polyethylene on the ground and pour out each component in the required proportions.
Soil preparation for pepper
For pepper, the soil must always be loose, since the formation of a soil crust has a detrimental effect on the nutrition of the plant. Loosening allows the roots to get more air, and also stimulates the work of microorganisms in the soil. Therefore, after watering and rain, the soil must be loosened, except for the first two weeks. During this period, the plant grows slowly, as the main emphasis is on strengthening the root system. After this period, after watering, loosening is carried out, while quite deep.
Rejection of pepper seeds
As soon as shoots appear, we transfer the seedlings to a warmer place (during the day the temperature should be 26-28 degrees, at night about 10-15). Do not get carried away with frequent watering of seedlings, as excess moisture can cause a disease such as black leg. Watering should be carried out with water, the temperature of which is about 30 degrees Celsius. Do not forget about the humidity of the air, and also periodically spray the plants, and ventilate the rooms where the seedlings are located, but avoid drafts. There are still very few sunny days in February, so it is advisable to carry out additional artificial lighting during this period from 7 am to 9 pm.
Temperature regime
© 2009-2016 Everything in the garden - a useful project for gardeners and summer residents. Copying materials is prohibited. Partial quoting is allowed, indicating a direct active link to the copied material of our project.
So, the new year has already arrived, which means that it is time for us - gardeners and gardeners to start preparing planting material this garden season. Probably the very first plant that you will have to meet is pepper.
vse-v-ogorod.ru
Watering should be done carefully and until the water is absorbed, while holding the seedling;
Preparing the site for planting peppers
Put the crops in a bright place, the temperature of which will be + 15-17 ° C;
The most optimal period for sowing seedlings are the days from February 20 to March 10. So, as in pepper, the fruits begin to ripen 100-150 days after shoots have appeared, and seedlings must be planted at the age of 60 to 80 days. If you know the characteristics of the variety, then you can independently calculate more accurate sowing dates.
A good harvest is always several components. All of them are important: the quality of the seeds, their proper preparation for sowing, the choice of variety, conditions and care. But there is one parameter whose influence is most important. This is the qualitative composition of the soil in which seedlings are grown. The yield of all seedling crops (and in our climate most vegetables are grown through seedlings) depends to a large extent on properly composed seedling soil.

There is no one universal soil that meets the needs of all plants. Each garden crop requires an individual approach. Any plant makes its own demands on the soil mixture. But there are general rules that allow you to create a base soil, so that you can then optimize it for a particular crop with minimal effort.

Initial requirements for seedling soil
Depending on the type of plants that are grown by seedlings, the soil mixture can be composed of different components mixed in various proportions. But in all cases, it is necessary to comply with the initial requirements for seedling substrates.
- Fertility. The soil must contain in sufficient quantities all the substances necessary for sprouts for rapid and successful development.
- Nutrition. This means that the content of all components is balanced, organic elements are present in the soil and there is a mineral component, moreover, in the form and compounds available to plants.


Soil constituents
In the land intended for sowing seeds, components of organic and inorganic origin must be present.

Organic Ingredients:
- soil - soddy, leafy, garden;
- vegetable compost;
- decayed cattle manure;
- peat - lowland and highland;
- sphagnum, coconut fiber, seed husks, bark, sawdust;
- wood ash.
 Peat is one of the most popular components of seedling soil mixtures.
It is not necessary that absolutely all the components from the list be present in the soil, but most - yes. It is better to mix the soil from three different soils: garden, which can be taken directly from the ridge (unless, of course, diseased or insect-affected plants did not grow there); leafy (from leaves that have rotted with the ground); turf (which is obtained by cutting turf). The soil is the basic element of the seedling substrate.

Compost - rotted plants - is necessarily mixed with rotted manure, which is called humus. This is the supplier of the necessary substances.
Advice! Do not sow vegetable seeds in manure, compost or lowland peat. Too much organic matter will cause the seedlings to overgrow leaf mass at the expense of rooting. As a result, seedlings will not take root well when planted on a garden bed or in greenhouse soil.

Peat is required, it is he who makes the soil fertile. The lowland contains about 70% of organic matter, the horse, consisting of sphagnum, makes the soil structure loose.
Peat is found in most potting mixes for seedlings. It is mined from swamps. This is not to say that it is a non-renewable resource. From decaying organic components under the influence of natural processes, it is formed in swamps, but very slowly - over thousands of years. In addition, peat is part of the natural ecosystem - if you completely remove it from the swamps, or at least create a serious deficit, the ecological balance will be disturbed.
That is why scientists over the past decades have been trying to find a replacement for peat. And finally found. More and more producers of seedling soil mixtures are switching to use today.

Benefits of Coconut Fiber.
- It is 100% organic with no chemical additives.
- They are able to absorb and retain water, working like a sponge, retaining moisture for plants and not removing nutrients from the soil.
- A layer of earth in a pot or container with a substrate that includes coconut fiber remains dry, which prevents soil fungi.
- Coconut fiber has a pH level of about 6, so it normalizes the overall acidity of the entire substrate.
- The fiber contains phosphorus, potassium, as well as other substances necessary for plants in significant quantities.
coconut fiber prices
coconut fiber
Also, sunflower seed husks, tree bark, rotted sawdust, dry moss and other rippers are used to loosen the soil. Wood ash is added to normalize soil acidity.

Advice! Do not add nutrients to the soil more than the norm - an abundance of dressings is appropriate during the growing season, the seeds, inside which the plant embryo, have a sufficient supply of substances to form and release a full-fledged sprout. Enhanced nutrition of the seed is not required.
Inorganic components:
- river (in extreme cases, quarry) sand;
- perlite;
- vermiculite;
- expanded clay;
- mineral supplements.
Advice! Do not grind the components of the soil mixture too much and do not sift the mixture through a sieve with small cells - the fine-grained substrate will turn sour and “float” after each watering.

It is an excellent component of seedling soil mixture. This substance has a number of significant advantages.
- Sterility - spores of fungal diseases and pathogens of infectious diseases do not settle in perlite.
- The absence of insects - they simply do not start in the substance.
- The absence of weed seeds - they do not take root in the soil mixture with perlite and do not germinate.
- Preservation in its original state for a long time - perlite does not rot.
- Light weight – perlite is very light.
Vermiculite- a porous, environmentally friendly material that contains a record amount of magnesium, potassium and calcium necessary for sprouts already at the initial stages of life.

Drains the soil, acting as an organic leavening agent and helping to improve the structure and moisture capacity of the soil.

- a polymer compound, which, due to its properties, also serves to maintain a high moisture capacity in the soil.
Advice! To simplify the irrigation procedure and maintain the required moisture, add a hydrogel to the prepared soil before sowing.

hydrogel price
hydrogel
In addition to the required components, the following elements are also included in the soil mixture:
- ash;
- urea;
- potassium sulfate;
- chloride and potassium sulfate;
- ammonium nitrate;
- superphosphate.

What should not be in the soil
This small but important point is often overlooked. Amateur gardeners neglect it, as a result, all efforts to compile the right soil are wasted.
The following components should not enter the soil mixture:
- clay;
- fresh manure;
- not rotted plant residues;
- tea leaves, coffee grounds and other similar waste;
- salty sea sand.

Clay will make the soil heavy, impermeable to moisture and air, dense. Unrotted organics and coffee / tea will cause decay processes - they can begin to decompose, raising the temperature of the substrate, which will be detrimental to many seeds and seedlings. Also, the decomposition of organic matter will entail the release of nitrogen, which will evaporate, depleting the substrate.

Soil for various crops
The table below shows the composition of the soil for each of the most commonly grown vegetable crops.
Table. The composition of the soil mixture for common vegetable crops.
| culture | Soil components and their proportions |
|---|---|
| About 2 kg of garden soil, 1 - humus, ½ kg of sawdust (rotted), fine-grained wood bark or coconut fiber. For 6 kg of finished substrate - 40 g of ash, 20 g of superphosphate, 10 g of urea. |
| 5 kg of soddy soil, 5 kg of high-moor peat, 2.5 kg of sand, 2 kg of humus, 1/4 kg of lime, 1/2 kg of ash or dolomite flour. |
| 6 kg of peat or 3 kg of leaf earth and coconut fiber, 2 kg of soddy soil, 1 kg of humus, 1 kg of sand, ¼ kg of lime. |
| 4 kg of peat, 2 kg of soddy soil, 1 kg of rotted sawdust or coconut fiber, 1 kg of humus. |
| 2 kg of peat, 2 kg of soddy soil, 2 kg of humus, 1 kg of coconut fiber or rotted sawdust, 1 kg of sand. For 6 liters of the mixture - 40 g of ash and 15 g of potassium sulfate and superphosphate. |
| 8 kg of peat, 2 kg of sod land, 1 kg of river sand, mullein or humus, or 2 kg of vegetable compost, 1 kg of sawdust or coconut substrate. For 6 kg of the mixture - 10 g of ammonium nitrate and potassium chloride, 20 g of superphosphate and 45 g of ash. |
| 2 kg of sheet soil, 2 kg of humus, 2 kg of peat or coconut substrate, 1 kg of sand. For 6 kg of the mixture - 50 g of ash, 15 g of potassium sulfate, 20 g of superphosphate. |


How to prepare the soil mixture
In the process of preparing the soil for sowing seedlings, it is recommended to follow the instructions and follow the step-by-step recommendations. It is necessary to start harvesting components in the fall. Also in the fall they are mixed. Then the finished soil is sent for freezing, which will serve as additional sterilization.

Important! At the stage of mixing the soil components, do not add nutritious mineral additives. Nutrient additives are introduced into the soil in the spring, after the main sterilization, before planting seeds, in the form of solutions.
Soil preparation step by step instructions
Step 1. Prepare all the necessary components that you plan to add to the substrate. They must be dry and in different containers.

Step 2 Spread an oilcloth or other suitable bedding on the floor in the utility room, or take a large container (basin, trough, bath, tray) in which you will mix the soil components.
Step 3 Take a measuring container (glass, mug, etc.) or prepare the scales. Prepare tools - a spatula, small rakes - and put on gloves.
Step 4 Measure the required amount of the necessary components, place in a container or pour on oilcloth, mix thoroughly.

Step 5 Pour the finished substrate into small bags (ideally - no more than 20 liters). If the bags are plastic, make a few small holes at the top so that the soil “breathes”.
Step 6 Install bags of soil in a barn, utility room, where sub-zero temperatures will be kept in winter.
If we talk about the middle lane, then watermelons here (as well as some other crops - for example, melon) are preferable to grow through seedlings. In fact, there is nothing complicated in this process, the main thing is to know how to do it.

Decontamination procedure
Harmful microorganisms contained in garden, leafy, soddy soil, peat, sand, humus and other essential components of the seedling substrate can harm the seeds, introducing an infection and reducing their germination. To prevent this from happening, the substrate must be disinfected. This is a very important procedure that should not be neglected if you want to get strong, healthy seedlings and productive plants.

There are four ways to disinfect a substrate:
- freezing;
- steaming;
- calcination;
- pickling.
You can limit yourself to one method, but it is better to combine any of the first three with subsequent etching.
Important! Freezing is carried out during the winter. All other methods begin to be applied in January - February, when it is time to prepare the soil for sowing.
freezing
The method of disinfection by freezing consists in the fact that a bag of soil is left in a room where sub-zero temperatures are maintained in winter. If there is no such room, closer to spring, the soil is taken out to frost and left for a week at a temperature of about -10 ° C ... 15 ° C. Then the frozen soil is returned to heat and allowed to thaw for a week. During this time, all the germs of weeds and pests that were not destroyed by the first freezing will “wake up” in it. After that, the soil is again sent to frost. And so two or three times.
Harvested and it's time to prepare for next year. Beginning gardeners sigh more freely. All major work has been completed. It remains to buy seeds and sow in cups in ordinary soil taken from your garden. And their surprise is great when an unknown weed sprouts instead of a tomato seedling. The mistake of such gardeners is that they try to feed the baby with roughage instead of baby food. Seedlings need a different soil composition. Such a mixture can be bought ready-made in specialized stores, but it is best to prepare it yourself.
What soil to choose for seedlings of tomatoes and peppers?
There is a huge selection on the market today. You can choose the soil for any plant. But is all purchased soil as good as the manufacturer claims? Unfortunately no.
Many manufacturers instead of nutrient soil put simple 100% peat in bags. It is impossible to grow seedlings on such soil. Peat can only be used as a baking powder.
Do not look at the manufacturer, but pay attention to the composition of the soil. Despite the choice, it is very difficult to find a good soil for pepper.
General requirements for soil mixtures for seedlings of tomatoes and peppers
The most correct nutrient soil for seedlings is one that fully meets the needs of a particular crop. One plant needs fertile, moist soil, for another it is a real disaster - give it poor, dry land. Some specimens like acidic soil, and most react negatively to increased acidity. In a word, the dreams of gardeners - gardeners about a universal soil for seedlings are untenable. However, there are some basic requirements for the potting soil in which you plan to sow the seeds. Do-it-yourself soil for seedlings should be:
Moderately fertile, containing the substances necessary for nutrition and beneficial microflora.
- Balanced in the composition of minerals and organic matter, which should be contained in the soil in a form accessible to plants.
- Waterproof, able to retain moisture for a long time.
- Environmentally friendly - free from toxins, salts of heavy metals, hazardous waste products.
- With a neutral level of acidity.
- Having a good structure - light, crumbly, breathable, not containing lumps, foreign inclusions.
- clay. When added to the soil mixture, clay makes it too dense, poorly permeable to air and water, which leads to seedling diseases.
- Plant residues, actively decomposing components. Mature leaves or manure can begin to decompose, releasing heat and reducing the nitrogen concentration in the soil, which is detrimental to young plants. The lack of nitrogen negatively affects their development, and when the soil temperature exceeds 30 ° C, the roots may even die.
- Weed seeds. By themselves, they are not so dangerous, but pathogens can be present on them.
- Worms, insect larvae. After all, even an earthworm, so useful for garden beds, being in a seedling pot, can cause considerable harm to a young plant.
 More about the components of mixtures for seedlings of peppers and tomatoes
Peat for seedlings of pepper and tomato
It is used as a baking powder. Most soil mixtures require peat additives. There are three types:
- lowland: not acidic, rich in nutrients;
- transition;
- superficial, requiring enrichment with lime or ash. The introduction of phosphate, magnesium fertilizers is welcome.
Coarse-grained sand for seedlings of pepper and tomato
Provides proper drainage, contributing to the formation of the supporting part of the bush. Makes the soil porous, light.
Sod for seedlings of pepper and tomato
To saturate the soil mixture, improve the structure in the summer-autumn period, the top soil layer is removed along with the grass. Stacked in boxes. Warm up before use.
Sphagnum mosses for seedlings of pepper and tomato
Increase moisture content. Possessing bactericidal qualities, they prevent rotting of the root system of seedlings.
Sawdust for seedlings of pepper and tomato
Additives from wood waste lighten the soil, increase its permeability.
Compost for pepper and tomato seedlings
Contains humus, so necessary for the successful development of seedlings. Increases fertility, ventilation.
Perlite for seedlings of pepper and tomato
When growing seedlings in mixtures containing a substance of volcanic origin, the risk of fungal diseases and decay of seedlings is reduced. Protects against the formation of lumps, caking, tamping, temperature changes. 
What should not be in the soil mixture for seedlings of tomatoes and peppers
Weed seeds, fungal spores, insect eggs and larvae, worms and pathogens.
toxic substances. You should not take components for the mixture near major highways and airfields, from city lawns, and so on - dangerous areas can be listed indefinitely. I think it's easier to say where you can get it from: from a forest, a grove, a forest plantation.
Actively decomposing components. When mixing organics, the decomposition process should not be activated. You know that it is accompanied by the release of heat and the loss of nitrogen - both of which are highly undesirable for seedlings! And if the temperature rises above +30 ° C, the root system of the sprouts may die.
Do not use clay: its properties will significantly degrade the quality of the soil mixture and make it unsuitable for growing seedlings.
Why disinfect the soil for seedlings of tomatoes and peppers?
This process is necessary to remove pathogens from the soil. You can disinfect the soil mixture for home seedlings in various ways, one of which is its freezing. But, if this is not possible, then you can use watering with disinfectants or steam treatment.
Method one. It is good to pour the prepared fertile mixture with a solution of potassium permanganate (3 g per 10 liters of water), and then carry out additional treatment with antifungal drugs.
Method two. Land for seedlings is placed in a cloth bag or in a perforated container and set to steam for 45 minutes. You can, of course, ignite the earth in the oven, but along with pathogenic microbes, the necessary nutrients also disappear.
After the disinfection process has been carried out, seed material can be placed in the earthen nutrient mixture. Prepared soil for seedlings in accordance with all the rules will guarantee a high and stable harvest in your summer cottage.
Latest articles about gardening and gardening
Freezing soil for seedlings of tomatoes and peppers
With the onset of frost, the container with the mixture is taken out into the street under a canopy so that snow does not fall. In the open air, the mixture is 3-5 days. With constant frosts of -15 ... 25 ºС, most pests and seeds of some weeds die. After freezing, the container is brought into a warm room with a temperature of + 18 ... + 22-25 ºС. Surviving seeds and pests begin an active life. After 10 days, the container with the soil mixture is again exposed to frost. The procedure is repeated 2-4 times. During this time, the vast majority of weeds and pests die. 
Steaming the soil for seedlings of tomatoes and peppers
A month before sowing the seeds, the soil mixture is subjected to steaming in a water bath, which can be done in several ways.
In small portions, pour the mixture into a colander lined with gauze or other loosely woven fabric. We cover the colander with a lid and hold it over a container (bucket or pan) with a small amount of boiling water. The duration of steaming is, depending on the size of the colander, from 10-15 to 30-45 minutes.
Pour water into the bottom of the tank, set a high stand. We place the soil mixture in an old finely perforated bag on a stand. Steam from boiling water steams the mixture for about 1-2 hours.
Scatter the steamed moist soil in a thin layer on paper or cloth and dry it in air to a mature state. A properly dried soil mixture should, when squeezed and then opened, easily crumble into small loose particles, slightly velvety to the touch.
Preparing soil for seedlings of tomatoes and peppers

Pepper
1. Turf land (1 part), humus (2 parts).
2. Peat (2 parts), humus (2 parts).
3. Humus (3 parts), sod land (2 parts).
4. Nutritious peat soil (2 parts), sod land (1 part).
5. Peat (4 parts), soddy land (2 parts), humus (1 part), rotted sawdust (1 part).
Tomato
1. Peat (16 parts), sod land (4 parts), mullein (1 part). Add 3 liters of river sand, 10 g of ammonium nitrate, 20-30 g of superphosphate, 10-15 g of potassium chloride to a bucket of the mixture.
2. Peat (3 parts), sawdust (1 part), mullein (0.5 parts). Add 3 liters of river sand, 10 g of ammonium nitrate, 20-30 g of superphosphate, 10-15 g of potassium chloride to a bucket of the mixture.
3. Humus (1 part), peat (1 part), sod land (1 part), rotted sawdust (1 part). Add 1.5 tbsp to a bucket of the mixture. ash, 3 tbsp. superphosphate, 1 tbsp. potassium sulfate and 1 tsp. urea.
Peppers and tomatoes are highly responsive crops to fertilization. If you want the plants to please you with an excellent harvest, then from the first days of planting seedlings, you need to make sure that the soil contains all the necessary trace elements for its growth and development. And since they will absorb them quickly and rather diligently, pepper fertilizers will have to be applied regularly as the seedlings grow.
Main difficulties
When talking with gardeners, you often hear that they stop growing peppers in their area. This is due to some difficulties, which is the cultivation of a heat-loving crop in our climatic conditions. Few people know that this is a perennial shrub, but we cultivate it exclusively as an annual plant. Its fruits are loved by everyone, they are used to prepare salads, first and second courses, and are sources of vitamins and minerals.
Is it so difficult to grow them in Russia? Let's just say that it is possible, subject to a number of rules. We do not take into account the southern regions of the country. This culture has a long growing season, which means that in many regions of the country, planting seedlings begins in February. This gives the plant a chance to bloom and grow fruits in a short, hot period. In addition, timely weeding and watering, loosening are very important factors. Do not forget to fertilize the soil on time. For pepper, this is one of the foundations of normal life.
We grow seedlings
To get a good harvest, it is necessary to sow seeds in the ground in late January - early February. To do this, you need to prepare the boxes in advance, fill them with soil, water. After a couple of days, you can start planting seeds. The composition of the soil is the same as that which will be used for subsequent cultivation in open ground, greenhouses or greenhouses. You will need two parts of the earth, one peat and one humus. Everything is thoroughly mixed. If you take garden soil, then do not forget to disinfect it with potassium permanganate or exposure to high temperatures.

The first top dressing
Pepper fertilizer is a source of life and health. Only on nutrient-rich soil will seedlings grow strong and healthy. This means that it will easily transfer the transplant to open ground and take root without any problems. As soon as the seedlings have the first true leaves, it is necessary to feed them. The second stage - two weeks after the pick. The last time seedlings are fed 10 days before planting in the ground. Further, all activities will be carried out already at the main place of residence.
Best Cast
The ideal fertilizer for peppers during the first weeks of seedling life is complex, nutrient mixtures in which the nitrogen content predominates. If you have nowhere to buy it, then you can cook it yourself. There is nothing difficult in this. It is enough to dissolve 1.5 g of potassium salt and 0.5 g of urea, as well as 4 g of superphosphate in one liter of water. This is the starting composition, which will enable the plants to quickly gain strength and begin to grow. Top dressing of pepper seedlings is carried out by watering the pre-moistened soil with a nutrient composition.
As soon as the plants release the second and third leaves, it's time to pick. It is best if these are immediately cups designed for an individual fit. For example, peat.
Immediately after this, another top dressing of pepper seedlings follows. It is best to use urea for this. To do this, dissolve one tablespoon of the substance in 10 liters of pure water. For the third time, immediately before planting in the ground, preparations containing nitrogen and phosphorus are used. Small amounts of potassium are acceptable.

Optimal dosage is the key to success
Fertilizers for the growth of seedlings of pepper should be supplied to the soil regularly, this is an essential guarantee of good growth and future harvest. Young peppers are the most unpredictable of all garden plants. They can grow and develop normally, and suddenly, in an instant, they begin to dry out. Experienced gardeners say that this is just the result of a lack of nutrition. If you urgently apply top dressing, then the situation can still be saved.
It is useful to know what functions this or that substance has. Nitrogen is extremely necessary for building up the green mass of the stem, phosphorus - for a powerful root system. But the seedlings almost do not use potassium, it will be needed much later. But the number is a little more difficult to determine. Based on practical experience, we can say the following. As long as the plants are developing well, have thick stems and well-developed leaves, you can not bother to fertilize. And as soon as growth retardation is diagnosed, you can correct this situation with a new portion.
We stopped at this point because an inexperienced gardener may decide that granular compost, biohumus and other "charms" that are freely sold today in country stores can be poured under the root in unlimited quantities. It is unlikely that this plant will die, this is a fact, but they will begin to "fat". That is, you will get a huge bush with lush leaves that will refuse to bloom and produce a crop. All his energy will go to the formation of green mass. But if you really overfeed, then the leaves will lose their beauty, begin to curl and become brittle.
The main differences in feeding seedlings
You need to apply fertilizer for bell pepper correctly. If you can simply water the ground in the ground, and only then go through the nutrient solution with the help of a watering can, then you will have to change tactics in the boxes. Here you moisten the soil in the evening, and fertilize in the morning. Otherwise, there is a risk of flooding the root system. Fertilization tactics are of two types. In the first case, nutrients are applied under the root, and in the second case, they are sprayed on green leaves. In the case of seedlings, it is the first option that is suitable, since nutrition must reach both the roots and the leaves.
The first nutritional cocktail is prepared in approximately the following proportions: 1 g of urea, 8 g of superphosphate, 3 g of potassium sulfate. This mixture must be dissolved in two liters of water. There is another trick. Before fertilizing bell peppers, it is recommended to sprinkle the ground in pots with ashes. Subsequently, the concentration is doubled. The frequency of application is two weeks.

Choosing a garden
It is best to plan your spring plantings in advance, and for this you need to know what conditions the pepper likes. Growing and caring outdoors is a bit easier than in pots. The main thing that a southern guest needs is warm land with a high content of humus. It is best if the composition is sandy or loamy. That is, moderately loose. Good moisture is required, so peat, turf and leaf humus must be added to too light soils. It is best if legumes grew in the selected area last year. But the bed from under the tomatoes does not fit well, because they have only one pest.
The soil for planting pepper is prepared in advance. Since autumn, organic matter must be added to the selected bed. For example, rotted manure. This is the best choice for every gardener. It must be applied in an amount of 3-4 kg per square meter. Another option may be straw with the addition of nitrogen components. These are the best fertilizer options for any type of soil.
Top dressing in the ground
It's time to transplant our young peppers into the garden. Cultivation and care in will be largely determined by weather conditions. If the weather is hot and sunny, then you just have to add the necessary nutrients, as well as carry out regular watering. If it is cool outside, then you will have to organize additional protection in the form of a greenhouse or greenhouse. But more on that later.
The first dressing will be required two weeks after the young peppers have moved into open ground. For this purpose, the following solution is used. For 10 liters, you need to take two teaspoons of urea and the same amount of superphosphate. Under each bush, you will need to add about one liter of solution.

Mass flowering period
This is an important point, because right now your future harvest is being laid. The formed ovary will now grow and turn into healthy vegetables. So that flowering does not go to waste, it is very important to add potash fertilizers. For pepper, this will be their first application since planting. To prepare a nutrient solution, you will need a teaspoon of potassium sulfate, a similar amount of urea and two tablespoons of superphosphate. The dosage is similar to the first top dressing.
fruit formation
When flowering is over, a small ovary appears on the bushes. Each of these buds can grow into a huge juicy and tasty pepper. For more intensive growth and development, the third top dressing is performed. To do this, for 10 liters of water, you need to take two teaspoons of superphosphate and potassium salt. If fruit growth is intensive, then this can be limited. But sometimes the gardener notices that, despite all efforts, the ovary continues to hang on the bushes unchanged, or the plant itself has stopped growing. If nothing is done, you can stay at the end of the season with tiny green fruits that are only suitable for winter harvesting. An excellent solution would be a solution of urea. A bucket of water will take 30 g. It is best to do this in the evenings, for 5-7 days.
Indoor feeding schedule
Growing plants in a greenhouse has its own specifics. Here the temperature regime is different, which means that the growth of peppers will be more intense. Accordingly, much more nutrients will be required. At the same time, do not forget that organic substances contribute to the productive formation of the crop, and minerals are necessary for proper plant growth. The ideal fertilizer for peppers when planting is an aqueous solution of bird droppings. The concentration should be weak, maximum 1:15. You can also use mullein, here the proportions can be 1:10. These mixtures contain a complete set of nutrients that contribute to the growth and development of crops. If the soil of the greenhouse is well manured since autumn, then organic matter can be replaced with potassium sulfate with superphosphate.
Mineral fertilizers for greenhouse peppers become very important about two weeks after flowering. Now comes the time of active formation and growth of fruits. The best choice would be organic with the addition of mineral fertilizers. By the way, the collection of the first fruits does not at all mean that plant care can be stopped. The third feeding is performed just at this time. The composition can be slightly changed. In some cases, gardeners believe that the best fertilizer for peppers is the above composition. Further top dressing is necessary only if the soil is very poor. Here, a mixture of superphosphate with mineral fertilizers is best suited.

Folk remedies
If you are against the use of chemistry, and there is no way to get rotted manure, then you can use other folk remedies. To do this, one tablespoon of wood ash must be dissolved in two liters of hot water. Mix and leave to brew for a day. Now it remains only to strain and use as intended. Ash as a fertilizer for peppers is a source of essential minerals.
Egg shells can also be used for feeding. To do this, take the shells of two or three eggs, wash and dry. Now carefully grind, pour into a three-liter jar of water and let it brew for three days, stirring occasionally. During this time, the water will be enriched with magnesium and iron, calcium and potassium. As a top dressing, this infusion can be used, breeding one to three.
Another great recipe is an onion peel tincture. It not only saturates the soil with microelements, but also disinfects it, which is especially useful for young plants. It is very easy to prepare it, for this you need to take 20 g of husk per 5 liters of water and insist for five days. If you love coffee, try not to throw away the grounds throughout the year. It is dried and harvested, and then applied to the soil. So it is saturated with nitrogen and oxygen, which is very useful for plants. In addition, gardeners recommend storing dry banana skins. Crushed and added to the soil, they are also an excellent source of potassium and other nutrients.

Ready-to-use nutrient complexes
It is difficult to say which option is optimal. Some people prefer to grow their plants exclusively on natural top dressing, such as mullein or bird droppings. Others from early spring stock up on industrial solutions, powders and tablets, which are enough to be diluted in water and applied to the ground. Complex fertilizer for seedlings of tomatoes and peppers can be bought in liquid form or in granules. Trademarks may have different names, but the essence of this does not change. Check out the composition. If it has nitrogen, phosphorus and potassium, then this is exactly the mineral complex that you need. For pepper, the percentage should be N:P:K % 12.5:17.5:25. When fertilizer in the amount of 20-30 g per 1 square meter is evenly scattered over the surface of the earth, and then dug up.
The second stage opens during the growing season. Now the plants are additionally fed with a half dose. That is, 10 g per square meter is already used. The product is applied to moist soil and evenly distributed around, embedding into the soil. In addition, fertilizer is applied in the form of a solution. To do this, you need to take 10 g of powder for seedlings and 20 g for adult plants. A small amount of insoluble residue is acceptable. For seedlings, it is recommended to alternate top dressing with one watering with plain water. For adult plants, it is permissible to use it with each watering.
Instead of a conclusion
Pepper is a rather capricious crop, so in order to get a good harvest, the gardener must provide all the conditions for it. The southern plant loves hot weather and abundant watering, as well as nutritious soil. If the first two factors are highly dependent on the climatic conditions of the region, then the third one depends entirely on you. The choice of dressings differs in the preferences of the gardener himself. You can ask for humus from a neighbor farmer, supplement it with wood ash and forest humus, and you will get excellent nutrition for your plants. Or you can just buy a special solution or granules in the store, which is enough in excess for the whole season.
And finally, the advice of experienced gardeners. After harvesting, sow the bed where you plan to plant regular barley peppers next season. As soon as the first green appears, mow it down with a sickle and leave it on the ground. This will enrich the soil with nodule bacteria and heal it.
Pepper is a rather capricious and demanding culture. However, most gardeners and gardeners have adapted to its requirements regarding soil, watering, heat, and successfully grow it in their backyards. There are many guidelines in the handbooks on how to how to prepare soil for peppers, including for seedlings. Let's review the information.
Soil for pepper seedlings
Pepper is a heat-loving plant, so it is recommended to grow it only with seedlings. Since pepper does not tolerate picking, it is recommended to immediately sow the seeds in separate pots (preferably peat ones). The diameter of the pots is no more than 10 cm.
Soil for seedlings should consist of the following components:
- garden soil
- Humus, which saturates the soil with minerals, increasing its fertility.
- River sand, which is a good baking powder, and earth.
The components are mixed in a ratio of 1: 2: 1 and ash is added here (for each kilogram of substrate - 1 tablespoon). You can add peat - it provides the soil with the necessary friability and moisture.
The substrate must be uniform and fine, for which it should be sieved. Must be carried out disinfection measures:
- The easiest way to disinfect is to water the soil with potassium permanganate. After the soil has been watered abundantly, wait until it dries and only after that you can plant the seeds.
- More complex methods include calcination - soil treatment by exposure to high temperatures (up to 80 degrees on average). This can be done by placing the earth in a preheated oven or microwave.
- Steaming - for several hours you need to steam the soil in a water bath with the lid tightly closed. This procedure should be performed a month before the start of soil use. Then the microflora of the soil will have time to recover by the beginning of sowing.
- Fungicides are also used, they must be dissolved in water and poured abundantly on the soil, thereby destroying various types of fungi that may be in the ground.
- And in order to improve the quality of the substrate and saturate the soil with air, it is recommended to add natural soil disintegrators to it - perlite or vermiculite - these are processed small minerals.
It's simple! For sowing, you can also use a special soil mixture, making it easier for yourself to carefully soil preparation for pepper seedlings. Such soil is sold in garden stores and has a fairly reasonable price.
Pepper seedlings can be grown in greenhouses or at home on a balcony or windowsill. Plant the seeds to a depth of 1.5 cm.
Pepper is a plant very sensitive to lack of moisture, so its seedlings should be watered abundantly, but be aware of the measure. If you overfill the seedlings, a fungus can start in it and the plant will die. It should be watered with warm water, since from cold - plants can also die or get sick with a black leg.
Soil for planting in a greenhouse and open field
Peppers prefer a warm microclimate, so they are most often planted to greenhouses providing the right air temperature.
autumn ground for peppers dug up and saturate with organic fertilizers, for example, compost or manure. Dose of organic fertilizers: 5-6 kg per 1 m2. During the winter, the fertilizers will overheat, the beds will become warm and quite fertile. And this is the ideal soil for growing peppers in a greenhouse.
In the spring, before planting seedlings, the soil is re-dug and fertilized. Now potash and phosphorus fertilizers are already being applied. Dose: 40 g per 1 m2. Nitrogen fertilizers are also needed, their dosage is 30 g per 1 m2. Fertilizers can be prepared independently. This will require humus (but not fresh manure), a glass of wood ash, a glass of double superphosphate and 25 g of saltpeter. This composition is used per 1 square meter of area.
Before planting seedlings, the soil is thoroughly loosened to a depth of about 15 cm, holes are made into which one and a half to two liters of water are poured. Then pepper is planted there along with a clod of earth in which it grew. The lower leaves should be at ground level. After planting, the plant is compacted by hand and covered with mulch (peat, humus), which prevents the evaporation of moisture from the soil.
Before planting, it is advisable to preheat the air in the greenhouse. The temperature of the soil must be at least 15 degrees, otherwise the peppers start to hurt and lose their ability to absorb nutrients. The optimum soil temperature for peppers is 25 degrees.
Greenhouses must be thoroughly ventilated, especially after watering, and do not forget to loosen the soil to a depth of 10 to 3 cm (it is gradually reduced as the plants grow).
2-3 days after planting in a permanent place, it is useful to spud seedlings with moist soil, the height of the mound is about 3-4 cm. Hilling will help the young plant take root better.
Soil for planting peppers in open ground prepared in the same way as for greenhouses. In addition, you should choose the right site for landing. Pepper is afraid of drafts and loves light and warmth. Therefore, the site should be bright and protected from drafts.
At the end of May, when the soil warms up well, seedlings can be planted in a permanent place. Now she is no longer afraid of illness.
If you use the advice of experts and take care of this extremely healthy vegetable, then a good harvest will not be long in coming!