A fireplace in a house or in a country house is a place of attraction for the whole family. Of course, you want it to be beautiful, but practicality also does not interfere - soot and soot, dirt or tar from firewood, all this often ends up on the walls of the portal. For this reason, the surface must be easy to clean. In addition, the finish of the fireplace must be heat-resistant - although the sides of the fireplace do not heat up to such temperatures as a stove, this requirement should not be neglected. Few materials meet these requirements. These are heat-resistant plaster, special types of ceramic tiles and stone - natural or decorative.
Fireplace plaster
Plaster is one of the simple and practical options for decorating a brick fireplace. A few years ago, plastered surfaces were whitewashed or painted. Today it is possible to apply a layer of decorative plaster with different textures on top of ordinary plaster.
Types of plaster for fireplaces
Finishing a fireplace with plaster is popular for the reason that any design can be developed. The second plus - if everything is done correctly, to achieve a smooth surface, the finish is beautiful and durable. For plastering fireplaces, the same compositions are used as for brick ovens. Although the heating temperatures of the surfaces are different, the plaster mixes are made the same. There are two options: make the plaster composition yourself or buy ready-made. If there is no experience with clay and determining its fat content, it is better to buy. Shop plasters for fireplaces and stoves include additives and additives that make the surface more durable and less likely to crack.

As a rule, each manufacturer has two compositions with different properties. The first is basic, for rough finishing. It can be applied in a fairly thick layer - up to 10 mm. After drying, the second layer is laid - the finishing one. It contains more finely ground substances, is applied in a thin layer - usually up to 3 mm, the surface is smooth. Such a surface can already be painted if it is plastered evenly) or decorative plaster can be applied.
If you want to finish the fireplace at a minimum cost, you can make plaster compositions from clay, sand and lime on your own. But, once again, without experience with clay, it is difficult to ensure that home-made plaster does not crack. Compositions for plastering a fireplace for making them with your own hands are different, here are a few proven ones:
- Clay lime:
- 1 part clay and slaked lime + 2 parts sand;
- based on slaked lime - into 2 parts of lime, one part of gypsum and sand.
- Cement-clay: one part of clay and cement (M 500) + 2 parts of sand;
In order for the plaster solution for the fireplace to be more durable, reinforcing fibers are added to it. Previously, it was finely chopped straw, later asbestos fibers, and today glass or fiber fibers are mainly added. The proportion of this additive is small - 0.1-0.2 parts. It is added to the dry components (cement and sand), everything is mixed. The dry mixture is added to the clay and / or lime dough, mixed thoroughly again, water is added if necessary.
It is better to take lime already slaked, in the form of lime dough. If you extinguish it at home, unreacted particles always remain, which are then extinguished during the operation of the fireplace, destroying the plastered surface. Regarding sand - its amount is precisely selected depending on the fat content of the clay. The solution must be sufficiently plastic. The degree of fat content of the solution is checked with a piece of wood. Dip it in the solution and take it out. If an even layer of 2-3 mm thick remains on the surface, the solution is normal. If the layer is thick and lumpy - you need to add sand, if the stick is almost clean - add clay.

The clay is pre-soaked (2 days or until all the lumps are limp), then rubbed through a metal sieve with a cell of 2 cm.
Quarry sand is needed, it must be clean and dry. It is also sifted before use.
For those who do not want to deal with home-made compositions, here are several companies that produce plaster for fireplaces and stoves. The following compositions proved to be normal:
- Plitonite superfireplace refractory;
- Petromix KU;
- heat-resistant plaster Terracotta;
- Bossnab;
- RSH parade;
- rtner;
- Oven plaster HEFNERPUTZ.
The list includes both domestic producers and European ones. It cannot be said that Russian trains are worse, but it is easier to work with imported ones.
Features of plastering stoves and fireplaces
The technique of applying the solution itself is no different: a certain layer is applied (sprayed) with a spatula or a special bucket, then it is leveled (you can use beacons). The main points are to prepare the surface of the fireplace for plaster:
- First, all the old finishes are removed from the walls, if any - paint, lime, remnants of plaster, mortar, etc. Only a clean brick should remain.
- For better adhesion of the plaster mortar to the surface, the seams are deepened by about 1-1.5 cm. They take a joint, a chisel or a screwdriver and scrape the mortar in the seams.
- All gaps that exist are sealed with a repair compound or heat-resistant sealant (which can withstand heating up to 800 ° C).
- When everything is prepared, take a brush with long bristles and clean the surface well. She must be clean.
- Following are the options:
- If the surface of the fireplace is relatively flat (less than 5 mm difference), you can wet the walls and start applying the plaster.
- If, due to the curvature of the surface, the layer has to be made more than 5 mm, reinforcement is necessary. A metal mesh with a small mesh is stuffed onto the walls of the fireplace. It is fastened with nails, which are hammered into the seams (the seams can not be embroidered, or embroidered, but not so deep). In order for the hats to hold the mesh, metal washers are put on that are larger than the cell size. Plaster is applied over this stack. In this case, you can be sure that the plaster will not fall off.

Before you start plastering the fireplace, carefully read the instructions on the pack. It usually describes under what conditions and how to apply plaster. But the masters advise to melt the fireplace, warm the walls to 60 ° C, then moisten the surface and start plastering. The walls are heated so that the brick takes its "working" dimensions. In this case, it is less likely that the plaster will tear when heated. Wetting with water is necessary so that the solution is not too dry: the brick is hygroscopic. If it is dry, it quickly draws water out of the plaster and it becomes too dry, does not harden to normal. The result is cracks on the surface.
A few more points about drying. When plastering a fireplace, at least two layers are applied. The second can be applied only after the first has dried completely. To speed up drying, you can organize a draft, but you can not heat the fireplace. The same applies to the second - finishing - layer.
See the following video for the technology of plastering stoves and fireplaces.
Fireplace tiling and stoneware
Finishing the fireplace with tiles or porcelain stoneware is carried out on a special heat-resistant adhesive. Not every tile is suitable for such work. It should tolerate heat well, be strong, dense (with small pores), and besides, it should be easy to care for.
Decorating a fireplace with ordinary ceramic tiles is a lottery. If you are lucky, it will stand normally, if not, after a while the glaze layer will be covered with a network of the finest cracks. The view will be “not very”, it will be difficult to wash. If possible, it is better to use special materials:
- Terracotta. A tile with an unglazed surface, characterized by a characteristic color, thanks to which it got its name. It has a coefficient of thermal expansion similar to brick, therefore it does not crack.

Terracotta - tiles for finishing fireplaces and stoves
- Majolica. This is the same terracotta tile only with glaze applied to the front side. The technology is more complex, the price is higher. Finishing the fireplace with majolica requires careful sketching - you won’t be able to cut such tiles anymore. It also requires a high qualification of the master - the slightest deviations are striking. Apparently, for this reason, and even because of the very high price, you can often see fireplaces and stoves with fragments of majolica. I must say that these fragments decorate and enliven the interior very much.

Majolica - colorful and beautiful
- Heat-resistant clinker tiles. It is made from a mixture of several types of clay, with the addition of fireclay. It is molded, pressed, then fired. The result is a thin - 9-12 mm thick - and durable tile. Colors range from whitish gray to brown.

- Porcelain tile. The production technology is similar - first the composition is pressed, then fired. The components differ: in addition to several varieties of clay, quartz sand, fine crumbs of granite or marble, dyes, oxides and metal salts are added. The structure of porcelain stoneware is low-porous, it tolerates both high and low temperatures well. The technology makes it possible to obtain material imitating marble, other natural stones, terracotta, clinker and majolica. The disadvantage of porcelain stoneware is that it is difficult to cut and it has a lot of weight. For facing fireplaces, plates of small thickness are used, therefore the weight is not terrible, and you can cut it into the company (you just need to know the exact dimensions of the required fragments).

Finishing the fireplace with porcelain stoneware - you can design in any style
- Tiles. The production technology is not much different - clay is molded, fired in a kiln. The main difference is the shape and method of installation. The tiles are installed during the laying of the stove or fireplace - the fragments are fixed in the seams with the help of wires. So finishing the finished fireplace with tiles is impossible.

Special tiles for facing fireplaces and stoves are made in small or medium format, and the same porcelain stoneware is available in large slabs. Seamless installation is certainly attractive, but there is no guarantee that such a finish will not fall. The coefficient of thermal expansion is quite different, because of this, incidents are possible.
Technology for mounting tiles on the walls of the fireplace and exhaust pipe
All of the listed types of tiles, except for tiles, are mounted on fireplaces using a single technology. Finishing the fireplace with tiles begins with the preparatory stage, and it is one to one the same as described above: clean the surface, embroider the seams, heat up to 60 ° C, moisten and you can start decorating the fireplace with tiles.
In case of large irregularities, it is necessary to plaster the fireplace. Solutions - any containing clay and cement, but not containing lime. Preparation is standard, as is the plastering process. The difference is that the second - the leveling layer does not need to be applied.
It is necessary to lay tiles on the walls of the fireplace after complete drying. Laying technology is standard, the difference is in the thickness of the seams. For a fireplace, it is better to make them larger (to compensate for different amounts of thermal expansion), therefore, instead of crosses, pieces of drywall 9.5 mm thick are used.

The adhesive is applied to the wall or tile, leveled with a notched trowel. The tile is pressed against the surface, shaking it from side to side, set to the desired position. Set the distance between the fragments using drywall spacers. Remove from 3-4 hours after installation.
The tiles on the fireplace are left to dry. The exact time depends on the adhesive used and the weather, usually indicated on the adhesive package. The last step is filling the seams. The grout for the joints is also used special, it is better to buy together with glue - from the same company, so that there are no compatibility problems. The process is also standard - the composition is diluted with water according to the instructions, the seams are filled with a rubber spatula or from a construction syringe. Freshly applied mortar levels out, forming a beautiful seam. Excess is wiped off with a soft cloth.

There are tips from the masters:
- To ensure that the tile does not fall, attach a metal mesh with a fine mesh to the wall. Better yet, stuff nails into the seams and intertwine them with soft steel wire, creating a wire frame. This option is better because in difficult places the grid can be made thicker. This stage is necessary if you are going to install heavy porcelain stoneware or large format tiles.
- In order not to put a thick layer of glue, apply it both on the wall and on the tile, and here and there remove the excess with a notched trowel.
- Before laying the tiles, lay them out on the floor so you can really appreciate how attractive the finish will be.
- After laying each tile, excess mortar is removed from the joints. They will then be filled with a special paste. The surface of the tile is immediately wiped clean - if the glue hardens, it is almost impossible to clean it off.
The main thing in this work is to ensure that air cavities do not form under the finish. Air has a large coefficient of expansion and, when heated, it will someday tear the tile off the wall.
Video tutorials for tiling a fireplace
No matter how much you read about how to do it, it is much more useful to look at it - you can grab more details.
How to line a fireplace with stone
Finishing a fireplace with stone is technologically not much different from laying tiles. The difference is in working with the material itself, but there are almost no technical features. The only thing is that when using natural flagstone, it is necessary to upholster the fireplace with a net. It will fall off without it.

Finishing the fireplace with stone - one of the options
Features of working with artificial gypsum stone
This type of decorative stone is inexpensive and light, you can finish fireplaces, especially without overloading the floors. There are only a few nuances, without which you will not achieve a good result.
The production technology of gypsum stone is such that each element has some irregularities, sagging, protrusions. We grind them with a knife, since gypsum is cut without problems. We grind each element of the cladding so that at the back, along the perimeter, a frame is formed with an angle of 45 ° (or so).
Moreover, often the corner elements of a plaster decorative stone are several millimeters higher than an ordinary one from the same collection. To make the cladding look monolithic, this difference also has to be removed - to grind. When all the elements of the cladding are fitted, they can be glued into place. They use heat-resistant glue for lining fireplaces, although with the right design it almost does not heat up.
Working with natural stone
Most often, fireplaces are lined with natural stone, sawn into plates. It is also called flagstone or stone tile. The shape of all the fragments is different, you have to adjust to make everything look beautiful. In this case, it’s definitely better to first lay out the entire picture on some kind of plane, pick up and process the elements. Only after the mosaic has formed can it be glued. The whole technology of mounting on the walls of the fireplace is described above and is practically no different. The whole process can be seen in the video.
Interesting options for finishing fireplaces (photo)
All the methods described above can be combined to create finishes in different styles. Sometimes it turns out very nice. Some of the already implemented ideas are posted below.


There are two options to achieve this effect - paint the existing brick fireplace or revet with clinker tiles.

This is polished porcelain stoneware.

This is an unpolished, small format porcelain tile. As you can see, it fits well into rounded shapes. Horizontal surfaces and columns are also porcelain stoneware of a similar texture, but already in the form of slabs


Smooth clinker tiles - strictly and functionally


Insert tiles - beauty
The hearth is the "heart" of the home, and this truth has not changed over the years. In the era of advanced technology, complex life rhythm and constant stress, people are beginning to reach for truly homely and cozy things. This rule also applies to the interior, and in particular, the fireplace in modern designs.
Cladding features
The fireplace fits easily into almost any interior, regardless of style, color scheme and variety of shapes and textures. It quickly fills the space with special warmth and becomes the main "highlight" of the room. At the same time, the fireplace not only embodies dreams of home comfort, but also acts as a heating element and part of the heating as a whole.


If everything is clear with the functions of this piece of furniture, then the appearance raises a lot of questions. because the variety of shapes, colors and textures is simply amazing. The result depends solely on the vision of the designer and the materials used to finish the fireplace. They can be both natural and artificial origin. In appearance, it is difficult to determine how the material was produced and what its cost is, which allows you to reduce the cost of installing and finishing the fireplace, and the beauty of the product will not be affected.


There are a lot of advantages of finishing with stone, but at the same time there are certain disadvantages that can affect the decision of the master.
- the high cost of the materials themselves, especially such beautiful stones as marble and granite;
- problems in terms of installation, since it is difficult to find a specialist who has experience in this matter and is familiar with stone cladding;
- marble and granite are heavy, which also creates great installation difficulties.


At the same time, the building materials market is replete with decorative stone, which is an ordinary tile with a surface that imitates the natural texture of individual materials. Its cost is not so high and installation does not cause great difficulties, so these materials are chosen by those who prefer a budget, simple, but no less attractive option. Falshkamina often has the most diverse design. Such portals can be overlaid with all sorts of materials.


Fireplace finishes
Tile
Ceramic tile is the most popular fireplace mantel material. It is characterized by relatively low cost, durability, long service life, ease of installation and attractive appearance. Specifically for the fireplace, those types of tiles are used, the surface of which is an imitation of natural materials.
This solution allows you to significantly reduce the budget and at the same time create a unique fireplace that will be relevant in any room.


The main advantage of using ceramics for fireplace decoration is that you can do it at home and with your own hands. The tile is easy to install, so you do not have to spend extra money on the services of specialists in the field of repair.
At the stage of choosing a tile, it is important to consider that an unusual tile should be used., which is laid on the floor or walls in the bathroom, are types with high thermal conductivity. The main materials for its manufacture are ceramics, porcelain stoneware and clinker.
In some interiors, you can find fireplaces lined with gypsum tiles that imitate natural stone.


The main reasons for choosing tiles as a material for finishing a fireplace are:
- A wide choice in terms of design, since the tiles are made from different shades, textures and shapes, which makes it possible to choose the most suitable option.
- High thermal conductivity, which is the main criterion for using the material for finishing the fireplace.
- Ease of maintenance.
Such tiles are not afraid of aggressive cleaners, mechanical damage is extremely rare, and cleaning is wiping the surface from dust with a dry or damp cloth.


- Not only specialists are familiar with tiles, but also many men who have at least once carried out repair work with their own hands. The cladding process does not require special knowledge, so the installation takes place without much difficulty, which is important for do-it-yourself repairs.
- In addition to the fact that the tile must have a special thermal conductivity, the adhesive for masonry must be used heat-resistant. Experts recommend choosing tiles of small sizes, because in this way the risk of cracking is reduced, and the material will last much longer, and the appearance will always be attractive.


If we talk about the cost of tiles, then the price varies greatly depending on the manufacturer, composition and collections, which are constantly updated. The average price will be 700-800 rubles per 1 sq. m. m.
Installation is carried out in the same way as with ordinary tiles., but after completion of work, it is desirable to cover the entire surface with heat-resistant varnish. This will greatly facilitate the cleaning process, getting rid of soot and other unpleasant contaminants, since it is extremely difficult to remove them later.


Brick
An equally popular material for finishing a fireplace is ordinary brick. This is especially convenient if the fireplace is made entirely of brick, since such masonry can be left in its natural form. You just have to decorate the surface a little and tidy up the seams to get a finished and attractive look.
Experts advise finishing in several stages:
- The surface of the brick requires grinding, although some options may do without these manipulations.
- At the second stage, a chamfer is removed from the edges of the brick.


- Brickwork becomes more attractive when treated with sulfuric acid or saline. This makes the surface bright and beautiful, and painting can be the final touch in the struggle for an attractive appearance of the fireplace. For brick, there are special paints with which it easily takes on any shade.
- After painting, it is desirable to take care of the appearance of the seams. To do this, it is necessary to process all these elements with a special solution and decorative grout.
Quite often, the brick is covered with tiles, mostly clinker, but this will require large costs and labor.


Facing bricks are completely unsuitable for such work., as it gives a too "heavy" look, since the material itself is quite heavy and takes up a lot of space. This is especially inappropriate in a city apartment, where every meter counts. In addition, the cost of facing bricks is high, and it makes no sense to spend money on something that can overload the interior and thereby ruin it.


Decorative rock
This material has long been used for finishing interior surfaces, including for fireplaces. The main advantage of this solution is an attractive appearance, since the decorative stone is available in different shades and textures. Such a surface fits into the common space and becomes an integral part of the interior, attracting most of the attention.
In addition to appearance, decorative stone is high strength and long service life. Natural stone is always a durable material, and if we talk about marble or granite, then its service life is simply unlimited. A shelf made of this material against the background of a home fireplace looks very elegant.


The material is also easy to install because it does not require perfect evenness in terms of fabric and seams. Natural origin does not give restrictions in terms of appearance, since there is plenty to choose from here. It must be understood that the service life and future appearance of the fireplace depend entirely on the material that will be used for decoration.
The most budget option is the shell rock. At the same time, it has an attractive appearance, is sold in most modern stores and is easy to install even by non-professionals. Among the shortcomings, low strength can be noted, since it is easily damaged, and its porous structure is easily contaminated with soot and dirt.


Granite is superior to other types of natural stone in strength and durability. Such material will last more than one century and will delight several generations of owners of a house or apartment. The color scheme allows you to harmoniously fit a fireplace finished with granite into the interior design, while the surface looks attractive both in polished and natural form.
Granite is not afraid of aggressive detergents, it is resistant to mechanical damage, and cleaning does not require much effort, because any dirt can be easily washed off. A granite countertop looks very beautiful and stylish - such a fireplace stove will last for many years.
The main disadvantage of this material is the high weight and price, which not everyone will be happy with.


It is also worth noting such natural stones as sandstone and limestone, the cost of which starts around 1,700 rubles per 1 sq. km. m. Compared to other materials, it is not so expensive. At the same time, sandstone and limestone have a wide palette of shades, as a result of which they can be used in different interiors. Just like the shell rock, these types of stone are not durable and create a lot of problems when cleaning due to the porous structure.


A strong competitor of granite is marble, the price of which starts from 3,500 rubles per 1 sq. m. The main advantage of marble is its unique appearance, wide range of colors, special strength and ease of maintenance. If we talk about the installation of marble, then the hand of a professional with extensive experience in this matter is definitely required. It's definitely not worth it to save money.
Slate has a relatively low cost, which in its natural properties is very similar to shell rock and limestone. It can hardly be entered into the interior, but with the right design decision it looks harmonious, interesting and rather unusual. It is also used for ovens.


Experts have come up with several options for solving the problem with the porous structure of some types of natural stone. One of these solutions is the treatment of the structure after installation with a special transparent coating that prevents the appearance of complex contamination.

Do-it-yourself fireplace decoration is quite possible if there is a desire to carry out this process and certain skills of a tiler. A lot of this work depends on the selected types of finishes. Some of them are quite simple to perform - you just need to carefully study the technology. However, there is such a finish that will require not only theoretical knowledge, but also sufficient experience. Since each master stove-setter has his own little secrets, some fireplace lining techniques need to be studied only in practice, standing next to a professional and adopting what he does tricks.
The complex technique of finishing the surface of the fireplace can be attributed to such as working with tiles. And quite accessible even for beginners, the technique can be called tiling - it can imitate a variety of materials, from wood to wild stone.
Finishing of fireplaces is carried out in order to transform its appearance, in case it is outdated and has lost its respectability, or when the initial masonry did not turn out as we would like or did not plan at all.
Before you start finishing the fireplace, it is necessary to carry out preparatory work. They will help to quickly cope with the work and securely fix the finishing material on the wall.
Preparation for facing work
Whatever material is chosen, the following tools will be needed to work with it:

- Building level for marking the surface and controlling the evenness of the masonry.
- Container for mixing compositions.
- Notched trowel.
- Smooth spatulas of different sizes for applying and grouting solutions on the surface.
- Rubber mallet for fitting tiles to the fireplace wall.
- To cut ceramic tiles, you will need a tile cutter.
- Pencil and ruler.
- Rubber or metal grater.
- Electric drill with mixer attachment.
- Inserts to keep the seams even. As they are often used pieces of ceramic tiles of the same thickness.
- Rule.
- Stone grinder.
- Jointing will be needed if the fireplace is designed for brickwork
- Sponge and soft cloth.
- Knife for cleaning seams.
- Metal brush.
- From auxiliary materials, you will need to purchase a primer, a heat-resistant plaster mixture, the same adhesive for tiles, as well as grout for joints.
When all the tools and materials are ready, you need to work on the surface of the fireplace.
- First you need to use a knife to deepen the seams between the bricks, by about 12 ÷ 15 mm.
- Then both the seams and the entire surface of the fireplace are cleaned of dust deposits. If whitewash or paint was previously applied to the walls, then it is also cleaned with a metal brush.
- The surface and seams must be treated with a primer for better adhesion with the plaster and grout mixture.
Possible types of fireplace finishes
Tidy up the surface of the fireplace in several ways and using different materials.
Seam update
It happens that after cleaning the brickwork and coating its surface with a primer, it turns out that it has a quite decent appearance. In this case, you can only update the grout material.

Since the joints have already been cleaned and treated with a primer, it is only necessary to dilute the heat-resistant mortar for grouting and fill them with a construction syringe. Then it remains to smooth the solution with jointing, giving the seams a neat shape.
tiling
Different materials are used for facing the fireplace - it can be porcelain stoneware, ceramic glazed or unglazed tiles, natural stone veneer, gypsum volumetric tiles imitating various types of stone, and other types.
For each type of tile, it is necessary to choose a suitable adhesive that will go well with both the surface of the walls and the facing material. In addition, the adhesive composition must necessarily be heat-resistant in order to calmly endure high-temperature drops.

- Once the tile and adhesive have been purchased and the surface has been cleaned and primed, the walls of the fireplace must be leveled with plaster before laying.

- If the walls need to be aligned to the ideal, then a reinforcing mesh is installed on them or a reinforcing mesh is fixed on the wall.
- If the wall is aligned with beacons, then a plaster mortar is thrown onto the wall and leveled with a rule. If it is not planned to apply a thick layer of plaster, then it is applied with a wide spatula and evenly distributed over the surface.

- Tiles are laid only after the surface of the walls is completely dry and gains strength.
- Glue is applied to the wall with a notched trowel, which leaves grooves that promote good adhesion of the tile to the surface.

- Laying starts from the bottom row, gradually climbing up.
- The first row is displayed in level to the ideal horizontal, since the accuracy of the entire masonry will depend on it. This applies to all tiles that are laid ordinal and not in a chaotic mess.

- To achieve the same size of horizontal and vertical seams, each master uses his own methods. Someone puts pieces of tiles between the rows, others use special crosses, but they are only suitable if you plan to make the seams very small, no more than 3 ÷ 5 mm.
- If the seams must be wide, then thin wooden or plastic slats are used to maintain evenness and uniform spacing. They are convenient in that they have a sufficiently large length, which greatly facilitates the work.

- When the masonry is finished, it must be left to dry. In the period when the glue has not yet dried out, but it will grab well, you need to carefully remove the leveling rails or other inserts from the row spacing.
- Then, after the glue has completely dried, the seams are sealed with grout, which is applied with a rubber spatula or with a construction syringe, depending on their width.

If the seams are wide, then they are given the desired shape with the help of embroidery.
 ... and the subsequent execution of the jointing
 - When grouting and grouting, grout may accidentally get directly onto the tile. It must be removed immediately with a damp sponge and dry soft cloth.
- After the grout has hardened, tiles or stone, if desired, can be coated with heat-resistant fireplace varnish.
Video: an interesting option for a combined fireplace tile finish
Prices for refractory mortar for stoves and fireplaces
Refractory mortar for stoves and fireplaces
Tiled fireplaces
Tiling fireplaces with tiles is a whole art form, the technology of which has been used for centuries and has shown its effectiveness.

The advantage of this method is that, due to its design and the material from which the tiles are made, the stove or fireplace lined with them is able to retain the heat received two or even three times longer than conventional brickwork. This factor contributes to fuel savings, and hence funds to the owner of the house.

A tile is a tile with a protrusion in the form of a hollow box on the back side, which can have different depths. This structural element is called rumpa. It serves not only as a heat accumulator, but also for fixing the tile in the fireplace masonry during its construction.

For the convenience of masonry and the formation of a single surface, tiles are produced in different types that complement each other - these are not only even tiles, but also corner ones, as well as skirting boards and elements for creating cornices and shelves.

The tiles are produced with various relief drawings and paintings, glazed or not. Previously, all tiles were always painted by hand, and today there are also author's samples, which are made in the singular. Sometimes on the walls of fireplaces and stoves, with the help of tiles, various stories were shown in pictures.

For the manufacture of tiles, special refractory clay is used with the addition of pure quartz sand, so this material is environmentally friendly and does not emit any fumes hazardous to human health. In addition, thanks to the design of the tiles, the surface of the fireplace, finished with them, is not too hot. It gradually releases heat into the room, so it maintains a comfortable temperature for a long time.
Video: interesting information about the types and properties of tiles
Tiling
Traditionally, tiles are mounted together with the erection of walls. The wire attached to each of them is embedded in the seams of the masonry, and the tiles are connected to each other by the ramp with metal brackets.
The diagram clearly shows how the tiles are fastened together from the back and how they are embedded in the wall.

1 - Clay box on the back side - ramp, often has one or two holes. A metal pin can be installed in them or a wire is directly fixed.
2 - Steel pin.
3 - Wire embedded in the seams of the masonry.
4 - Staples fastening together the tiles for the sides of the ramp.
Work is carried out in stages:
- The first step is to simply lay out the bottom row of tiles, without fixing them into the masonry seams. This process is carried out in order to determine the required number of elements on each side of the fireplace. Laying out tiles starts from the corners, and it is possible that one of the middle blocks will have to be made a little narrower. Having determined the number and size of parts, you can proceed to the final masonry.
- Like all other facing tiles, tiles are mounted from the bottom row, starting from the corner elements. Beforehand, a soft wire is screwed onto the holes in the tiller or onto the pin. Between themselves, behind the edges of the rump, on the back side, the tiles are linked with brackets. The edges of the front tiles of the tiles are smeared with a solution of glue and pressed tightly against each other.
- The space around the tiller is filled with clay mortar mixed with small pieces of bricks, or filled with dry backfill. It is important to ensure that there are no air bubbles in the solution.
- Twisted wire is laid on top of the laid brick row. Then a mortar is laid on it, and the next row of bricks is laid on top. Here it is important to ensure that the tiller is firmly pressed against the brick wall of the fireplace.
- On top of the first row of tiles, the next one is installed in the same way as the first one, but it is additionally fastened to the previous row with vertical brackets or rods.
- It is desirable that the seams between rows, both vertical and horizontal, be minimal, so for horizontal rows they should not be more than 3 mm, and for vertical rows - 1 mm. If they are nevertheless formed, then they are sealed with a gypsum-based grout.
- If a ready-made fireplace is laid out with tiles, then the wire is fixed to nails or hooks driven or screwed into the brickwork. Even the smallest hole around them must be covered with plaster.
Video: one of the options for mounting tiles
Prices for different types of tile
Decorative plaster
In addition to finishing the fireplace with tiles, the transformation of this interior detail with the help of decorative plaster, which can imitate stones of different breeds or reproduce a variety of relief patterns, is very popular.
At the moment, several types of decorative plaster are being produced, which are made on different bases.
- The acrylic-based plaster mixture also includes a certain percentage of mineral additives. This type of plaster withstands temperatures up to 90 ÷ 95 degrees and can be used to clean up an existing fireplace.
- The most affordable option for finishing the fireplace is mineral plaster, which is made on the basis of cement. It easily withstands high temperatures and therefore will last a fairly long time. A mineral-based finishing material is quite suitable for decorating a fireplace, which is operated throughout the cold period.
- On the basis of liquid glass, silicate plaster is made, which is produced in different shades, which gives it an advantage over other materials for which dyes must be selected. Such a coating is vapor-permeable, which means it is able to "breathe", which increases its service life. Such plaster withstands quite high temperatures, so it may well be applicable for finishing fireplaces.
In addition to classifying by type of base, plaster can be divided into textured and smooth. A material is produced containing marble chips, which immediately upon application gives a certain relief pattern. If fine plaster powder is used, it can be buffed to a high sheen by adding various shades to create a surface that cannot be distinguished from natural
- The preparation of the base for applying decorative plaster is carried out in the same way as for tiling. The surface must be even and well dried.
- Then, a solution of decorative plaster is mixed.
- If an option is chosen that has crumbs in its composition, then it is applied with a wide spatula, distributing the solution vertically, horizontally or in circular motions.

- If, however, a material of a homogeneous composition is applied and it is planned to finish in several colors, then plaster of a different color is applied to the still wet surface with a spatula. With movements that predetermine the direction of the textured pattern, the required relief is displayed.

You can achieve the desired texture by using any auxiliary means and tools - it can be a brush, spatula, washcloth, plastic bag, or even many other household items that have a certain pattern.

- Another option for finishing with decorative plaster is to apply embossed strokes to a flat surface with a spatula. Further, on top of the already dried plaster, it will be possible to apply the selected color shade, and perhaps even more than one - the main thing is that they harmoniously combine with each other.
- Venetian plaster is called a smooth polished surface, which creates an imitation of polished stone finish.
– Work is carried out on a wet surface of applied and leveled monophonic plaster. Parts of the solution are tinted with different shades and applied to plastered the walls of the fireplace with wide and narrow strokes, and then rubbed and carefully smoothed out, creating the desired picturesque pattern.
 A very interesting technique is the application of Venetian plaster.
 - Next, the plaster is given a little time to dry and it is polished with a metal spatula or grout about 80 ÷ 100 mm wide, achieving a shine of natural polished stone.
If you decide to decorate the fireplace with decorative plaster, then a wide selection of various techniques opens up before the master. The advantage of this method is that the plaster surface can always be transformed by applying a different shade, relief or laying it on top. Therefore, for those who prefer to make frequent changes in their interior, decorative plaster is exactly what is required.
Video: finishing a fireplace using Venetian plaster technique
Prices for fireplaces and stoves
Fireplaces and stoves
Fireplaces in the interior
You can give as an example several options for finishing fireplaces in different techniques. Perhaps, after such an acquaintance, it is easier for some owners to choose the option that is more suitable for a particular interior.

A stone veneer fireplace will look perfect in an interior decorated in any style. The material is made from stone of different breeds, which is cut into thin tiles with a thickness of 7 ÷ 10 mm. The material is quite fragile, so an experienced craftsman should work with it, otherwise the tile is easy to spoil. Stone veneer is a natural material, so its price is quite high.
There is also an imitation of natural stone. This finishing material is made on the basis of gypsum and tinted under various rocks. If the tile imitating stone veneer is large enough, then it also needs to be handled very carefully, the larger its area, the more fragile it is.
Both natural material and its imitation can be designed and actively exploited. The material is quite heavy in weight, so the base for laying it must have a certain rigidity, and it is also important to choose the right adhesive composition.
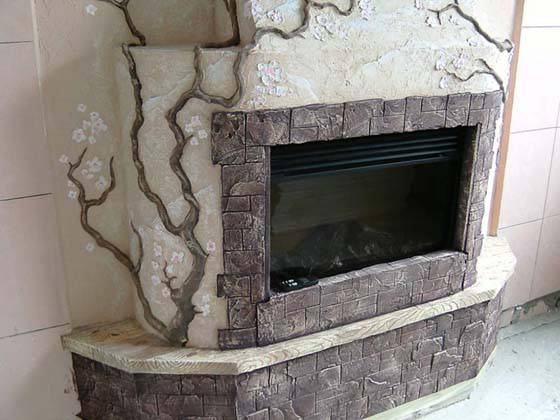
 Combined option - finishing techniques for the lower and upper parts of the fireplace are different
 In this case, for the design of the fireplace, a combined version of materials that are harmoniously matched to each other was used. The lower part is lined with ceramic terracotta tiles, which are perfectly combined with heavy oak mantels, which give the structure solidity.
The upper chimney section of the fireplace is decorated with decorative light-colored plaster. It makes this part of the building lighter, not burdening the interior. The color of the upper section is closer to the ceiling tone, and the lower one is in perfect harmony with the shades of the floor and furniture made in the English style. For this interior, such decoration of the fireplace is an ideal option that fits in both in terms of color and style.

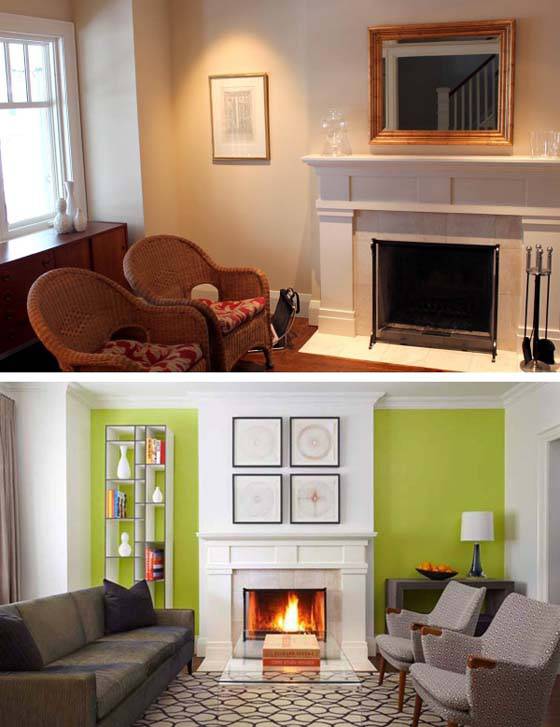
A tiled fireplace is perfect for a modern living room or bedroom interior. It has a rather modest design, without stucco elements and a heavy stone base. it looks like a light structure precisely because of the perfectly matched delicate pistachio color and snow-white design.
All the material used in the design of this fireplace is quite possible to purchase in modern hardware stores. For the manufacture of a fireplace portal, both gypsum elements and those made of polyurethane are used, which are coated on top with white heat-resistant paint or disguised as wood of various species, and varnished on top.
Ceramic tiles can also be purchased in various colors and sizes, choosing them to match the color scheme and style of the entire interior of the room. This design of the fireplace is quite possible to do it yourself, if you carefully prepare the surface and carefully approach the masonry.

This design is suitable for fireplaces located in spacious rooms, decorated in classic, romantic and other styles close to them. The surface of the fireplace is covered with decorative plaster in the Venetian style, which perfectly matches the design elements of the portals in the form of columns and relief ornaments. These parts are made of polyurethane and glued to a prepared polymer-based surface. From above they are tinted under a common surface or they are distinguished in white or dark color.
The design in this style gives the fireplace respectability and solidity. It can become the central decorative element of the interior of the hall, to which all other style details are matched.
If there is a desire to carry out the lining of the fireplace on your own, then the main thing is to correctly calculate your strengths and creative capabilities. To do this, it is recommended to start with a sketch of the future structure, according to which it will be easier to estimate the amount of work and determine the amount of material needed.
In order to achieve the desired result without spoiling what was planned, on a small sheet of hard cardboard, you can conduct a “general rehearsal” of all planned works, starting with the primer and ending with the final stage, strictly adhering to the chosen design technology.
Fireplace facings made of artificial stone can be found quite often. After all, artificial stone for facing the fireplace has a lot of advantages. But not in all cases, such a finish is suitable.
Today we will talk about this topic. We will consider how much such a finishing option is suitable in your case, we will learn about the advantages, we will determine the disadvantages, and instructions will also be given for lining the fireplace with artificial stone.
All stages of work can be viewed in the photo and in the video, you can select the desired configuration of the product.
Facing fireplaces with artificial stone is done in three stages.
Let's take a look at what we have to do:
Pros of using artificial stone for fireplace decor
The main advantages of the material:
- It has soft mechanical properties, as a result of which it is quite easy to work with it during the finishing process;
- The preparation of parts of the structure and their installation will not be a laborious process; only a grinder can come in handy from working tools;
- The structure will have a small weight, since the material consists of light and flexible fillers;
- On the market, the finishing stone is represented by a wide variety of shapes and textures, which allows you to lay out any pattern from it;
- The price of artificial stone is much lower than the cost of natural stone, as a result, you can save a lot on finishing the fireplace;
- Using artificial stone for decoration, you can fully express your imagination and make the fireplace original and unique.
What to look for when choosing a finishing stone
A competent choice of material will allow high-quality finishing work on decorating the fireplace.
Selection conditions:
- Pay attention to the price of artificial stone. Domestically produced material will cost several times cheaper than foreign products.
- Before making a purchase, check whether the material has the necessary certificates. There must be a certificate of conformity and hygienic. If the seller cannot provide you with the required documents, it is not recommended to buy such material. Since artificial stone is produced chemically, the quality of the material should be given the closest attention.
- If the manufacturer is known in the market, has been working in this field for a long time and has a positive reputation, you can safely buy such material.
Attention: Pay attention to the quality of the material when buying. This will guarantee the quality of your work.
- It is necessary to check all parts of the material and pay special attention to its structure. If the manufacturing technology was violated during the production process, the outer surface of the brick will be porous. This will not in the best way affect the strength of the material, and, as a result, its service life.
- Good quality material will always have good packaging with the manufacturer's logo.
- Pay special attention to the date of manufacture, which the manufacturer must indicate on the packaging. The material gains the strength necessary for operation only 28 days after it was made. If the material was produced later, the quality of the product is worth considering.
Fireplace decoration
There are a number of rules according to which it is necessary to carry out work on finishing the fireplace with artificial stone:
- Artificial stone can be used when finishing metal, wood and other structures, for example, from chipboard. The surface of each material must be prepared in its own way for work.
- Finishing work can be carried out if the air temperature in the room exceeds 5°C.
- Artificial stone must first be laid out at the top of the fireplace, gradually descending. This is necessary in order to avoid contamination of the material during the finishing process.
- For fastening elements, it is better to choose glue or mortar, which is recommended by the manufacturer of artificial stone.
- To cut stone, it is best to use a hacksaw, just make sure that the tool does not have large teeth, as this can damage the material.
How to prepare the surface for finishing
Artificial stone can be laid on a surface made of almost any material. It can be different for everyone.
Let's see what you should pay attention to when facing different surfaces:
- The wooden surface is very susceptible to moisture, so it must be coated with waterproofing materials, such as pigment, before processing with artificial stone. This material covers the entire wooden surface of the fireplace before work.
- The next necessary stage of work will be the installation of a plaster mesh using special fasteners.

Attention: To do this, make holes in the masonry using a perforator and place self-tapping screws in them. You also need to put washers on hats. Then the grid will not fall under load.
- The fastening points should be located at a distance of about 15 cm vertically from each other, horizontally - about 5 cm.
- Plaster must be laid directly on the grid so that its layer is at least 1 cm.
- The plaster must be allowed to dry completely, and then continue to work.
- All the same actions can be done when laying an artificial stone on a metal or concrete surface, with the only difference being that there will be no need for waterproofing.
- It should be noted that on a plastered concrete or brick surface, it is desirable to apply notches to the entire surface before starting the finishing process.
What tools will be needed for work
Before you get started, make sure you have all the necessary tools at hand:
- Nails or self-tapping screws with which the elements will be attached;
- A small brush or special sprayer to dampen the surface of the fireplace before laying the stone;
- Master OK;
- Ordinary hammer;
- Grinder;
- Drill;
- Wooden block with a flat surface;
- Dishes in which the solution will need to be kneaded.
A fireplace in a house or apartment is both a sign of luxury and an interior detail that gives comfort, peace, and warmth. And what is a romantic evening without fire? And besides, fire is one of those things that you can look at indefinitely. Inspired and already engaged in the arrangement of the fireplace?
Leave the installation to the professionals, and think about how to finish the portal for the fireplace so that it fits into the interior of the room and is almost its central element.
The fireplace can be anything - gas, electric, biofuel, natural, even imitation. And it can be placed in a corner, in a wall or against a wall, be an island. Any of them are beautiful.
The main thing is that the fireplace itself, and the mantelpiece, portal, fireplace accessories are chosen with taste and look harmonious.
In the meantime, the fireplace is being mounted, there is time to think about what the fireplace portal will be like. You can use different materials.
- Brick.
- Wood in the form of a solid array, lining or panels.
- Decorative stone - artificial or natural.
- Modeling.
- Drywall.
- Plaster.
- Ceramic tiles.
Advice: all materials must be fire resistant, and drywall and wood are impregnated with special compounds that prevent combustion.
Before moving on to the options for finishing the portal, it is worth considering the height of the fireplace, its width, and location.


- Fireplace and portal style. They must match. This largely depends on the finish and location.
- Location and size. If the hearth is located near the floor, then both a narrow and a wide model will do. But wall-mounted fireplaces or those that are raised above the floor should be wide. The exception is island fireplaces, which are not tied to any of the walls.
- The portal is associated with the design of the fireplace and its task is to emphasize this. If the fireplace itself protrudes, then the portal must be on the same level with the fireplace, otherwise all the beauty of an open fire will be lost.
- Proportions. Consider not only the hearth itself, but the space surrounding it. So, for a floor fireplace, you need free space right in front of it. If this is a stretch, prefer the wall model. In addition, the proportions and sizes should be maintained. The classic ratio is when ¾ of the entire height of the portal is occupied by a fireplace and ½ of its width.
- It is not necessary to build a portal in advance without having a real fireplace model. It happens that either the dimensions do not correspond to those indicated on the site, or you can simply miss various little things during its installation - wiring, chimney, fastening. Yes, and with the design you can miscalculate in shade, material. Conclusion - it is easier to deal with a ready-made, already installed fireplace.
And now consider the options for finishing the fireplace portal from various materials.
What finishing material to choose?
Brick
The brick finish of the portal is suitable for an interior in country style, Provence, loft.

Finishing brick must be of high quality, without chips and cracks. It is preferable to use grade 200 and above.

The color is chosen both for the fireplace itself and for the style of the living room - white, red, red-orange, etc.

Would you like to make a brick portal yourself? The video will help you with this.
A natural stone
Expensive interiors - classics, empire, baroque, modern, should also correspond to the portal of the fireplace.
Marble, granite and other durable, beautiful rocks - such a stone is used to decorate the fireplace.


A fireplace made of marble is expensive, made of cobblestone is original.
There are subtleties in working with this material.
- The weight. It is significant, so before installing the fireplace, it is necessary to strengthen the floor under it. The foundation should exceed the width of the portal and the depth of the fireplace by several centimeters.
- It is durable, beautiful, refractory, almost eternal.
- Large pieces of stone may fall off during installation, so use hooks.
This is an expensive material, but the result is worth it.
Fake diamond
If you are confused by the weight or cost of a natural stone, you can take an artificial one. In terms of beauty and quality, it is almost as good as natural material.

Decorative stone portal. Find 5 differences.
The artificial stone is mounted on a frame and a construction mesh. But a strengthening foundation is not necessary. When purchasing material, make a margin of 10-15%. It will be needed to finish the corners, the frieze, perhaps the shelves above the fireplace.
The beauty of finishing the portal with artificial stone is that it has enough variations in color, structure, texture. At the same time, it does not emit toxic gases and unpleasant odors when heated, since it is made from environmentally friendly materials.
Yes, and styling with your own hands is within the power of everyone. Doubt? Video instructions to help you.
Drywall
The plasterboard portal will fit into modern interiors. His styles are high-tech, art deco, minimalism.


For such a design, you will need a frame to which drywall sheets will be attached. Subsequently, the portal is covered with paint, mosaic, plaster, artificial stone, molding.
Important! Remember that this material is not suitable for natural fire fireplaces. Despite the impregnation, he is unable to withstand the heat.
Wood
For decoration, you can use both wooden panels and carved solid wood. In the first case, the fireplace will fit into the loft, modern, country style. In the second case, it will become a decoration of a classic interior.


Fireplaces made of solid wood or parquet boards are equally environmentally friendly.
You can lay out a fireplace from a parquet board or sheathe it with clapboard. If you use wood, do not hide its texture. The more noticeable the smoothed knots, annual rings, the more beautiful and unusual the portal will turn out.
Important! The tree must certainly be well dried and impregnated with a substance that ensures the fire resistance of the material.
Ceramics
Ceramic fireplace cladding is neat, practical and versatile. Such a portal is suitable for both natural and artificial fireplaces.


The basis for the portal is a frame made of chipboard and a profile. And the finish itself resembles laying tiles in the bathroom or in the kitchen - mortar or glue, beacons, grout.
plaster molding
If there is already a ready-made portal, then gypsum elements are attached to it - cornices, semi-columns, moldings, pilasters.
Please note that gypsum stucco is quite heavy. Therefore, the frame must be strong to withstand this weight.


Polyurethane molding
In a modern interior, a polyurethane analogue of gypsum stucco is allowed.
True, it is desirable to use it only in false fireplaces. An open fire can not only damage this beauty, but also cause a fire.
Plaster
If the fireplace is built into the wall, then finishing the portal is not complicated and is similar to the usual wall decoration.