The entrance hall is the first thing you see when you enter the apartment. Often the choice in stores is the same, and choosing furniture for the corridor is not easy. And if it is not large, then the closet simply may not enter or take up all the space. In this case, you can make furniture for the hallway yourself. In addition to saving money, you will get a customized model that suits your space.
What furniture is needed for the hallway
The main rule for furniture in the hallway, it should be roomy, compact, with a neat appearance. Don't over decorate it. In addition to decoration, it has the function of storing things. You should carefully consider the size, availability of drawers and cabinets. It is better if there are more of them, but it is necessary to push off from the area of \u200b\u200bthe corridor, you do not need to overload.
Hooks of an unusual shape on the wall look beautiful, plus a shoe rack.
It looks original, in the presence of a large hallway, a wooden bench, it will give the interior a twist. A win-win wardrobe, it will fit into any interior. And a wardrobe, if space permits, is an ideal solution, it is comfortable and roomy.
For small sizes, it is worth using:
- built-in wardrobes - take up minimal space,
- mirrors and light finishes - visually expand the space.

DIY hallway furniture
With the help of the right project, even a small area can be transformed, and the hallway will look organic and roomy.
The design of this room should be combined with the interior of the entire apartment. It is permissible to choose a different decor or floor covering different from other rooms, but the stylistic direction should be the same.

Practicality
When choosing a model, you should pay attention to practicality. With a small hallway, it is worth stopping at the standard version and choosing multifunctional furniture: compartments for things, shoes.
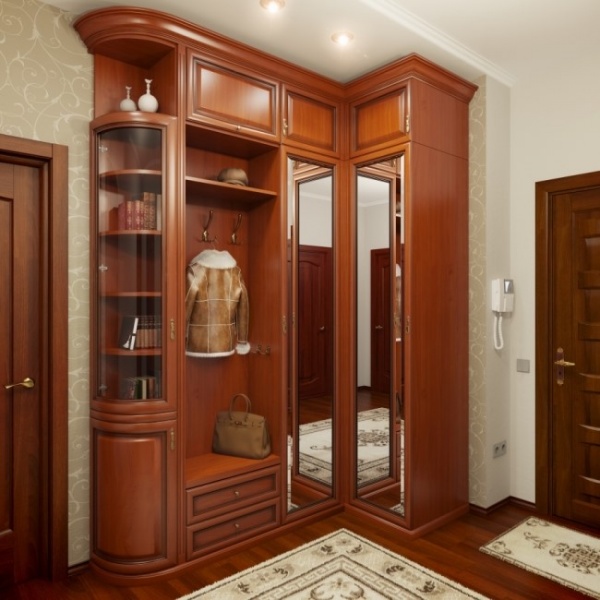
A compromise between capacity and external beauty is a corner cabinet. It looks small, but has a lot of depth, so it's roomy.
In the presence of a large family, it is necessary to think over a place for the things of each inhabitant of the apartment.
The entrance hall is a room into which dirt is carried from the street. Therefore, you should not do it in bright colors, it will quickly get dirty. And such things as: umbrellas, strollers, bicycles, it is undesirable to carry deep into the apartment, it is worth providing a storage system for them in the corridor.

Individuality
Everything that is done by hand, including furniture, is always the embodiment of your ideas and desires. You can decorate the hallway with decor to your taste and give it personality. Such furniture will be one of a kind, and not mass-produced at the factory, and guests will be surprised at its exclusivity.

What you need to work
Having chosen a model, having made a drawing, you should prepare everything that is needed for work: material, accessories, tools.
Depending on the type of furniture, the accessories need different:
- sliding wardrobe - guides for drawers, tires for a sliding system;
- cabinet with hinged doors - hinges, handles, locks;
- hooks for clothes.

Tools
You should stock up on the following tool:
- saw or electric jigsaw;
- screwdriver or screwdriver;
- sandpaper;
- with a knife;
- screws;
- tape measure;
- corners;
- loops;
- plugs;
- special wooden fasteners;
- chimney.
This is the main set that can be useful in the manufacture of furniture.

We make the hallway ourselves: the choice of material
Importance is given to the choice of material, should not be taken too expensive. In addition, it should be easy to process and safe for health.
Suitable: plywood, chipboard, fiberboard, MDF, furniture board, edged board, wooden block, drywall - they have a long service life and good quality.
- Wood. Wood is an environmentally friendly material, so it is perfect for an apartment. It never goes out of fashion, and furniture from it speaks of the wealth and excellent taste of the owners. The wooden entrance hall will harmoniously fit into any style. It can be carved, thereby giving individuality. For the manufacture of furniture, different species are used: oak, birch, pine, beech, walnut. The only negative is the high price, but given the long service life, this cost will fully pay off.
- Furniture shield. It is made from natural materials, therefore it is safe for health. Looks classy and lasts a long time. The cost is high, but below the tree.
- Chipboard. Chipboard is a common and convenient material for making a hallway on your own. It is simply cut and processed, weighs little, there is no need for reinforced fasteners. With all the pluses, it is affordable.
- Plywood .. It has the same qualities as chipboard, but more dense and durable. From it you can make not only parts with curved lines, but also make a welt pattern.
- MDF. Slightly less durable than plywood. But it has limitless possibilities in processing: painting, toning, applying stain.
- Fiberboard. It is used only for the manufacture of the back wall of cabinets.
- Wooden bar. Designed to assemble a frame structure.
- Cutting boards. Relatively expensive material, pine boards are the most affordable.
- Drywall. Built-in niches are equipped with drywall.
- Mirror or glass. Glass or mirror inserts will decorate any room, and you can’t do without a mirror in the hallway. However, they are heavy and cannot be handled alone.

Choosing a hallway depending on the type of room
When designing a hallway, you need to take into account the features of the room and the number of households. You should decide on the functional accessories of the hallway so that it is practical and comfortable. With a small area, the beauty of the closet will not be visible and it will look bulky. It is better to choose the corner version of the hallway. In addition, there should be enough shelves and hooks for all family members.
The right decision is to install furniture along a long wall.
Ordinary hallway: instructions, diagrams and drawings
Making a simple entrance hall yourself is not difficult. It includes: a hanger, a shoe rack, a small pencil case or chest of drawers with a mirror.
For this you will need:
- loops;
- furniture board;
- plywood;
- grooved boards;
- three-dimensional rail.;
- pens.
The first thing to start with is a pencil case. For this, planks of the required size are cut out of the shield, a cover for the top (with an overlap) and shelves. The assembly is not complicated - the slats, with the help of self-tapping screws, are attached to the lid, the shelves are installed in the same way. For structural strength, corners are cut out of plywood and fixed in the corners. A door is made from the shield, which is mounted on 3 hinges.

Now we make cabinets. If desired, you can make only one cabinet. For manufacturing, you need 2 sidewalls of the same size and a bottom that will connect them together. The lid should be made smaller than the bottom. All parts are fixed with glue and screws. Doors are cut out of the shield and attached to the hinges. If there is a drawer, skids will be required. You can make them yourself from plywood, but it’s better to buy them (the box will roll out easily on them). The second cabinet is made according to the same principle as the first.
Now, the whole structure is going. The prepared boards are fixed to the edge of the pencil case and to the cabinet - this will be the base of the hanger. From above, the boards are connected with a rail, for strength. Hooks for clothes are attached to the rails, and a shelf for hats is screwed on top.
The final stage is the installation of handles and varnishing.

Corner option: instructions, diagrams and drawings
It is easy to make a corner hallway with your own hands, but in order for it to be stable, it is necessary to use solid material: chipboard, plywood. The module consists of 2 parts that are connected at right angles. In addition, you should decide whether the walls themselves will be the frame or the base. If the walls are even, then you can do without a frame, fasten the shelves directly to the walls - this will be economical.
Manufacturing principle:
- a drawing is made in size, areas for attaching shelves are marked;
- Chipboard is cut with a jigsaw;
- holes are drilled for dowels on the front side of one panel and at the end of the other, holes are made for confirmations;
- dowels are lubricated with glue and sidewalls are assembled;
- shelves are attached to confirmations, clothes hooks.
If necessary, you can attach a mirror to the door or make compartment doors, thereby getting a corner wardrobe.

Do-it-yourself non-standard hallway: drawings and diagrams
If there is a non-standard corridor that does not fit the wardrobe or hallways sold in the store, you can resort to an original and simple solution. For example, the presence of a bedside table or shoe rack, plus a hanger and a mirror.
You should start with a nightstand. From the furniture board, 2 sidewalls of the same size are cut, the base and the lid. If there are skirting boards, then the corners are cut off from the sidewalls (on one side). The back wall is made of plywood. All parts are fastened with self-tapping screws. Inside, skids for drawers and fasteners for shelves are made. Doors are hinged.
A hanger in the hallway is an element that you cannot do without. It is not difficult to make it and you can give free rein to your imagination. For lovers of eco-style and everything natural, tree branches are suitable instead of a hanger. Those who prefer country style need a vintage version.

Capabilities wardrobe: instructions, diagrams and drawings
The sliding wardrobe is an excellent choice for the hallway, it can be built-in or separate. If there is a niche, shelves are mounted in it and it is equipped with a sliding system.
The process of manufacturing a cabinet with side walls:
- A wooden frame is being made.
- The place for the cabinet is determined. Holes are made on the walls, floor, ceiling to fix the frame.
- The front frame is attached to the wall and ceiling with dowels, and then the side ones.
- Inside, rails are mounted under the shelves. The shelves themselves are cut out of plywood.
- The sides are sheathed with drywall, then glued or painted as desired.
- Guides are mounted on the floor and ceiling.
- Doors are installed - first in the upper tire, and then in the lower one. Doors must move freely, their position is regulated by screws.

You can make a sliding wardrobe in different sizes and models, depending on the preferences and area of \u200b\u200bthe room.
Furniture for the hallway is really do it yourself. Models are quite simple and small in size. And if you have imagination, you can turn an ordinary hanger into a piece and a unique thing.
Photo gallery
Video
The hallway will be inferior if it does not have a solid spacious closet. It is not necessary to buy it at all, since the manufacturing process is quite simple.
Spacious closet in the hallway niche
The advantages of this option:
- you can choose any project that is most suitable for the hallway in terms of style and parameters;
- designers will not have to pay for the development of an individual project;
- material costs are minimal.
The main thing is that the furniture in the hallway should be roomy, compact, neat, not pretentious.
Details to consider when designing.
- must be exact dimensions;
- the presence of a crossbar to accommodate the hangers;
- hooks for clothes for every day;
- one or more shelves for hats;
- cabinet for storing shoes.
- mirror;
- small drawers for small items (gloves, scarves, etc.).

Furniture fittings for the wardrobe in the hallway
To assemble a wardrobe in the hallway with your own hands, the following tools and accessories are prepared in advance:
- guides for installing boxes;
- tires, if a "coupe" with a sliding system is conceived;
- hinges and handles for doors;
- clothes hooks;
- the number of nails, screws, self-tapping screws calculated in accordance with the project;
- wooden fasteners are also needed: confirmations, dowels for furniture assembly;
- furniture corners (metal, plastic) and plugs;
- you can’t do without a standard set of tools (a screwdriver, a drill, an electric jigsaw, a saw for wood, a key for furniture confirmations, a mallet, a clamp, a square and a building level).

DIY cabinet assembly tool
It is better to take inexpensive materials that are easy to process. For example, even experienced manufacturers will not undertake to make furniture from solid wood.
- Chipboard is the most acceptable option for a future DIY product. This material is easy to cut, process. The building material weighs a little, so it does not need reinforced fasteners or fittings. An important fact is the low cost.

Chipboard cabinet with mirrored door
- Plywood is a light, durable and denser material that can be used to make curly details, as well as welt patterns.

Spacious eco-friendly plywood wardrobe
- MDF can be subjected to various types of processing (painting, tinting, staining, etc.). It is less durable than plywood.

Sliding wardrobe and cabinet made of MDF in the hallway
- Fiberboard must be purchased for the back walls of the elements.

Fiberboard for the back wall of the cabinet in the hallway
- Wooden beam for frame construction.

Wooden beam for the frame of a homemade cabinet
- Edged boards (usually from pine).

Edged board (pine)
- Drywall for interior space equipment with built-in niches.

Homemade drywall wardrobe in the hallway
The most responsible approach is to take measurements. If a miscalculation is allowed, all subsequent work will be difficult or nothing will work out at all. There are various ready-made options with suitable sizes. If the finished drawings are not suitable, and the drawing skills are weak, you need to attract a specialist for this stage, who will think over the project with the right dimensions. Cutting materials and edging the end parts is better in a store that sells building material. Store services are inexpensive, but it saves a lot of time.
Assembling the wardrobe
This model belongs to the built-in ones, it is easier to manufacture, since the parts do not need to be calculated and cut out. The complexity of this option is that it is necessary to take into account the features of walls and floors.
The ideal solution for such furniture would be a niche with a sliding system, equipped with several shelves, a crossbar for hangers. The installation of the wings in this case is the same as for the interior doors (the wall and the floor are involved).
Very often, a closet is made in the corner of the room. This model does not have one side and back wall (and in some cases there is no floor and ceiling).
The base consists of a wooden frame, which consists of a pair of frames (front and side), assembled on self-tapping screws or nails. If the project provides for the arrangement of shelves and partitions, cross rails must be fixed to the frames in the designated places.
Instruction
Mark the walls, floor, ceiling in places where the frame will be installed, drill holes for the fasteners. It is recommended to mark the places of the paper clip as well.

We make markings for shelves, install corners
Fasten the front frame to the wall and ceiling with dowels. Check its verticality using a level.

We lay and fasten the shelves on the corners, install the vertical panel to the shelves inside the cabinet
Install the side frame.
In the resulting niche, wooden slats are attached to the walls, designed for shelves (cut shelves from plywood or chipboard). You can not fix the shelves by laying them on the slats or fix them with nails.

On top of our construction, we lay a horizontal shelf according to the level
The side is sheathed with drywall or laminated chipboard. Drywall is pasted over or painted. The side part, in which the crossbar with hangers will be located, must be strong (chipboard, plywood, but not drywall).

We prepare panels for the front side of the cabinet

Attaching the bottom and top panels
The final stage is the installation of sliding doors. Top and bottom rails are mounted respectively on the ceiling and on the floor.

Installing door rails
Here it is very important to observe the exact dimensions. First, they try to install the layout of the future door. Take any part whose height is the same as that of the door and install it inside the top rail. Check the verticality value and mark the area where the lower guide will be attached. The door must first be inserted by slightly pressing on the upper rollers, and then into the lower tire. To adjust the position of the door leaf, adjusting screws are used. A properly installed door moves smoothly, without hindrance.

We insert the doors into the guides, snap the latches and adjust the mechanisms in the roller systems
The above example is suitable for a simple small size structure consisting of two halves. With a good hallway area, it is possible to manufacture a more spacious model. Then the frame of the bars will not work. It is better to make a base from chipboard, and “fasten” its elements with the help of a common floor and ceiling. This method will allow you to place in a niche, in addition to shelves and a bar for hangers, also boxes for small items and other details.
Such a product will be assembled as a designer for dowels and confirmations. For this fitting, you must first drill holes. All this must be done very carefully and patiently. All fasteners for corners are kept in a clamp for a day.

Built-in two-door wardrobe in the hallway
Corner cabinet assembly
It will be easy to make a corner module with your own hands. For stability, modules are often made of durable solid materials (chipboard, plywood). These products come in several forms:
- triangle;
- L-shaped;
- trapeze;
- five-walled.

Basic configurations of corner cabinets
The most suitable for the hallway is five-walled.

Built-in five-wall corner cabinet

Detailed assembly diagram of the corner cabinet


Instructions for self-assembly of a corner cabinet
Shoe cabinet assembly

Convenient do-it-yourself shoe rack
This is the easiest process, because everything that is needed in the work is sold by the building materials store.

The design includes: an outer frame, several shelves with partitions. The width of the structure depends on the maximum shoe size, and the height depends on the number of shelves.

Addition of facades and clearances of cabinets for shoes
A good solution would be to combine a shoe cabinet with dresser elements. Or place it in a closet or corner wardrobe, which have open facades.
There is a lot of information on the Internet about how to make a closet in the hallway with your own hands. Therefore, by examining all the available data, the most suitable model can be successfully constructed.
Video: Wardrobe in the hallway, do it yourself
Traditionally, in our everyday life, each room of a residential building eventually receives one or another name. According to them, we can easily determine the main functionality and purpose of each small department of a house or apartment. Kitchen, bathroom, bedroom, nursery - each of these names hides its own separate small world. Today we will talk about the first room, often having the smallest area - the hallway. This small room welcomes everyone entering the house or apartment, gives them the first impression of the home. That is why many owners strive to equip the hallway on their own, to invest all their talent in it. We will talk about the design options for the entrance room, about the manufacture of the hallway as an element of furniture in the future.

For a long time, the main element of a small space located directly behind the front door and leading to the rest of the house was a piece of furniture, which had the same name as the room itself. We are talking about the hallway, as a piece of furniture designed for temporary storage of street clothes and shoes, as well as hats and various accessories. There are many options for making these products. Some are based on natural wood in the form of solid or lumber, others are assembled from flat parts made from various artificial wood sheet materials. There are also such hallways, which are based on a frame and an abundance of various metal parts. Let us consider in more detail the various options and the technology of their manufacture with our own hands.
This hallway is one of the possible options made from edged boards. For its manufacture, narrow slats with a thickness of 20-25 millimeters were used. All parts must be sawn depending on the desired dimensions of the structure and carefully planed with a manual or electric planer. To make the front of the shoe storage area, you will need three bars 50 centimeters long and 40 × 40 in rough design. As follows from the attached photo, self-assembly of the hallway is carried out using wood screws. At the same time, the screw heads are not painted over, which gives the product some roughness. Surrounded by other products that have a similar combination of parts and form an ensemble with the hallway we are describing, the feeling of rudeness is smoothed out.
To store outerwear, the design of the product provides for several metal hangers, and a separate shelf is made for hats. The disadvantages of this hallway include the lack of a mirror that provides an overview to a person who is preparing to leave the apartment.

Above is an even simpler version of the hallway. Compared to the previous product, the number of hangers is increased in it, but the upper and shoe shelves are completely absent. At the same time, the absence of fasteners on the front side of the product makes it look neater.

A small entrance hall, which is quite within the power of almost every home craftsman who knows how to work with an electric drill, screwdriver and electric jigsaw. The material for its manufacture can serve as wood furniture panels, and chipboard.
A feature of independent work with chipboard in the manufacture of a hallway with your own hands is the difficulty in obtaining perfectly even edges of parts without chipping the laminating coating. To do this, you need to use a high-quality electric jigsaw and sharp files with a medium-sized tooth. Even if these rules are observed, it often becomes necessary to additionally process the edges of parts with sandpaper. All this is necessary to prepare the edges for pasting them with a special edge tape. In its absence, the cut looks rough and significantly worsens the appearance of the entire product.
The fastening of the tape to the edge of the parts is carried out using PVA glue or using a pre-applied adhesive composition. To increase the setting speed, the edge can be ironed with a non-hot iron through a layer of fabric (in production, special edge machines are used for this purpose). As a rule, the width of the edge is several millimeters greater than the thickness of the sheets. The resulting excess must be carefully cut off with a sharp knife, a metal spatula or a triangular file in the direction of the plane of the part.
The use of a furniture board does not require such a large number of additional operations. It is enough to cut out the details for the future hallway according to the preliminary marking and clean it with sandpaper.

The parts obtained from one or another material are interconnected by self-tapping screws. Shelves are hung on furniture hangers.

This version of the hallway combines the whole range of necessary elements, small size and easy to use.
In addition to the above option, a large number of other types of hallways are made from chipboard.

For rooms furnished with furniture made in various styles, with a significant amount of metal parts, this variant of the hallway may be suitable.

It is compactly located in the available space between two doors, has a large number of shelves for storing various accessories and clothing items. The basis of the design is two chrome-plated steel tubes with a diameter of 30 millimeters and several shelves of the same size. For mounting in horizontal parts, two holes of the corresponding diameter are drilled in the same places. For greater stability of the structure, it is additionally attached to the walls with four brackets. This product, as an independent one, cannot fully fulfill the functions of a hallway. It is convenient to use it as an addition to a hanger with a mirror and a shoe rack made using the same technique.
Currently, wardrobes are actively replacing the hallway as an element of furniture, installed in rooms of sufficient area. We will talk about the technology of their independent production in one of the following articles.
Dear readers, comment on the article, ask questions, subscribe to new publications - we are interested in your opinion :)
How to make a hallway Furniture in the hallway with their own hands.
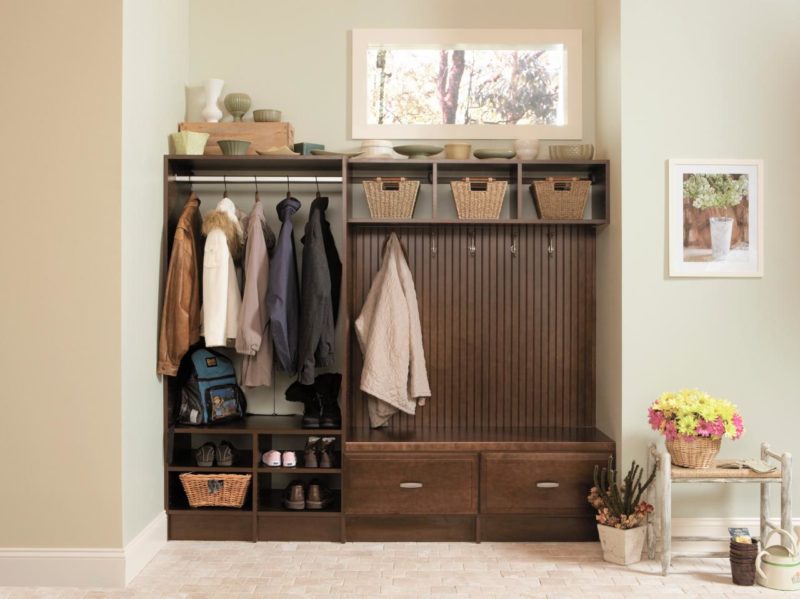
An example of this hallway in the interior.

Hallway structure.
Structurally, the entrance hall consists of four parts - elements that, when combined, form a single set. Below is a list of elements of the furniture set in the hallway. Each element, with drawings and diagrams, is described on a separate page.

The entrance hall is made of laminated chipboard 16 mm thick. For facades, in this example, used frame MDF profile AGT with an insert of chipboard 8 mm. Of course, in each individual execution time other materials can be used for facades , profiles of other manufacturers, different content or in general, facade material in general. For example, install facades made of film MDF (PVC), facades made of natural wood on the frame of the hallway, or, if this is an economy option, then make facades from laminated chipboard, pasting the ends with an ABS edge 2 mm thick.
The project gives the dimensions of the facade panels themselves, otherwise what kind of facades they will be will depend on the choice of the master manufacturer.
Choice of design dimensions.
The dimensions of the elements of the hallway are selected taking into account the theme: - "Furniture in a small hallway." So, the depth of the cabinet and cabinets was chosen taking into account that they will be installed in the wall, up to the door to the inner rooms. Such piers, as a rule, rarely exceed 45 cm in width. Therefore, with a sidewall depth of 420 mm, plus the thickness of the facade and handle, it will just be somewhere around 45 cm.
In addition, since a full-length wardrobe cannot be squeezed into a narrow hallway, it is necessary to proceed from at least the minimum ease of use. Retractable holders for hangers (trempel) - microlifts just right for narrow cabinets. With their help, clothes can be hung in a shallow closet frontally.
Microlifts are simple and reinforced. Reinforced ones differ only in an additional guide rod. Microlifts come in different sizes: from 250 to 450 mm. The size that is needed in this project is 400 mm.
(these two photos are from dudo.home.pl)
Wardrobe width 600 mm., two doors. For outerwear, even for winter, this width is more than enough.
The height of the bedside table (2) is such that low shoes, boots, slippers, etc. can be placed on two shelves. Bedside table (3), 690 mm high, the top cover can be used as a small table. Small drawer . The lower compartment is designed for high shoes or perhaps for a vacuum cleaner, the tube and hose from which can find their place in the wardrobe under the bottom shelf.
The height and width of the open hanger allows it to be used for everyday, frequently used outerwear, incl. and long raincoats, coats. A large mirror in the hallway is not only functional, but also very adorns the entire set.
hallway dimensions.


Hallway detail.
To begin with, I will give a general detailing of the product, by part numbers. Further in the description of the assembly diagrams, it will be easier to navigate, because. drawings are arranged by elements. It is very difficult to indicate part numbers on a single diagram, for which it would be necessary to create a large "out of format" sketch.
| title | X size | U size | PCS | m 2 | note | |
Element - 1. Wardrobe for outerwear. |
||||||
| 1 | Top link. | 568 | | 420 | 1 | ||
| 2 | Medium connections. | 568 | | 420 | 2 | ||
| 3 | Rigidity. | 568 | 226 | 1 | ||
| 4 | Plinth. | 568 | 50 | 1 | ||
| 5 | The bottom of the closet. | 568 | | 420 | 1 | ||
| 6 | Sidewall left. | 2200 | | 420 | | 1 | ||
| 7 | Sidewall right. | 2200 | | 420 | | 1 | ||
| 8 | Bottom shelf. | 566 | | 220 | 1 | ||
| 9 | Back wall, main. | 1508 | 598 | 1 | fiberboard | |
| 10 | Back wall, top. | 358 | 598 | 1 | fiberboard | |
|
Element - 2. Nightstand for shoes, shelves for shoes. |
||||||
| 11 | Sidewalls. Left and right. | 434 | | 420 | 2 | ||
| 12 | The bottom of the pedestal. | 768 | | 420 | 1 | ||
| 13 | Plinth. | 768 | 50 | 1 | ||
| 14 | Top connection. | 768 | | 50 | 1 | For fastening the top and fiberboard | |
| 15 | The top of the pedestal. | 800 | | 442 | | | 1 | ||
| 16 | Shelf. | 766 | | 400 | 1 | ||
| 17 | Back wall. | 798 | 384 | 1 | fiberboard | |
Element - 3. Bedside table in the hallway, with a drawer. |
||||||
| 18 | Sidewalls. Left and right. | 674 | | 420 | 2 | ||
| 19 | The bottom of the pedestal. | 368 | | 420 | 1 | ||
| 20 | Plinth. | 368 | | 50 | 1 | ||
| 21 | Top connection. | 368 | | 50 | 1 | For fastening the top and fiberboard | |
| 22 | The top of the pedestal. | 415 | | 442 | | | 1 | ||
| 23 | Back wall. | 624 | 398 | 1 | fiberboard | |
| 24 | Side of the box. | 400 | 100 | 2 | ||
| 25 | Front and back panels . | 310 | 100 | 2 | ||
| 26 | Bottom of the box. | 400 | 342 | 1 | fiberboard | |
Element - 4. Hanger in the hallway, with a mirror and a shelf for hats. |
||||||
| 27 | Hanger bars. | 1385 | | | 110 | | 5 | ||
| 28 | Hanger ties. | 790 | | | 110 | | | 2 | ||
| 29 | Mirror panel. | 1044 | | | 400 | | | 1 | ||
| 30 | Shelf for hats. | 1200 | | 200 | | 1 | One corner is milled. R = 100 mm. | |
Detail of the facades of the hallway.
You rarely see a large entrance hall of the correct form in a city apartment. Most often, this is a small room or a long corridor where no more than two people can fit. But the hallway is the first thing people see when they enter the house. In addition, it should also be functional, since outerwear and shoes for all seasons are stored here.
Starting the repair of the hallway, it is worth remembering that there are few rooms in the apartment with an equally aggressive environment. It is the entrance hall that takes on all the possible hardships associated with constant dirt that is brought in from the street.

Design Secrets for Visual Expansion

But even the smallest room can be made stylish and comfortable with the help of some design solutions. They will help to realize almost any fantasy, turning the minuses of the room into virtues. Consider a few secrets to visually enlarge the room:

Advice ! If you direct the light to the ceiling, this will give the effect of height, the direction of light on narrow walls will expand the room.
Types of hallways

- Square.
- The corridor.
- Coupe.
- Corner.
- With branches.
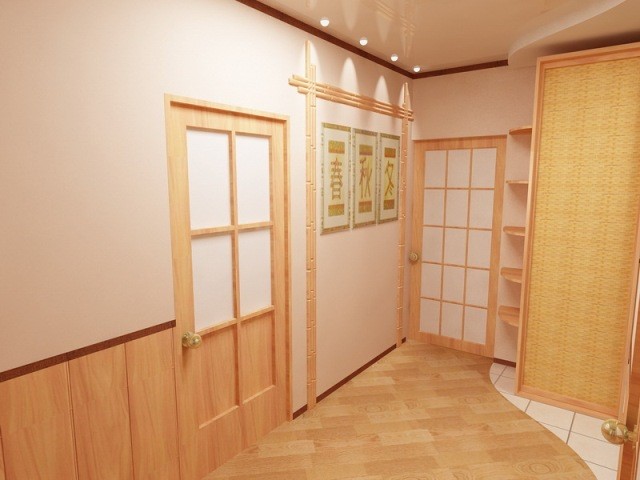
Entrance hall square It is a small room, most often with one solid wall, while on the rest, there are doors to other rooms and a bathroom. In such a room there are no other options for arranging furniture, only along a solid wall. To expand such a hallway will help light colors, play with light and install doors and arches. For example, the doors to the bathroom should not be highlighted, let them be the same color as the walls. In the rooms you can install doors with colored stained-glass windows, mirrors or completely transparent. In rooms such as a kitchen or a hall, you can make arched openings.

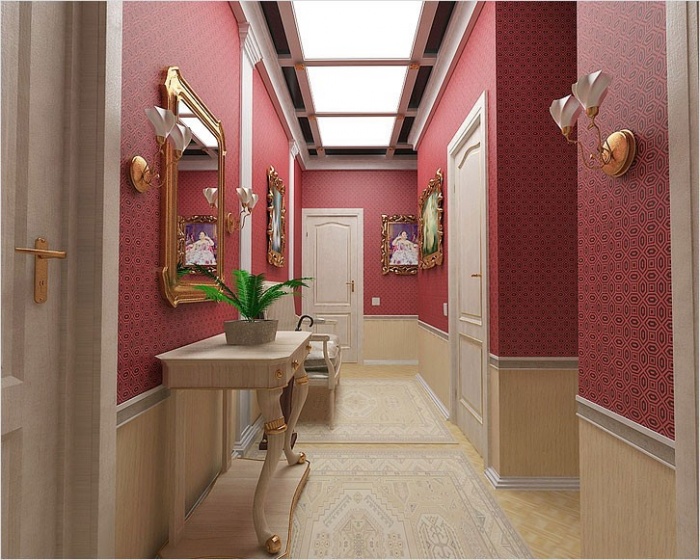
hallway-corridor usually very narrow. Furniture in it can be installed only along one wall. It is desirable to always divide a narrow and usually long hallway into certain zones, using arches or a color palette. Separately allocate space for hangers for outerwear, separate the front door, organize an area for mirrors. Thanks to these techniques, you can optimize the space of the hallway. Near the front door, a tiled floor would be ideal, and then you can cover it with other material, such as linoleum or laminate, laying it across the room. The longitudinal walls should be made in light colors, and the end walls should be darker. And most importantly - mirrors, they will help expand a narrow room if they are hung on long walls.

Entrance hall-compartment, this is either a square room with a corridor extending from it, or in the form of a winding corridor, or several square corridors diverging into different rooms. In such a room, it is not easy to place the necessary furniture, it is worth dividing the hallway into zones.

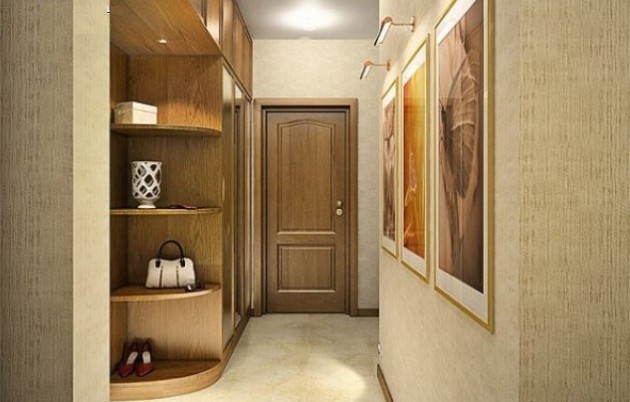
corner hallway consists mainly of one corner and goes immediately into another room. It can be separated by zoning the floor and ceiling or light. You can also install a partition, preferably from light translucent materials.
Entrance hall with branches, usually a square room with several corridors branching off from it in different directions or a branching corridor. The main furniture is installed near the front door, decorating the branches to your taste.

Advice ! The flooring will help to visually enlarge the entrance hall, the same as, for example, in the kitchen with a separated arch.
Decorating a small hallway

Designing a small hallway with your own hands is not difficult at all. Most importantly, initially you need to decide how much the repair is calculated. But you should not save much if you want an original room that reveals the character of the owner. Given the design secrets, by visually enlarging the hallway, you can choose the finishing materials for the room.
wall decoration

When choosing a finishing material for the walls in the hallway, you need to consider that this is not only the dirtiest room in the house, but also a place where overall things are sometimes stored. For example, a stroller or a bicycle. Gathering in the morning, households often collide with each other and wipe the walls. From this, the hallway is the most frequently cleaned room.
Wallpaper for the hallway must be washable or moisture resistant. With a large selection on the market, this will not be a big problem. Choosing wallpaper, you should think about their colors. For small rooms choose light shades with a small pattern. It must be remembered that a vertical pattern will make the room taller, and a horizontal pattern will expand it. Wallpaper can be combined with other materials such as wood panels or. If the ceilings are high, you can separate the finish, mount panels from below, and stick wallpaper on top. The right inserts made of stone or mirrors will help not only decorate the hallway, but also visually expand it.
Plastic panels are very easy to care for, they are not afraid of moisture and tolerate temperature changes well. The choice of textures and colors is very large and they can be chosen for every taste. But accidentally knocking with a sharp heel or corner, you can damage them.
Wood panels are more durable and, given modern technology, there will be no problems with their choice. The main thing is to get resistant to moisture, otherwise you will need to spend money on special impregnation or varnish for their processing.
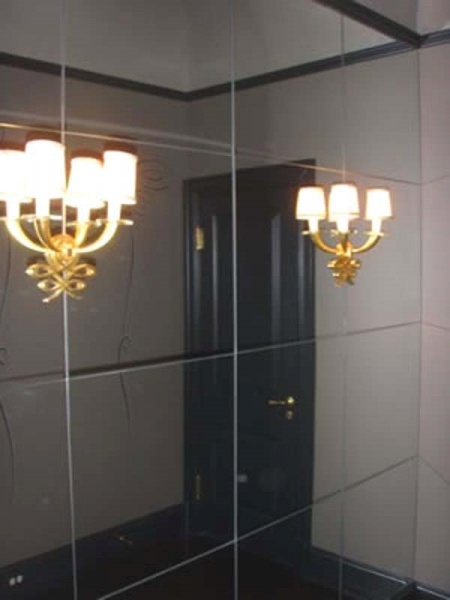
Tiles of large and small sizes will look cold in the hallway, but it is worth diluting it with other finishing materials and it will help to visually expand the room. If it is a mirror tile, then it will be in theme on wide walls, making the room much larger.
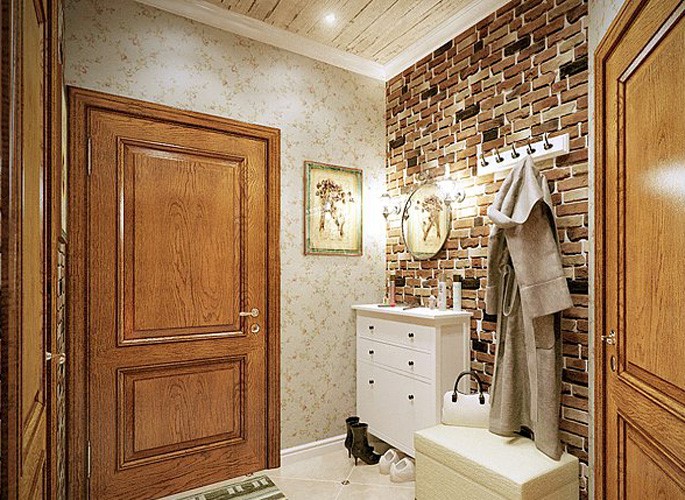
Stone, both natural and decorative, should not completely cover the walls. This can be the original decoration of doorways or corners; with high ceilings, the lower half of the walls can be overlaid with stone.
Plastering or painting the walls in the hallway is the cheapest way to finish. A variety of plaster and paint, they will help create your own unique design.

Choosing a floor covering
The floor in the hallway should also be taken more carefully, because of the constant dirt and lovers of stiletto heels.
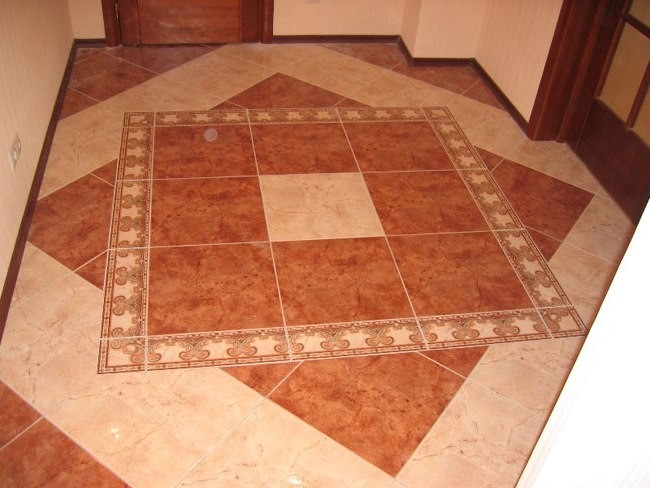
Advice ! Floor coverings in the hallway can be combined. It looks very impressive and stylish, and besides, it will visually expand the room.

Tiles or porcelain stoneware are considered the most durable flooring. They are easy to wash and can withstand heavy loads. It is better to choose a tile with a roughness so that there is no slip.
Linoleum is wide in the choice of colors, it is easy to care for it, it is not afraid of moisture. When choosing linoleum, you need to clarify that it is for rooms with high traffic.

Hardwood flooring is rare in a hallway as it quickly absorbs moisture and is easily scratched. If desired, you can further process it, but it will take more time.

Laminate is a good substitute for wood, it is moisture resistant and hard to damage. Laminate is considered the most popular flooring for the hallway.
Ceiling in the hallway
The main thing for the ceiling in a small hallway is not to be too voluminous. Multi-level ceilings are not suitable here. Well, if they are with a reflective effect. Also, do not hang a chandelier, spotlights and flat shades in the hallway, they will fit more here.

- Stretch ceiling is a good option for the hallway. You can mount a backlight in it, and it is easy to use.
- Painting or whitewashing is the most profitable option in terms of finances. The ceiling is maintenance-free and easy to update or repaint if you want a different color.
- Panels are a good choice for a hallway ceiling, but don't forget that if the ceilings are low, the panels will steal a few inches and the ceiling will be even lower.
Conclusion
Even if the hallway is small in size, this is not a reason to be upset. Knowing the secrets of the visual expansion of space, it is quite simple to create an individual design of a small hallway with your own hands, which will delight both the owners and their guests for many years.