Cooking is a process that should be enjoyable. But here a lot depends on the conditions in which you cook. The atmosphere should inspire and encourage the creation of delicious and healthy dishes filled with your good energy. In the summer, in the closeness and the smoke of the closed space of the kitchen, you are unlikely to be able to easily tune in to a pleasant cooking process. But if you have a dacha and a couple of skillful hands, you can solve this problem. Having built a summer kitchen in the country, you will not only save your main room from unnecessary fumes and heat from the stove, but also get the opportunity to cook outdoors in a pleasant environment, surrounded by greenery and blown by the breeze. In addition, an open summer kitchen can be equipped with a barbecue, barbecue or fireplace and have cozy picnics surrounded by people you love.
Where to begin
When planning the construction of a summer kitchen for a summer residence, first of all, it is worth finding answers to a number of important questions that will determine your further actions:
- Appointment. Will you use the summer kitchen only during the warm season or all year round? Do you want to cook on it often and a lot, or will it become a place for occasional gatherings with friends and family?
- Dimensions. Will the space of the summer kitchen become a working place for the hostess during the period of closing home preparations and cooking, or will it be organized in the form of a kitchen-dining room designed for a certain number of people?
- Accommodation. Will the kitchen be implemented as an extension to the main room of your cottage or will it be a separate house? How will your facility be positioned in relation to the sun, wind, green spaces, communications and roadways?
- Project's budget. The materials that you choose for the summer kitchen, the design of the room and the time spent on implementing your ideas will largely depend on it.
Advice ! Examine the ready-made projects of summer kitchens for summer cottages offered by construction companies, and independently adjust them to your scale and needs.
After analyzing all the significant points, you will need to accurately establish for yourself the following:
- Open or closed type suits you;
- Will you build a stove or will you limit yourself to installing a stove, do you plan to use a barbecue and grill;
- How will water supply, sewerage, electricity supply be organized in your project;
- What design are you planning to do?
Open summer kitchen
An open type of summer kitchen usually has one to three walls, a canopy as a roof, and in its appearance is more like a gazebo.

Advantages of an open view of summer kitchens:
- Such an open-type summer kitchen design can be built quite quickly and without much effort.
- It is economical in terms of production costs.
- When cooking outdoors, you will not suffer from the stuffiness, fumes and burning that are characteristic of indoors.
However, there are a number of significant drawbacks to be aware of:
- In the open summer kitchen, you can cook and relax only while it is warm outside;
- You can't leave food on it;
- Kitchen furniture for the winter must be removed into the house so that it does not deteriorate from dampness;
- The room is poorly protected from drafts, showers and insects.
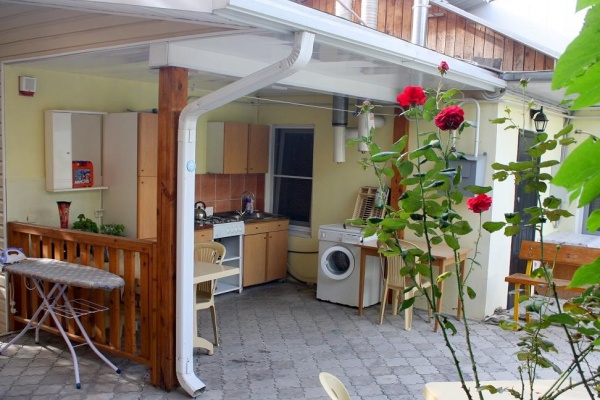
Outdoor summer kitchen on the veranda
You can organize an open type of summer kitchen on the veranda of your country house.

Advice ! To make the open summer kitchen look good, try to equip it in the same style with your summer cottage.
First of all, you will need to lay the foundation. Its depth should match the depth of the foundation of the house. Next, you form the frame of the walls, perform their sheathing and build the roof. It is better if the roof is the same for the house and the veranda. The open summer kitchen looks good, the front or side wall of which is glazed.
Open summer kitchen
An open summer kitchen can be organized as an extension and connected to a summer house or to some utility room, for example, a bathhouse.

Such an extension is created by expanding the porch and is a kind of terrace with all the necessary kitchen attributes: a gas or electric stove, furniture, a sink, etc. During the construction process, supporting structures are mounted along the dacha wall, on which a canopy is attached. The floor can be laid out with paving slabs directly on the ground, having previously leveled it. This is possible if the water in this area is not collected after rain. You can protect an open summer kitchen from bad weather with the help of sliding or removable side partitions, tarps, roller blinds. The walls can be covered with plants that will please the eye and create coolness in the heat.
This open summer kitchen project is cheaper and easier to implement than the option with a foundation, but it is less reliable, because when the soil subsides, the kitchen may begin to tilt.
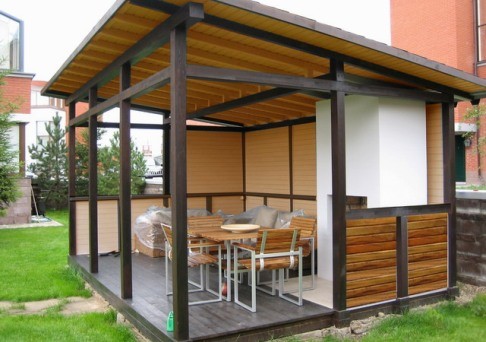
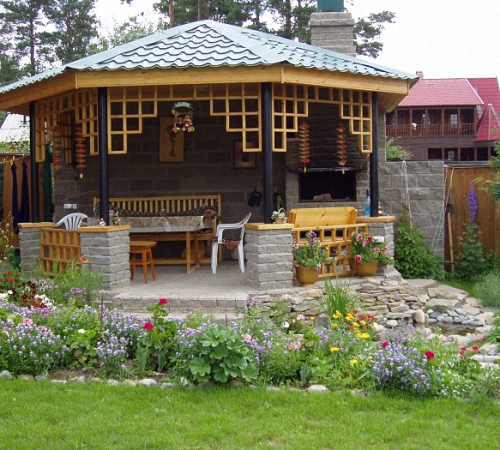
Open summer kitchen-gazebo
Such an open summer kitchen project is especially good when you want to install a fireplace, a barbecue in the kitchen and use it for a pleasant pastime in the company of friends and relatives. Even in such a gazebo it will be convenient to process the harvest harvested in the country.


Decide which foundation for an open kitchen gazebo - tape or columnar - will suit you best. The roof is recommended to be made of bitumen or ondulin. When creating a frame, materials such as stone, brick, timber are usually used. Any wall can be made closed in order to place a kitchen set and other necessary attributes along it. Leave the rest of the openings open so that you can breathe fresh air freely. If necessary, they can be draped with fabric curtains and roller blinds, decorated with lattice panels, entwined with plants, or organize various partitions.
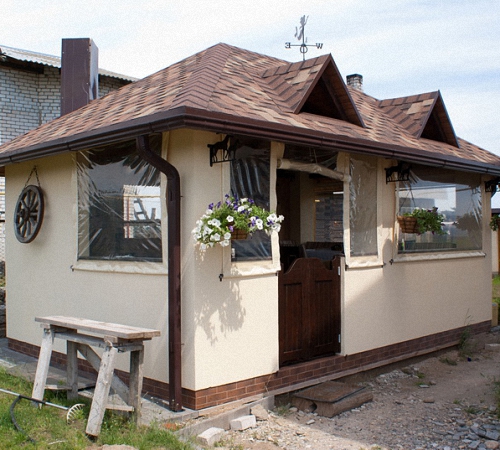
Closed summer kitchen
The closed summer kitchen is a full-fledged house, standing separately or attached to another building: a country house, a bathhouse, a utility room. This option is well suited for areas where the climate is characterized by strong winds, rains, early frosts. You may like this design if you like to relax in the country in winter and prefer to cook in a separate room. It needs more capital investments, a serious approach to design, it is more difficult to build. But in the end, you can build a house with comfortable conditions, including the presence of heating, running water, sewerage and electricity. Often, closed kitchens in the country are equipped with a cellar, a fireplace, and utility rooms.

Advice ! When it is impossible to conduct electricity to the summer kitchen, you can buy a country diesel generator and feed all kitchen appliances from it.

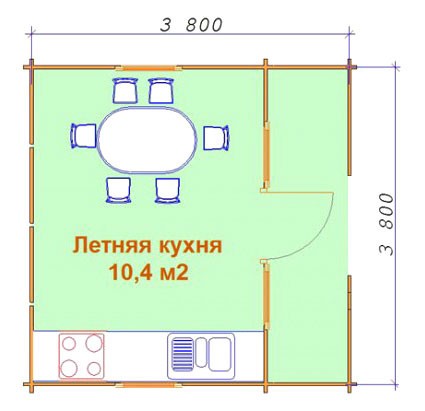
In this project of a closed summer kitchen: 1 - the kitchen itself, 2 - the dining area. Numbers 3, 4 and 5 are stools, a table and a corner bench in the dining room. The kitchen area is equipped with a cupboard (6), stove (7), sink (11), water tank (12). Also provided here: chimney (8), ventilation duct (9), window (10).
Kitchen-house with a terrace
The closed option can be organized as a detached house with a terrace. In the house you will cook, so it must be equipped accordingly, and on the terrace under a canopy you can organize a dining area with a table and chairs.
Such a project is quite labor-intensive, since it requires laying a monolithic foundation, building walls, installing windows and doors.

When equipping the walls, the strength of the wind in the area should be taken into account so that they can adequately withstand all possible loads. For a closed summer kitchen, a gable roof is recommended, which reliably protects against rain and snow.

You can also consider the project of a kitchen-house with a cellar. Then, before starting the construction of the premises, you will need to dig a foundation pit, and the walls of the cellar will serve as the foundation for the upper part of the building.
How to build a summer kitchen with your own hands
There are several main stages in the process of implementing any kitchen project for a summer residence:
- Select the location of the building.
- Prepare the foundation.
- Raise the walls.
- Build a roof.
- Perform interior decoration.

Choose a location
A well-placed kitchen should:
- Conveniently located relative to the entrance to the house. On the one hand, it is not desirable that the fumes from the stove fall into your main home. On the other hand, too much remoteness of the kitchen from the house will lead to the fact that in bad weather, it will be quite difficult to transfer ready-made food to the house.
- Stay away from places that emit unpleasant odors, such as a country toilet, pets, cesspools, etc.
- Be far enough away from traffic so that exhaust fumes and road noise do not interfere with your cooking and breathing fresh air.
- Be available for connection of communications: water supply, sewerage, heating, electricity.
- For an open summer kitchen, one should take into account the wind blowing, the warming up by the sun's rays, and the presence of greenery around.
- Attention should also be paid to the level of groundwater, as well as the terrain on which the cottage will be built.
Attention ! The country house and the summer kitchen should be at least 15 meters away from cesspools, toilets and livestock enclosures.
We are preparing the foundation
What kind of foundation you will lay depends on the chosen kitchen project for the cottage. A construction option is also possible without a foundation, for example, when you concrete a site of a suitable scale and reinforce it with a metal mesh. It will be appropriate for an open summer kitchen with a light canopy. For closed brick or stone summer kitchens, a strip foundation is usually prepared. Column supports are suitable for open kitchens or tree houses.
The foundation formation algorithm is as follows:
- Along the perimeter of the kitchen being created, select soil or dig small holes with a scale of 30x30 cm and a depth of 70-80 cm.
- Create a 20 cm thick cushion of crushed stone and sand and tamp it down carefully.
- Pour the foundation, platform or pillars. Concrete can harden from 7 days to a month.
- If it became necessary to fill the floor, after removing the soil layer from the platform under the kitchen, pour sand 15 cm thick, crushed stone on top and pour the pillow with a cement solution. If you plan to lay tile floors, the surface must first be leveled using sanding or a cement screed option.

Attention ! For an open summer kitchen, the floor should be raised above ground level to a height of five to seven centimeters so that rainwater does not flood the room.
Building walls
Your kitchen project may or may not have walls, but the support pillars that will hold the roof or canopy will most likely need to be installed. Materials for the construction of walls can serve:
- Stone, e.g. marble, limestone, granite, slate, concrete. The advantage of stone is its reliability and durability, but its prices are quite high. The thickness of the walls will depend on the temperature regime of the environment in which the operation is planned. One brick thickness may be enough for you. For use in the cold season, additional insulation may be required.
- Wood. This material is cheaper than stone and easier to use. Buildings made of it look elegant and are popular with summer residents. However, it should be noted that in order for the tree not to deteriorate over time, it must be subjected to special processing. Exterior sheathing can be made of boards or siding, for interior - use clapboard, drywall. To create fasteners, metal corners or self-tapping screws are used.
Building a roof
You can choose from the following roof options:
- Flat or one-sided. This is an easy-to-build and inexpensive roof.
- Gable. More reliable, durable and popular.

Attention ! The long canopy will protect the walls in the rain and extend the life of your kitchen.
We do interior decoration
Often, flooring is performed using linoleum, parquet, laminate, decking or ceramic tiles.
In the case of wooden walls and ceilings, they can be covered with a protective layer of drying oil, which will prevent the negative effects of dampness and time on this material.
The interior of the kitchen should be pleasing to the eye, create coziness and comfort, so furnish the kitchen in such a way that it would be pleasant for you to be there and, of course, take into account your financial capabilities.
It is very simple to create a cozy and comfortable atmosphere on the plot of land - it is enough to equip a summer kitchen where you can cook food and organize friendly gatherings.
Building a summer kitchen is a rather painstaking and costly undertaking. However, if you wish, you can save a lot by choosing an inexpensive project and implementing it yourself.
Summer kitchen - a functional area for a comfortable stay
The summer kitchen very often becomes the central object of the backyard. The process of cooking is transferred from a stuffy room to the street, it becomes possible to combine business with pleasure - to communicate with guests and at the same time set the table.
An impromptu building can decorate a garden or complement the exterior of a residential building, and by building a summer kitchen on your own, using inexpensive material, you can save a lot.
The advantages of arranging a "home cafe" in nature are obvious:

Of course, a summer kitchen is not a house, but its arrangement must be taken responsibly, having thought through everything to the smallest detail. Developing an individual project and translating it into reality is quite an expensive pleasure. However, you can significantly reduce costs:

Types of summer kitchens: choose the best and inexpensive construction option
There are a lot of summer kitchen projects. The main parameter by which they are classified is the openness of the kitchen space. There are three types of arrangement of backyard kitchens:
- open kitchens;
- semi-open kitchens;
- closed kitchens.
Open summer kitchen, or the so-called "kitchen island" - resembles a gazebo or veranda. The main elements of the kitchen are a stove for cooking, a sink for dishes and kitchen furniture. Such a kitchen does not have side walls, at most - there can be decorative nets with climbing plants or sun shades. Often an open kitchen is equipped with a canopy.

"Kitchen Island" is an economical project for a summer kitchen, since the building does not need a "powerful" foundation and walls, the consumption of materials is minimal.
The benefits of an open kitchen include:
- ease of construction;
- significant savings in money;
- excellent ventilation.
The disadvantage of an open-type kitchen is that the building can only be used in summer when the weather is calm.
Semi-open kitchen- a kind of open type, but one or three walls are already provided here. Such a structure is more versatile than a "kitchen island", but its construction will cost a little more.

One wall of the kitchen can belong to a house or a bath - this will reduce the cost and time for building a building. An additional plus of such a structure is the proximity of the water supply.
The presence of walls will give the kitchen more comfort, and the feeling of closeness with nature is preserved.
Closed summer kitchen- a full-fledged small house, which can be insulated or not. This building is multifunctional. The kitchen can be used as a guest house, dining room or storage room.

Closed kitchen equipment is the most expensive option. But even here you can save money. For example, to build a kitchen not from stone and brick, but from lining, drywall, plywood or slate. Of course, you won’t be able to use such a kitchen all year round, but for the spring-summer-autumn period it will become an indispensable assistant in your summer cottage.
Requirements for the location of the summer kitchen
The following requirements are put forward for the location of the summer kitchen:
- Possibility of free supply of communications (electricity and water supply).
- The kitchen should be located away from compost pits, toilets, household facilities with pets.
- Preference should be given to a place with a slight slope for the outflow of rainwater and melted snow.
- Flammable buildings should be located at a distance of at least 10 meters from the kitchen, coniferous trees and shrubs - at least 2 meters.
- The open part of the kitchen should “look” to the north - this will save you from the bright rays of the sun.

Whatever the configuration of the building, the backyard should be used rationally, and in front of the kitchen there should be a panoramic view of the garden or courtyard
Highlights when designing a summer kitchen
The initial stage in the construction of summer kitchens, regardless of their type, is design. It is important to take into account all the important questions as much as possible:

On the general drawing of the building, all the necessary dimensions, the name of the building materials used, and the connection diagram for engineering equipment should be indicated.

In advance, you need to think over the internal and external design of the kitchen, choose decor elements and finishing materials.
Stages of building a "kitchen island" with your own hands
It is inexpensive to equip a summer kitchen in a country house by creating and installing a home-made work surface on a separate site. Consider the option of building a "kitchen island" on a wooden frame.

preparation of materials and arrangement of the site
For work it is necessary to prepare the following materials:

For an open kitchen, it is not necessary to build a foundation, it is enough to equip the site as follows:

construction of the base for the working area
The sequence of manufacturing the frame of the "kitchen island" is as follows:

Before finishing the frame, it is necessary to cut out the internal shelves, doors and check the correctness of their installation. If necessary, "adjust" the design.
kitchen island decor
All internal parts of the frame must be removed, after which you can proceed to finish the working part of the kitchen:

The second layer of plaster can be made even if painting is used as the finish of the "kitchen island" or the base is covered with stainless steel
How to build an inexpensive semi-open summer kitchen
The most popular among summer residents are semi-open summer kitchens with a gazebo. Projects can be peeped on the Internet or specialized magazines. To create a kitchen with a gazebo, aerated concrete or foam concrete is suitable - this is a great alternative to brick and wood. The main advantage of foam concrete - reasonable price and durability.

Work order:

Economical options for the construction of closed kitchen buildings
If the budget is limited, and the weather conditions of the region do not allow the installation of an open summer kitchen, you can experiment and build a closed building not from brick, but from more affordable materials.

An interesting and inexpensive option is a closed polycarbonate kitchen. For a small kitchen, 3 * 3 m in size, pouring the foundation is not required. The entire construction process can be divided into several stages:
- Remove the top layer of soil from the site.
- At the corners of the site, in the dug holes, install a metal profile.
- Pour the base of the platform and the rack with concrete. The floor level of the kitchen should be 5 cm above the ground.
- Weld the transverse beams intended for the installation of the roof to the side posts. The transverse profile should protrude 5 cm beyond the kitchen area - for normal water flow.
- Using self-tapping screws, “sheath” the frame with polycarbonate, using waterproofing gaskets and polyethylene washers. Sheathing of the frame must begin from the roof.
Some craftsmen build inexpensive summer kitchens from improvised materials. For example, from old wooden window frames, you can build an original "transparent" structure that protects from wind and rain.

From flat slate, a more durable and warm closed kitchen will turn out, and if it is additionally insulated, then it will be quite possible to use the kitchen in the cold season. An old cargo container can be given a second life by making it an original summer kitchen for a summer residence.

You can make a summer kitchen from an old small house, the state of which is already close to emergency.
Photo projects and design solutions for summer kitchens
Consider different options for external and internal design of summer kitchens.
Summer kitchen in hi-tech style. The main accent is a combination of comfort and restraint in design.

Summer kitchen in classic style.

The summer kitchen, made of wood, fills the backyard with the warmth of natural material. Many elements can be replaced with wooden clapboard.

The building of the original form can become the hallmark of a personal plot.

A summer kitchen in a landscape style will become a central element of the landscape design of the garden.

Summer kitchen in rustic style.

The arrangement of a summer kitchen on the terrace of a country house will cost much less than the construction of a separate building.

The role of living plants in the design of a summer kitchen.

Economy version of the kitchen under a canopy of corrugated board.

A kitchen attached to a Russian-style bathhouse.

The use of photo wallpaper in the decoration of the summer kitchen.

As you can see, there are many options for arranging a summer kitchen, and even with a limited budget, you can create an original, durable and cozy summer kitchen. The main thing is to stock up on time, approach the process creatively and not be afraid to experiment.
Cooking in the summer is quite difficult, as the temperature in the kitchen is several degrees higher than in the room. Owners of a private house or cottage can easily solve this problem by arranging summer kitchens. Cooking and preserving outdoors is convenient and easy. We will talk about the features of the construction of a summer kitchen in the country house further.
Do-it-yourself summer kitchen in the country: functional features and types
The summer kitchen is, first of all, a place for cooking, and not only in summer, but also in spring and autumn. Such premises are especially relevant in small suburban areas. The summer kitchen is a platform with a stove, stove, cabinets and furniture installed on it. Fresh air improves the comfort of using the cooking surfaces.

A summer kitchen is not a mandatory building, but in cramped country conditions it is necessary. In relation to the materials for the construction of the building, we distinguish several varieties of summer kitchens:
1. Structures made of wood - glued beams, logs or boards. Among the advantages, we note: environmental safety, attractive appearance, ease of processing, affordable cost. However, wood, before installation, is necessarily treated with antiseptic compounds.
2. Simple metal frame structures. They are easy to assemble and dismantle, easy to transport from place to place.
3. Budget options for summer kitchens with a combination of various materials. For the construction of such a kitchen, everything that is at hand is used, it can be boards and metal and even plastic bottles.
4. Summer kitchens made of bricks - they have a chic appearance, excellent refractory characteristics. Among the advantages we note - high structural strength, good protective characteristics, long service life. On the other hand, the construction of a brick summer kitchen will take a lot of time, physical and material effort.
Depending on the design features, summer kitchens are divided into rooms:
- open type;
- closed type.
The first option has the form of a platform on which all the necessary appliances and furniture are located. Sometimes such structures are supplemented with a roof to protect against moisture during rain.
The closed summer kitchen has walls and resembles a full-fledged, but most often separate cooking room.

Summer kitchen in the country: choosing a place for construction
The area for the summer kitchen can have a wide variety of shapes in the form of an oval, circle, rectangle, square or polygon. Therefore, before drafting a summer kitchen, decide on its location.
Pay attention to these characteristics:
- remoteness from the entrance of the house, garden, other buildings;
- the presence of sunlight on the site, it is possible to build a kitchen in the garden, but try to choose a place where at least half of the kitchen is heated by sunlight;
- choose a site with a limited wind load, otherwise, with a strong wind, garbage will get into the food.
In addition, study the terrain, determine the level of groundwater, the presence of vegetation, distance from neighbors and other individual factors.
Choose a place convenient for supplying communication systems. After all, the kitchen should have electricity, water. It is not recommended to build a kitchen next to a toilet, household yard or compost pit.
Do-it-yourself summer kitchen in the country photo:

The following is the process of making a summer kitchen project. It indicates the size, shape of the building, the type of materials from which the building will be built, the foundation, the material for finishing the roof, etc. According to the project, the amount of materials for work is calculated and their purchase is made. In addition, make sure that the design of the kitchen fits into the overall style of the house and the exterior as a whole. Summer kitchen should be in harmony with the environment. We recommend building it from the same materials as the main house.
Although it is possible to build a slab foundation, over the entire surface of the building. This option requires large material investments, but it has better performance characteristics.
If there is soil with a high level of heaving on the site, we recommend stopping at the screw foundation. For its construction, it is enough to purchase special piles, and the workflow takes no more than one day.

Summer kitchen construction technology in the country
We offer a variant of the construction of a summer kitchen with a brick base and a wooden frame. Work should begin with the foundation, since the upper part of the kitchen will be wooden and the building does not have an impressive weight, a shallow strip foundation is enough.
Pre-prepare the site for work, remove all debris and vegetation, level the surface. Next, using pegs and a rope, mark the installation of support structures.
Build a pit, the depth of which is determined by the weight of the summer kitchen and the type of soil on the site. Most often, a tape shallow foundation is laid at a depth of about 20-40 cm.
After digging a trench, lay a pillow at the bottom of the pit, first from sand, and then from crushed stone. Do not forget about waterproofing in the form of roofing material. This is followed by the process of mounting the formwork and installing reinforcement, if necessary.
Then prepare a high quality concrete mortar and pour it into the trench previously equipped with formwork. Do not forget about compacting concrete with a special vibrator or improvised means. Thus, the quality of the solution improves and there will be no air pores inside the foundation. The drying time of the foundation is at least 14 days, only after their expiration, work continues on the summer kitchen. We recommend covering the foundation with a film to prevent moisture from entering during rain.
If time costs are limited, choose a pile version of the foundation. There are special bored piles, the installation of which is carried out quickly enough. Initially, calculations are performed to determine the length of the piles and their diameter, and then the structures are mounted in the ground. For these purposes, specialized equipment or tools are not required. Two people are enough. Such a foundation does not need to be defended, compared to concrete, and work on the construction of a summer kitchen continues immediately after its construction.
The following is the process of creating a site in the summer kitchen. It will be equipped with a stove, furniture and other kitchen utensils. The main requirements for the site are its evenness, strength and construction on a small hill.
Choose refractory materials for site construction - concrete, paving or ceramic tiles. After the foundation has completely dried, equip the pit with a depth of about twenty centimeters. Pour sand into the pit, tamping it well and wetting it with water. Try to achieve maximum pressing of the sand.
If you chose paving slabs to create an even base, then lay it directly on a bed of sand. Please note that the tile should rise at least 5 cm above the ground. From this, and push off, constructing a sand cushion. It is possible to install a decorative stone on the site, in this case, we recommend using a cement mortar.
Summer kitchen in the country photo:
The next stage is the construction of a high-quality blind area. This element will protect the foundation and summer ground from moisture. Arrange a drainage system near the blind area. In addition, the blind area increases the decorativeness of the structure, framing it.
The next step is the laying of the walls. Beacons are pre-installed to obtain an even structure. Prepare a cement mortar, preferably using a concrete mixer. This device increases the quality of the resulting solution and reduces the time spent on its preparation. Perform laying in half a brick, with mandatory reinforcement. This is followed by the process of stitching and wiping the material. Wait a few days for the cement mortar to set.
The following is the process of mounting the frame part, made of wood. Please note that before starting work, the wood is treated with special antiseptic and fireproof compounds. The upper part of the summer kitchen consists of vertical pillars, along the perimeter of which a bar or beams is fixed. Make high-quality dressing of structures, it will improve the strength of the walls. Monitor the evenness of the installation of the bars, using the building level.
Build a summer kitchen in the country house photo:

After that, proceed to the construction of the roof in the summer kitchen. There are many options for constructing a roof - corrugated board, tiles, slate, soft tiles, etc. When choosing one or another option, start from the total weight of the building and the load on the foundation. In addition, we recommend choosing the same roofing material as on the main building.
Before starting installation work, install a crate or solid flooring, provide for a slope along which moisture will drain from the roof. For maximum protection of the summer kitchen from moisture, install a gutter system.
After finishing the roof, take care of the interior design of the room, namely:
- grout the seams between the tiles;
- check the quality of the brickwork;
- make the ceiling in the form of filing the roof;
- paint or varnish the wooden sections of the building.

For cooking, build an oven or install a stove. It is possible to supplement the summer kitchen with a barbecue or barbecue. Set a table, chairs, soft chairs for relaxation. Shelves with racks for dishes and kitchen utensils will help to complement the interior. Run electricity, install a sink for washing dishes.
Textile elements, beautiful towels, napkins, tablecloths, fresh flowers in flowerpots, various decorative elements will help to complement the design of the summer kitchen in the country.
Do-it-yourself wooden summer kitchens for summer cottages
We offer the option of making a summer kitchen from wood. In the process of work, prepare the tools in the form of:
- high-strength woodworking machine;
- chain saw for working with timber;
- electric jigsaw with high power;
- screwdriver;
- electric drills with a set of nozzles;
- belt type grinder;
- planer, circular saw;
- hacksaws;
- brushes.

The dimensions of the proposed kitchen are 300 by 400 cm. The main part of the building is made of timber. Each of their elements is pre-processed, planed and planed. After processing all parts, soak them with used oil. This process prevents the wood from rotting and protects the material from moisture. Handle the end sections especially carefully, as these parts are subject to the highest operational load. Choose light-colored oils so as not to spoil the appearance of the wood.
Such a structure does not need an expensive foundation, an ordinary concrete block, 15 cm deep into the ground, is enough. Pour sand around the blocks and compact it well. To connect the ends of the timber, choose the easiest half-tree method. Fix the parts with nails. Additionally, strengthen the internal joints with metal corners and long self-tapping screws. This method significantly increases the durability and strength of the structure.
Next, lay the floor, for this, use a standard board, the thickness of which is at least 35 mm. For the manufacture of the frame part, also use a beam. We recommend stopping at the gable version of the roof, for the manufacture of which wood is also used. The next step is to install the crate. Pre-lay waterproofing material with a slight overlap on the roof. Set the exterior trim to suit your individual preferences. For wall cladding, also use wooden boards. Pre-treat the wood with an antiseptic in several layers.

A summer kitchen in a country house with a barbecue requires additional processing with fireproof compounds. Since wood is a highly flammable material.
A summer kitchen with a veranda in the country house is an excellent solution not only for outdoor cooking, but also for receiving guests.
What elements should a summer kitchen consist of?
If you properly equip the summer kitchen, then being in it in the summer will be a real pleasure. It is not hot to cook there, it is convenient to preserve, the floor in the house does not get dirty with dirty shoes, and it is completely pleasant to dine outdoors.
But, if you choose the wrong location, then instead of convenience, you will get an extra headache and unnecessary fuss: carrying dishes, cans over a long distance, running back and forth.

Therefore, let's immediately decide what must certainly be present in the summer kitchen:
- Cooking oven
- Brazier
- Dishwasher
- Working table for cooking
- Cupboards for dishes and jars
- Shelves or hanging drawers for dishes
- Dining table and chairs
These are all the main elements, without which it will not be very comfortable to use the room, and they should be in any case. And there are also auxiliary ones, without which it is quite possible to do, but if they are present, then it will definitely not be worse, only better.
- Cellar adjoining the summer kitchen
- small woodcutter
- Sofa
- Television
- Swing

As you can see, if you add these modules, then the summer kitchen will be multifunctional, cozy and you can spend almost all day outdoors.
Where should the summer kitchen be located?
But not only the choice of elements depends on success. The main thing is the location! It used to be customary to build a summer kitchen as a separate house without heating, away from the main building.
Now it does not seem convenient anymore, since it is difficult to bring communications and the building itself does not look very harmonious in the middle of the yard.

The best solution is the location of the summer kitchen - adjacent to the main house, and in such a way that you can go into it from there. Or from the main door, or from the side entrance. Also good options were discussed in the article "".
Also, choose the right wall to which the summer kitchen will adjoin. If you attach it to the one where the main windows of the room are located, then the house will become dark and damp, from the fact that sunlight does not fall. It is better that it be a blank wall with a side exit.

If you want to equip a cellar adjacent to the summer kitchen, then do not forget an important thing: you cannot dig a large hole near the foundation of the house, since in this case the earth layer may subside and the building will roll. Therefore, you need to dig it at least 3.5 meters further from the foundation.
Another important point: what type of room you will have. An open area or a full extension in the form of a veranda. Let's take a closer look at this, because hasty savings at the planning stage can then turn into many years of annoyance and regrets.
Summer open kitchens
They have their advantages, the main of which is budget. In order to organize such a zone, a lot of expenses are not needed, there is no need to fill the foundation, put windows, erect walls. The only thing you need:
- Concreting of the area under the kitchen
- The erection of supporting pillars under a canopy
- Roof decking
- Construction of the oven and barbecue
- Organization of the working area and washing

That is, at least twice the consumption is reduced. But besides the budget, there is another plus here: the space is open, which is a pleasure.
True, only in good weather. But for bad weather there is a main kitchen in the house! And does it make sense to equip another one? Let's clear this up as well.
Summer kitchens
Why did summer kitchens used to be made separately from the house, in the form of separate houses? Mainly because stove heating was used and during the conservation season, during cooking, the walls of the summer kitchen were very hot. And if the main house were so fired up, then it would be simply impossible to sleep in it. To lay out outdoor stoves, like "Finnish", then they did not guess, apparently.
Also, the summer kitchen was used as a guest house, in case guests arrived. They put a sofa, a wardrobe, and also made a separate utility block for storing boxes, glass jars, nets for drying fruits, herbs and other equipment for harvesting, which was quite a lot.

And besides this, they made animal feed, stirred and crushed grain, beat butter, etc. Therefore, the premises had to be closed, so that in case of bad weather the mass of provisions would not be damaged.
Now, few people are engaged in raising livestock and the original purpose of the closed kitchen has lost its rationality. Yes, and a guest house is not always needed, since for these purposes you can use any extra room in the house.
So, now there is no particular need to build a capital structure, but making a summer kitchen completely open is also not an option. Best of all - the combined type and below you will find out why.
Combined summer kitchens
You can combine in different ways. You can make an area with a stove, a desktop and a small utility block indoors, and leave the dining table under a canopy, or vice versa. Some people really enjoy cooking outdoors.
But the best option is to make the hozblok in the form of a closed room adjacent to the terrace, and leave the stove, work table and dining table just under a canopy, but with a slight amendment: fix sliding shutters under the roof, which can be closed in case of bad weather. Or, immediately make glazed frames, some of them to move apart, forming an open area.

But the hozblok should be with walls, since during long rains the vegetables that are stored there can become damp. If you have a cellar instead of a hozblok, then even better!
What is the best way to make a roof?
Of course, it would be nice if the roof of the summer kitchen was combined with the main floor of the house. Especially if the summer kitchen is adjacent to it.

But to do this does not always work out for only one reason: now metal roofs, such as metal tiles, are not uncommon. And if on the main house they are insulated from below, sheathed with wood, which guarantees some sound insulation, then in the summer kitchen there is no need for such things.

And if the canopy is made of metal, then you simply cannot be there in the rainy season. The knock will be so strong, peculiar and unpleasant that all the charm of eating in the open air will be nullified and you will have to urgently retreat to the house.
Therefore, the main thing: choose a roof that does not knock even without additional sound insulation: slate, tiles, shingles.
What floor should be in the summer kitchen?
Do not forget that the summer kitchen is designed to make it comfortable for you to use it in the summer. And in the summer, as a rule, all owners of private houses spend a lot of time in the garden, and then, with dirty feet, go to the summer kitchen.

Therefore, there can be no talk of any wooden flooring, it is simply impractical. The best option is tile for the street. It can be soiled three times, and then easily washed even with a hose (provided, of course, that your area is open and without large sides).
Stove in the summer kitchen
There are many options here. The simplest of them is the installation of a conventional gas furnace and cylinder. But still, it is better to spend a little more effort initially and lay out a real, wood-burning stove. It is much more economical during the conservation season, while building it is not as difficult as homemade. And she looks much more comfortable, whatever one may say.

You can make a very budgetary "Finnish", or you can make a whole complex, including a barbecue, a place for cooking, a built-in cauldron, a place for firewood. Everything here depends on your imagination and financial limit.
A brick chimney, which, when building a home stove, is more expensive than the cooking surface itself, can be replaced in the summer version with an inexpensive galvanized pipe.
Cellar in the summer kitchen
Believe me, this is a very, very convenient solution! If you still do not have a cellar, then it is difficult to think of a better place for it.
And most importantly, do not save on its area inside and ease of descent. Dig a small hole, then to go down the wooden stairs, standing upright - stupid. Then you will regret your hasty decision ten times over.

It is better to make the cellar large, wide and with a gentle slope. Let it be initially more expensive and more difficult, but then it will delight you all your life.
The optimal depth of the cellar is 3 meters down. You should not do less, otherwise it will always be damp and there will not be a stable temperature.
Width - about three by three meters. For the descent - about 1.5 meters, while the entrance should be from above, in the form of a separate entrance. That is, a hole is dug, and walls are formed at the place of descent, which gradually come to naught.
Be sure to consider the location of groundwater on the site. If they are close, then the cellar is not worth digging at all, since at a shallow depth it makes no special sense.
Sink in the summer kitchen
Without her - nowhere! Running to the house or to the well is inconvenient. Try to install a double sink at once, since one compartment is never enough in the open air.

Also, be sure to put a small water heater above it. And even better, put a 100-liter tank on the roof of the building for heating by the sun, or bring the sink to the summer shower tank.
Work table in the summer kitchen
Here it is necessary to make not only a countertop, but also cabinets with shelves. Without them, it will be difficult to accommodate comfortably. Moreover, if you do not do this, then in case of bad weather or hail, you will have to immediately bring all the dishes and equipment into the house, which will cause a lot of trouble.

Also, if there are no shelves and cabinets, you will have to take the necessary cooking equipment out of the house all the time, and if there are convenient storage places, they can be there all season.
Dining area in the summer kitchen
One thing can be said here: always count on the maximum number of people who can accommodate at your table, and not only on weekdays, but also on holidays.
Don't make this place too narrow. The minimum width should be 3 meters, and the length is already at your discretion, but approximately, about the same 3 meters.
Here are examples of the successful arrangement of tables in the summer kitchen:

Swing in the summer kitchen
A very unusual solution, while adding comfort. In America, swings are usually hung on the terrace, but we can easily place them in the summer kitchen, especially if it is open. See how wonderful it looks in the interior:

They can be placed in any convenient corner of the summer kitchen. The main thing is that they do not interfere with sitting at the table and cooking.
Summer kitchen design in a private house
The most important thing, namely functionality - we discussed. Now let's talk about beauty, which is equally important. The design of a summer kitchen in a private house can be so interesting and unusual that it will make all passers-by stop and look at your building.

Here are examples of interesting summer kitchen options that you can take as a basis for planning:


In conclusion, I would like to say that a summer kitchen in a private house is a necessary thing, and if you have a question whether it is needed at all, then we can answer: it is absolutely necessary!
In the warm season, especially during the conservation period, the presence of a summer kitchen greatly facilitates the cooking process and makes it more enjoyable. For construction, it is not necessary to hire specialists - all stages can be completed independently. If you choose the right materials, the summer kitchen will not cost too much, which is of great importance for the economical owner.
Types of summer kitchens
Summer kitchens can have a closed and open design. Both species are widely used in suburban and suburban areas. To decide which type to opt for, you should study all the advantages and disadvantages of such buildings.
Closed kitchen

This kitchen has windows, doors and a roof like a complete home. There are options combined with a bathhouse or a summer shower, a cellar, a workshop, with an attached veranda for eating and relaxing. Usually, light materials are chosen for construction and they do not insulate the building, so the room is not used in winter. At the same time, there are kitchens made of bricks and foam blocks, which are more durable and can be insulated if necessary.

Advantages of closed structures:

- a closed kitchen requires more materials, so it is more expensive;
- the project will require additional calculations;
- the construction process is more laborious and lengthy.
This option is more suitable for country houses where the owners live permanently. But in the country, which is empty in winter, the construction of a closed kitchen is not always justified.


Open kitchens are built according to the principle: a concrete or tiled base, supporting pillars along the perimeter, a canopy roof. Under the canopy, a stove, a kitchen table, and benches are installed. Sometimes the kitchen is made without a canopy if it is used exclusively for cooking on vacation on clear days. The building material for an open kitchen is most often wood, brick, natural stone.
 Summer kitchen - a project with a barbecue
 Advantages:

- do not use the room during the cold period;
- no protection from wind and insects;
- poor protection against rain and dampness;
- no food left.
- all the furniture that will be there must be hidden for the winter in closed, dry rooms, otherwise it will quickly rot.
Where to build

The location of the kitchen matters a lot. The utility yard and cesspools should be as far away as possible, but communications, on the contrary, are closer. You will have to supply water to the kitchen, connect electricity, so it is best if the building site is near the house. You can not choose a place in the lowland, otherwise the floor will be damp. A closed kitchen can be attached to the house, and it is better to place an open one in a garden or near a pond, away from the road.
Construction of an open kitchen

There are many options for building an open kitchen, but the main stages are always the same: marking and preparing the site, laying the foundation, installing load-bearing supports, installing the roof and interior design.

For work you will need:
- level;
- shovel;
- pegs and twine;
- tape measure; sand and gravel;
- cement mortar;
- pieces of reinforcement;
- timber 150x150 mm;
- Circular Saw;
- drill;
- screwdriver;
- hammer and nails;
- metal squares;
- self-tapping screws;
- boards 25 mm thick;
- primer.
Step 1. Markup
The selected area is cleared of all unnecessary and the sod is removed. One of the corners of the building is determined and a peg is driven into the ground, and then the width and length of the platform for the kitchen are measured from it. Beacons-pegs are placed in each of the corners and a twine is pulled between them. Check the correct markings on the diagonals - they must be the same length. After that, inside the markup, the soil is selected to a depth of 15-20 cm, leveled and rammed.
Step 2. Foundation pouring


The bottom of the pit is covered with an even layer of sand, leveled, well compacted. If necessary, communication pipes are laid along the bottom, crushed stone is poured from above. A reinforcing mesh is laid, metal rods 20 cm high are inserted at the corners of the site, formwork from boards is installed around the perimeter. The height of the formwork above the ground should be about 10 cm; using a level on the inside of the formwork, mark the line for pouring the solution so that the site is even. Knead and pour it into the formwork, guided by the markup. The communication pipes are closed with plugs, otherwise the solution may get inside. The surface is leveled with a rule, after which the foundation is left until it dries completely.
Also, the foundation for the kitchen can be made of a columnar type using bricks. The marking is carried out similarly to a monolithic foundation, after which square-shaped pits are dug up to a depth of 50 cm. The bottom of the pits is covered with sand and rammed, then a metal bar is inserted, around which brickwork is made. The height of the foundation columns is checked by level. If necessary, the columns are leveled with an additional layer of cement.


A lower trim made of timber will be attached to the reinforcement bars, which is joined using the “paw” method. The beam is laid on roofing material, previously glued with bitumen to each column. Logs of the subfloor from the edged board are mounted on the lower trim.
Step 3. Installation of bearing supports


In the lower ends of the timber, holes are drilled for reinforcing bars protruding from the foundation. The front racks are made 20 cm higher than the rear ones, so that it is more convenient to mount the canopy. The bars are installed at the corners of the site, leveled, and then fixed to the base with metal plates on anchor bolts. Along the upper edge, the pillars are connected with a strapping of timber, and horizontal jumpers are mounted at a height of 70-80 cm from the floor.


Table. Roof slope depending on the coverage
| Roof material | Weight sq. m (without base), kg | Approximate durability, years | Roof pitch, deg. |
|---|---|---|---|
| Sheet black steel | 3-5 | 20-25 | 16-30 |
| Cink Steel | 3,5-6 | 30-40 | 16-30 |
| Ruberoid | 4-13 | 13-15 | 4-27 |
| Roof tiles | 40-50 | 60 and over | 30-45 |
| asbestos cement | 14-20 | 40-45 | 27-50 |
Step 4. Mounting the canopy
The boards treated with a primer are nailed to the upper trim along the width of the structure every 50 cm. The internal joints must be reinforced with metal squares so that the canopy does not disperse in strong winds. A waterproofing material is laid on top of the boards, thin slats are stuffed and sheets of slate or

Step 5. Floor arrangement
The best solution would be tiling. It is not afraid of moisture, is easily cleaned of dirt, easily tolerates temperature changes. Wooden flooring in an open kitchen quickly becomes unusable under the influence of atmospheric moisture, cracks from the sun, is damaged by insects, and therefore requires regular maintenance. So, take the tile, tile adhesive, notched trowel and start laying the floor. Lay out the tiles from the corner: apply a little solution to the back surface, apply to the floor and level.
 In the photo - porcelain tiles for the street
 To make the seams as even as possible, special plastic crosses are used, which are inserted at the joints. Laying is constantly controlled by the level, otherwise the coating will be uneven. If installation or a barbecue is planned in the kitchen, it is not necessary to veneer the floor under them. After completion of work, the seams are cleaned of dust and residues of the solution, and then rubbed with a special mixture.
Step 6. Arrangement of the kitchen
For greater comfort, the space between the floor and horizontal lintels can be sheathed with boards or closed with wooden curly grates, leaving the doorway free. They install a stove, benches and a table, supply electricity and water. In conclusion, wooden surfaces are stained and varnished or painted, protecting the wood from environmental influences.

Prices for different types of building boards
Building boards
Construction of a closed kitchen
Closed kitchens are also very diverse, but the most convenient and easiest to implement is a frame structure made of timber on a columnar foundation. For sheathing, it is recommended to use clapboard or OSB boards.
In the process of work you will need:
- Circular Saw;
- jigsaw;
- drill and screwdriver;
- building level;
- shovel;
- a hammer;
- roulette;
- dry planed timber 100x100 mm;
- boards 25 mm thick;
- long cord and pegs for beacons;
- ruberoid;
- cement mortar;
- building studs;
- working out;
- nails and screws;
- sand.
Step 1. Marking the site

The selected site needs to be prepared: level the hills, remove tall grass, stones, debris. Now you need to determine where the facade line will be located, and put 2 beacons on it. The distance between the pegs is equal to the length of the facade. Perpendicular to this line, the length of the side walls is measured from each beacon and marks are also placed. A cord is pulled between the beacons, and diagonals are measured in the resulting rectangle. If they are equal, the markup is correct. In the center of each side of the future kitchen and at the intersection of the diagonals, it is also necessary to drive in pegs - these are marks for intermediate pillars.
Step 2. Foundation preparation

They dig holes with a shovel in places marked with pegs to a depth of 40 cm; the dimensions of the pit should correspond to two cinder blocks laid flat. The walls and bottom of the pits are leveled, a 10 cm layer of sand is covered and rammed. 2 lower cinder blocks are laid on the sand, covered with a solution, a construction pin is inserted in the center so that it rises about 25-30 cm above the soil surface. Then the second row of the cinder block is placed on top across the first, again the solution and the third row. Finished poles must have the same height and be located on the same level.
Step 3. Mounting the bottom trim

The lower harness consists of two rows of timber, knocked together. All bars are generously coated with used oil, paying special attention to cuts, and then dried. In the beams of the lower row, you need to make holes for the studs, and in the upper row, cut grooves for the floor beams. The depth of the grooves corresponds to half the thickness of the beam, and the width is equal to the thickness of the crossbar.
Pieces of roofing material are laid on top of the pillars, putting them directly on the studs. The lower bars are applied to the posts, the location of the stud is marked, holes of the appropriate diameter are drilled. Then they are laid on the foundation, the studs are threaded into the holes and the nuts are tightened. The ends of the studs should not protrude above the surface of the beam, on the contrary, it is better when they are slightly recessed into the tree. Check the strapping with a level around the entire perimeter to avoid distortions. Now you need to lay the top row of beams, nail them, insert the floor beams into the grooves. For greater reliability, it is better to strengthen the internal joints with metal plates with screws.
Step 4. Summer kitchen - log house
Such a summer kitchen has a beautiful appearance, is environmentally friendly and retains heat well indoors. However, it is extremely important to treat the material with fire-retardant impregnation in order to exclude the possibility of wood damage by insects.
It is worth remembering that the log house will shrink for several years, so it is not recommended to additionally sheathe the walls of the summer kitchen.
In order for the walls to be even inside the room, each log is hewn along the entire length with a planer or grinder. At the ends of the logs, grooves are cut for joining (the "paw" method). This method was not chosen by chance. Firstly, the logs will be used without residue, and secondly, even if the corner joint has a small gap, this will not affect the functionality and convenience of the summer kitchen.


To build a mortgage crown, we lay two logs opposite each other. We put two more perpendicularly on them. We adjust this square to a single plane so that it lies clearly horizontally on the lower trim of the future summer kitchen. Next, the following logs are marked, cut down and laid, between which we lay a heater, for example, moss or felt.

The openings for the doors and windows of the summer kitchen will be cut down in the future. The double-glazed windows themselves and the front door, together with the components, will be installed after the completion of the roof installation process. We bring to your attention a photo report of the construction of a summer kitchen 7x3 m.

Video - Cutting "in the paw"


Step 5 Mounting the roof


Roof trusses are knocked down from boards with a section of 150x50 mm, reinforced inside with spacers and mounted to the upper trim. The ends should protrude beyond the perimeter of the walls by 10-15 cm. The distance between the trusses is approximately 1.5 m. The roof elements are fastened to the trim using metal plates and bolts. After installing the rafters, a ridge is stuffed along the trusses, and then the roof frame is sheathed with boards. A corrugated board, slate or other roofing material is laid on the crate.
 The roof is covered with ondulin


 How Wrong Windows Installed


| Summer kitchen 7x3 m | Project |
|---|---|
| Kitchen height | Height from floor to ceiling: 2.15 m. (+-5 cm). Skate height: 1.5 m (+-5 cm) |
| Support-columnar blocks (one bedside table measuring 400x400x4000 mm consists of four cement blocks measuring 200x200x400, interconnected by a sand-cement mixture). | |
| Base binding | Unplaned timber with a section of 100x150mm. The harness is laid in 1 row on the edge. |
| Sexual lags | Unplaned timber 40x150 mm. with a laying step of 700 mm. |
| log cabin | Profiled timber with a section of 90x140 mm, natural humidity |
| Log house assembly | The log house is assembled on metal dowels (nails 200 mm). |
| Assembly of log corners | Assembling the corner into a "warm corner" |
| Mezhventsovye warming | A flax-jute cloth is laid between the crowns |
| Partitions | Partition timber 90x140 natural humidity. |
| Floor | Double floor: draft floor: edged board 20 mm; finished floor: grooved floorboard 36 mm. (chamber drying). It is insulated with KNAUF mineral wool 50 mm., ONDUTIS insulation is laid in 2 layers. |
| Ceiling beams | Unplaned timber 40x100 mm. with a laying step of 700 mm. |
| Ceiling | The ceiling is hemmed with clapboard of coniferous species (chamber drying). The ceiling is insulated with 50 mm KNAUF mineral wool, ONDUTIS insulation is laid. |
| truss structure | Bar 40x100 mm. with a laying step of 1000 mm. |
| roof lathing | The crate is made from a 20 mm edged board. (through the board). |
| Terrace | |
| According to the project of the kitchen - gable. | |
| Gables | Sheathed with clapboard of coniferous species (chamber drying). Ventilation grilles are installed in the kitchen gables (prevent the formation of condensate). |
| Celestials and cornices (roof overhangs) | They are sewn up with clapboard of coniferous species (chamber drying). Overhang width: 350 - 450 mm (4 linings). |
| roofing material | Ondulin, color to choose from: red, brown, green. |
| Window | Wooden with double glazing, installed according to the project. The size of window blocks is 1x1.2 m. Casing bars (swarms) are installed in the openings. |
| doors | Paneled. Casing bars (swarms) are installed in the openings. |
| Room decoration | All corners and joints in the kitchen are sealed with plinth; window, doorways are surrounded by a platband. |
| Terrace | Support poles are installed with compensation lifts (jacks) for shrinkage. Terrace finishing: railings - carved, balusters - chiseled. Steps are installed at the entrance. |
Step 6. Arrangement of the kitchen
When the basic processes are completed, you should come to grips with the internal arrangement of the kitchen. The walls can be sheathed with plastic or, since the frame sheathed with plywood does not look very aesthetically pleasing. Then they install a stove, a sink, connect electricity and water, and arrange kitchen furniture. On this, the construction of a closed kitchen can be considered completed.
Prices for drywall and sheet materials
Drywall and sheet materials
Video - Do-it-yourself summer kitchen