Currently, there are many options that allow you to equip the ceiling. Everyone chooses the best option for themselves. But the most common way is the use of foam products. In this regard, a logical question arises: how to glue such tiles on the ceiling. It may seem that the technology is quite simple, but the features of this material create many working nuances.
Pasting the ceiling with foam tiles remains one of the most popular types of finishing work. Indeed, such a coating can be found in almost any house or apartment. In addition, a wide choice of materials allows you to find an option that will be in harmony with the overall interior design.
According to the method of manufacture, the following types are distinguished:

In shape, it is square, rectangular, hexagonal, diamond-shaped. There are also various types of front surface, which can be smooth, embossed, imitating various natural materials.
Pros and cons of foam products
Styrofoam tiles have a lot of advantages. Among them are:

We must not forget that there are some disadvantages:
- Cheap options are not durable. They fade quickly in sunlight.
- Lack of vapor permeability. The microclimate may be disturbed in the room.
- Fear of mechanical damage. Styrofoam material is easy to spoil, even at the installation stage.
On a note! Some types are amenable to additional processing. They can be painted with water-based paints.
 Styrofoam ceiling tiles can be painted in any color
 Calculation of the required number of tiles
Sticking tiles on the ceiling begins with preliminary calculations. This is necessary to purchase the required number of products. It should be borne in mind that pruning often has to be done. To get the most beautiful surface, it is better not to make the fragments very small.
Calculations are made in several ways:
- The room is being sealed. It is necessary to obtain the area of the ceiling, as well as the area of \u200b\u200bthe tile. For example, a room of 9 square meters (3 * 3). The standard size of sheet material is 50 * 50 cm. That is, four such elements will equal one square meter. We get: 9 * 4 = 36 pieces. The necessary stock is added (+ 10%), the total quantity is 40 pcs.
- A scheme is being drawn up. To do this, take a sheet of paper in a box. The plan of the room is transferred to it. Each square will be equal to one tile. By simple calculations - it is possible to find out the right amount.
On a note! You can glue the ceiling tiles diagonally. For the calculation, the plan is drawn with diagonal lines. The number of undercuts is immediately taken into account.
- You can use computer programs, but they can give erroneous calculations.
Adhesive selection
 A special adhesive is required for gluing the foam material.
 It is necessary to glue the material on a special glue. It is designed to work with foam products. But you need to be very careful in choosing this composition. The fact is that there are a great many fakes that make the work extremely inefficient. The original glue is in a special bottle that has a metered cap.
You can also consider purchasing a special mastic. It is sold in banks and is completely ready for use. The application is carried out with a spatula.
On a note! The main indicator that must be taken into account is the time for which gluing will occur. Otherwise, you will have to press the product to the ceiling for a long time.
 Tiles must be firmly pressed to the ceiling
 Necessary tools and fixtures
Sticking ceiling tiles is carried out with a tool that is available for purchase to everyone. You won't have to spend much on it.
The following is being prepared:

Of course, sometimes you have to use additional devices, but this happens extremely rarely.
Preliminary preparation
Starting to finish the ceiling with tiles, a number of necessary manipulations are carried out:

On a note! Gluing ceiling tiles on an uneven ceiling is an extremely reckless decision. The fact is that due to its small thickness and extreme flexibility, all defects will immediately become noticeable. Naturally, small defects can be hidden.
Detail markup:
- The center of the ceiling is located. To do this, diagonal lines are drawn from one corner to another.
- Each wall is divided in half. Straight lines are drawn between parallel walls.
- If the walls have different lengths, then the markup is adjusted.
 Marking the ceiling for gluing tiles
 All work is done with a simple pencil or marker.
Sticking technology
To understand how to properly glue the ceiling tiles, you must first determine the scheme of work. So, you can glue the tiles on the ceiling diagonally or choose a parallel option. Of course, there are other ways, but they all follow similar rules.

On a note! It often happens that there are small sagging along the edges of the tile. They need to be cut off immediately.
The general gluing technology is as follows:
- The scheme of facing the ceiling with ceiling tiles is determined.
- Glue is being prepared. If it is in jars, then it is well stirred.
- The solution must be applied to the back of the product. You can do this with lines or points. It is better to combine these options.
- The glue must be placed at some distance from the edge of the material, otherwise it will protrude and will have to be constantly removed. Getting on the front side - it spoils the whole appearance.
- Standard laying starts from any of the corners that are formed when crossing lines directed from parallel walls, i.e. from the middle of the room (see video below). In this case, the excess tiles are cut equally at the edges, which looks more attractive.
- Each element must be pressed tightly to the surface and held in this form for some time. It is important to minimize efforts, if you overdo it, you can easily damage the product.
- It turns out a pasted square. Next, begin sequential installation.
A well-adhered fragment cannot be removed without damaging it. Therefore, the alignment of the product is carried out immediately.
When it comes to the walls, you will have to do the necessary trimming. To do this, the desired area is measured, the indicators are transferred to the wrong side. Trimming is performed with a construction (clerical) knife.
The ceiling tiles are glued diagonally like this:
- The first fragment is glued in the center. This is done so that the corners of the material are exactly on the lines that are perpendicular.
- Now the tiles are glued exclusively along these lines. It turns out that the elements are in contact only at the corners.
- There should be four filled sections.
- Then you can start pasting the remaining free surface.
- Install skirting boards.
From the foregoing, it becomes clear how to glue the ceiling tiles. The main requirements that must be met in order to obtain a beautiful surface are marking accuracy and utmost accuracy.
Ceiling tiles are a beautiful and inexpensive material. At the same time, it is easy to mount it, and the original result will please the most demanding apartment owner. The benefits don't end there, by the way. Ceiling tiles are good because they do not “steal” the space of the apartment (its width is no more than 1 cm), but at the same time it easily hides ceiling defects and has the property of additional heat and sound insulation.
The advantages are obvious, and with them - everything is clear. It remains only to figure out how to glue it in the apartment.
How to choose a tile
When choosing ceiling tiles, it is important to consider the features of the apartment.
Before heading to the hardware stores, it is important to determine the size and materials of the tile from which it is made and is best suited for a particular city apartment.
As for the material, there are exactly two options:
- expanded polystyrene;
- Styrofoam.
Both of them are very similar in their characteristics and in the method of manufacture. However, the first one is somewhat more expensive, and therefore is less popular than polystyrene.
Depending on the production, products are distinguished:
- injection;
- stamped;
- from extruded polystyrene foam (or from expanded polystyrene).
Of the options presented, the simplest is a stamped plate. Its thickness is from 0.6 to 0.8 cm. On the front side of such a tile, as a rule, there is some kind of pattern or a simple pattern. However, the quality of the material is far from the best, so it must be handled very carefully, and the laying should be carried out as carefully as possible so as not to damage the slabs.
Injection tiles are of higher quality. Its thickness is from 0.9 to 1.4 cm. The use of such a tile allows a certain maneuver during repairs in the apartment, because later it can be painted with water-based paint.
In addition, the material of such tiles is stronger, it can be washed - it is not afraid of moisture and is suitable for bathrooms and kitchens. The injection plate is different:
- a clearer drawing of the pattern;
- strong edges;
- thermal insulation.
Extruded tiles are the thinnest. Its thickness is from 2.5 to 3 mm. At the same time, it is the most resistant and durable product of all available options. Often, such panels are called "laminated" - for the fact that they are smoother and denser than other options. These plates are ideal for bathrooms and toilets. Washing such a ceiling will not be difficult. At the same time, extruded tiles will delight you with other aspects of care. For example, she is not afraid of strong detergents and can absorb excess moisture well.
Rectangular tiles can also be used for flow if space permits.
When choosing a tile, it is important to pay attention to:
- the condition of the material (it should not have cracks or other defects);
- the edges of the tiles (they must be perfectly even so that they can be “seamlessly” joined to each other);
- the inside of the plates (it is important that there are no voids there);
- reliability of the material (it should not break or crumble in the hands).
A special case is the choice of bathroom ceiling tiles. Most likely, saving in this case will not work. You will have to purchase the highest quality material, which will cost more. Pressed products, as well as injection products, are contraindicated for rooms with high humidity. Such a tile can only last for two months, and then it simply disappears, and everything will have to start over.
Separately, it is worth dwelling on the type of seamless tile. Its advantage is that during installation it does not create conspicuous and frustrating seams for apartment owners. This can be achieved by special processing of the edges of the tiles, which makes the seams (in fact, they still exist) completely invisible.
An important point in choosing a tile is to determine the right amount of material. You can understand how many plates are required for one single room, as follows:
- measure the width and length of the room;
- multiply these numbers and get the size of the ceiling area;
- purchase tiles for a given volume - with a "margin" of approximately 20 percent of the area.
An additional “reserve” purchased in advance will come in handy in case of force majeure. For example, it is very common for plates to break down in the course of work.
The standard size of a ceiling tile is 50 by 50 cm. Thus, four tiles combined together will cover a space of 1 meter. However, if desired, you can paste over the ceiling with rectangular plates. They look good in rectangular rooms and even slightly expand their space.
As for the appearance, it all depends on the taste of the person.. However, it is preferable to make a choice in favor of the classic options, which over time will not look “wild” and are unlikely to get bored with the owner of the apartment.
The variety of types of ceiling tiles never ceases to amaze - in stores there is an offer for every taste
Although the scope for choosing types of tiles is wide. She can:
- imitate noble wood;
- be made "marbled";
- create the effect of an iron ceiling.
In addition, tiles can be made in the form of textiles in completely different colors. The most daring option is a tile with drawings.
When choosing a material design, it is important to consider which skirting boards and corners will be installed in the room. With a successful combination, they can complement each other.
Of the tile brands, experts recommend paying attention to products from Germany - from Grelich and Ormit. Decent quality at a reasonable price is provided by the Spanish brand Dune. Of the Russian options, it is worth taking a closer look at such tile manufacturers as Solid, Martin, Format and Unix.
When choosing a tile, you should not worry about the safety of the material. The options presented in stores are equally harmless to the health of apartment residents. All materials are pre-protected from damage by fungi and mold, and should not succumb to rotting processes.
Adhesive selection
The choice of adhesive for ceiling tiles in specialized stores is wide and varied. However, it is worth buying brands that provide the fastest setting and do not require long manipulations.
The result of the work done depends entirely on the choice of glue.
Stop your choice, perhaps, is on two options. The first is Moment - Liquid Nails glue, which sets quickly (3 seconds is enough), which allows you to install the plates very quickly and not spoil them with long presses.
The second option is "Titan". It holds the plates firmly, but has a number of features when used. So, the tile must first be treated with a composition. Next - attach to the ceiling, but immediately remove and hold in your hands for about a minute, then glue it completely.
Another option for fixing plates on the ceiling is a special mastic. Many masters are increasingly making a choice in her favor. After all, it has a number of advantages over other types of glue, primarily greater flexibility. Thanks to this, the fixed tile does not even have to be supported. The only caveat: this method of fixing the plates is only suitable for rooms with a flat ceiling surface. In cases of irregularities, it is not suitable.
During the gluing of tiles, it is important to monitor the occurrence of excess adhesive and remove them in time.
When working in the bathroom, it is important to use an adhesive with high humidity, specially designed for such rooms. In addition, he must:
- have excellent adhesion;
- be environmentally friendly;
- equally reliable to lay down both in thin, and thick layers.
Surface preparation
The ceiling must be ready for pasting work . The reliability and durability of the work depends on how well the master processes the surface.
In addition, preliminary preparation to a large extent also affects how the ceiling will look in the end - whether the plates will lie flat and whether they will bristle.
Pre-training includes:
- complete and final removal of the old finish (whitewash must be washed off with soap and water, paint must be removed with a spatula);
- temporary dismantling of the chandelier (with insulation of the wires remaining after it);
- applying a primer to a dried ceiling - in several layers.
Features of applying a primer should take into account the type of ceiling in the apartment. If it is concrete, then a special composition of concrete contact is perfect for work. A deep penetrating agent will be required when preparing a gypsum ceiling.
Proper preparation of the ceiling affects the quality and reliability of the work performed.
In wet areas, the choice should be in favor of a primer with an antiseptic, which, among other things, will not allow the appearance of microorganisms.
It is also possible to glue tiles directly onto a concrete ceiling, but it is still not recommended to do this. After all, the primer gives a much more stable grip.
The case when the plate is glued directly to the whitewash is rather an exception. To do this, it must be in perfect condition and perfectly stick to the ceiling. Previously, such a ceiling must be primed. However, one cannot count on the durability of the results of gluing tiles in such conditions. This technology is acceptable only in cases where the apartment is undergoing a quick cosmetic repair.
Another moment of surface preparation is the marking, in accordance with which the tiles are to be glued. Moreover, the master can choose one of the two options that suit him the most:
- straight;
- diagonal.
With direct marking, the installation of plates will be carried out strictly parallel to the wall. It is necessary to apply lines from opposite corners of the room to the center. In order to make the result more accurate, you can stretch the cords under the ceiling. The point of their intersection will be the center of the room (as a rule, it coincides with the place where the chandelier is attached). When gluing tiles, you must strictly follow this markup, especially if the geometry of the room is far from ideal.
Diagonal markings will achieve very interesting results. The tile will be attached from the center and along the formed diagonal lines. In order to accurately apply such markings, the master will again have to use cords that allow you to accurately determine the center of the ceiling.
Necessary tools and materials
To carry out the work you will need:
- stable ladder;
- sharp paint knife for cutting material;
- convenient jar for glue;
- brush for applying it to the tile;
- tape measure, ruler and cords for measurements when marking on the ceiling;
- a bucket of soapy water - for washing the ceiling - and a scraper (for removing old wallpaper and paint).
Of the materials - tiles purchased in advance in the right amount, skirting boards along the edges of the walls, as well as a primer (to prepare the ceiling for pasting work).
Sticking ceiling tiles: step by step instructions
Even those who do not have great skills in construction work will be able to cope with the installation of tiles. It is important to prepare the tools and think over the location of the tile on the ceiling in advance - so that it blends harmoniously with the wallpaper, increases the space of the room and beats its pattern as effectively as possible.
Even before starting work, it is necessary to open the packages with tiles, and spread the material on the floor so that it rests at the temperature of the room where the pasting is planned.
In the meantime, the master can start marking the ceiling - using diagonal or straight lines, carefully draw out the entire space with the determination of the places where each of the plates will be glued. After that, you can proceed to the most important thing - the installation of plates.
The space of the room in which the repair is supposed to be done can be beaten with the help of ceiling tiles
An important point: you need to start gluing not from the corners of the room, but from its center. The starting point, as noted above, can be a place near the chandelier.
The process is quite simple: a drop of glue is applied to the middle of the inside of the tile, as well as to its edges. Further, the tile is pressed against the ceiling - in accordance with the drawn lines.
It is not recommended to press hard on the plates - the risk of damaging the material is more than high. When gluing, it is important to press the tiles as tightly as possible to each other, to prevent gaps from appearing, and if glue protrudes somewhere, remove it immediately - before it starts to dry out. Subsequently, removing traces of glue without damaging the new ceiling, alas, will no longer work.
In the course of work, the occurrence of small joints between some of the tiles is inevitable. These places should be sealed with sealant (white acrylic is suitable; for the bathroom, it should be silicone so as not to let moisture through).
The final chord should be the installation of a plinth along the edges of the walls. It is also fixed with glue, but for greater strength in some places it is worth using small nails. This is a temporary measure: the next day, the carnations are taken out, and the remaining places from the holes are sealed with acrylic putty.
After finishing work, the room should be closed and not entered for three to five hours, so that the plates are finally fixed and the glue dries. It is important that there are not only drafts in the room, but even a slight breath of air. This must be done before work begins.
With all the advantages of ceiling tiles, it also has weaknesses. The service life of the material may be short. First of all, this concerns inexpensive options that quickly turn yellow in the sun. In addition, ceiling tiles are highly flammable. And this makes it unsafe in terms of fires. Also, ceiling tiles are not the best option for those apartment owners who are regularly flooded by neighbors from above.
However, these “cons” of the material are by no means a reason to completely abandon its installation. After all, there are many "pluses". It is only important to take into account all the nuances during the repair, and when choosing a tile in a store, do not chase the cheapest options.
Home renovation is a serious test for all residents. One of the steps in this complex process is gluing the ceiling tiles. The use of foam plastic ceiling trim is a budget option. But the range on the market is large, so everyone will choose the right look for themselves in color and design. If you want to keep such a repair for a long time, you need competent actions in the process of gluing.
Training
How to properly install ceiling tiles? This is the main question that interests everyone who decides to carry out repairs on their own. It is better to decorate the ceiling until the walls are lined.
Provided that there will be no other change in the interior, you need to hide everything under polyethylene so as not to spoil it. The use of tiles is acceptable on any surface. In order for the tile to fix securely, it is worth preparing:
- The chandelier is removed.
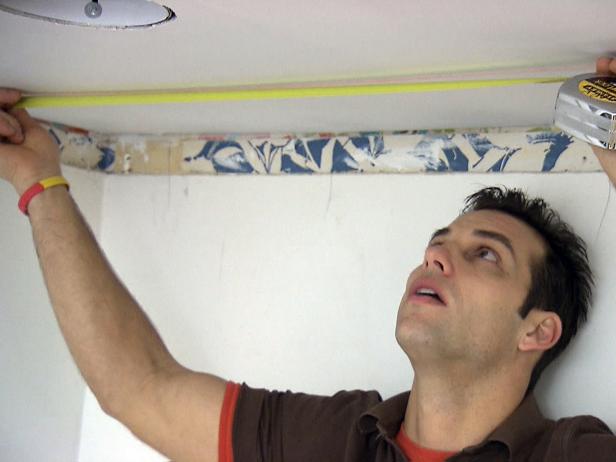
- The old finish is removed and the entire perimeter is checked for the reliability of each element present. You need to carefully check the corners (this is usually the weakest area).
- If large gaps appear after, they need to be covered up.
- After drying, an adhesive-based primer is used.
- The flatness of the ceiling is assessed. If there are differences and convex zones, you need to level them using putty. This is done with large irregularities. In other cases, the tile will hide everything.
How to glue the ceiling tiles diagonally with your own hands? Everyone can do this, and even on simple lime on the ceiling, but provided that there is no shedding. In any case, each surface is pre-primed with an adhesive compound for reliability and durability.
What kind of ceiling tiles can be found in the store?
So, we will have to purchase good ceiling tiles and high-quality glue. How to make a choice? Before you go shopping, everyone should know that tiles can be:
- Pressed. It is not too dense, and it is stamped, so it often comes across defective.
- extruded. Such a tile is covered with a film. Polystyrene is used in the manufacturing process. This version is tight and smooth. Often they create imitations for other materials - wood, marble, etc. A big plus is moisture resistance.
- Injection. Such models have patterns, as they are produced in a special way, the thickness reaches 12 millimeters.
- Seamless. This is the most expensive finishing material in this series. But it looks beautiful, as there are no joints here at all.

Once the right type is selected, you need to understand how to glue. Due attention will have to be paid to quality:
- It is necessary to inspect the packaging with tiles so that the corners are even, otherwise there will be problems when pasting.
- At the edges of the tile should not crumble. It is better to choose one that has small grains in its composition.
- If there is a pattern, it is important that it is clear and symmetrical.
- Most companies produce standard parts 50x50 cm. Based on this size and knowing the area of \u200b\u200bthe ceiling, it is easy to calculate the required amount of material.
It is required to buy material with a margin, but with a small one (10 percent). Each batch of the same tile may have slight differences. And if not enough, it will be difficult to find a similar one.
What glue is suitable?
Not only the speed of finishing, but also the durability depends on what kind of adhesive will be purchased. You need to choose a not too thick consistency. But too liquid will not work either. Such a mass will be convenient when applied where a thick layer is required, and in other places a thin layer. A lot will do:
- Putty.
- Liquid Nails.
- Mounting adhesive "Moment".
You need to make a choice depending on the surface of the ceiling. If it doesn't matter, then a suitable option is liquid nails. When differences are used putty. To hide the joints, you will need ceiling plinths.

How to start?
Before answering the question of how to glue ceiling tiles, you need to make a sketch - create a ceiling diagram, reflect on it the method of applying the finishing material:
- Parallel.
- Diagonally.
- In a checkerboard pattern.

To mark everything, you will need a tape measure and a cord. Do not rely on visibility, otherwise it will turn out ugly. The presence of irregularities will ruin the look. How is each fastening made? It is believed that the methods of how to properly glue ceiling tiles have their own algorithm.
Parallel execution
The beginning is the corner that catches the eye first. The process is carried out in several stages:
- Glue is applied on all sides from the inside of the tile and in the middle. You don’t need too much, otherwise it will come out and make the joints uneven.
- Press the tile and iron evenly around its perimeter so that the adhesive mass is distributed.
- The next one is joined and only after that it is pressed. Everything must be done carefully, without violating symmetry.
- Next, we perform the same actions on the area of \u200b\u200bthe ceiling.
- After the full parts are glued, you need to measure and glue the rest. Cut conveniently with a utility knife. The walls can be uneven, so it is better to make a preliminary measurement.
Diagonal drawing
How to glue ceiling tiles? Different ways have the same beginning. You need to glue from the center of the room. Next - work according to a simple plan:
- Marking and the process of fastening. The first tile is set so that the corners are in the middle of the line.
- The second is placed along the marked marking lines.
- After in order - the rest of the components.
- The necessary elements are cut along the edges.

Upon completion of the work, the plinth is glued and the remaining glue is removed. It has already been noted earlier: seamless tiles are the most convenient in the installation process. After application, nothing else is required. Other options involve a thorough review of the perimeter. If there are gaps between the components of the finishing material, then they are removed when using a sealant. It does not react to water and temperature increase. When filling the existing holes, it is leveled, and the excess is removed.
How to glue the ceiling tiles with your own hands in a checkerboard pattern? To do this, after marking, the parts are attached strictly along the axis. And the extreme row is made from prepared measured segments. To make the surface of the ceiling look beautiful, you need to use the building level. But it's not that easy. Therefore, experts say that it will be easier to initially remove imperfections and defects with a spatula.

Depending on the selected adhesive, the process of applying it to the surface of the tile is also built. On the back of the finishing material there are special protrusions for the adhesive mass. Application is done with dotted lines or a full layer. If the selected product is too liquid, then after spreading on the surface, wait two minutes and proceed to the installation.
With the right approach to the process of fixing tiles, you will get a quality result. Below we give small tips that will help you do everything quickly and well:
- In order for the work with the finishing material to be easy, you need to leave the tile in the room for about a couple of hours. It should be at room temperature. After that, you can proceed with the installation.
- It turns out a beautiful combination if the tiles are assembled from different colors. You can use any convenient method of gluing for this.
- According to the masters, the best adhesive material is liquid nails. They are used with a mounting gun.
- If you decide to paste over the ceiling, this is done immediately. Do not stop, otherwise cracks and notches may form.
- When gaps are smeared in some places, if the sealant gets in, it is immediately removed with a wet cloth. Because after that it will be difficult to do it accurately.
- In order for the tile to be firmly fixed, it is held not with hands, but with a bar.
- To see the distribution of the adhesive on the tile, it is better to take it in color.
- If a foam tile is used, then after it it will not be possible to cover it with water-based paint, as peeling will begin.

Conclusion
So we've looked at different ways. How to glue ceiling tiles is now clear. Everyone can cope with sticking tiles on the ceiling. The main thing is to prepare the necessary things before starting so that the process does not stand still.
Styrofoam ceiling tiles are the most common, affordable way to upgrade a ceiling. Everyone tries to approach this responsibly and individually. Before gluing the ceiling tiles, it is necessary to carry out preparatory work so that a beautiful ceiling covering with an original finish will please the eye for many years. Choosing a finishing option, everyone tries to approach this responsibly and individually. He tries to get acquainted with the varieties of this material, the rules for calculating the required amount, what glue to glue, as well as some of the nuances of combining tiles with the interior of the room.
Types of ceiling tiles
In the construction market, ceiling tiles are represented by the following varieties, which differ in their production methods:
- Pressed ceiling tiles are made by stamping from polystyrene blocks. The thickness of the finished product min - 6 mm, max - 8 mm.
- Extruded blocks are made from polystyrene strip by pressing. They have a shiny smooth surface. The plates can be structured to look like a marble slab, a cut of a tree trunk and other natural materials.
- For the manufacture of injection tiles for the ceiling, a method is used in which the raw material is sintered. As a result, the product has a regular shape with a deep pattern. Its thickness is from 9, but not more than 14 mm.

The choice of ceiling tiles according to physical parameters
In order to properly glue tiles for the ceiling, during the purchase, special attention must be paid to the geometry of the product. If a tile is selected with squares, then all its angles must correspond to the required parameters, that is, equal to 90º. The slightest deviation in the future will lead to the formation of uneven seams. The corners of the ceiling tiles must not be rounded or crumpled.
Another indicator when choosing a ceiling tile is the material from which it is made. When buying polystyrene tiles, you need to make sure that the edges do not crumble, and that all grains are the same size. Better quality is considered to be one in which the grain size is especially small. Styrofoam plates should not break under their own weight, if it is held at any of the corners in weight. The selected ceiling tile should have a clear pattern. No flaws are allowed, any minor inaccuracy or dent will immediately attract attention.
Calculation of the required amount of material and the choice of adhesive
After choosing the type of ceiling tile according to its physical parameters and external design, it is necessary to determine how many tiles will be required for the entire ceiling area. More experienced owners immediately buy 10-15% more, in case of culling due to broken corners or a mistake during trimming. In general, the calculation is not difficult. You need to know the area of \u200b\u200bthe ceiling and the size of each element. Typically, ceiling tiles are produced with side faces of 50-50 cm. If the dimensions of the ceiling are not a multiple of the length of the side of the tile, then gaps will remain along the edges of the ceiling during finishing. Therefore, when calculating this nuance, it is necessary to take into account.

Expert Advice: if you want to save on glue, instead of liquid nails, it is better to use transparent glue with a more liquid "rubber" base. Its consumption is significantly lower. But for a strong fixation, be sure to dry the glue already applied to the tile a little.
Having calculated the required number of tiles, you need to decide which glue to glue. A lot of people use "Titan", "Econaset", "Liquid Nails", "Moment". They adhere well to any surface and dry quickly. After gluing, the tile is firmly held. Only for this it is necessary to press it against the ceiling for a few seconds.
Work order
Many owners of apartments and private houses prefer to stick ceiling tiles with their own hands. Therefore, it is important for them to know that work must begin with marking the center of the finishing area. To do this, from diagonally located corners, it is necessary to stretch two threads. Their intersection is the desired center. If a chandelier hangs in the room, then you can start work from this point. At the same time, the joining angles at the lamp wire are slightly cut off. As a result, they will be closed by the figured glass of the chandelier rod.
Many begin work from one of the walls and lay tiles row by row. This option is the easiest and fastest. But here there is a small nuance. It is better to lay the first row from the wall opposite the window or front door. Then the gaps that are closed by partial fragments will not be so noticeable.
Before proceeding with the sticker, the ebb along the edges of the product must be carefully cut off. In this case, the surface of the ceiling will be perfectly flat, without seams. It is also necessary to strictly observe the symmetry of the pattern at the joints of the tiles. The slightest deviation violates the integrity and beauty of the finish.
There are relatively many options for the location of ceiling tiles relative to the walls of the room. The most common are parallel and diagonal with respect to the edges of the intersection of walls and ceiling. You can choose plain, colored and combined tiles. Of the combined styling options, the following are most often practiced:
- alternating or intersecting diagonals,
- in checkerboard pattern,
- snake,
- along the perimeter of the ceiling or in its center, etc.
At the end of the work, skirting boards are installed around the entire perimeter. They are glued with the same glue as the tile itself.
Options for gluing ceiling tiles to whitewash
We will glue directly on the whitewash, so you should choose one of two methods:
- The first is that a primer is applied over the old whitewash. It is absorbed into the layer of the old coating and seizes with the main surface of the ceiling. Then you need to wait for the primer to dry completely and proceed to the finish.
- The second method involves partial scraping of the falling whitewashed layer with a spatula. Subsequently, a thicker layer of glue is applied to the wrong side of the tile, and it is pressed for several minutes to the place of gluing. The adhesive is absorbed through the thin layer of whitewash remaining on the ceiling and sets to the ceiling.
How to glue ceiling tiles with your own hands: video instruction
Updating the ceiling covering is a laborious and costly business. In addition to tiles, you can arrange tension and suspension structures, mirror panels of various configurations and sizes. Everything here is decided by the financial possibilities and fantasies of the owner.
(No ratings yet)
Good advice, helped especially about whitewashing. When I glued the tiles with my dad, we first tried to scrape off the whitewash, but then we got tired and decided to stick it like that ... for two days they tried to glue it, you glue it, it falls off along with the whitewash ... They tried to apply the primer and then glued it in a couple of hours.
By clicking the "Add comment" button, I agree to the site.


If you need to quickly and inexpensively tidy up the ceiling, pay attention to the tiles made of foam or polystyrene. If you approach the matter correctly, you can get a very decent result. About how to glue the tiles on the ceiling correctly, what to use for this and we will talk further.
Kinds
If you look closely, for all its similarity, the tiles on the ceiling have significant differences. It's not about the pattern and shape, but about the appearance - density, surface smoothness and other "little things" on which the appearance and service lines of this type of finish depend. This is explained by the use of different materials and technologies:

The easiest way to glue and care for extruded polystyrene tiles. The second in quality is injection, and the most “capricious” in maintenance and installation is stamped. Now you can choose the type of tile yourself, but there is still an appearance.
Ceiling tiles are most often produced in the form of squares with a side of 5o cm. There are non-standard options - rectangular. According to the type of surface, there are tiles with a piping that forms a clear seam at the junction, there are seamless options. The edges of seamless slabs can be straight or curved.

Design types - with piping, seamless
The principle of gluing does not change depending on the type of edge, only the appearance of the product changes. There are a lot of design options for this type of finishing materials. There are geometric, floral, without a pattern, or with a variety of relief. In general, there are a lot of options.
Calculation of quantity and features of choice
Before gluing tiles to the ceiling, you need to calculate its quantity. It's not hard. Most often, it is produced with a side of 50 cm. This means that there are 4 tiles per 1 square meter. If you know the area of the room, you can easily determine the required number of tiles: multiply the area by 4. For example, the room has dimensions of 3.2 m * 2.8 m. The total area is 8.96 m2. Rounding up, we get 9 m2. To calculate the number of tiles, multiply by 4: 4 pcs * 9 m2 = 36 pcs. It will take some more trimming, part may be broken. Therefore, we increase the total number by several pieces. How much specifically - you need to look at the layout, but usually 10-20% of the stock is enough.

To make foam board ceilings look beautiful, when choosing a material, pay attention not only to the appearance and type. Carefully evaluate the geometry: all tiles should be the same size, the same thickness, the corners should be exactly 90 °. The quality of the drawing should be stable, clear, there should be no sags or inhomogeneities on the side faces. If you choose pressed boards, pay attention to the size of the "grain". The smaller it is, the better.
What to glue
Most often, ceiling tiles are glued to glue such as "Titan", "Naset", "Moment" or liquid nails. All of them are not bad, but with their use it is necessary to hold the tile for a while. You have to hold from 3-5 seconds to several tens, and this is not very convenient. The Moment “grabs” the fastest of all, but it is not ideal either: you have to withstand the applied glue in the air for some time.

In addition to these compositions, there are mastics for ceiling tiles. They are sold in small buckets, they are a paste. It is easier to work with this type of adhesive compositions, as they are more “sticky”. The tile smeared with this composition sticks to the ceiling, it does not need to be kept for as long as it is lubricated with ordinary glue.

All of the above options are for flat or nearly flat ceilings. Where there are differences (joints of plates), this method is not suitable. If the ceiling is uneven, you can glue the tiles on gypsum putty) or Perlfix type glue. Starting or finishing composition - depends on the required layer, the finish is suitable if the height difference is no more than 5 mm, with a larger layer, take the starting one, but it is better to pre-level such a ceiling or use another system (for example, it is also an inexpensive and quick way put in order frankly crooked ceiling).

Both of these materials allow you to simultaneously level the ceiling and glue the ceiling tiles. Only the method of gluing changes, and dramatically (more on this below).
Foundation preparation
Before gluing tiles to the ceiling, the surface must be prepared. To begin with, we remove everything that can fall off. If there is a significant layer of whitewash on the ceiling, it is better to remove it - the ceiling tile, although it weighs little, can eventually fall along with the whitewash. Therefore, we clean it with a spatula in a dry form or wash it off with water. If large “craters” have formed during the stripping process, it is better to repair them. It is easier to use the starting putty or the remains of any plaster composition for this.

If the base is loose, loose, you can not do without a primer. For concrete, it is better to choose "betonokontakt", for a gypsum base - any composition of deep penetration. After drying, you can start gluing polystyrene or foam tiles to the ceiling.
Placement and layout methods
Squares on the ceiling made of foam or polystyrene are placed with edges along the walls or diagonally. When gluing diagonally, the consumption of material is greater - more trimmings and not all of them can be used, but visually it looks better - it is more difficult to notice the seams.

Gluing most often starts from the chandelier. In this case, it is easier to "fit" it, since the edges of the plates can be cut a little, and the resulting gap will then close the cartridge from the chandelier. But not all rooms have a chandelier - often there are several lamps and they can be located on the walls. Then they start gluing from one of the walls, most often from the opposite entrance. With this approach, most likely the extreme row will be cut off, and near the entrance it will not be so noticeable.
If you need to glue tiles on the ceiling from the chandelier, markup is required. In a square room, everything is simple - we find the center, we start from it. To do this, we take a paint cord, one end to one corner, the other to the opposite, pulling the cord and releasing, we get a line on the ceiling. We repeat the operation with another pair of corners. The center was found, it is easy to glue tiles from it. For diagonal gluing, there are already guides, and for parallel gluing, you will have to make two more strips - through the center to opposite walls (in the figure above).
But this is a very rare case. More often the rooms are rectangular, and the chandelier is not located in the middle of the ceiling. Therefore, more complex markup will have to be done.

To begin with, we also find the center of the room (painting cord diagonally). If it coincides with the place where the chandelier is attached, great, we “dance” from it. If not, we shift the starting point to the chandelier. Further markup is the same. We measure the distance from the starting point of installation to the nearest wall. Using this value, draw the squares as shown in the picture above (use the masking line). After drawing the diagonals, we get guides for laying flow tiles. On them we level the edge of the first row. The more precisely we set this row, the easier it will be to glue the tiles on the ceiling further.
How to glue tiles on the ceiling: two technologies
Styrofoam or polystyrene tiles on the ceiling are attractive because they allow you to quickly and cost-effectively put in order a far from ideal ceiling. If the ceiling is relatively even, the tiles are glued to a special glue. It is applied in a thin layer, but provides a secure fixation.
With uneven ceilings, this method will not work: the tile simply will not stick with large differences or the view will be deplorable. leveling is not always the time, desire or opportunity. Moreover, often this finishing option is considered as temporary, then planning to make or. Therefore, it makes no sense to waste time and money. In this case, another technology is used - on the adhesive composition for drywall or putty. They work no worse than glue, at the same time leveling the base.

Before starting work, unpack all the material, make sure that it is the same color, size. If there are bumps, sagging, they are cut off with a blade or a sharp knife. Now you can proceed to the installation of ceiling tiles on the ceiling.
How to stick on a flat ceiling
If the ceiling is even, ordinary glue for polystyrene or foam tiles is used, the technology is as follows:

As you can see, everything is very simple and these are all the rules for how to glue tiles on the ceiling. Only one caveat: you need to press one square to another tightly. If you have already glued it, but there is a gap, you can move it by pressing a wooden plank to the free edge. When you try to do it with your hands, you can break the foam or polystyrene, and it’s easier to achieve what you want with a flat bar.
If the ceiling is uneven
If the ceiling has significant irregularities, gluing tiles to ordinary glue will not work. To remove significant differences, use drywall glue or putty. The mixture is diluted to a pasty state, applied to the ceiling, grooves are formed using a notched trowel. The amount of glue depends on the overall curvature, but it is advisable to start with a minimum layer. The area on which glue is applied at a time is approximately 4 fragments. During this time, the composition will not have time to grab, and it is not difficult to align such a fragment.

A tile is laid on a layer of glue. It sticks well, moves without problems. Aligning the edges of the stacked fragments, take the rule or the building level (preferably one and a half meters) and set the tiles in the same plane. Just press the fragments harder in the right place.
Then the composition is again applied to the ceiling, and, again, about 4 tiles. All of them are set in the same plane, or at least so that there are no sharp drops. Only in this case it is necessary to ensure that the necessary layer of glue does not grow too quickly - it is better not to apply more than 3-5 mm, otherwise everything will fall.
Cleaning and Sealing
You know how to glue tiles on the ceiling, but there are some nuances left, without knowing which a worthy result is unattainable. When working on the front side of the tile, the adhesive composition often gets. It must be removed immediately and completely. You can use a sponge or a soft non-shedding cloth. Wipe the surface immediately after putting the fragment in place. After a few minutes, this will no longer be possible and traces will remain. Therefore, while working, keep a bucket of water and a sponge / rag at hand.

If there are small voids between the plates, you can fill them with the same mastic or putty (if it is white), just remove the excess immediately. Another option is white acrylic sealant. It perfectly masks all the cracks, adheres well to polystyrene foam and polystyrene. Thin cracks can be filled with a rubber spatula, and the excess can also be wiped immediately with a damp cloth.