We continue to equip the summer cottage. Today we’ll talk about how and with what to fill the dining area or recreation area. It is difficult to imagine a cozy gazebo or a shady canopy without a table and comfortable benches or chairs.
Today, garden furniture manufacturers offer a huge variety of tables: large and small, wooden, forged, wicker or plastic.
Of course, you can buy a finished product, but many people prefer to make garden furniture with their own hands.
About how and from what material to make a table, how to decorate the countertop will be discussed in this article.
Wooden outdoor table
Undoubtedly, the most malleable and environmentally friendly material is wood. A wooden table can be made round, square, rectangular or irregular in shape, it all depends on the size of the gazebo or the number of seats. As a tabletop leg, you can use a regular stump.

The shape and appearance of the table largely depend on the style of your country house and exterior. A log house can be supplemented with furniture made from logs and boards. The main tool for processing parts is a grinder, since the surfaces of the tabletop and benches must be smooth, without nicks.


The tabletop can be made from slats or a narrow board, strung on metal rods, or by connecting them with short slats.

A table made of wooden saw cuts looks interesting, especially if there is one on the site.


There are several ways to make such a table:
- connect the saw cuts to each other with brackets or tongue and groove, forming a flat surface;
- fix the cuts on some kind of base (in this case, the parts must be of the same thickness to form a flat surface). The product must be sanded and varnished. If desired, the gaps between the cuts are filled with epoxy resin, after which the surface has dried, the surface is polished again and coated with a protective compound.
A garden table made of wood with benches, made of a single design, looks great both in the gazebo and in the open area.


It's easy to make. Use the diagram below to make your own drawing and calculate materials.

When drawing up a drawing, consider some generally accepted standards:
- bench seat height from ground level - 400-500 mm;
- seat width - 300-400 mm;
- tabletop height from floor level - 700-750 mm;
- tabletop width - 580-900 mm.
The length of the table and benches is individual. The figure shows an example of the manufacture of a table with benches located on two long sides of the tabletop. Similarly, you can make a design with benches on four sides.
And here is a variant of a small round table with stationary benches-stools for four seats. It is easy to move it to the place you need at the moment: to an open area, under a canopy or in a house.

If you wish, you can purchase or make your own folding garden furniture, which can be easily installed in any part of the garden or in the house.

Such furniture will last longer, as it will not be constantly exposed to precipitation. The weight of such products is small, they can be easily and quickly transferred to a permanent storage place in a house or barn, where they do not take up much space.
In order for the product to serve for a long time, all wooden elements must be treated with an antiseptic and coated with varnish, wax or paint. To give the wood the desired shade, use a stain or a special impregnation with pigment.


Garden table from improvised material
Earlier we already talked about furniture made. A stylish table made of pallets is cheap and organically looks on the backyard. The design, complemented by furniture wheels, is also mobile.

Ordinary stumps, decorated with mosaics, look very original and can serve as a small table or stools in the recreation area. For mosaic decor, various tiles left over from repairs, chopped into small fragments and laid on tile adhesive or cement mortar, are suitable.

The originality of this composition lies in the creative approach of the owners. The most ordinary stumps turn into a work of art.

An old table that has fallen into disrepair can also be decorated with mosaics and thereby update the tabletop. Old paint must be removed from the legs, sanded and repainted. Such a garden table will serve the owners for a long time and will gather the family around it for lunch and tea drinking.

A wooden reel for winding a cable can also serve as a table, it is enough to process it and decorate it a little or simply paint it in the desired color. The table will be easy to move if you attach wheels to the bottom.


Many have things that they inherited, as they say: it’s a pity to throw it away, and there is nowhere to put it. Try to be smart and use them when arranging a summer cottage. As table legs, you can use the base of an old sewing machine, metal headboards and much more. By the way, you can simply buy a countertop and install it on top of a metal structure.

Those who have weaving skills can make garden furniture from vines with their own hands. If you are not capable of such feats, but love wickerwork very much, then you should go to the store. Manufacturers offer tables and chairs made of wicker, rattan or artificial fibers for every taste and budget.

Metal garden furniture
If you are “friends” with metal, have a welding machine, then you can make garden furniture from this material. Such furniture, as a rule, is openwork and original. In order for the product to serve for a long time, the metal must be protected from corrosion before it is used. One of the simplest ways to protect metal surfaces is a primer, which is applied to the product before finishing painting.

Forged furniture for summer cottages is an excellent solution for respectable homeowners. Only blacksmith forging masters with the appropriate equipment and the presence of a forge can make one.

Forged products are perfectly combined with many materials: wood, glass, marble. If desired, you can purchase a forged blank for the table, and fill it yourself.
Stone table
Recently, small architectural forms made of stone are gaining popularity. Including on sale you can find tables and benches made of marble or granite. Such products have a high cost.

But this is not the only solution. You can independently make a stone base for a table and benches, for example, from rubble, flagstone, brick or blocks, fitting them into the overall look of the garden, combining them with other stone buildings.
As you can see, there are quite a few options for arranging a recreation area on a personal plot: from cheap, practically worthless, to expensive ones. A table made with love will surely gather wonderful people around it, and joint gatherings will bring pleasant moments.
It is such a building on a personal plot or in a garden where you can relax with the whole family and invite friends.
But the arrangement is not only in giving an aesthetic appearance to the building itself.
It is important to organize the interior space.
The role of the gazebo in the design of the cottage
The gazebo has a special role in the design of the cottage. In addition to its functional purpose, it should be in harmony not only with the surrounding buildings, but also with the landscape of the site.
It is good if all the facades of buildings on the plot, including the gazebo, are finished with one material. Gazebos look interesting, the roof of which is an exact copy of the roof of the house.
But even such a room is unthinkable without internal content, the main element of which is the table.
A good table can be made with your own hands
You do not have to buy a ready-made table for the gazebo, because you can make it yourself.
This option is preferred. As a result, you will receive such a piece of furniture that you not only need, but also ideally fits in size and shape.
This does not require extensive experience in construction work and special tools. Simple skills and a small set of tools are enough.
Wood is the best choice for making a table. Its main advantage is a long service life, external attractiveness and naturalness.
Such a table will become a worthy element of the overall design of the cottage.
Creating a project and drawing
At this stage, it is necessary to create a detailed drawing of the future table.
Self-tapping screws and fasteners made of stainless steel can be used as fasteners. Be sure to use impregnation for wood, which will protect the table from rotting and fungus.
Development of a 3d drawing of a garden table in AutoCad.
Instruction step by step
You can make a garden table with your own hands by following this master class.
It is necessary to prepare all tools and materials for work in advance. At the preparatory stage, the wooden surface is treated and the boards are selected by thickness.
Then four boards measuring 15x70 cm are laid in a row and connected with thin wooden planks. And the end parts are closed on both sides with boards measuring 15x60 cm, which are fixed with special metal plates.
Thus, a smooth wooden surface is obtained.

Rectangular top rail box
To prepare the top trim, make a box. To do this, you can use boards measuring 10x91 and 10x46 cm. First you need to make a rectangular base from long boards.
After that, stiffeners are installed on its surface, fixing them with self-tapping screws. It is important to install them at an equal distance.
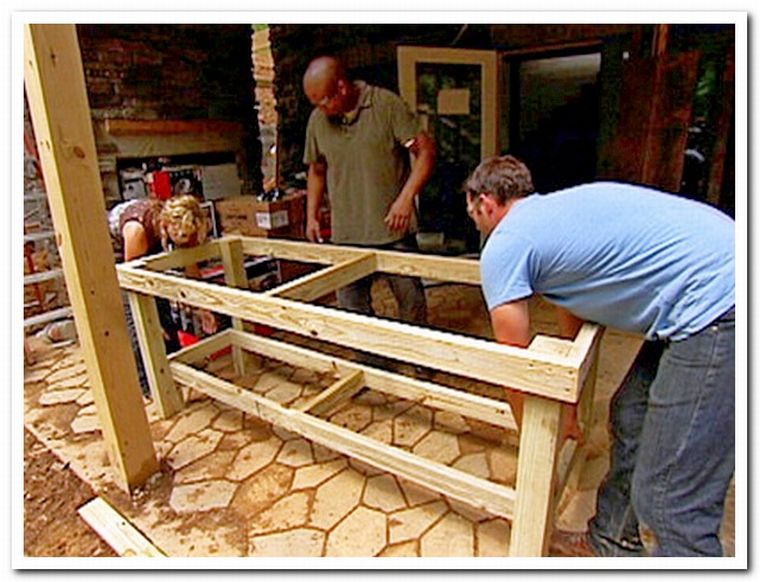
Carrier box
Preparing the bottom frame
It consists of 2 parts, made in the form of the letter "P". They are fastened together with a long wooden plank. U-shaped elements are represented by two legs connected to each other by a bar.
Each support leg is made of four bars 4x4 cm in size. After the manufacture of both parts, they are fastened together with a bar, the length of which is 10x99 cm.

To make it more comfortable, turn the table top over and lay it on the ground. Do the same with the frame.
As fasteners, metal corners and self-tapping screws are suitable, which provide a reliable connection of structural elements.

Connecting the tabletop to the frame
We process surfaces
All wooden surfaces must be carefully treated with a special protective compound.
It will provide reliable protection against moisture and insects.

Impregnation with varnish
Wooden table
Wood is the most environmentally friendly and pliable material.
Wooden garden table can be round, square or rectangular. Irregular models are also popular.
If you plan to make it yourself, the countertop may consist of narrow boards or slats.
A table made of wooden cuts also looks good, which can be done in several ways:
- connect saw cuts with each other with tongue and groove or staples, forming a flat surface;
- fix saw cuts on any basis.
The finished surface is sanded and varnished. The gaps between the boards can be covered with epoxy.
Sand the finished product and cover it with a protective compound.
To give the surface the desired shade, you can use stain or a special impregnation with pigment. Such a piece of furniture can be placed not only in the gazebo, but also in an open space in the garden.
For more information on how to make a table for a wooden gazebo, see the video:
As a basis - pallets
Designers actively use wooden pallets to create furniture. This technique allows you to create an original stylistic solution.
Existing ideas can be used to implement the following solutions:
- stand models;
- on wheels;
- with lid;
- with glass top.
It is not necessary to buy a ready-made table. You can also make your own using pallets.

Such tables themselves are not difficult to manufacture. To do this, you first need to find or buy a pallet. It can be found in one of the large hardware stores. Then you need to saw off a part that is suitable in size and screw the wheels to it.
On top you can put a panel of MDF or glass. They can also be bought at one of the hardware stores. The finished table must be treated with impregnation.
If you want to change its color, use a suitable shade of stain. This completes the manufacture of a table from a pallet.
Such a piece of furniture will organically look not only in the gazebo, but also in the open air on the plot. And the design, supplemented by wheels, is mobile and inexpensive.
From improvised materials
Many designers use any available materials to make a table. Such a piece of furniture allows not only to decorate the interior of a house or apartment, but will also look organically on a personal plot, in a gazebo or garden.

Ordinary stumps decorated with mosaics look original. Larger stumps can be used in a quality original table. And smaller stumps are suitable for use as unusual stools.
Any tile left after repair is suitable for decoration. It is split into small pieces, which are attached to the surface with cement mortar or tile adhesive.
Originality lies in your creativity. Such designs often turn into a real work of art.

Table top in mosaic
An old table that has fallen into disrepair can also be decorated with mosaics. This will update the countertop. To do this, first remove the old paint from the legs, sand them and cover with one or two layers of new paint.
Then the tabletop is sanded and the mosaic is glued to it. From above, you can apply a grout that will protect the surface from the adverse effects of the external environment.
A wooden bobbin for winding the cable can also be used as a table. To do this, it is enough to process it and paint it in a suitable shade. But it can be further decorated.
The resulting piece of furniture will become more convenient if you attach wheels to its lower part. In this case, you can easily move it around the site.
Also, many have tables inherited. Usually they are not used, as they require serious improvement. With the right approach, they can be used as garden furniture or put in a gazebo.
If you inherited a wrought iron table, you can simply restore or replace the old tabletop.

Wrought iron gazebo furniture
For those who have weaving skills and sufficient perseverance, garden wicker furniture made of wicker is suitable. Such furniture can be made independently.
But if you like wickerwork, but don't want to make it, go to a large store. Here you can buy tables made of wicker or rattan, as well as artificial fibers.
If there is a lot of metal left on your site, and you know how to work with a welding machine, you can make a beautiful table for a garden or gazebo.
If you have the right skills, you will get an openwork and original product that will be one of a kind.
But before starting its operation, do not forget to treat all metal surfaces with an anti-corrosion agent.
If you plan to paint the table, you can coat its surfaces with a special primer and apply a final coat of paint. As a countertop, materials such as wood or glass are most successful.
You can use a more interesting approach. Decorate a simple countertop with mosaics or pebbles of the same height. Then cover the surface with glass according to the size of the resulting tabletop.

Whatever table you choose for the gazebo or your garden, the main thing is that it is in harmony with the surrounding landscape and the interior of the gazebo. And a thing made with your own hands will please you for a long time with its uniqueness and originality.
For each dacha causes soy associations. For example, for some it is work, for others it is outdoor recreation. In any case, in the fresh air after working in the garden, any food will taste better. And for whatever you have to eat, as they say, on your knee, you can equip a special place, the center of which will, of course, be a table. And such a piece of furniture, made by hand, will not only express the care and skill of the master, but will also serve as his pride.
How to make a table for a summer house with your own hands - instructions
To make a table in the country, you do not need special skills or tools, because its main function is to stand. Therefore, even a beginner will be able to make such furniture. When choosing a material for a country table, it is worth considering the nature of the operation: the furniture will be outdoors in any weather, so it is important to choose a durable material.
How to make a wooden table for a summer residence
For the table, it is necessary to carefully choose wood, because each type of wood is good in the area in which it is used. For example, to use conifers, you will have to impregnate them with a special solution, protect them from fire, but even all these actions will not help get rid of resin stains on the tablecloth. But hardwoods, on the contrary, are great for these purposes.
Wooden table
The tabletop should consist of boards, at least three to five centimeters wide. For greater stability, they need to be nailed to the frame. The legs are usually made straight or crossed. To avoid the danger of getting a splinter during lunch, you need to carefully treat all surfaces. In addition, the finished table must be protected with special compounds. You can cover the table with varnish, for greater strength. As a rule, the varnish is applied in three layers, heating it before that in a water bath.
Logs can also be used to make a wooden table, they are also perfect for creating benches. You can also use narrow slats in combination with a metal frame.
In fact, the manufacture of a table made of wood comes down to two technologies: saw cuts are interconnected and form a dining plane; saw cuts are fixed on a solid base.
How to make a stone table for a summer residence
The stone table impresses with its inaccessibility and strength. It will definitely withstand all the tests of nature and will lay down the family and the dacha for many years.
You can reduce the cost of construction by laying out the base yourself and buying only the countertop. For the bases, you can use rubble, flagstone, cobblestone, brick. These materials fit perfectly into the interior of the garden and the dining group will look very original.
How to make a metal table for a summer residence
If the house has a welding machine and a person who knows how to operate it, you can make metal furniture. Such lunch groups are original and interesting. To extend the life of such furniture, the metal must be protected from rust and exposure to aggressive environments. The easiest way to do this is using a special primer, which serves as the basis for the paint.
Table for giving from another material
For an inventive person with imagination, there are no boundaries. For country furniture, you can use any material at hand, from old tires to wooden pallets.
Original table ideas for a summer residence
from pallets
The loft style, which has been gaining popularity lately, encourages the use of atypical materials for the interior. For example, pallets. It is comfortable, environmentally friendly, and most importantly, cheap material is used to build benches, tables, sofas, even beds. For furniture, it is better to take new pallets, you can choose the size, there are euros or Russian ones. In addition, the size of the pallets can be adjusted independently. To equip the table, you will need from one to three pallets, depending on the design. You can put glass or plywood on the lid. Before use, you need to carefully check the pallet for the presence of unnecessary nails, then sand it. When the product is ready, it needs to be painted or varnished.
 Pallet outdoor table and benches
  Outdoor table and cable reels
  Outdoor table and chairs from old tires


Table - furniture without which you can not do either in the city or in the country. The table can be placed on the veranda, in the gazebo or just in a shady place. Behind him you can dine, arrange feasts or play board games in the fresh air. Inexpensive, you can only buy a plastic, not large table, a large wooden table for a summer residence is cheaper to make with your own hands. The article will present three options for tables and drawings for their manufacture.
Table dimensions and construction features
The optimal size of the tabletop for a summer house is 80x120 cm. A smaller table will be significantly inferior in functionality, a large table will be too bulky and it will be difficult to clean it for the winter. The size of the table 80x120 cm will allow you to hold solemn feasts with the number of participants 8 - 10 people.
A table for a summer residence is easiest to make from boards. In addition, it is the most accessible and inexpensive material. The advantage of making a wooden table is that the boards can be sawn to the desired size at any construction base, and brought to the dacha without any problems, thereby saving on transportation. It should be noted that with a table dimensions of 75x80x120 cm, the longest board will be a table top board 120 cm long. A board of this length will fit into almost any car.
There are a lot of varieties of table designs, but by and large the difference is only in the form of legs on which the table top rests. Therefore, the legs of the table are the most complex element of the entire structure.
Table top
The tabletop at the table in the country is made of boards. The thickness of the boards can be from 30 to 50 mm. However, the best option is a board with a thickness of 40 mm.
An important point is cutting boards. With a worktop length of 120 cm, you need 5.3 boards 150 mm wide, 6.6 boards 120 mm wide and 8 boards 100 mm wide. Considering that the boards are sold with a length of just over 6 m, it is advisable to choose a board with a width of 100 mm for the countertop.
By choosing a board with a width of 100 mm, you will not have to adjust or resize the table top, which will greatly simplify the work on setting up the table. In addition, there will be 2 more boards 120 mm long, which can be used for other parts.
If you can’t get the right board, you can make the countertop not solid, but at intervals. Such a countertop will look no less interesting. At the same time, water that can accumulate on a table with a solid top will drain through the gaps between the boards.
Table with straight legs
A table with straight legs is the simplest design of a table for a summer residence. This is a stable, comfortable table that will serve well both indoors and outdoors.

Fig.1.
The legs for the table consist of 4 elements, 2 vertical posts and 2 horizontal ones. The upper horizontal rack is attached to the tabletop, the lower one is a support.

Fig.2.
Leg design may vary. For example, instead of resting on the bottom board, you can make the support on vertical posts, and the bottom board can be made as an additional one for strength.
Please note that in this design the boards are connected without additional grooves. This greatly simplifies the assembly of the table. In order for all elements to be well fixed, it is necessary to glue all joints with wood glue. In this case, the boards can be connected with self-tapping screws.

Fig.3.
- Collect legs. To do this, you need to saw according to the drawing of the board. Treat the joints with glue and tighten with self-tapping screws or a confirmant.
- On a flat area, lay out the boards for the table top, mark the position of the legs and fix the boards of the table top through the top bar of the legs.
- Install a horizontal tie between the legs.
- Wait 2 - 3 hours until the glue dries and clean the table from burrs and sharp edges.
- Next, the table can be varnished. Or just treat with an antiseptic.
Table with X shaped legs
A table with X-shaped legs is essentially not much different from a table with straight legs, it just has a different shape of the legs. However, it is impossible to manufacture without creating additional grooves on the legs. This makes the job a little more difficult.

Fig.4.
Table legs consist of 3 elements. Two crossed supports and a vertical top bar. The top bar, as in the previous case, is necessary for fixing the table top.

Fig.5.
To connect the legs in inclined supports, it is necessary to make a slot in the floor of the board.

Fig.6.
The assembly order of the table is as follows:
- Cut the boards to the required length.
- In the legs make a groove in the floor of the board. The groove can be made with a jigsaw or a milling cutter.
- Collect legs. The connections are glued. Parts are fastened with self-tapping screws.
- The tabletop boards are laid out and the assembled legs are attached to them.
- Install the bottom screed board.
- Treat the table from burrs and varnish.
Table with benches
A table with benches is quite often installed on verandas or in the open air. Unlike the designs described above, it does not require additional benches or chairs, the benches are included in the design of the table.

Fig.7.
The disadvantage of this version of the table for the country house is that the design turns out to be rather cumbersome, and it becomes very problematic to remove it for the winter.

Fig.8.
The design feature of the table is that the benches are fixed directly on the legs of the table. The crossbars on which the benches are attached are at the same time a coupler of the legs, and the benches play the role of a longitudinal coupler.

Fig.9.
The assembly order of the table with benches is as follows:
- Cut boards to desired length.
- Assemble the legs and support for the flooring of the bench. The joints are glued and tightened with self-tapping screws.
- Mark the boards for the countertop and mount them to the legs.
- Fix benches.
- Treated with impregnation or antiseptic.
Examples of tables for giving

Fig.10.

Fig.11.

Fig.12.

Fig.13.

Fig.14.

Fig.15.

Fig.16.

Fig.17.
One of the best ways to make your backyard truly cozy is to make your own garden table. There are several types of country tables, but the designs made of natural wood are the most popular. They are distinguished by aesthetics, environmental friendliness and reliability. Products made of combined materials (wood and metal) are also in demand. You can assemble an outdoor table yourself. To do this, you will need boards, carpentry tools and drawings.
The choice of materials for the outdoor table
To make a garden table with your own hands, you need to choose the right materials. Particular attention should be paid to wood:
- Coniferous species (spruce, pine) are characterized by flexibility and ease of processing, but are characterized by increased flammability.
- Hardwoods (aspen, birch, oak, larch, ash) are more difficult to process, but strong enough, durable and attractive.
For a country table, it is recommended to take a board with a thickness of at least 3 cm, as it can withstand serious loads. The optimal length of the table is 150-200 cm, this must be taken into account when choosing boards or a furniture board for the table top. For the manufacture of legs from a bar, it is necessary to choose boards with a section of at least 5x5 cm. The optimal table height is 75 cm.
Convenient picnic table
You can make a table for giving with your own hands using the simplest drawings. However, such a product will be bulky, it will be quite difficult to move it. But the folding structure can not only be easily rearranged from place to place, but also taken with you on a picnic. At the same time, even a novice master can make an outdoor table of this type according to ready-made drawings.
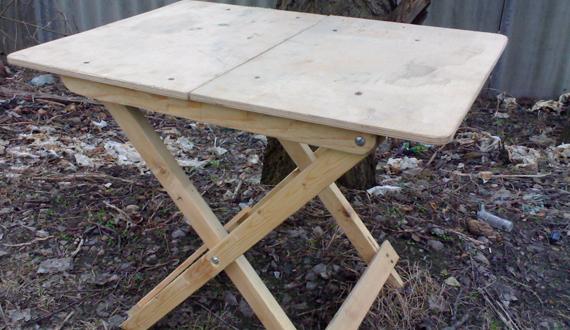
Such a table is not only compact and attractive in appearance, but also durable (the product can withstand weight up to 100 kg). At the first stage of work, it is necessary to cut out the structural elements in accordance with the drawing. The dimensions of the folding product can be changed, the main thing is to maintain proportions.

The edges of the legs and footboards need to be rounded off. If you are just learning the craft of a furniture maker, then it is better to cut the corners of the elements at a right angle, and then smooth them out with a grinder. This is easier than rounding the edges with a jigsaw.
To connect the structural parts in accordance with the drawings, you need to use bolts of any diameter (preferably 6 mm), 35 mm long and with a screwdriver thread. If the bolts are longer than 35 mm, they will create obstacles in the operation of the future mechanism. When all the elements are prepared, you can pre-assemble the folding table. The legs should be connected to each other in the central part, and then screwed to the supports as shown in the drawing: the left leg - to the front support, the right one - to the back.

If everything is done correctly, then you can attach the supports to the tabletop using self-tapping screws 50 mm long. But first you need to make markings on the countertop and drill holes for the screws. Then you should check the performance of the structure, it should easily fold and unfold. When folded, the folding summer table looks like this:
If you are convinced that everything was done without errors, then the structure can be disassembled by signing each part so as not to get confused when reassembling. After that, all elements must be carefully sanded, coated twice with an antiseptic, and then varnished. This is necessary in order to protect the folding table from environmental influences when used outdoors. When everything is done, the structure must be assembled. Now she is ready to use!
Porridge from an ax ... or rather, a table from a stump
Another great idea for a garden is a stump table, you don't even need a blueprint to make it. But you will need to find a stump of a suitable size. You can look for a stump in your own backyard, with neighbors or in the nearest forest. For the manufacture of countertops, you can take boards or a furniture board with a thickness of 20 mm or more.

The stump for the future table should be dried, with whole, not rotten and not damp wood. You can dry a fresh stump in the open air or in a warm, dry room. Drying time - at least 2 months. Determining whether the stump has dried is quite simple: if the bark easily separates from the wood, then the stump is ready to go.
For assembly, you will also need a building level, tape measure, wood varnish, sandpaper, grinder, chisel, hammer, nails, screwdriver, self-tapping screws.
Stages of work on assembling a table from a stump
First, the dried workpiece must be cleaned of bark with a chisel or chisel. This must be done carefully so as not to damage the wood and not provoke the appearance of cracks. All soft and rotten areas are removed. The recesses and cracks in the trunk are cleaned of dirt with a chisel, and then processed from the inside with double-folded sandpaper (grained layers out).

Then the stump needs to be leveled from the bottom side so that its bottom becomes even. The protruding parts are removed with a planer. This is necessary so that the table can be installed on a horizontal surface. By means of a planer, other shortcomings of the hemp are also removed, in particular, large rhizomes.
After that, all cuts are carefully polished. It is necessary to process the rest of the surface of the workpiece with a grinding machine. Hard-to-reach areas are sanded with coarse sandpaper. When the treatment is completed, the stump is covered with an antiseptic, and then with varnish. To make the table move easily from place to place, you can attach metal or wooden legs, wheels or rubberized coasters to the bottom of the stump.
Then you need to make a countertop. To do this, the boards are fastened to each other with glue, screws or planks nailed from the underside. If you want to make the countertop round or oval, then the corresponding drawing should be applied to the fastened boards, and then the product should be cut out.

To attach the countertop to the stump, you need to make a frame. To do this, two parallel strips are stuffed on the sidewalls of the hemp, and two more rows of holders on top. The result is 6 planks connected to each other with nails. The tabletop is attached to them with screws or nails.
Then the finished structure is once again processed by a grinder and covered with two layers of varnish. To prevent the varnish from peeling off, it is recommended to process the intermediate layers after complete drying with fine-grained sandpaper. The table is ready!