
- 1 Benefits of using corrugated board
- 2 Mounting considerations
- 3 Installation in the area of the valley, ridge and pipes
- 4 Fasteners and seals
- 5 Videos
- 6 photos
Decking is a universal material made on the basis of galvanized metal sheet, widely used in modern construction practice. Elegant and attractive forms of roofing, made of profiled sheets of bright colors, are quite common today in private buildings. Often they are made in the form of a combination of geometric shapes of various configurations, giving the roofing a special chic and originality.
 Roof sheeting with capillary groove
Before you cover the roof with corrugated board with your own hands, we advise you to familiarize yourself with the advantages of this material, as well as take into account some of the features of working with it.
Benefits of using corrugated board
 Decking
The main advantage of corrugated board is the possibility of its independent installation, produced without the involvement of third-party workers. In this case, you can get by with the forces of just a few people invited as assistants.
First of all, you should know that the profiled billet is made from a cold-rolled metal sheet with a combined protective coating. The sheet blank formed in this way has the following advantages:
- the profiled sheet has a sufficient thickness to ensure the resistance of the roofing to mechanical stress (to the effects of wind and packed snow);
- multi-layer coating, which includes a special paint layer, reliably protects the metal base from the damaging effects of moisture (corrosion);
- galvanized corrugated board is cheaper, but over time, such a coating fades;
- the cost of the material in question can please a potential consumer with its availability.
Mounting Features
 Installation of corrugated board on the roof
Everyone who wants to get acquainted with how to properly prepare a roofing from corrugated board, first of all, it is necessary to take into account some features of the operations carried out in this case. First of all, these features should include:
- a method of delivering sheet material to the place of work (to the attic of a building being erected or being repaired), ensuring the complete preservation of the appearance of the material;
- the procedure for manufacturing the lathing used as the basis for the installation of roofing;
- the safety of the operations performed, ensured by the observance of the rules for working with metal (the use of overalls and gloves, for example), as well as the need to use soft shoes to move along the laid material.
 Sheathing for corrugated board
In addition, before starting work, it is necessary to determine in advance the main characteristics of the mounted truss system (rafter pitch, roof overhang angle, etc.), which, in turn, depend on the configuration of the coating itself.
In the most general case (when installing roofs of complex configuration), it is necessary to ensure that the following conditions are met:
- First of all, the fastening elements of the lower valley (the junction of adjacent roof planes, which serves to drain rainfall) should be prepared.
- The laying of the roofing itself should begin with fixing the end cornice strips, located approximately at the level of the waterproofing layer.
- Installation of the coating begins, as a rule, from the corner of the roof (in cases with hip structures - from the center of the hip);
- The amount of overlap between adjacent sheets (the so-called overlap) is selected depending on the angle of the roof. It usually has a value from 150 to 200 mm, but not less than the width of one wave.
- At least seven self-tapping screws should be spent on fixing each sheet; moreover, the most important joints are sometimes strengthened with special steel rivets.
Before the final fixation of the workpieces laid in a row, they are all subject to mandatory alignment along the lower cut of the slope.
Installation in the area of the valley, ridge and pipes
 Installation of corrugated board in the ridge area
When installing corrugated board, you will definitely encounter the need to finish such places that are inconvenient for laying, such as valleys, chimney pipes, ridges and other junctions. To finish them, it is necessary to use special elements included in the profiled sheet covering kit.
The order of installation of adjoining elements is as follows:
Fasteners and seals
 Roofing screws
 Roof seal self-expanding To fix profiled sheet blanks, it is recommended to use special galvanized self-tapping screws, complete with sealing gaskets made of elastic material. The caps of the fasteners must be protected by a special composition, matched to the color of the coating and providing them with the necessary resistance to corrosion, mechanical and ultraviolet influences.
Often in practice, when installing corrugated board, special gaskets are used to ensure a snug fit of the coating material to the base planks. The use of sealing elements makes it possible to protect the under-roofing structural elements from the ingress of climatic precipitation in the form of rain, snow, wet drizzle, etc.
Such protection not only increases the service life of the elements of the truss system, but also improves the soundproofing characteristics of the entire coating as a whole.
 Roof ridge seals made of corrugated board
Currently, manufacturers of building materials produce sealing elements that repeat the structure of the corrugated surface of corrugated sheets. In addition, special seals are also commercially available to ensure a secure fit of the ridge roof elements.
- do-it-yourself solar battery from improvised means;
You can watch a video on working with roofing material of the class we are considering at the end of the article.
Video about the installation of corrugated board with your own hands. In the process of viewing, the author will share some professional secrets that few people talk about:
 Installation of corrugated roofing
 Old house covered with corrugated board
 Red corrugated board
 Roofing from corrugated board
 Gable roof made of corrugated board
 Roof made of galvanized corrugated board
Decking is a fairly popular material that has been used in the construction industry for many decades. It is easy to install, has a small weight and at the same time serves for a long time, which attracts craftsmen and novice builders. But how to properly lay the profiled sheet on the roof, many may not know. This is a rather responsible process, but nothing is impossible.
The profiled sheet is made of thin metal, which has corrosion protection and is coated with various compounds that protect it from the effects of atmospheric phenomena. The grooves that are formed on it thanks to the cold rolling technology give the sheet increased strength, and hence resistance to mechanical stress.

Roofs from corrugated board - photo
Corrugated sheet or corrugated board is highly reliable and easy to install, it is ideal for covering the roofs of various buildings - industrial, warehouse, residential purposes, etc. It is a durable material that can last a very long time if used correctly and was chosen taking into account various features the region where the building is located and operating conditions.

On a note! Decking can also be used for other purposes - sheathing the walls of the building, creating fences, for formwork during the construction of the foundation. But in the above cases, other types of material are usually used - not those used to create the roof.
The material is also distinguished by its low price, which makes it possible to purchase it even for those who have a limited budget for construction. And even the cheapest version of corrugated board will clearly please the novice builder with its quality.

Features of choice
Roof structure made of profiled sheet, if in general terms, includes several elements. This is a crate, heat and waterproofing layers, the corrugated board itself. And the material, due to its low weight, is excellent for laying on non-reinforced structures. It is suitable for the construction of a roof, the slopes of which will be at least 12 degrees.

On a note! The slope can also be made with a smaller angle, but then all the joints between the individual sheets of corrugated board will have to be additionally sealed.
When choosing a corrugated board, you need to pay attention to its thickness, as well as the height of the ridge. The thickness should be at least 0.8 mm, and the height of the corrugations should be from 21 to 25 mm. It is worth stopping at such brands as HC20, HC35 or C44. But for roofs with slopes of only 5-8 degrees, a professional sheet H75 or H60 is suitable. It is best to choose sheet models with a trapezoidal or wave-shaped corrugation.

Roofing profiled sheet - wave
Advice! The greater the angle of the roof slope, the more “low” grade the corrugated board is purchased.
By the way, when choosing a material, it is worth remembering that the stronger it is, the smaller the step will be for the crate. So, you need to calculate all the cost options and choose the best one in specific conditions. After all, you can also save on the purchase of materials for the crate. The main thing is that the savings should be reasonable.

When calculating the amount of material, the dimensions of the sheets and the need to form overlaps are taken into account. So, the length of one profiled sheet can be 12 m, width - up to 1250 mm. When buying material for sheathing small roof sizes, it is recommended to buy sheets of such a size that they completely cover part of the slope from top to bottom. Then the number of joints of the coating will be minimal, which means that the indicators of the tightness of the roof will increase.

Prices for corrugated board
Decking
Installation rules
During the installation of corrugated board, certain rules must be observed, otherwise the roof will be unreliable and will not last long. And these rules apply to all components of the roof structure. For example, if the rafters are installed in increments of up to 100 cm, then the boards for the crate can be used with a cross section of only 3x10 cm, this will be enough. But if the distance between adjacent rafters is 1 meter or more, then the cross section of the lathing bars should be larger. To create it, an unedged board can be used. But in the place where the valley will be attached, the crate should be continuous at a distance of 60 cm on each side of the valley axis.

Table. Required crate step.
| The value of the slope angle, degrees | Lathing type/pitch | Profiled sheet thickness, mm | Material Grade |
|---|---|---|---|
| Up to 15 | Solid | 0,5 | C8 |
| fifteen; over 15 | solid; up to 30 cm | 0,5 | C10 |
| fifteen; over 15 | solid; up to 50 cm | 0,5-0,7 | C20 |
| Up to 15; over 15 | 30 cm; 65 cm | 0,5-0,7 | C21 |
| Up to 15; over 15 | 50 cm; 1m | 0,5-0,7 | HC35 |
| At least 8 | up to 3 m | 0,7-0,9 | H60 |
| At least 8 | up to 4 m | 0,7-0,9 | H75 |
Decking is a material that is created from metal that is prone to corrosion, although protected by certain coatings. It is imperative to provide good ventilation under it - this will reduce the risk of a large amount of condensate forming, which negatively affects the profiled sheets. In order to form a ventilated space, a counter-lattice is laid - then the best option for the gap between the finishing roofing material and the waterproofing layer will be obtained.

Prices for different types of building boards
Building boards
Attention! Wood is a material that does not like water. It negatively affects him and gradually destroys, leads to the processes of decay. To reduce the risk of their occurrence, it is recommended to impregnate all wood products with protective compounds before starting the installation of the roof.
Installation of corrugated board always begins with the installation of a cornice strip, fixed to the crate with self-tapping screws or nails. Further work on laying the lining carpet and other materials is carried out so that drops of water do not fall on them in the future, but immediately fall off the profiled sheets onto the eaves and enter the drainage system.

It is recommended to glue all joints between the individual elements of the corrugated board with sealants and use a special mastic or sealant. Sheets of corrugated board can be laid starting from either side of the roof - right or left. But the individual elements must be necessarily overlapped on top of each other. On gentle slopes, when using gaskets, the overlap can be one wave, and without them, two waves of material. If the roof slope is steep, then the material is laid with an overlap in one wave without the use of gaskets.

If the roof is large enough and the sheets are not long enough to cover the entire distance from top to bottom (from the ridge to the eaves), then the profiled sheets are overlapped, the width of which is 20 cm. top.

Attention! It is recommended to work on the roof using safety ropes and, preferably, fences. It is required to move along the laid corrugated board in soft shoes, stepping only on the recesses. If the coating of the material has been scratched or otherwise damaged, these places are additionally treated with protective compounds.
fixing material
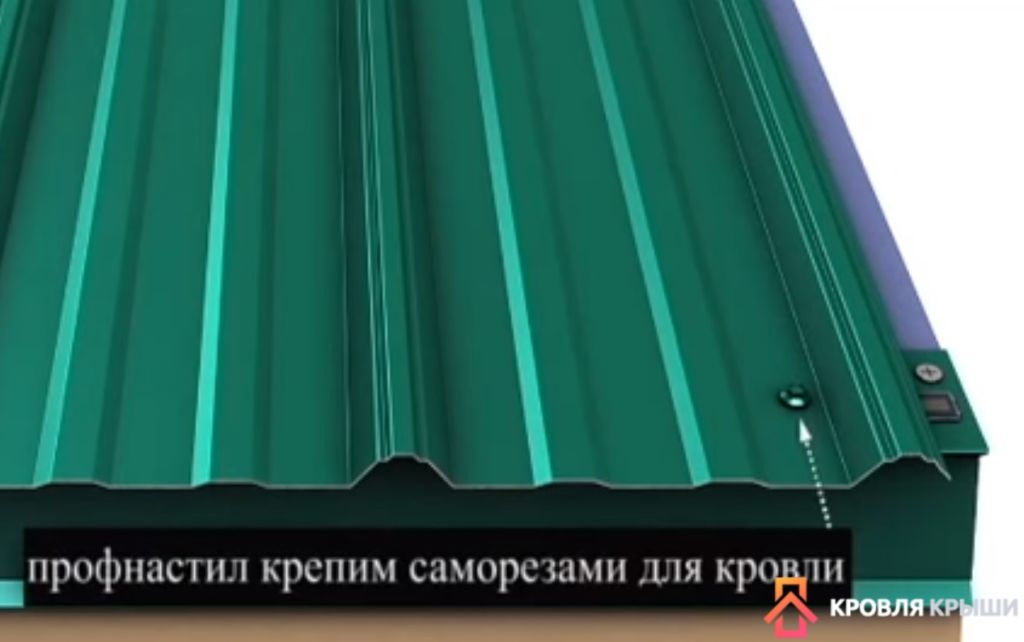
For fastening the profiled sheet, special galvanized fasteners with a hexagonal head are used. These are self-tapping screws 4.8x19 mm. They are screwed from the ridge to the eaves in 50 cm increments. Along the ridge or on the eaves, screws are screwed into every second corrugation so as to attach the material to the crate. On the rest of the area of \u200b\u200bthe profiled sheet, self-tapping screws 4.8x38 mm are used, taking into account that there are 4-5 of them per 1 m 2 of the sheet.

For fastening the profiled sheet, only roofing screws are used, which have special linings made of dense rubber that protect the metal from moisture penetration to it. The screws must be screwed in tightly, at right angles to the surface.

Methods of multi-row laying of corrugated board
If the installation of roofing material involves laying it in several rows, then there are two options for doing this work. In the first case, the first sheet in the bottom row is laid first, and the sheet of the second row is immediately mounted next to it. Next, the installation of the second element of row 1 and the second element of row 2 is carried out. It turns out a part of the roof of four sheets. Further, according to the same principle, the second block of 4 sheets is mounted, etc. That is, the roof is “sewn up” as if by separate large sheets, consisting of 4 smaller ones. This method is applicable to material having a drainage groove.
In the second case, the block is assembled from 3 sheets, where the two lower sheets are first fastened together, and the third sheet, which is the first element of row 2, is already attached to them. The structure is aligned with the cornice overhang, it is fastened. The option is suitable for sheets that do not have a drainage groove.

The following tools may be required for installation:
- screwdriver;
- construction level;
- scissors for cutting metal;
- drill;
- roulette;
- sealant gun.
Contrary to the opinion of inexperienced craftsmen, welding cannot be used for laying a profiled sheet. Under the influence of high temperatures, the material will be destroyed. If it is necessary to trim the sheets, scissors for metal products are used, and all sections after the procedure are treated with anti-corrosion compounds.

Installation of profiled sheet and other roofing elements
Creating a roof from this material involves the following steps:
- installation of a rafter system;
- waterproofing;
- creating a crate;
- insulation installation;
- creation of a counter-lattice;
- laying of corrugated board and its fastening;
- attachment of additional straps.
On a note! A layer of insulation must be laid only if it is planned to create a warm room under the roof. Otherwise, this step can be skipped.

Glass wool, polystyrene, mineral wool can be used as a heater. They must be laid very tightly, in an interference fit, so that cold bridges do not form under the roof, letting cold air into the room. The material used is the same thickness as the width of the rafters.
The waterproofing material is fixed with the help of construction staples from a stapler or nails, it is attached directly to the rafters, covering the insulation. As a waterproofing material, it has shown itself well. A crate is mounted on top of it.
Before corrugated sheets are laid, a cornice strip is mounted. It will protect the ends of the rafters from moisture. Installation of cornice elements is carried out with an overlap of 10 cm, and fastening with self-tapping screws - in increments of 30 cm. But after laying the profiled material, ridge and end strips are fastened. The first will close the gap remaining for ventilation at the junction of two slopes. The end bar is also called the wind bar and is installed on the ends of the roof. It is necessary to reduce the wind load experienced by corrugated board.

Advice! To work with corrugated board, it is better to invite an assistant. It will not only facilitate the lifting of the material to the roof, but also help with the installation of the material.
Foamed polyurethane products act as seals that are placed between individual sheets for better connection. Also, the purpose of using seals is to reduce the noise level that will come from the roof during rain, to increase thermal insulation performance. This type of seal is attached under the sheets to the crate. It is recommended to use material with special perforation.
Video - Installation of roofing corrugated board
Fastening of corrugated board
Step 1. The first sheet is being laid on the roof: a double-sided adhesive tape is glued onto the previously designed cornice. A strip of sealant is glued to it. If a sealant for sheets with a self-adhesive base is used, then adhesive tape is not used. The profiled sheet is laid on the crate so that its edge, with a slight indentation, lies on the strip of sealant.


Step 2 The profiled sheet is fixed with the help of roofing screws. At the edges, self-tapping screws are screwed in more often than on the rest of the material element. The vertical step of the self-tapping screws is 50-60 cm.


Step 3 The next sheet of corrugated board is laid with an overlap on the previously laid first. In this case, the sealant is used in the same way. The edge of the sheet with the drainage groove should be at the bottom, under the second sheet. The sheet is also fastened with self-tapping screws.


Step 4 Next is the design of the roof in the place where there is a pipe. The profiled sheet is laid around this part of the roof. Only the topmost element does not fit. A sealant is glued to the profiled sheet laid below the level of the pipe.

Step 5 A layer of sealant is applied to the seal.
Step 6 The junction bar is cut and bent according to the shape of the pipe. Then it is laid close to it so that part of it lies on the seal, and is attached to the pipe with dowels.


Step 7 The plank is attached to the sheet of roofing material with the help of roofing screws.

Step 8 The side rails are attached in the same way. They are placed on top of the previously installed bar.

Step 9 After installing the lower and side junction strips, the roof section above the pipe is designed. First, seals are glued around the perimeter of the installation of the upper part and on the upper parts of the side rails.

Step 10 According to the shape of the side junctions, bends are made on the upper junction bar. The plank is installed in its place. Its width should not be less than 40 cm.


Step 12 On top of such an abutment, a decorative one is mounted, which is also fastened with dowels.

Step 13 A polyurethane sealant is applied along the perimeter of the junction so that it closes the gaps between the bar and the pipe.

Step 14 Using a sealant, the top sheet of corrugated board is installed. It is fixed with roofing screws.


Step 16 On the other side of the extension, the valley is installed in the same way, but in the upper part it overlaps the previously installed one.

Step 17 A sealing tape with a width of at least 200 mm and a thickness of at least 10 mm is glued along the edge of the valley.

Step 18 A polyurethane sealant is applied to the surface of the tape.

Step 19 With an overlap of 4 cm, a profiled sheet is laid on the valley. It should cover the sealing tape. The material is fixed with roofing screws.

Step 20 End plates are being installed. The plank is cut to the shape of the roof, one of its edges is bent, as shown in the figure. From the inside, a sealing tape is glued to the edge.


Step 21 The bar is installed in its place and fastened with roofing screws from above and from the front side.

Step 22 The installation of the ridge bar is in progress. With a small indent from the edge, double-sided tape is attached to the profiled sheets. A sealant is installed on it and coated with a sealant.


Step 23 A ridge element is installed on top, bent accordingly to the shape of the roof.


Step 24 The ridge element is fixed with roofing screws.

Prices for popular models of screwdrivers
Screwdrivers
Video - Do-it-yourself corrugated roof
Video - Installation of a profiled sheet on the roof
Proper laying of the profiled sheet on the roof is a guarantee that the roof will be reliable and will last for many years without leaking. On average, the service life of this type of coating is at least 20 years. But this is provided that all installation rules have been observed.
The installation technique for the special profiled sheet used for roofing is relatively simple. To master it, it is quite enough to get acquainted with some features of the material used, as well as with the basic rules for handling it.
Before you cover the roof with a metal profile with your own hands, you need to carry out a number of preparatory operations of the following nature:
- determine the angle of inclination of the future roof;
- choose the right brand of profiled sheet blanks for the selected angle of inclination;
- prepare fasteners corresponding to the selected material.
The complexity of installation work increases significantly in the case of the construction of roofs of complex configuration.
Types and grades of sheet material
At the initial stage of the preparatory work, it is necessary to choose the type of profile sheet that suits your conditions, which can have the following designs:
- Grade "C" material, which is a sheet of a sinusoidal (trapezoidal) profile with a wave height of 8 to 44 mm, which is usually used for the construction of light roofs or as decorative wall cladding.
- Sheets of the brand "NS" with a fixed wave height of 35 or 44 mm, used for arranging typical roofing.
- Sheet material of the brand "H" with a height of a wavy profile from 57 to 114 mm, reinforced with stiffeners, which allows it to be used for covering solid roofs.

Before installing the roofing, you should familiarize yourself with how to choose the right amount of overlap between adjacent sheets, which depends on the angle of inclination of the roof itself. In this case, the following relations are valid:
- at an angle of inclination within 12–15 degrees, the overlap should be at least 20 cm;
- with a slope of the base of the roof of 15–30 degrees, this figure can be reduced to values of 15–20 cm;
- in the case of an inclination angle of more than 30 degrees, the overlap is selected in the range from 10 to 15 cm;
- at angles of inclination of the base less than 12 degrees, sealing of horizontal and vertical seams formed in the overlapping areas is mandatory. As a rule, ordinary silicone sealant is used for these purposes.
Preparatory activities

Before closing the roof with a metal profile, it will be necessary to take care of the arrangement of waterproofing, which protects the wooden structural elements and insulation from the damaging effects of moisture. Waterproofing, which, as a rule, is used as a thick plastic film, is attached directly between the rafters using small building brackets. At the joining points of adjacent strips of film, a slight overlap is made (about 15 cm).
Particular attention should be paid to the fact that the protective waterproofing film should be stretched with a slight sag (about 2 cm), and between it and the insulation material there should be a small gap of about 2-3 mm.
Special ventilation slats are mounted on top of the waterproofing layer, creating conditions for air circulation in the free spaces under the crate and excluding the possibility of accumulation of unwanted wet fumes in this place.

For the installation of metal profile blanks, a special crate should be used, providing the required strength of the roof structure and resisting its breaking or deflection under the influence of wind loads or under the weight of snowfall.

Manufacturers of roofing metal products indicate the main parameters and the procedure for arranging the lathing for them in the instructions attached to the product. That is why, before starting work, it is recommended that you carefully study all the instructions for using the purchased material.

At the end of the installation of the crate, a special end board is nailed to its pitched cut, the width of which must correspond to the height of the selected roofing profile.
Thus, the general composition of the roofing, the final layer of which is the metal profile itself, usually looks like this:
- internal facing layer, for example, made of drywall;
- ceiling slats used as an internal crate;
- vapor barrier protective film;
- slabs of insulating material placed in niches between the rafter legs;
- waterproofing protective coating, which excludes the possibility of accumulation of moisture in the area where the insulation is located;
- special ventilation gap;
- outer crate;
- the coating itself (metal profile).

Mounting order

Laying of roofing sheets with overlap corresponding to the angle of inclination should be carried out starting from the lower corner of the blood. In this case, the following sequence of installation must be observed:
- the first sheet is located on the roof in such a way that its lower cut protrudes 3-4 cm beyond the overhang;
- then this sheet is baited using special self-tapping screws with rubber seals, screwed into pre-prepared holes located at the bottom of the wave;
- at the same time, each subsequent overlapped sheet is aligned along the edge of the previous one, and then it is also baited;
- after the formation of a row of 3–4 sheet blanks, the latter are finally fixed on the crate;
- the second and all subsequent rows of the coating are mounted in the same way (taking into account the overlap indicated in the instructions with the previous row).

Sheets are attached to the crate every second wave.
In the course of work, it should always be remembered that it is only allowed to move along the finally fixed workpieces. In this case, the feet should be placed in the recesses of the waves, based on the elements of the crate.

Video
On the features of the installation of corrugated board, see the video below:
To protect the house from rain and snow, it is necessary to close it with a reliable roof. The roof covering is intended for protection of internal rooms from adverse atmospheric influences. Most often, a gable or four-pitched (hip) roof is used for private houses, but for small buildings, a single-pitched roof is possible.
A multifunctional profiled sheet can be used as a coating material. A do-it-yourself profiled sheet roof will allow you to complete the construction without unnecessary costs and loss of quality.
Pros and cons of roofing material
Installation of corrugated board on the roof is a fairly popular way to complete the building box. But before choosing this particular material, you need to familiarize yourself with its advantages and disadvantages. Knowing undesirable features, you can eliminate or smooth them out in time.
The advantages of the material include the following characteristics:
- a shed or gable roof made of corrugated board with your own hands has a fairly low cost;
- installation technology and transportation do not cause difficulties;
- technology allows to provide high speed of roofing works;
- light weight of the material;
- strength and resistance to snow loads;
- high degree of waterproofing with proper installation;
- long service life;
- resistance to corrosion and fading under the influence of ultraviolet radiation;
- Fire safety;
- with proper fixing, high resistance to wind loads;
- the ability to use a sparse crate, which saves materials;
- the presence of a variety of colors.

The list of positive characteristics is quite wide, but do-it-yourself corrugated roofing also has disadvantages:
- laying the metal sheet makes the roof too noisy when it rains;
- surface heating in the sun;
- it is important to carefully lay the material, leakage is possible due to installation errors;
- the appearance of corrosion in areas with a damaged top layer.
If you do the job correctly, the above problems will not arise. To reduce the noise level, soundproofing materials are placed in the coating cake. Heating from the sun in this type of roofing is not higher than in other materials. Unlike, for example, bituminous tiles, it does not lead to a change in the structure of the coating and its melting. If the installation technology is followed, there are no problems with leaks either, and in order to prevent corrosion, it is necessary to be careful during transportation and movement, to prevent damage to the profiled sheet.
Which profiled sheet to choose for the roof
There are quite a number of different types of corrugated board on sale. When buying material for a shed or gable roof, you need to pay attention not only to color, but also to technical characteristics, namely:
- metal thickness;
- profile type and height;
- type of protective coating.
According to regulatory documents, there are three types of profiled sheet:
- grade "H" with high bearing capacity for horizontal structures;
- grade "C" for vertical structures;
- brand "NS" - universal.


It is best to lay on the roof material of grades "H" and "NS". Grade "C" can only be laid in the roof cake on small buildings with a large roof slope (60 degrees or more).
It is also possible to lay a wall profiled sheet in a pie for a shed roof of garages. Also, when choosing, it is necessary to pay attention to the wave height of the sheet, it is indicated immediately after the letter in the marking. For pitched roofs, laying grades H60 and H75 is possible. For flat profiled sheets H75 or H114 are suitable. To choose the right one, you need to know the snow load and the pitch of the rafters.
Roof construction options
Depending on the purpose of the under-roof space, the pie of a shed or gable roof may differ. When arranging a cold attic or technical floor, the pitched roof structure will look like this:

- rafter legs;
- waterproofing;
- crate;
- roofing.
In this case, insulation is not required, as it is provided by the attic floor pie.
To equip an attic or a warm attic, you will need to lay the insulation. The roofing pie from the profiled sheet will look like this:
- ceiling lining;
- bottom crate;
- vapor barrier;
- rafter legs with insulation between them;
- waterproofing;
- wind protection;
- counterlattice;
- upper crate;
- roofing.
The cake also largely depends on the chosen insulation. For example, laying mineral wool requires the arrangement of an air-ventilated layer. The thickness of such a gap should be at least 4-5 cm. This must be taken into account when choosing the thickness of the rafters and counter-battens. The insulated roof must meet the requirements of heat engineering, on the basis of which the thickness of the heat-insulating material is selected.
Step by step laying technology
 The device of the roof from the profiled sheet
 The device of a roof from a professional flooring demands performance of a preparatory work. They include measurements of the exact length of the slope and the calculation of the required number of sheets. The roof of individual buildings can be single-pitched, double-pitched or four-pitched. Most often, the length of the profiled sheet is taken equal to the length of the slope. In the calculations, it is necessary to take into account the margin for overlap, which depends on the angle of inclination of the surface:
- 200 mm or more for roofs with a slope of less than 15 degrees;
- 150-200 mm for roofs with a slope of 15-30 degrees;
- 100-150 mm for roofs with a slope of 45 degrees or more.
Having calculated the amount of profiled sheet needed to cover the roof, it is necessary to check the tools that may be needed. The device of a roof from a professional flooring requires the presence of:
- rulers and pencils;
- building level;
- hammer and nails;
- tools for cutting metal (metal shears, hacksaw, circular saw, electric jigsaw for metal);
- riveting machine with steel rivets.
Having prepared all these tools in advance, you can easily lay a profiled sheet.
Choice of crate
The installation instructions for this element of the truss system are quite simple. Shedding for a shed or gable roof can be of two types:
- solid;
- sparse.

In most cases, both options are installed on the same roof. For the main area, the lathing is laid sparsely, and such roofing units from corrugated board as valleys, cornices, skates require laying without gaps.
The crate of a shed or gable roof can be made from the following materials:
- timber with a section of 50 by 50 mm;
board with a section of 32 by 100 mm.
The dimensions also depend on the snow load and the pitch of the rafters. In the first case, the crate is laid every 5 cm, and in the second, every 10 cm (that is, every one). It is possible to lay more discharged.
All wooden roof elements must be treated with antiseptic compounds before work begins. After fixing the bars or boards (if there is no need for waterproofing), you can lay the roofing material.
Instructions for fastening sheets
Installation of corrugated roofing requires attention to the reliability of fastening. Sheets are fixed with self-tapping screws in the lower part of the wave. To properly cover the roof, you will need to prepare self-tapping screws with hexagonal caps and neoprene gaskets. It is necessary to use special high-strength fasteners designed for metal.
This video provides instructions for laying the profiled sheet:
The fastening technology is quite simple: sheets are fastened with self-tapping screws to the crate in the lower part of the wave so that there are 5-7 fasteners per square meter of coverage.
Also, before starting, do not forget to familiarize yourself with the important subtleties that professionals talk about:
Before you cover the roof of the house with corrugated board with your own hands, you need to carefully study the issue. If the structure is mounted correctly, there will be no problems with its operation in the future. The roof will not leak and will last for many years.
Profiled sheet (corrugated board) is made of steel sheet coated with zinc, aluminum and protective polymers. It is widely used in construction as a roofing material, for the construction of gates, fences and other structures.
The material acquires corrugation when passing through a roll forming machine, while the ribs of the sheet can be in the form of a wave or in the form of a trapezoid. The width of the corrugated board is 113-120 cm, the length is 30-1200 cm, the thickness is 0.4-1.2 mm.

Advantages of corrugated board
Before proceeding to the installation of a roof from a profile sheet, consider the advantages of the material:
- Not subject to corrosion;
- Long service life;
- Ecologicaly clean;
- Variety of colors and shapes;
- High performance to environmental impact and mechanical stress;
- During installation, a minimum number of joints is formed;
- Universal.
The disadvantages include the formation of condensate and poor sound insulation.
Overlap of corrugated board and angle of inclination of the roof
In the case of using corrugated board as a roofing material, the installation of sheets must occur with an overlap.
- If the slope exceeds 30 °, the overlap of the sheet will be 10-15 cm;
- 15°-30° - 15-20 cm;
- less than 15° - up to 20 cm.
Calculation of roofing material
To correctly calculate the roofing material, you first need to calculate the area of \u200b\u200bthe roof, taking into account design features. To do this, the surface is divided into geometric shapes, all data is subsequently added up.
Each type of roof shape (triangle, trapezoid or square) uses its own formula to calculate the area. Eaves, end overhangs and kinks (ridges, ridges and junctions) are measured. Decking has two width indicators: total - 118 cm, and working - 110 cm, this fact must also be taken into account in the calculations.

To calculate the required number of sheets running horizontally, you need the length of the slope divided by the working width. The size of the overlap is also taken into account. The number and length of the sheets is equal to the sum of the overhang from the cornice, the overlap and the length of the slope.
2 meters is the standard length of the additional element, in order to determine the required amount of material, we sum up the length of the slopes, and then, taking into account 10 cm of overlap, divide the resulting figure by 1.9. To fix the corrugated board, self-tapping screws with rubberized gaskets are used, their number is 8 pieces per 1 m2. At the last stage, we determine the amount of insulation and waterproofing.
The device of a roof from a professional flooring
The indicators of thermal insulation, vapor barrier and waterproofing in the roof structure largely depend on the correct laying of the "pie". Roofing "pie" tout the entire structure of the roof. The system may be different, depending on the premises: whether it will be residential or not.
Pie device:
- Decking;
- Clapboard or drywall;
- insulation;
- Vapor-proof material;
- crate;
- Rafter leg;
- Ridge seal;
- Skate and rail;
- Rafter bar;
- Waterproof film.

The first sign of a violation of the roofing "pie" will be the formation of ice at sub-zero temperatures.
Tool and material for the installation of corrugated board
- Film or thick polyethylene;
- stapler;
- Glass wool or mineral wool;
- Silicone;
- For gluing waterproofing seams connecting tape;
- For waterproofing membrane in rolls;
- Paralysis film;
- self-tapping screws;
- Screwdriver;
- timber;
- Clapboard.
The list of the required amount of building material is compiled when calculating the estimate, and will depend on the type of roof structure.
We properly cover the roof with corrugated board with our own hands
At the first stage of installation work, waterproofing is laid, starting from the lower edge of the crate. The film is laid with an overlap of 10 cm to 15 cm. The material should not be strongly stretched, and a construction stapler is used to fasten it.
Installation of the counter-lattice

Between the waterproofing and the corrugated board, it is required to leave a gap to remove moisture. The counter-lattice is installed after, the design consists of planks 5 cm high, they are placed along the crate, parallel to the eaves and rafters.
Installation of corrugated board
To ensure that the mounting hole is tightly closed, use self-tapping screws with sealing gaskets. Silicone sealant is used to process the horizontal overlap of the corrugated board.

If the installation takes place in a sloping roof, then the sheets are installed with a vertical overlap in two waves. In the case of using a sealing gasket, it is allowed to install sheets with an overlap in one wave.
Installation of corrugated board on a gable roof occurs from the bottom row. Lay 5 sheets and fix in the center with a self-tapping screw. And after that, with a step of 50 cm, the corrugated board is interconnected with self-tapping screws. If everything is verified along the overhang, then the final fixation is performed.
Installation of end strips
The end plate for most sheets is 2 m, the lowest installation begins with an overlap of 5-10 cm. If installed correctly, at least one wave of the profiled sheet will overlap. In increments of up to 1 meter, self-tapping screws are fastened.

The fastening of the ridge strip with an overlap of 10 cm is carried out with the help of smooth elements, they must be included in the kit. It is advisable to install a layer of air-permeable sealant between the corrugated board, fastening takes place in increments of 30 cm with roofing screws.
Installing the junction bar
With an overlap of 20 cm, an abutment bar is laid, fastening takes place with self-tapping screws in increments of 40 cm. Using a ridge sealant, the joints of the ends of the wall and roof are sealed, this will help to avoid moisture getting into the cracks.

- The roofing process is considered high-altitude work, and safety measures must be taken before installation begins;
- It is better to lay the corrugated board on the boards during the installation process, and not on the ground;
- The corrugated board from the cornice should go down by about 5 cm;
- The waterproofing should sag a little.
- Use a taut cord to lay the profile sheets evenly along the cornice.